15
5
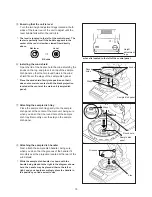
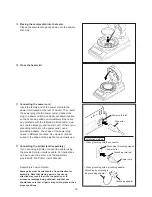
Level is located to the left of the control panel.
Knobs
Round
holes
Stays
Sample dish panel
Grooves
Stay
8
Attaching the sample dish handler
Next, attach the sample dish handler, being sure
when you do so that the grooves of the handler fit
smoothly over the projection located at the rear of the
wind shield.
* While the sample dish handler is shown with the
handle being placed to the right in the diagram shown
here, the handle may be placed either to the left or
right, and you should accordingly place the handle in
the position you find easiest to use.
7
Attaching the sample dish tray
Place the sample dish tray gently into the sample
dish panel at the center of the main unit, being sure
when you do so that the round hole of the sample
dish tray fit smoothly over the stay on the sample
dish panel.
6
Installing the wind shield
Open the lid of the heater, hold the wind shield by the
knobs on the top, and place it on top of the sample
dish panel so that the two round holes in the wind
shield fit over the stays of the sample dish panel.
* Place the wind shield firmly into position so that it
does not come into contact with the black projection
located at the center of the main unit (sample dish
panel).
5
Ensuring that the unit is level
Turn the two height adjustment legs located at both
sides of the lower rear of the unit to adjust until the
level bubble falls within the red circle.
* The level is located to the left of the control panel. The
tester is perfectly level if the bubble appears in the
center of the red circle when viewed from directly
above.
Not level
Level
Bubble
⇒
Height
adjustment
legs
Sample dish
panel
Round hole
Stays
Содержание FD-720
Страница 1: ...Infrared Moisture Determination Balance FD 720 Operating Manual ...
Страница 2: ......
Страница 66: ......
Страница 67: ......
Страница 68: ...0706 PA 0201 200 ...

