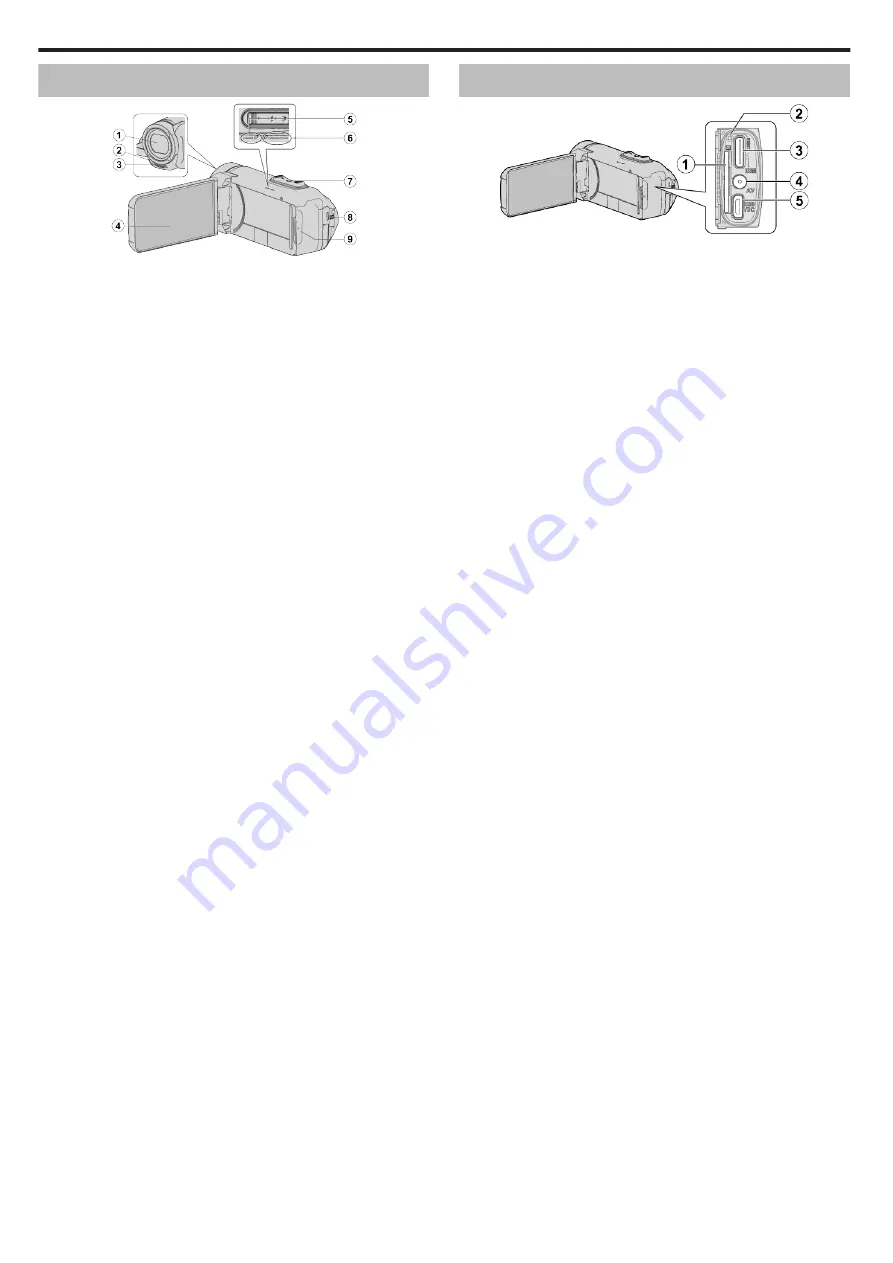
Top/Left/Rear Side
.
A
Lens
0
The lens is protected by a protective glass cover.
0
If the lens is dirty, use a commercially available lens blower to remove
any dust, and a commercially available cleaning cloth to wipe off any
dirt.
0
Do not cover the front of the lens with your fingers during recording.
B
Light (GZ-RX615)
0
Turn on the light when shooting in dark places.
C
Stereo Microphone
0
Do not cover the microphone with your fingers during video recording.
D
LCD Monitor
E
CHARGE (Charging) Lamp
0
Lights up: Charging in progress
0
Goes off: Charging completed/Beyond temperature range
0
Blinks: Charging error or abnormal temperature
F
POWER/ACCESS (Power/Access) Lamp
0
Lights up/blinks during recording or playback.
Do not remove the SD card or any connecting cables.
G
Zoom/Volume Lever
0
During shooting: Adjusts the shooting range.
0
During playback (index screen): Moves to the next or previous page.
0
During video playback: Adjusts the volume.
H
START/STOP (Video Recording) Button
0
Starts/stops recording of videos/still images.
I
Terminal Cover
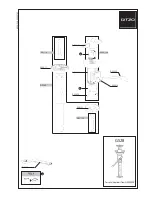
Inside Terminal Cover
.
A
SD Card Slot
0
Insert an optional SD card.
B
Reset Button
C
HDMI mini connector
0
Connects to TV using an HDMI mini cable.
D
AV Connector
0
Connects to the AV connector of a TV, etc.
E
USB Connector (Micro USB AB type)
0
Connect to the AC adapter to perform charging.
You can also connect to the external device or computer using the USB
cable.
Names of Parts
162
Содержание Everio GZ-RX610
Страница 1: ...CAMCORDER C6B7_RX615_EU_EN Detailed User Guide GZ RX615 GZ RX610 ...
Страница 80: ...Windows 7 1 Click the start button 2 Right click Computer 3 Click Properties Copying 80 ...
Страница 108: ...6 Operate from a smartphone 0 How to operate from a smartphone Using Smartphone Applications A p 114 Using Wi Fi 108 ...
Страница 179: ......


