background image

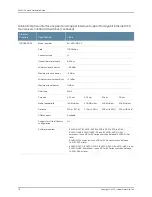
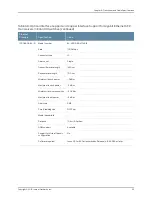
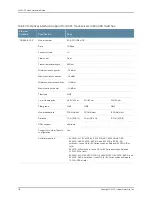
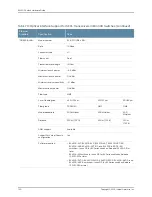
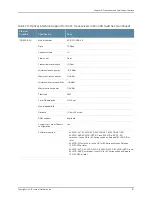
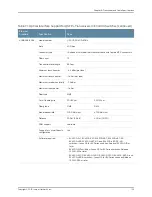
Table 68: Optical interface Support and Copper Interface Support for Gigabit Ethernet SFP
Transceivers in EX4300 Switches

(continued)

Value

Specification

Ethernet
Standard

EX-SFP-1GE-LH

Model number

1000BASE-LH (or
1000BASE-ZX)

1000 Mbps

Rate

LC

Connector type

Dual

Fiber count

1550 nm

Transmitter wavelength

–2 dBm

Minimum launch power

5 dBm

Maximum launch power

–25 dBm

Minimum receiver sensitivity

–3 dBm

Maximum input power

SMF

Fiber type

9/125 µm

Core/Cladding size

Modal bandwidth

70 km (43.5 miles)

Distance

Available

DOM support

No

Support for Virtual Chassis
configuration

EX4300-24T, EX4300-24P, EX4300-48T, EX4300-48T-AFI,
EX4300-48P, EX4300-48T-DC, and EX4300-48T-DC-AFI
switches—Junos OS for EX Series switches, Release 13.2X50-D10 or
later

EX4300-32F switches—Junos OS for EX Series switches, Release
13.2X51-D15 or later

EX4300-24T-S, EX4300-24P-S, EX4300-32F-S, EX4300-48T-S, and
EX4300-48P-S switches—Junos OS for EX Series switches, Release
13.2X51-D26 or later

Software required

Copyright © 2015, Juniper Networks, Inc.

116

EX4300 Switch Hardware Guide

Содержание EX4300

Страница 1: ...EX4300 Switch Hardware Guide Modified 2015 06 29 Copyright 2015 Juniper Networks Inc ...

Страница 2: ...ise this publication without notice EX4300 Switch Hardware Guide Copyright 2015 Juniper Networks Inc All rights reserved The information in this document is current as of the date on the title page YEAR 2000 NOTICE Juniper Networks hardware and software products are Year 2000 compliant Junos OS has no known time related limitations through the year 2038 However the NTP application is known to have...

Страница 3: ...ules 9 Virtual Chassis 10 Power Supplies 11 Fan Modules 12 EX4300 Switch Components 13 EX4300 Switch Models 15 Identifying EX4300 Switch Models 19 EX4300 Switch Hardware and CLI Terminology Mapping 20 Chapter 2 Chassis Components and Descriptions 23 Chassis Physical Specifications for EX4300 Switches 23 Field Replaceable Units in EX4300 Switches 24 LCD Panel in EX4300 Switches 25 LCD Panel Modes 2...

Страница 4: ...ation of DC Power Supplies 58 DC Power Supply LEDs in EX4300 Switches 59 Chapter 5 Viewing System Information 61 Dashboard for EX Series Switches 61 Graphical Chassis Viewer 62 System Information Panel 63 Health Status Panel 65 Capacity Utilization Panel 67 Alarms Panel 67 File System Usage 68 Chassis Viewer 68 Part 2 Site Planning Preparation and Specifications Chapter 6 Preparation Overview 83 S...

Страница 5: ...rt QSFP Port SFP Port and SFP Port Connector Pinout Information for EX4300 Switches 143 RJ 45 to DB 9 Serial Port Adapter Pinout Information for a Switch 148 Part 3 Initial Installation and Configuration Chapter 10 Unpacking the Switch 151 Unpacking an EX4300 Switch 151 Parts Inventory Packing List for an EX4300 Switch 152 Registering Products Mandatory for Validating SLAs 153 Chapter 11 Installin...

Страница 6: ...e 211 Disabling or Enabling Menus and Menu Options on the LCD Panel 212 Configuring a Custom Display Message 212 Part 4 Installing Maintaining and Replacing Components Chapter 15 Replacing Cooling System Component 217 Installing a Fan Module in an EX4300 Switch 217 Removing a Fan Module from an EX4300 Switch 219 Chapter 16 Replacing Power Supply 221 Installing an AC Power Supply in an EX4300 Switc...

Страница 7: ...Monitoring System Log Messages 259 Part 6 Safety and Compliance Information Chapter 22 General Safety Guidelines and Warnings 265 General Safety Guidelines and Warnings 265 Definitions of Safety Warning Levels 266 Qualified Personnel Warning 268 Warning Statement for Norway and Sweden 269 Chapter 23 Fire Safety Requirements 271 Fire Safety Requirements 271 Chapter 24 Installation Safety Guidelines...

Страница 8: ... Warning 303 DC Power Electrical Safety Guidelines 304 DC Power Disconnection Warning 306 DC Power Grounding Requirements and Warning 307 DC Power Wiring Sequence Warning 308 DC Power Wiring Terminations Warning 310 Multiple Power Supplies Disconnection Warning 312 TN Power Warning 312 Chapter 28 Agency Approvals and Compliance Statements 315 Agency Approvals for EX Series Switches 315 Compliance ...

Страница 9: ...odule 31 Figure 15 2 Port 40 Gigabit Ethernet QSFP Uplink Module 32 Figure 16 LEDs on the 2 Port 40 Gigabit Ethernet QSFP Uplink Module 32 Figure 17 8 Port 10 Gigabit Ethernet SFP Uplink Module 33 Figure 18 LEDs on the 8 Port 10 Gigabit Ethernet SFP Uplink Module 33 Figure 19 Chassis Status LEDs in an EX4300 Switch 34 Figure 20 LEDs on the Management Port on a 24 port EX4300 Switch 35 Figure 21 LE...

Страница 10: ...o the Side Panel of the Switch 158 Figure 43 Mounting the Switch on Two Posts of a Rack 159 Figure 44 Attaching the Side Mounting Rail to the Switch Chassis 161 Figure 45 Mounting the Switch on Front Posts of a Rack 162 Figure 46 Sliding the Rear Mounting Blades into the Side Mounting Rails 162 Figure 47 Attaching Wall Mount Brackets to the Switch Chassis 164 Figure 48 Mounting the Switch on a Wal...

Страница 11: ...71 Removing an AC Power Supply from an EX4300 Switch 224 Figure 72 Installing a DC Power Supply in an EX4300 Switch 226 Figure 73 Removing a DC Power Supply from an EX4300 Switch 227 Chapter 17 Replacing Uplink Module 229 Figure 74 Installing a 4 Port SFP Uplink Module in a 24 Port or 48 Port EX4300 Switch 230 Figure 75 Installing a 2 Port QSFP Uplink Module in a 32 Port EX4300 Switch 230 Figure 7...

Страница 12: ...8 Figure 87 Location of the Serial Number ID Label on the Fan Module Used in an EX4300 Switch 248 Figure 88 Location of the Serial Number ID Label on the QSFP Uplink Module 249 Figure 89 Location of the Serial Number ID Label on the 4 Port SFP Uplink Module 249 Figure 90 Location of the Serial Number ID Label on the 8 Port SFP Uplink Module 249 Part 6 Safety and Compliance Information Chapter 27 E...

Страница 13: ...k Modules in 24 Port and 48 Port EX4300 Switches 30 Table 14 Uplink Modules in 32 Port EX4300 Switches 30 Table 15 Uplink Modules Used in 24 Port and 48 Port EX4300 Switches 31 Table 16 Uplink Modules Used in 32 Port EX4300 Switches 32 Table 17 Chassis Status LEDs on an EX4300 Switch 34 Table 18 Link Activity LED on the Management Port on an EX4300 Switch 36 Table 19 Status LED on the Management P...

Страница 14: ... 49 Chassis Viewer for EX4300 Switches 71 Table 50 Chassis Viewer for EX4500 Switches 72 Table 51 Chassis Viewer for EX4550 Switches 73 Table 52 Chassis Viewer for EX6210 Switches 75 Table 53 Chassis Viewer for EX8208 Switches 75 Table 54 Chassis Viewer for EX8216 Switches 77 Table 55 Chassis Viewer for XRE200 External Routing Engines 77 Part 2 Site Planning Preparation and Specifications Chapter ...

Страница 15: ...ches 141 Table 79 Management Port Connector Pinout Information for EX4300 Switches 143 Table 80 10 100 1000BASE T Ethernet Network Port Connector Pinout Information 144 Table 81 SFP Network Port Connector Pinout Information 144 Table 82 Built in SFP Uplink Port and SFP Uplink Module Port Connector Pinout Information 145 Table 83 Built in QSFP Port and QSFP Uplink Module Port Connector Pinout Infor...

Страница 16: ...Copyright 2015 Juniper Networks Inc xvi EX4300 Switch Hardware Guide ...

Страница 17: ...formation in the latest release notes differs from the information in the documentation follow the product Release Notes Juniper Networks Books publishes books by Juniper Networks engineers and subject matter experts These books go beyond the technical documentation to explore the nuances of network architecture deployment and administration The current list can be viewed at http www juniper net b...

Страница 18: ...tion mode type the configure command user host configure Represents text that you type Bold text like this user host show chassis alarms No alarms currently active Represents output that appears on the terminal screen Fixed width text like this A policy term is a named structure that defines match conditions and actions Junos OS CLI User Guide RFC 1997 BGP Communities Attribute Introduces or empha...

Страница 19: ...ts edit routing options static route default nexthop address retain Identifies a level in the configuration hierarchy Indention and braces Identifies a leaf statement at a configuration hierarchy level semicolon GUI Conventions In the Logical Interfaces box select All Interfaces To cancel the configuration click Cancel Represents graphical user interface GUI items you click or select Bold text lik...

Страница 20: ...d an online self service portal called the Customer Support Center CSC that provides you with the following features Find CSC offerings http www juniper net customers support Search for known bugs http www2 juniper net kb Find product documentation http www juniper net techpubs Find solutions and answer questions using our Knowledge Base http kb juniper net Download the latest versions of software...

Страница 21: ...For international or direct dial options in countries without toll free numbers see http www juniper net support requesting support html xxi Copyright 2015 Juniper Networks Inc About the Documentation ...

Страница 22: ...Copyright 2015 Juniper Networks Inc xxii EX4300 Switch Hardware Guide ...

Страница 23: ...ew System Overview on page 3 Chassis Components and Descriptions on page 23 Cooling System and Airflow on page 41 Power Supplies on page 47 Viewing System Information on page 61 1 Copyright 2015 Juniper Networks Inc ...

Страница 24: ...Copyright 2015 Juniper Networks Inc 2 EX4300 Switch Hardware Guide ...

Страница 25: ... in a rack to provide connectivity for all the devices in the rack and provide options for optimized airflow hot aisle cold aisle Three variants of the EX4300 switches are available 24 port 32 port and 48 port switches with or without PoE with AC or DC power supplies and with different airflow directions EX4300 switches also provide uplink ports and a slot for installing an optional uplink module ...

Страница 26: ...or Virtual Chassis Fabric VCF configuration This redundancy enables graceful Routing Engine switchover GRES Junos OS with its modular design that enables failed system processes to gracefully restart The following EX4300 switches are available 24 Port EX4300 Switches on page 4 32 Port EX4300 Switches on page 6 48 Port EX4300 Switches on page 7 24 Port EX4300 Switches The 24 port EX4300 switches EX...

Страница 27: ...odules each with an AIR OUT AFO label 0 24 10 100 1000BASE T Ethernet ports and four QSFP ports EX4300 24T 4 port 10 Gigabit Ethernet SFP uplink module Power supplies for this model are not shipped by default you must separately order either AC power supplies or DC power supplies Fan modules for this model are not shipped by default you must separately order either two AIR OUT AFO labelled or two ...

Страница 28: ...iguring the ports as VCPs For more information about Virtual Chassis see EX Series Virtual Chassis Overview For more information about VCFs see Virtual Chassis Fabric Overview 32 Port EX4300 Switches The 32 port EX4300 switches EX4300 32F and EX4300 32F DC provide 32 built in 1 Gigabit Ethernet small form factor pluggable SFP network ports that can house SFP transceivers four built in 10 Gigabit E...

Страница 29: ...0 Gigabit Ethernet SFP uplink module A 550 W DC power supply with the AIR OUT AFO label Two fan modules each with an AIR OUT AFO label 0 32 SFP ports four SFP ports and two QSFP ports EX4300 32F DC You can use the built in QSFP ports as network ports or as VCPs to connect the switch in a Virtual Chassis or a VCF By default the built in QSFP ports are configured as VCPs You can also use the uplink ...

Страница 30: ... OUT AFO label Two fan modules each with an AIR OUT AFO label 0 48 10 100 1000BASE T Ethernet ports and four QSFP ports EX4300 48T 4 port 10 Gigabit Ethernet SFP uplink module Power supplies for this model are not shipped by default you must separately order either AC power supplies or DC power supplies Fan modules for this model are not shipped by default you must separately order either two AIR ...

Страница 31: ...rately order either two AIR OUT AFO labelled or two AIR IN AFI labelled fan modules 48 48 10 100 1000BASE T Ethernet ports and four QSFP ports EX4300 48P S You can use the QSFP ports as network ports or as VCPs to connect the switch in a Virtual Chassis or a VCF By default the built in QSFP ports are configured as VCPs You can also use the uplink module ports to connect members of a Virtual Chassi...

Страница 32: ... as VCPs and use them to connect the switch in a Virtual Chassis or a VCF configuration 2 port 40 Gigabit Ethernet QSFP uplink module 13 2X51 D26 EX4300 32F S 13 2X51 D15 EX4300 32F EX4300 32F DC The 8 port SFP uplink module can house up to eight SFP transceivers eight SFP transceivers or a combination of eight SFP and SFP transceivers You can also configure the ports on this module as VCPs and us...

Страница 33: ... used in EX4300 switches and the direction of airflow in them Table 8 Airflow Direction in Power Supply for EX4300 Switches Direction of Airflow Label on Power Supply Power Supply Rating Back to front that is air intake to cool the chassis is through the vents on the rear panel of the chassis and hot air exhausts through the vents on the front panel of the chassis AIR IN AFI 350 W AC Front to back...

Страница 34: ...s In the EX4300 switches the fan modules are hot insertable and hot removable field replaceable units FRUs All the EX4300 switch models except EX4300 24T S EX4300 24P S EX4300 32F S EX4300 48T S and EX4300 48P S switches are shipped with two fan modules pre installed in the rear panel of the switch EX4300 24T S EX4300 24P S EX4300 32F S EX4300 48T S and EX4300 48P S switches are not shipped with p...

Страница 35: ...SFP uplink module optional LCD panel 7 3 Network ports LCD panel Menu button 4 Chassis status LEDs Figure 8 on page 13 shows the components on the front panel of a 32 port EX4300 switch Figure 8 Components on the Front Panel of a 32 Port EX4300 Switch 5 1 Chassis status LEDs Cover panel for uplink module slot 6 2 LCD panel Enter button SFP network ports 7 3 Mini USB console port LCD panel 8 4 SFP ...

Страница 36: ... a 24 Port and 48 Port EX4300 Switch 8 1 AC power supply in slot 1 Management port 9 2 Power supply slot numbers ESD point 10 3 Fan module slot numbers and LEDs Fan module in slot 0 11 4 QSFP port LEDs Serial number label 12 5 USB port QSFP ports 13 6 Console port Fan module in slot 1 7 AC power supply in slot 0 NOTE DC power supplies are installed in the power supply slots in models that use DC p...

Страница 37: ...els The EX4300 switch is available with 24 32 or 48 ports and with or without Power over Ethernet PoE capability EX4300 switches support AC and DC power supplies depending on the switch model EX4300 24P EX4300 24P S EX4300 48P and EX4300 48P S provide PoE Table 9 on page 15 lists the components shipped with EX4300 switch models Table 9 EX4300 Switch Models Shipped Components and Supported Junos OS...

Страница 38: ...O label Two fan modules each with an AIR OUT AFO label 24 24 10 100 1000BASE T Ethernet ports and four 40 Gigabit Ethernet QSFP ports EX4300 24P 13 2X51 D26 4 port 10 Gigabit Ethernet SFP uplink module Power supplies for this model are not shipped by default you must separately order either AC power supplies or DC power supplies Fan modules for this model are not shipped by default you must separa...

Страница 39: ...bit Ethernet SFP uplink module A 550 W DC power supply with the AIROUT AFO label Two fan modules each with an AIR OUT AFO label 0 32 1 Gigabit Ethernet SFP network ports four 10 Giagbit Ethernet SFP uplink ports and two 40 Gigabit Ethernet QSFP ports EX4300 32F DC 13 2X50 D10 4 port 10 Gigabit Ethernet SFP uplink module A 350 W AC power supply with the AIROUT AFO label Two fan modules each with an...

Страница 40: ...h with an AIR IN AFI label 0 48 10 100 1000BASE T Ethernet ports and four 40 Gigabit Ethernet QSFP ports EX4300 48T DC AFI 13 2X50 D10 4 port 10 Gigabit Ethernet SFP uplink module A 1100 W AC power supply with the AIROUT AFO label Two fan modules each with an AIR OUT AFO label 48 48 10 100 1000BASE T Ethernet ports and four 40 Gigabit Ethernet QSFP ports EX4300 48P 13 2X51 D26 4 port 10 Gigabit Et...

Страница 41: ...Version 03 19 Date 02 19 2013 Assembly Flags 0x00 Version REV D CLEI Code ID EX4300 48P FRU Model Number EX4300 48P The model number of your switch is one of the following EX4300 24T EX4300 24P EX4300 32F EX4300 32F DC EX4300 48T EX4300 48T AFI EX4300 48T DC EX4300 48T DC AFI EX4300 48P In the sample output the switch model is EX4300 48P Meaning In EX4300 switch model numbers The 24T 24P 32F 48T a...

Страница 42: ...AC power supply Related Documentation EX4300 Switch Models on page 15 EX4300 Switch Hardware and CLI Terminology Mapping This topic describes the hardware terms used in EX4300 switch documentation and the corresponding terms used in the Junos OS CLI See Table 10 on page 20 Table 10 CLI Equivalents of Terms Used in the Documentation for EX4300 Switches Additional Information Item In Documentation V...

Страница 43: ...hes n is a value in the range 0 through 2 Abbreviated name of the Physical Interface Card PIC PIC n EX4300 Switches Hardware Overview on page 3 In 24 port and 48 port switches PIC 0 stands for built in network ports numbered 0 through 23 or 0 or through 47 In 32 port switches PIC 0 stands for built in network ports followed by SFP uplink ports In the CLI output the network ports are numbered 0 thr...

Страница 44: ...n the same chassis Power supplies and fan modules with different airflow labels AIR IN AFI and AIR OUT AFO in the same chassis NOTE The 32 port EX4300 switches support fan modules and power supplies with the AIR OUT AFO label only JPSU 550 DC AFI A JPSU 715 AC AFO A JPSU 1100 AC AFO A Cooling System and Airflow in an EX4300 Switch on page 41 Fan module n has a value 0 or 1 corresponding to the fan...

Страница 45: ...11 on page 23 summarizes the physical specifications of the EX4300 switch chassis Table 11 Physical Specifications of the EX4300 Switch Chassis Value Description 1 72 in 4 37 cm Chassis height 17 36 in 44 09 cm The outer edges of the front mounting brackets extend the width to 19 in 48 2 cm Chassis width 16 38 in 41 61 cm With power supply and uplink module installed 18 01 in 45 76 cm Chassis dept...

Страница 46: ... and Connecting an EX4300 Switch on page 155 Installing and Removing EX4300 Switch Hardware Components on page 165 Field Replaceable Units in EX4300 Switches Field replaceable units FRUs are components that you can replace at your site The FRUs in EX4300 switches are hot removable and hot insertable You can remove and replace them without powering off the switch The FRUs in EX4300 switches are Pow...

Страница 47: ... Care service contract register any addition change or upgrade of hardware components at https www juniper net customers csc management updateinstallbase jsp Failure to do so can result in significant delays if you need replacement parts This note applies if you change the type of power supply or add a new type of uplink module It does not apply if you replace these components with the same type o...

Страница 48: ...idle for 60 seconds the backlight turns off You can turn on the backlight by pressing the Menu or Enter button once After turning on the backlight you can toggle between the LCD panel menus by pressing the Menu button and navigate through the menu options by pressing the Enter button NOTE The chassis viewer in the J Web interface also displays the LCD panel From the J Web interface you can view re...

Страница 49: ...alarms is updated every second In status mode the second line displays Status of the Virtual Chassis port VCP Status of the power supplies Status of the fan modules and the chassis temperature Version of Junos OS for EX Series switches loaded on the switch In maintenance mode the second line displays one of the following options which you can use to configure and troubleshoot the switch System hal...

Страница 50: ...n VCPs status Up or Down Display the status of VCPs on the switch This option is supported only on EX4300 switches in a Virtual Chassis configuration This option is not supported on standalone EX4300 switches Power supply status OK Failed or Absent Fan status and Temperature status Fan status OK Failed or Absent Temp status OK High or Shutdown Junos OS version for EX Series switches loaded on the ...

Страница 51: ...panel flashes a success or failure message after which it displays the Idle menu Press Menu to go to the next option in the Maintenance menu ENTER EZSETUP Choose one of the following Press Enter to launch EZSetup Press Enter again to confirm the launch EZSetup configures DHCP and enables the J Web user interface on the switch The LCD panel flashes a success or failure message for approximately 10 ...

Страница 52: ...em to connect the switch in a Virtual Chassis configuration or a VCF 4 port 10 Gigabit Ethernet SFP uplink module Junos OS Release 13 2X51 D26 EX4300 24T S EX4300 24P S EX4300 48T S EX4300 48P S Table 14 Uplink Modules in 32 Port EX4300 Switches First Junos OS Release Supported EX4300 Switches Description Uplink Module Name Junos OS Release 13 2X51 D15 EX4300 32F EX4300 32F DC This uplink module c...

Страница 53: ...d 48 Port EX4300 Switches Figure Uplink Module Figure 13 4 Port 10 Gigabit Ethernet SFP Uplink Module Figure 14 LEDs on the 4 Port 10 Gigabit Ethernet SFP Uplink Module 3 1 Captive screws of the uplink module Link activity LED of the uplink module port 4 2 Handle of the uplink module Status LED of the uplink module port 4 port 10 Gigabit Ethernet SFP uplink module 31 Copyright 2015 Juniper Network...

Страница 54: ...t QSFP Uplink Module Figure16 LEDsonthe2 Port40 GigabitEthernetQSFP Uplink Module 3 1 Status LED of the uplink module port Status LED of the uplink module 2 Link activity LED of the uplink module port 2 port 40 Gigabit Ethernet QSFP uplink module Copyright 2015 Juniper Networks Inc 32 EX4300 Switch Hardware Guide ...

Страница 55: ... the ports on the uplink module The switch creates the required interfaces when transceivers are installed in these ports The SFP uplink module ports can operate either in 10 gigabit or in 1 gigabit mode depending on the transceiver you install in them The operating mode for an SFP uplink module is shown in the output of the show chassis pic fpc slot slot number pic slot slot number command Each p...

Страница 56: ...tional mode command show chassis led Table 17 Chassis Status LEDs on an EX4300 Switch State and Description Color LED Label There is no alarm or the switch is halted Unlit ALM Alarm There is a major alarm NOTE When you connect power to the switch the Alarm ALM LED glows red This behavior is normal Plugging an active Ethernet cable into the management MGMT port on the switch completes the network l...

Страница 57: ... A minor alarm yellow indicates a noncritical condition that requires monitoring or maintenance A minor alarm that is left unchecked might cause interruption in service or performance degradation All three LEDs can be lit simultaneously Related Documentation show chassis lcd Checking Active Alarms with the J Web Interface on page 258 Understanding Alarm Types and Severity Levels on EX Series Switc...

Страница 58: ...00 Switches Each 10 100 1000BASE T network port SFP network port SFP uplink port SFP uplink module port built in QSFP port and QSFP uplink module port on an EX4300 switch has two LEDs that show the link activity and status of the port The following figures in this topic shows the location of those LEDs Figure 21 on page 37 shows the location of the LEDs on the 10 100 1000BASE T Ethernet network po...

Страница 59: ... In QSFP Ports 2 1 Status LED Link activity LED Figure 24 LEDs on the SFP Uplink Ports and on the SFP Uplink Module Ports on the 4 Port SFP Uplink Module 2 1 Status LED Link activity LED Figure 25 LEDs on the QSFP Uplink Module Ports 3 1 Status LED of the uplink module port Status LED of the uplink module 2 Link activity LED of the uplink module port 37 Copyright 2015 Juniper Networks Inc Chapter ...

Страница 60: ...FP ports and QSFP uplink module ports Table 20 Link Activity LED State and Description Color LED Blinking The port and the link are active and there is link activity On steadily The port and the link are active but there is no link activity Off The port is not active Green Link activity Table 21 on page 39 describes the Status LED on 10 100 1000BASE T Ethernet network ports and SFP network ports F...

Страница 61: ...unlit when the speed is 100 Mbps LED SPD Indicates the PoE mode The status indicators are Steadily green PoE is enabled on the port and a device is drawing power Blinking green PoE is enabled on the port but no power is drawn from the port Unlit PoE is not enabled on the port LED PoE Table 22 on page 39 describes the Status LED on SFP uplink ports and SFP uplink module ports Table 22 Status LED on...

Страница 62: ...Related Documentation Uplink Modules in EX4300 Switches on page 29 EX4300 Switches Hardware Overview on page 3 Copyright 2015 Juniper Networks Inc 40 EX4300 Switch Hardware Guide ...

Страница 63: ...page 44 Do Not Mix AIR IN AFI and AIR OUT AFO Components in the Switch on page 45 Positioning the Switch on page 45 Fan Module Status on page 46 Fan Modules In the EX4300 switches the fan modules are hot insertable and hot removable field replaceable units FRUs All the EX4300 switches except EX4300 24T S EX4300 24P S EX4300 32F S EX4300 48T S and EX4300 48P S switches are shipped with two fan modu...

Страница 64: ...through the back of the switch indicated by label AIR IN AFI and front to back air exhausts through the back of the switch indicated by label AIR OUT AFO Table 24 on page 42 lists the available fan module models and the direction of airflow in them NOTE The 32 port EX4300 switches support fan modules and power supplies with the AIR OUT AFO label only Table 24 Fan Modules in EX4300 Switches Label o...

Страница 65: ...is The switch ships with two fan modules and an AC power supply each with a label AIR IN AFI EX4300 48T AFI Back to front that is air intake to cool the chassis is through the vents on the rear panel of the chassis and hot air exhausts through the vents on the front panel of the chassis The switch ships with two fan modules and a DC power supply each with a label AIR IN AFI EX4300 48T DC AFI CAUTI...

Страница 66: ... have AIR OUT AFO labels in switches in which the fan modules have AIR OUT AFO labels Back to Front Airflow In the EX4300 switch models that have back to front airflow the air intake to cool the chassis is through the vents on the rear panel and hot air exhausts through the vents on the front panel of the switch See Figure 30 on page 45 Copyright 2015 Juniper Networks Inc 44 EX4300 Switch Hardware...

Страница 67: ...chassis Mixing components with AIR IN AFI and AIR OUT AFO labels in the same chassis hampers the performance of the cooling system of the switch and leads to overheating of the chassis CAUTION The system raises an alarm if a fan module fails or if the ambient temperature inside the chassis rises above the acceptable range If the temperature inside the chassis rises above the threshold temperature ...

Страница 68: ...ction of other components Unlit Under normal operating conditions the fan modules operate at a moderate speed Temperature sensors in the chassis monitor the temperature within the chassis The system raises an alarm if a fan module fails or if the ambient temperature inside the chassis rises above the acceptable range If the temperature inside the chassis rises above the threshold temperature the s...

Страница 69: ...tches are shipped with one AC power supply pre installed in the rear panel of the switches EX4300 24T S EX4300 24P S EX4300 32F S EX4300 48T S and EX4300 48P S switches are not shipped with pre installed power supplies you must order them separately This topic describes the AC power supplies CAUTION Do not mix AC and DC power supplies in the same chassis Power supplies with different airflow label...

Страница 70: ...r Supply Details JPSU 1100 AC AFO A JPSU 715 AC AFO A JPSU 350 AC AFO A JPSU 350 AC AFI A Model number Hot insertable and hot removable Hot insertable and hot removable Hot insertable and hot removable Field replaceable unit FRU type 2 43 lb 1 1 kg 2 43 lb 1 1 kg 2 43 lb 1 1 kg Power supply weight 1 1 1 Minimum installed in chassis 2 2 2 Maximum installed in chassis Install in power supply slots l...

Страница 71: ...ction of airflow in the power supply Table 28 on page 49 lists the AC power supply models and the direction of airflow in them Table 28 Airflow Direction in AC Power Supply Models for EX4300 Switches Direction of Airflow Label on Power Supply Model Front to back that is air intake to cool the chassis is through the vents on the front panel of the chassis and hot air exhausts through the vents on t...

Страница 72: ...ulation for 24 port EX4300 switches that use 350 W AC 715 W AC and 1100 W AC power supplies Table 29 N 0 AC Power Calculations for 24 Port EX4300 Switches Ports Enabled forPoE Available PoE Power in watts Base Power in watts Backup Power in watts System Power Budget in watts Total Power in watts PSU 0 W PSU 1 W Power Supply Rating PSU 1 PSU 0 6 200 150 0 350 350 350 W AC 17 515 150 0 665 700 350 W...

Страница 73: ...C 18 540 175 0 715 715 715 W AC 39 1183 5 175 0 1358 5 1430 715 W AC 715 W AC 48 1530 175 0 1705 1815 1100 W AC 715 W AC 30 925 175 0 1100 1100 1100 W AC 48 1915 175 0 2090 2200 1100 W AC 1100 W AC 38 1165 175 0 1340 1450 350 W AC 1100 W AC N N Redundancy Configuration of AC Power Supplies You can configure your switch for N N redundancy in which N power supplies can be removed or fail and the rem...

Страница 74: ... the lower output wattage System power budget MIN PSU 0 W PSU 1 W 0 05 x MIN PSU 0 W PSU 1 W Backup power available Output wattage of the power supply that has the lower output wattage 5 of the output wattage of the power supply that has the lower output wattage Backup power available MIN PSU 0 W PSU 1 W 0 05 x MIN PSU 0 W PSU 1 W Table 32 on page 52 lists the N N power calculation for 24 port EX4...

Страница 75: ...pply Rating PSU 1 PSU 0 177 0 350 350 350 W AC 177 332 5 332 5 700 350 W AC 350 W AC Table 34 on page 53 lists the N N power calculation for 48 port EX4300 switches that use 350 W 715 W AC and 1100 W AC power supplies Table 34 N N AC Power Calculations for 48 Port EX4300 Switches Ports enabled for PoE Available PoE Power in watts Base Power in watts Backup Power in watts System Power Budget in wat...

Страница 76: ...wer Supply in an EX4300 Switch on page 221 AC Power Supply LEDs in EX4300 Switches Figure 32 on page 54 shows the location of the LEDs on an AC power supply for an EX4300 switch Figure 32 AC Power Supply LEDs in an EX4300 Switch 1 2 2 1 OUT OK LED IN OK LED Table 35 on page 54 describes the AC power supply LEDs Table 35 AC Power Supply LEDs in EX4300 Switches Description Color LED Indicates one of...

Страница 77: ...4300 Switches on page 97 Connecting AC Power to an EX4300 Switch on page 173 DC Power Supply in EX4300 Switches The DC power supply in EX4300 switches is a hot insertable and hot removable field replaceable unit FRU You can install it without powering off the switch or disrupting the switching function All the EX4300 switches that are powered by DC power supplies except EX4300 24T S EX4300 24P S E...

Страница 78: ...r over Ethernet PoE in EX4300 24P EX4300 24P S EX4300 48P and EX4300 48P S models Figure 33 DC Power Supply for an EX4300 Switch You can install up to two DC power supplies in an EX4300 switch Power supplies are installed in the power supply slots labeled PSU 0 and PSU 1 in the rear panel of the chassis Table 36 on page 56 lists the details of the 550 W DC power supplies used in EX4300 switches Ta...

Страница 79: ... cooled by its own internal cooling system Each power supply has a label AIR OUT AFO or AIR IN AFI on the faceplate of the power supply that indicates the direction of airflow in the power supply Table 37 on page 57 lists the DC power supply models and the direction of airflow in them Table 37 Airflow Direction in DC Power Supply Models for EX4300 Switches Direction of Airflow Label onPowerSupply ...

Страница 80: ...0 550 550 1100 2 12 375 175 0 550 550 1 48 port EX4300switch 29 870 175 0 1045 1100 2 N N Redundancy Configuration of DC Power Supplies You can configure your switch for N N redundancy in which N power supplies can be removed or fail and the remaining N power supplies continue to supply power for the switch without interruption You can configure the power management software to manage switch power...

Страница 81: ...hes that use 550 W DC power supplies Table 39 N N DC Power Calculations for EX4300 Switch Configurations Ports Enabled for PoE AvailablePoE Power in watts Base Power in watts Backup Power in watts System PowerBudget in watts Total Power in watts Number of Power Supplies Switch Configuration 13 400 150 0 550 550 1 24 port EX4300switch 12 372 5 150 522 5 522 5 1100 2 N A N A 149 0 550 550 1 32 port ...

Страница 82: ...ting range No DC power input Unlit IN OK The power supply is receiving power Green Indicates one of the following IN OK LED is unlit The power supply is not delivering power correctly Unlit OUT OK The power supply is functioning correctly Green The power supply has failed and must be replaced Red Related Documentation DC Power Supply in EX4300 Switches on page 55 DC Power Supply Specifications for...

Страница 83: ...le window will not appear when you log in if you have not selected the Check for updates automatically on every login in the Update Preference section in the Maintain Update J Web side pane By default the Check for update automatically on every login is selected If you choose Update Later you can update to the latest J Web Application package by clicking the orange icon next to Update Available on...

Страница 84: ... instead of its ID Assigned ID that applies to the entire Virtual Chassis configuration Master Possible roles are Master Backup or Linecard Role of the member switch Prsnt Possible statuses are Prsnt NotPrsnt Inactive or Unprvsnd Status of the member switch The status of the member switch is displayed on the image of the switch If the member switch appears dimmed it means the switch is not present...

Страница 85: ...e dashboard or click Cancel to return to the dashboard without saving changes NOTE You can drag the various panels to different locations in the J Web window System Information Panel Table 43 System Information Description Field Indicates the local name of the EX Series switch The local name of the EX Series switches changes when an individual image is clicked System name Indicates the model of th...

Страница 86: ... Inventory details field are 1 2 CB and 1 9 FPC CB or Control Board refers to the SRE module FPC refers to line cards and the FPC within the CB For an EX8208 switch the values displayed in Inventory details field are 1 3 CB and 0 8 FPC CB or Control Board refers to SRE and SF modules FPC refers to line cards For EX8216 switches the values displayed in Inventory details field are 1 2 CB and 0 16 FP...

Страница 87: ...e status Temperatures are listed in Celsius and the corresponding Fahrenheit values NOTE The Temp field is unavailable for a standalone EX2200 C switch The Temp field is dynamically available for an EX2200 Virtual Chassis switch based on the model of the member clicked NOTE In EX4300 Virtual Chassis the temperature of the master Routing Engine is displayed by default To display the temperature of ...

Страница 88: ...ty of internal flash memory and any external USB flash drive Flash Indicates the status of the fans in the fan tray The possible values are OK Failed and Absent Fan status EX8208 Switches Indicates the memory used in the external Routing Engine In an EX8200 Virtual Chassis the memory utilization value of the XRE200 External Routing Engine in the master role is displayed Click the XRE200 External R...

Страница 89: ...00 Virtual Chassis the total number of ports of all of the switches is displayed Total number of ports Indicates the number of MAC table entries Used up MAC Table entries IndicatesthemaximumnumberofMACtableentriespermitted Supported MAC Table entries Indicates the number of VLANs configured NOTE Only tagged VLANs are counted Number of VLANs configured Indicates the maximum number of VLANs supporte...

Страница 90: ...X4550 switches Table 52 on page 75 Describes the chassis viewer for EX6210 switches Table 53 on page 75 Describes the chassis viewer for EX8208 switches Table 54 on page 77 Describes the chassis viewer for EX8216 switches Table 55 on page 77 Describes the chassis viewer for the XRE200 External Routing Engines Table 46 Chassis Viewer for EX2200 Switches Description Field Front View In the image the...

Страница 91: ...tional Gray Interface is down and nonoperational Mouse over the interface port to view more information Interface status The management port is used to connect the switch to a management device for out of band management Management me0 port The console port is used to connect the switch to a management console or to a console server You might do this for initial switch configuration Console port I...

Страница 92: ... port icon Interface status LCD panel configured for the LEDs on the ports Mouse over the icon to view the current character display LCD panel Rear View of the EX3200 Switch The management port is used to connect the switch to a management device for out of band management Management me0 port The console port is used to connect the switch to a management console or to a console server You might do...

Страница 93: ... Mouse over the interface port to view more information Interface status LCD panel configured for the LEDs on the ports Mouse over the icon to view the current character display LCD panel The mini console port is used to connect the switch to the management console Mini USB console You can install an uplink module in the PIC 2 slot Mouse over the ports in the module to view the details of the port...

Страница 94: ...erface is down and not operational For QSFP ports the interfaces appear dimmed if no transceiver is inserted The chassis viewer displays Transceiver not plugged in when you mouse over the port When a QSFP port is configured as a Virtual Chassis Port VCP the following colors denote the VCP status Green VCP is up and operational Yellow VCP is up but is not operational Gray VCP is down and not operat...

Страница 95: ...d airflow direction information For a Virtual Chassis the status of the fans of the selected member switch is displayed Fan tray Displayed only when switches are configured as a Virtual Chassis The colors listed below denote the Virtual Chassis port VCP status Green VCP is up and operational Yellow VCP is up but is nonoperational Gray VCP is down and nonoperational Virtual Chassis port Mouse over ...

Страница 96: ...used to connect the switch to a management device for out of band management Use this port for initial switch configuration Management me0 port You can insert an uplink module or a Virtual Chassis module in the PIC1 slot Mouse over to display the details of the module inserted uplink or Virtual Chassis PIC1 slot Indicates the USB port for the switch NOTE We recommend that you use USB flash drives ...

Страница 97: ... me0 ports Console port The console port is used to connect the switch to a management console or to a console server You might do this for initial switch configuration CBs support 4 SFP uplink ports Mouse over the interface on the CB for more information For SFP and SFP ports the interfaces appear dimmed if no transceiver is inserted The chassis viewer displays Transceiver not plugged in when you...

Страница 98: ...and management Console port The console port is used to connect the switch to a management console or to a console server You might do this for initial switch configuration Because the SF module has no ports no status information is displayed Interface status Slots on the switch are labeled from the top of the switch down 0 3 line cards SRE0 SF SRE1 SRE and SF modules 4 7 line cards Slot numbers T...

Страница 99: ...port is used to connect the switch to a management console or to a console server You might do this for initial switch configuration Interface status Slots on the switch are labeled from the top of the switch down RE0 RE module RE1 RE module 0 15 line cards Slot numbers The active slots contain a gray temperature icon Mouse over the icon to display temperature information for the slot Temperature ...

Страница 100: ...e LEDs on the ports Mouse over the icon to view the current character display LCD panel The active slots contain a gray temperature icon Mouse over the icon to display temperature information for the slot Temperature Indicates the USB port for the switch NOTE We recommend that you use USB flash drives purchased from Juniper Networks for your EX Series switch USB port You can install a Virtual Chas...

Страница 101: ...3 EX4500 Switches Hardware Overview EX6210 Switch Hardware Overview EX8208 Switch Hardware Overview EX8216 Switch Hardware Overview Checking Active Alarms with the J Web Interface on page 258 XRE200 External Routing Engine Documentation 79 Copyright 2015 Juniper Networks Inc Chapter 5 Viewing System Information ...

Страница 102: ...Copyright 2015 Juniper Networks Inc 80 EX4300 Switch Hardware Guide ...

Страница 103: ...ration and Specifications Preparation Overview on page 83 Power Specifications and Requirements on page 97 Transceiver and Cable Specifications on page 107 Pinout Specifications on page 139 81 Copyright 2015 Juniper Networks Inc ...

Страница 104: ...Copyright 2015 Juniper Networks Inc 82 EX4300 Switch Hardware Guide ...

Страница 105: ... the tasks you need to perform when preparing a site for EX4300 switch installation Table 56 Site Preparation Checklist Date Performed by For More Information Item or Task Environment Environmental Requirements and Specifications for EX Series Switches on page 84 Verify that environmental factors such as temperature and humidity do not exceed switch tolerances Power Measure the distance between ex...

Страница 106: ...d for each cable Choose the length of cable based on the distance between the hardware components being connected Plan the cable routing and management Related Documentation General Safety Guidelines and Warnings on page 265 General Site Guidelines on page 88 Installing and Connecting an EX4300 Switch on page 155 Mounting an EX4300 Switch on page 156 Environmental Requirements and Specifications f...

Страница 107: ...hrough 45 C Normal operation ensured in relative humidity range of 10 through 85 noncondensing No performance degradation up to 10 000 feet 3048 meters EX3200 Complies with Zone 4 earthquake requirements as per GR 63 Issue 4 Normal operation ensured in the temperature range 32 F through 113 F 0 C through 45 C Normal operation ensured in relative humidity range of 10 through 85 noncondensing No per...

Страница 108: ...6 562 feet 2000 meters EX4600 Complies with Zone 4 earthquake requirements as per GR 63 Issue 4 Normal operation ensured in the temperature range 32 F through 104 F 0 C through 40 C Normal operation ensured in relative humidity range of 10 through 85 noncondensing No performance degradation up to 10 000 feet 3048 meters EX6210 Complies with Zone 4 earthquake requirements as per GR 63 Issue 4 Norma...

Страница 109: ...ugh 85 noncondensing No performance degradation up to 10 000 feet 3048 meters XRE200 NOTE Install EX Series switches only in restricted areas such as dedicated equipment rooms and equipment closets in accordance with Articles 110 16 110 17 and 110 18 of the National Electrical Code ANSI NFPA 70 Related Documentation Clearance Requirements for Airflow and Hardware Maintenance for EX2200 Switches Cl...

Страница 110: ...e material such as metal flakes Follow prescribed airflow guidelines to ensure that the cooling system functions properly and that exhaust from other equipment does not blow into the intake vents of the device Follow the prescribed electrostatic discharge ESD prevention procedures to prevent damaging the equipment Static discharge can cause components to fail completely or intermittently over time...

Страница 111: ... pulses EMPs caused by lightning damage unshielded conductors and electronic devices Signaling limitations To reduce or eliminate RFI from your site wiring do the following Use a twisted pair cable with a good distribution of grounding conductors If you must exceed the recommended distances use a high quality twisted pair cable with one ground conductor for each data signal when applicable Radio f...

Страница 112: ...itch AC Power Supply in an EX9204 Switch DC Power Supply in an EX9204 Switch AC Power Supply in an EX9208 Switch DC Power Supply in an EX9208 Switch AC Power Supply in an EX9214 Switch DC Power Supply in an EX9214 Switch Power Supply in an EX Series Redundant Power System AC Power Supply in OCX1100 Switches DC Power Supply in OCX1100 Switches AC Power Supply in a QFX3100 Director Device AC Power S...

Страница 113: ...tandards of a 19 in rack as defined in Cabinets Racks Panels and Associated Equipment document number EIA 310 D published by the Electronics Industry Association http www eia org Ensure that the rack rails are spaced widely enough to accommodate the external dimensions of the switch chassis The outer edges of the front mount brackets extend the width of the chassis to 19 in 48 2 cm The rack must b...

Страница 114: ... the switch in a cabinet ensure that ventilation through the cabinet is sufficient to prevent overheating Ensure adequate cool air supply to dissipate the thermal output of the switch or switches Ensure that the hot air exhaust of the chassis exits the cabinet without recirculating into the switch An open cabinet without a top or doors that employs hot air exhaust extraction from the top ensures t...

Страница 115: ...ents for Airflow and Hardware Maintenance for EX4300 Switches When planning the site for installing an EX4300 switch you must ensure sufficient clearance around the switch Follow these clearance requirements 93 Copyright 2015 Juniper Networks Inc Chapter 6 Preparation Overview ...

Страница 116: ...re 36 on page 94 and Figure 37 on page 94 for reference Figure35 Front to BackAirflowon24 Portand48 PortEX4300Switches Front Rear g022084 Figure 36 Front to Back Airflow on 32 Port EX4300 Switches Figure37 Back to FrontAirflowon24 Portand48 PortEX4300Switches Copyright 2015 Juniper Networks Inc 94 EX4300 Switch Hardware Guide ...

Страница 117: ...earance on the left of the chassis for installing the grounding lug Leave at least 24 in 61 cm clearance in front of and behind the switch for service personnel to remove and install hardware components See Figure 38 on page 95 Figure38 ClearanceRequirementsforAirflowandHardwareMaintenance for an EX4300 Switch Chassis NOTE The 32 port EX4300 switches support fan modules and power supplies with the...

Страница 118: ...ons for EX4300 Switches on page 23 Rack Mounting and Cabinet Mounting Warnings on page 278 General Site Guidelines on page 88 Cooling System and Airflow in an EX4300 Switch on page 41 Copyright 2015 Juniper Networks Inc 96 EX4300 Switch Hardware Guide ...

Страница 119: ...he tables in this topic provides power supply specification of AC power supplies used in an EX4300 switch Table 61 on page 97 350 W AC power supply specifications Table 62 on page 98 715 W AC power supply specifications Table 63 on page 98 1100 W AC power supply specifications Table 61 350 W AC Power Supply Specifications for an EX4300 Switch Specification Item Low voltage line 100 120 VAC High vo...

Страница 120: ... 54 AC Power Cord Specifications for an EX4300 Switch Each AC power supply has a single AC appliance inlet that requires a dedicated AC power feed A detachable AC power cord is supplied with each AC power supply The 350 W AC and the 715 W AC power supplies are shipped with AC power cords with the C13 coupler type and the 1100 W AC power supply is shipped with AC power cord with the C15 coupler typ...

Страница 121: ...Specifications Country Region No graphic available CBL EX PWR C13 AR IRAM 2073 Type RA 3 250 VAC 10 A 50 Hz Argentina CBL EX PWR C13 AU AS NZS 3112 Type SAA 3 250 VAC 10 A 50 Hz Australia No graphic available CBL EX PWR C13 BR NBR 14136 Type BR 3 250 VAC 10 A 50 Hz Brazil CBL EX PWR C13 CH GB 1002 1996 Type PRC 3 250 VAC 10 A 50 Hz China CBL EX PWR C13 EU CEE 7 VII Type VIIG 250 VAC 10 A 50 Hz Eur...

Страница 122: ...50 VAC 10 A 50 Hz Italy g021275 CBL EX PWR C13 JP SS 00259 Type VCTF 125 VAC 12 A 50 Hz or 60 Hz Japan CBL EX PWR C13 KR CEE 7 VII Type VIIGK 250 VAC 10 A 50 Hz or 60 Hz Korea g021274 CBL EX PWR C13 US NEMA 5 15 Type N5 15 125 VAC 13 A 60 Hz North America g021289 CBL EX PWR C13 SA SABS 164 1 1992 Type ZA 3 250 VAC 10 A 50 Hz South Africa No graphic available CBL EX PWR C13 SZ SEV 6534 2 Type 12G 2...

Страница 123: ...C15M HITEMP CH GB2099 GB1002 Type PRC 3 250 VAC 10 A 50 Hz China CBL PWR C15M HITEMP EU CEE 7 VII Type VIIG 250 VAC 10 A 50 Hz Europe except Italy Switzerland and United Kingdom CBL PWR C15M HITEMP IL SI 32 Type IL 3G 250 VAC 10 A 50 Hz Israel CBL PWR C15M HITEMP IN SABS 164 1 1992 Type ZA 3 250 VAC 10 A 50 Hz India CBL PWR C15M HITEMP IT CEI 23 16 Type I 3G 250 VAC 10 A 50 Hz Italy CBL PWR C15M H...

Страница 124: ...X4300 Switch Specifications Item Nominal operating voltage 48 VDC Operating voltage range 48 VDC through 60 VDC DC input voltage 4 A maximum at nominal operating voltage 48 VDC DC input current rating 550 W Output power Related Documentation DC Power Supply in EX4300 Switches on page 55 DC Power Supply LEDs in EX4300 Switches on page 59 Calculating the EX Series Switch Fiber Optic Cable Power Budg...

Страница 125: ...atisfy the minimum input requirements of the receiver for the required performance level The power margin P M is the amount of power available after attenuation or link loss LL has been subtracted from the power budget P B When you calculate the power margin you use a worst case analysis to provide a margin of error even though all the parts of an actual system do not operate at worst case levels ...

Страница 126: ...ation for 2 km 2 km 1 0 dBm km 2 dBm 2 km 0 5 dBm km 1 dBm Multimode 1 dBm km Single mode 0 5 dBm km Fiber attenuation 1 dBm 1 dBm Clock Recovery Module CRM NOTE For information about the actual amount of signal loss caused by equipment and other factors see your vendor documentation for that equipment 2 Calculate the P M by subtracting LL from P B P B LL P M 13 dBm 0 5 dBm HOL 5 0 5 dBm 2 0 5 dBm...

Страница 127: ...le Power Budget on page 102 Understanding EX Series Switches Fiber Optic Cable Signal Loss Attenuation and Dispersion on page 137 Pluggable Transceivers Supported on EX Series Switches 105 Copyright 2015 Juniper Networks Inc Chapter 7 Power Specifications and Requirements ...

Страница 128: ...Copyright 2015 Juniper Networks Inc 106 EX4300 Switch Hardware Guide ...

Страница 129: ...P transceivers NOTE We recommend that you use only optical transceivers and optical connectors purchased from Juniper Networks with your Juniper Networks device CAUTION If you are having a problem running a Juniper Networks device that is using a third party optic or cable the Juniper Networks Technical Assistance Center JTAC can help you diagnose the source of the problem Your JTAC engineer might...

Страница 130: ...n page 109 Optical interface support and copper interface support for Gigabit Ethernet SFP transceivers Table 69 on page 117 Optical interface support for Fast Ethernet SFP transceivers NOTE Only the SFP network ports on 32 port EX4300 switches support Fast Ethernet SFP transceivers The built in uplink ports or the uplink module ports do not support Fast Ethernet SFP transceivers Table 70 on page ...

Страница 131: ... Minimum launch power Maximum launch power Minimum receiver sensitivity Maximum input power Core Cladding size Modal bandwidth 100 m 328 ft Distance EX4300 32F switches Junos OS for EX Series switches Release 13 2X51 D15 or later EX4300 32F S switches Junos OS for EX Series switches Release 13 2X51 D26 or later Software required No Support for Virtual Chassis configuration 109 Copyright 2015 Junip...

Страница 132: ...m 400 MHz km 200 MHz km 160 MHz km Modal bandwidth 550 m 1804 ft 500 m 1640 ft 275 m 902 ft 220 m 721 ft Distance Available DOM support No Support for Virtual Chassis configuration EX4300 24T EX4300 24P EX4300 48T EX4300 48T AFI EX4300 48P EX4300 48T DC and EX4300 48T DC AFI switches Junos OS for EX Series switches Release 13 2X50 D10 or later EX4300 32F switches Junos OS for EX Series switches Re...

Страница 133: ... 125 µm Core Cladding size Modal bandwidth 10 km 6 2 miles Distance Available DOM support No Support for Virtual Chassis configuration EX4300 24T EX4300 24P EX4300 48T EX4300 48T AFI EX4300 48P EX4300 48T DC and EX4300 48T DC AFI switches Junos OS for EX Series switches Release 13 2X50 D10 or later EX4300 32F switches Junos OS for EX Series switches Release 13 2X51 D15 or later EX4300 24T S EX4300...

Страница 134: ...10 nm Transmitter wavelength 1490 nm Receiver wavelength 9 dBm Minimum launch power 3 dBm Maximum launch power 30 dBm Minimum receiver sensitivity 3 dBm Maximum input power SMF Fiber type 9 125 µm Core Cladding size Modal bandwidth 10 km 6 2 miles Distance Available DOM support No Support for Virtual Chassis configuration Junos OS for EX Series switches Release 14 1X53 D26 or later Software requir...

Страница 135: ...nsmitter wavelength 1310 nm Receiver wavelength 9 dBm Minimum launch power 3 dBm Maximum launch power 30 dBm Minimum receiver sensitivity 3 dBm Maximum input power SMF Fiber type 9 125 µm Core Cladding size Modal bandwidth 10 km 6 2 miles Distance Available DOM support No Support for Virtual Chassis configuration Junos OS for EX Series switches Release 14 1X53 D26 or later Software required 113 Co...

Страница 136: ...10 nm Transmitter wavelength 1550 nm Receiver wavelength 9 dBm Minimum launch power 3 dBm Maximum launch power 21 dBm Minimum receiver sensitivity 3 dBm Maximum input power SMF Fiber type 9 125 µm Core Cladding size Modal bandwidth 10 km 6 2 miles Distance Available DOM support No Support for Virtual Chassis configuration Junos OS for EX Series switches Release 14 1X53 D26 or later Software requir...

Страница 137: ...nsmitter wavelength 1310 nm Receiver wavelength 9 dBm Minimum launch power 3 dBm Maximum launch power 21 dBm Minimum receiver sensitivity 3 dBm Maximum input power SMF Fiber type 9 125 µm Core Cladding size Modal bandwidth 10 km 6 2 miles Distance Available DOM support No Support for Virtual Chassis configuration Junos OS for EX Series switches Release 14 1X53 D26 or later Software required 115 Co...

Страница 138: ...MF Fiber type 9 125 µm Core Cladding size Modal bandwidth 70 km 43 5 miles Distance Available DOM support No Support for Virtual Chassis configuration EX4300 24T EX4300 24P EX4300 48T EX4300 48T AFI EX4300 48P EX4300 48T DC and EX4300 48T DC AFI switches Junos OS for EX Series switches Release 13 2X50 D10 or later EX4300 32F switches Junos OS for EX Series switches Release 13 2X51 D15 or later EX4...

Страница 139: ...t 1310 nm Transmitter wavelength 20 dBm Minimum launch power 14 dBm Maximum launch power 32 5 dBm Minimum receiver sensitivity 8 dBm Maximum input power MMF Fiber type 62 5 125 µm Core Cladding size FDDI OM1 Fiber grade 500 MHz km Modal bandwidth 2 km 1 2 miles Distance Not available DOM support No Support for Virtual Chassis configuration EX4300 32F switches Junos OS for EX Series switches Releas...

Страница 140: ...rade 1500 MHz km 500 MHz km 200 MHz km Modal bandwidth 100 m 328 ft 30 m 98 4 ft 10 m 32 8 ft Distance Available DOM support Yes Support for Virtual Chassis configuration EX4300 24T EX4300 24P EX4300 48T EX4300 48T AFI EX4300 48P EX4300 48T DC and EX4300 48T DC AFI switches Junos OS for EX Series switches Release 13 2X50 D10 or later EX4300 32F switches Junos OS for EX Series switches Release 13 2...

Страница 141: ...m 500 MHz km 400 MHz km 200 MHz km 160 MHz km Modal bandwidth 300 m 984 ft 82 m 269 ft 66 m 216 ft 33 m 108 ft 26 m 85 ft Distance Available DOM support Yes Support for Virtual Chassis configuration EX4300 24T EX4300 24P EX4300 48T EX4300 48T AFI EX4300 48P EX4300 48T DC and EX4300 48T DC AFI switches Junos OS for EX Series switches Release 13 2X50 D10 or later EX4300 32F switches Junos OS for EX ...

Страница 142: ... Fiber grade 500 MHz km 500 MHz km 500 MHz km Modal bandwidth 220 m 722 ft 220 m 722 ft 220 m 722 ft Distance Available DOM support Yes Support for Virtual Chassis configuration EX4300 24T EX4300 24P EX4300 48T EX4300 48T AFI EX4300 48P EX4300 48T DC and EX4300 48T DC AFI switches Junos OS for EX Series switches Release 13 2X50 D10 or later EX4300 32F switches Junos OS for EX Series switches Relea...

Страница 143: ...size Modal bandwidth 10 km 6 2 miles Distance Available DOM support Yes Support for Virtual Chassis configuration EX4300 24T EX4300 24P EX4300 48T EX4300 48T AFI EX4300 48P EX4300 48T DC and EX4300 48T DC AFI switches Junos OS for EX Series switches Release 13 2X50 D10 or later EX4300 32F switches Junos OS for EX Series switches Release 13 2X51 D15 or later EX4300 24T S EX4300 24P S EX4300 32F S E...

Страница 144: ...adding size Modal bandwidth 40 km 24 8 miles Distance Available DOM support Yes Support for Virtual Chassis configuration EX4300 24T EX4300 24P EX4300 48T EX4300 48T AFI EX4300 48P EX4300 48T DC and EX4300 48T DC AFI switches Junos OS for EX Series switches Release 13 2X50 D10 or later EX4300 32F switches Junos OS for EX Series switches Release 13 2X51 D15 or later EX4300 24T S EX4300 24P S EX4300...

Страница 145: ... Modal bandwidth 80 km 49 7 miles Distance Available DOM support Yes Support for Virtual Chassis configuration EX4300 24T EX4300 24P EX4300 48T EX4300 48T AFI EX4300 48P EX4300 48T DC and EX4300 48T DC AFI switches Junos OS for EX Series switches Release 13 2X50 D10 or later EX4300 32F switches Junos OS for EX Series switches Release 13 2X51 D15 or later EX4300 24T S EX4300 24P S EX4300 32F S EX43...

Страница 146: ...50 125 µm Core Cladding size OM4 OM3 Fiber grade 4700 MHz km 2000 MHz km Modal bandwidth 150 m 492 ft 100 m 328 ft Distance Available DOM support Yes Support for Virtual Chassis configuration EX4300 24T EX4300 24P EX4300 48T EX4300 48T AFI EX4300 48P EX4300 48T DC and EX4300 48T DC AFI switches Junos OS for EX Series switches Release 13 2X50 D10 or later EX4300 32F switches Junos OS for EX Series ...

Страница 147: ...25 µm Core Cladding size OM4 OM3 Fiber grade 4700 MHz km 2000 MHz km Modal bandwidth 400 m 1312 ft 300 m 984 ft Distance Available DOM support Yes Support for Virtual Chassis configuration EX4300 24T EX4300 24P EX4300 48T EX4300 48T AFI EX4300 48P EX4300 48T DC and EX4300 48T DC AFI switches Junos OS for EX Series switches Release 13 2X50 D10 or later EX4300 32F switches Junos OS for EX Series swi...

Страница 148: ...3 1331 nm Lane wavelength 7 0 dBm per lane Minimum launch power 4 3 dBm per lane Maximum launch power 3 5 W Maximum power draw MMF MMF Fiber type 50 125 µm 50 125 µm Core Cladding size OM4 OM3 Fiber grade 4700 MHz km 2000 MHz km Modal bandwidth 150 m 328 ft 100 m 328 ft Distance Available DOM support Yes Support for Virtual Chassis configuration Junos OS for EX Series switches Release 14 1 or late...

Страница 149: ...ne SMF Fiber type 9 125 µm Core Cladding size 10 km 6 2 miles Distance Available DOM support Yes Support for Virtual Chassis configuration EX4300 24T EX4300 24P EX4300 48T EX4300 48T AFI EX4300 48P EX4300 48T DC and EX4300 48T DC AFI switches Junos OS for EX Series switches Release 13 2X50 D10 or later EX4300 32F switches Junos OS for EX Series switches Release 13 2X51 D15 or later EX4300 24T S EX...

Страница 150: ... straight cable with no active electronic components EX Series switches support 1 m 3 m 5 m and 7 m long SFP passive direct attach cables Table 72 on page 128 describes the support for SFP passive direct attach cable lengths on EX Series switches for Junos OS releases Table 72 Software Support for SFP Passive Direct Attach Cables for EX Series Switches Cable Length Software Support Added Switch 1 ...

Страница 151: ... EX4550 32F AFI EX4550 32F AFO EX4550 32F DC AFI and EX4550 32F DC AFO switches 1 m 3 ft 3 m 10 ft 5 m 16 ft and 7 m 23 ft Junos OS Release 12 3R5 EX4550 32F S switches 1 m 3 ft 3 m 10 ft and 7 m 23 ft Junos OS Release 10 0 EX82008 portSFP linecards EX8200 8XS 5 m 16 ft Junos OS Release 10 3 1 m 3 ft 3 m 10 ft and 7 m 23 ft Junos OS Release 10 3 EX8200 40 port SFP line cards EX8200 40XS 5 m 16 ft ...

Страница 152: ... Gbps Table 73 on page 130 describes the cable specifications Table 73 SFP Direct Attach Cable Specifications Value Specification Model Number 10 Gbps full duplex serial transmission Rate EX SFP 10GE DAC 1M SFP passive Twinax cable assembly Connector type 3 3 V Supply voltage 0 57 W Power consumption per end 40 C through 85 C Storage temperature Twinax Cable type 30 AWG Wire AWG 1 in 2 54 cm Minim...

Страница 153: ...e characteristic impedance 2 maximum Crosstalk between pairs 1 31 nsec ft Time delay 9 9 ft 3 m Length 10 Gbps full duplex serial transmission Rate EX SFP 10GE DAC 5M SFP passive Twinax cable assembly Connector type 3 3 V Supply voltage 0 57 W Power consumption per end 40 C through 85 C Storage temperature Twinax Cable type 24 AWG Wire AWG 1 in 2 54 cm Minimum cable bend radius 100 ohms Cable char...

Страница 154: ... ftp ftp seagate com sff SFF 8431 PDF Electrical interface standard SFF 8432 see ftp ftp seagate com sff SFF 8432 PDF SFP Multi Source Alliance MSA standards Related Documentation Pluggable Transceivers Supported on EX Series Switches Installing a Transceiver in an EX Series Switch on page 235 Removing a Transceiver from a Switch on page 237 QSFP Direct Attach Cables for EX Series Switches Quad sm...

Страница 155: ...es Junos OS for EX Series switches Release 13 2X50 D10 or later EX4300 32F switches Junos OS for EX Series switches Release 13 2X51 D15 or later EX4300 24T S EX4300 24P S EX4300 32F S EX4300 48T S and EX4300 48P S switches Junos OS for EX Series switches Release 13 2X51 D26 or later EX4300 switches EX QSFP 40GE DAC 50CM QFX QSFP DAC 1M QFX QSFP DAC 3M JNP QSFP DAC 5M EX4550 32T AFI EX4550 32T AFO ...

Страница 156: ...bps full duplex serial transmission Rate EX QSFP 40GE DAC 50CM QSFP passive Twinax cable assembly Connector type 3 3 V Supply voltage 0 015 W Power consumption per end 40 C through 85 C Storage temperature Twinax Cable type 30 AWG Wire AWG 2 54 cm 1 in Minimum cable bend radius 100 ohms Cable characteristic impedance 1 maximum Crosstalk between pairs 4 3 nsec ft Time delay 0 5 m 1 6 ft Length Copy...

Страница 157: ...le characteristic impedance 1 maximum Crosstalk between pairs 4 3 nsec ft Time delay 1 m 3 28 ft Length 40 Gbps full duplex serial transmission Rate QFX QSFP DAC 3M Copper pigtail Connector type 3 3 V Supply voltage 0 015 W Power consumption per end 40 C through 85 C Storage temperature Twinax Cable type 30 AWG Wire AWG 2 54 cm 1 in Minimum cable bend radius 100 ohms Cable characteristic impedance...

Страница 158: ...between pairs 4 3 nsec ft Time delay 5 m 16 4 ft Length Related Documentation Pluggable Transceivers Supported on EX4300 Switches on page 107 Pluggable Transceivers Supported on EX4550 Switches Installing a Transceiver in an EX Series Switch on page 235 Removing a Transceiver from a Switch on page 237 Network Cable Specifications for EX4300 Switches EX4300 switches have interfaces that use various...

Страница 159: ...tenuation and Dispersion To determine the power budget and power margin needed for fiber optic connections you need to understand how signal loss attenuation and dispersion affect transmission EX Series Switches use various types of network cable including multimode and single mode fiber optic cable Signal Loss in Multimode and Single Mode Fiber Optic Cable on page 137 Attenuation and Dispersion i...

Страница 160: ... optical data link must transmit enough light to overcome attenuation Dispersion is the spreading of the signal over time The following two types of dispersion can affect signal transmission through an optical data link Chromatic dispersion which is the spreading of the signal over time caused by the different speeds of light rays Modal dispersion which is the spreading of the signal over time cau...

Страница 161: ...ses an RJ 45 connector to connect to a console management device The default baud rate for the console port is 9600 baud Table 77 on page 139 provides the pinout information for the RJ 45 console connector An RJ 45 cable and an RJ 45 to DB 9 serial port adapter are supplied with the switch NOTE If your laptop or PC does not have a DB 9 male connector pin and you want to connect your laptop or PC d...

Страница 162: ...h Fabric and Routing Engine SRE Module in an EX6200 Switch Switch Fabric and Routing Engine SRE Module in an EX8208 Switch Routing Engine RE Module in an EX8216 Switch Connecting a Switch to a Management Console on page 183 Configuring the Console Port Type CLI Procedure Mini USB Port Specifications for an EX4300 Switch The EX4300 switch has two management console ports an RJ 45 port and a Mini US...

Страница 163: ...t uses a Mini USB Type B connector to connect to a console management device The default baud rate for the console port is 9600 baud Table 78 on page 141 provides the pinout information of the Mini USB Type B console port Table 78 Mini USB Type B Console Port Pinout Information for EX4300 Switches Description Signal Pin 5 VDC VCC 1 Data D 2 Data D 3 Could be not connected N C connected to ground G...

Страница 164: ...cord See the documentation for your USB flash drive for information about how your USB flash drive is formatted Related Documentation EX2200 Switches Hardware Overview Rear Panel of an EX3200 Switch Rear Panel of an EX3300 Switch Rear Panel of an EX4200 Switch EX4300 Switches Hardware Overview on page 3 Front Panel of an EX4500 Switch Management Panel of an EX4600 Switch EX4550 Switches Hardware O...

Страница 165: ... pair 4 TRP4 7 Transmit receive data pair 4 TRP4 8 Related Documentation EX4300 Switches Hardware Overview on page 3 Connecting a Switch to a Network for Out of Band Management on page 181 Network Port QSFP Port SFP Port and SFP Port Connector Pinout Information for EX4300 Switches Depending on the switch model EX4300 switches support 10 100 1000BASE T Ethernet network ports SFP network ports SFP ...

Страница 166: ...ve Vport in PoE models TRP2 6 Transmit receive data pair 4 TRP4 7 Transmit receive data pair 4 TRP4 8 Table 81 SFP Network Port Connector Pinout Information Description Signal Pin Module transmitter ground VeeT 1 Module transmitter fault TX_Fault 2 Transmitter disabled TX_Disable 3 2 wire serial interface data line SDA 4 2 wire serial interface clock SCL 5 Module absent MOD_ABS 6 Rate select RS 7 ...

Страница 167: ...t and SFP Uplink Module Port Connector Pinout Information Description Signal Pin Module transmitter ground VeeT 1 Module transmitter fault TX_Fault 2 Transmitter disabled TX_Disable 3 2 wire serial interface data line SDA 4 2 wire serial interface clock SCL 5 Module absent MOD_ABS 6 Rate select 0 optionally controls SFP module receiver RS0 7 Receiver loss of signal indication RX_LOS 8 Rate select ...

Страница 168: ...cT 16 Module transmitter ground VeeT 17 Transmitter noninverted data input TD 18 Transmitter inverted data input TD 19 Module transmitter ground VeeT 20 Table 83 Built in QSFP Port and QSFP Uplink Module Port Connector Pinout Information Signal Pin GND 1 TX2n 2 TX2p 3 GND 4 TX4n 5 TX4p 6 GND 7 ModSelL 8 LPMode_Reset 9 VccRx 10 SCL 11 SDA 12 GND 13 RX3p 14 Copyright 2015 Juniper Networks Inc 146 EX...

Страница 169: ...tion continued Signal Pin RX3n 15 GND 16 RX1p 17 RX1n 18 GND 19 GND 20 RX2n 21 RX2p 22 GND 23 RX4n 24 RX4p 25 GND 26 ModPrsL 27 IntL 28 VccTx 29 Vcc1 30 Reserved 31 GND 32 TX3p 33 TX3n 34 GND 35 TX1p 36 TX1n 37 147 Copyright 2015 Juniper Networks Inc Chapter 9 Pinout Specifications ...

Страница 170: ...5 to DB 9 female adapter supplied with the switch along with a USB to DB 9 male adapter Table 84 on page 148 provides the pinout information for the RJ 45 to DB 9 serial port adapter Table 84 RJ 45 to DB 9 Serial Port Adapter Pinout Information Signal DB 9 Pin Signal RJ 45 Pin CTS 8 RTS 1 DSR 6 DTR 2 RXD 2 TXD 3 GND 5 GND 4 TXD 3 RXD 6 DTR 4 DSR 7 RTS 7 CTS 8 Related Documentation Connecting a Swi...

Страница 171: ...n Unpacking the Switch on page 151 Installing the Switch on page 155 Connecting the Switch to Power on page 167 Connecting the Switch to the Network on page 181 Performing Initial Configuration on page 197 149 Copyright 2015 Juniper Networks Inc ...

Страница 172: ...Copyright 2015 Juniper Networks Inc 150 EX4300 Switch Hardware Guide ...

Страница 173: ...ng area as close to the installation site as possible but where you have enough room to remove the system components 2 Position the carton so that the arrows are pointing up 3 Open the top flaps on the shipping carton 4 Pull out the packing material holding the switch in place 5 Verify the parts received against the inventory on the label attached to the carton See Parts Inventory Packing List for...

Страница 174: ...AFI EX4300 48P EX4300 48T DC and EX4300 48T DC AFI switches Fan modules Fan modules for this model are not shipped by default you must separately order either two AIR OUT AFO labelled or two AIR IN AFI labelled fan modules EX4300 24T S EX4300 24P S EX4300 32F S EX4300 48T S and EX4300 48P S switches 1 AC or DC preinstalled EX4300 24T EX4300 24P EX4300 32F EX4300 48T EX4300 48T AFI EX4300 48P EX430...

Страница 175: ... Juniper Networks website Registration is mandatory for activating your hardware service level agreements SLAs CAUTION Register product serial numbers on the Juniper Networks website and update the installation base data if there is any addition or change to the installation base or if the installation base is moved Juniper Networks will not be held accountable for not meeting the hardware replace...

Страница 176: ...Copyright 2015 Juniper Networks Inc 154 EX4300 Switch Hardware Guide ...

Страница 177: ...alling a DC Power Supply in an EX4300 Switch on page 224 3 Install a fan module if it is not preinstalled see Installing a Fan Module in an EX4300 Switch on page 217 4 Mount the switch by following instructions appropriate for your site Mounting an EX4300 Switch on Two Posts of a Rack or Cabinet on page 157 by using the mounting brackets provided MountinganEX4300SwitchinaRecessedPositioninaRackorC...

Страница 178: ...X4300 Switch You can mount an EX4300 switch On two posts of a 19 in rack or a 19 in cabinet by using the mounting brackets provided with the switch On four posts of a 19 in rack or a 19 in cabinet by using the separately orderable four post rack mount kit In a position recessed 2 in from the front of a 19 in rack or a 19 in cabinet by using the 2 in recess front brackets in the separately orderabl...

Страница 179: ...k Verify that the site meets the requirements described in Site Preparation Checklist for EX4300 Switches on page 83 Place the rack in its permanent location allowing adequate clearance for airflow and maintenance and secure it to the building structure Read General Safety Guidelines and Warnings on page 265 with particular attention to Chassis Lifting Guidelines for EX4300 Switches on page 275 Re...

Страница 180: ... Switch g021433 3 Align the bottom holes in the mounting brackets with the holes on the side panels of the switch chassis 4 Insert mounting screws into the aligned holes Tighten the screws by using the Phillips screwdriver 5 Ensure that the other holes in the mounting brackets are aligned with the holes in the side panels Insert a screw in each hole and tighten the screws by using the Phillips scr...

Страница 181: ...ing and Configuring an EX Series Switch CLI Procedure on page 205 Connecting and Configuring an EX Series Switch J Web Procedure on page 208 Mounting an EX4300 Switch in a Recessed Position in a Rack or Cabinet on page 163 Rack Mounting and Cabinet Mounting Warnings on page 278 Mounting an EX4300 Switch on Four Posts of a Rack or Cabinet You can mount an EX4300 switch on four posts of a 19 in rack...

Страница 182: ...e for airflow and maintenance and secure it to the building structure Read General Safety Guidelines and Warnings on page 265 with particular attention to Chassis Lifting Guidelines for EX4300 Switches on page 275 Remove the switch from the shipping carton see Unpacking an EX4300 Switch on page 151 Ensure that you have the following parts and tools available Phillips screwdriver number 2 not provi...

Страница 183: ...s Align the two holes in the rear of the side mounting rails with the two holes on the rear of the side panels 3 Insert 4x6 mm Phillips flat head mounting screws into the two aligned holes and tighten the screws by using the screwdriver Ensure that the remaining four holes in the side mounting rails are aligned with the four holes in the side panel See Figure 44 on page 161 Figure 44 Attaching the...

Страница 184: ...ounting BladesintotheSideMounting Rails 3 1 Switch Rear mounting blade 2 Side mounting rail 8 Attach the rear mounting blades to the rear post by using the appropriate screws for your rack Tighten the screws 9 Ensure that the switch chassis is level by verifying that all the screws on the front of the rack are aligned with the screws at the back of the rack NOTE We recommend that you install cover...

Страница 185: ...nless the switch is recessed The switch you are mounting has an uplink module with transceivers installed in it the transceivers in the uplink module ports protrude from the front of the switch To mount the switch in a recessed position on two posts or on four posts follow the instructions in Mounting an EX4300 Switch on Two Posts of a Rack or Cabinet on page 157 or Mounting an EX4300 Switch on Fo...

Страница 186: ...anel of the chassis pointing down to ensure proper airflow and meet safety requirements in the event of a fire NOTE For easier lifting install any additional power supplies only after you mount the switch on the wall To mount the switch on a wall 1 Attach the wall mount brackets to the sides of the chassis by using four of the wall mount bracket screws on each side see the representation in Figure...

Страница 187: ...unting screws see the representation in Figure 48 on page 165 Figure 48 Mounting the Switch on a Wall Hang attached brackets on wall mounted screws g020201 Front panel Rear panel 5 Tighten the mounting screws by using the screwdriver Related Documentation Connecting AC Power to an EX4300 Switch on page 173 Connecting DC Power to an EX4300 Switch on page 176 Connecting and Configuring an EX Series ...

Страница 188: ...ing a DC Power Supply from an EX4300 Switch on page 226 Installing a Fan Module in an EX4300 Switch on page 217 Removing a Fan Module from an EX4300 Switch on page 219 Installing an Uplink Module in an EX4300 Switch on page 229 Removing an Uplink Module from an EX4300 Switch on page 231 Installing a Transceiver in an EX Series Switch on page 235 Removing a Transceiver from a Switch on page 237 Rel...

Страница 189: ...tbepermanently connected to earth ground to adequately ground the chassis and protect the operator from electrical hazards CAUTION Before switch installation begins ensure that a licensed electrician has attached an appropriate grounding lug to the grounding cable that you supply Using a grounding cable with an incorrectly attached lug can damage the switch This topic describes Parts and Tools Req...

Страница 190: ... AWG 2 mm minimum90 Cwire or as permitted by the local code Rear panel of chassis EX3200 Phillips number 2 Two 10 32 x 25 in screws with 10 split lock washer not provided Two 10 flat washers not provided Panduit LCC10 14BWL or equivalent not provided 14 AWG 2 mm minimum90 Cwire or as permitted by the local code Rear panel of chassis EX3300 See Special Instructions to Follow Before Connecting Earth...

Страница 191: ... 2 mm minimum90 Cwire or as permitted by the local code Left side of chassis EX4550 Phillips number 2 Two 20 x 0 5 in screws with split washer provided Two flat washers provided Panduit LCD2 14A Q or equivalent provided The grounding cable must be the same gage as the power feed cables and as permitted by the local code Rear panel of chassis on lower left side EX6210 Phillips number 2 Two 20 x 0 5...

Страница 192: ... C wire or one that complies with the local code Rear panel of chassis EX9208 See Grounding Cable and Lug Specifications for EX9200 Switches Phillips number 2 Two 20 x 0 5 in screws with split washer provided Two flat washers provided Thomas Betts LCN6 14 or equivalent provided One 6 AWG 13 3 mm minimum 60 C wire or one that complies with the local code Rear panel of chassis EX9214 Special Instruc...

Страница 193: ...rack is accessible through the slot on the left rear bracket only if the rack is 27 5 in through 30 5 in deep for a switch mounted flush with the rack front and 29 5 in through 32 5 in deep for a switch mounted 2 in recessed from the rack front EX4300 NOTE If you plan to mount your switch on four posts of a rack or cabinet mount your switch in the rack or cabinet before attaching the grounding lug...

Страница 194: ... not touch or block access to other switch components WARNING Ensure that the cable does not drape where people could trip over it Related Documentation Connecting AC Power to an EX2200 Switch Connecting DC Power to an EX2200 Switch Connecting AC Power to an EX3200 Switch Connecting DC Power to an EX3200 Switch Connecting AC Power to an EX3300 Switch Connecting DC Power to an EX3300 Switch Connect...

Страница 195: ...1100 W AC power supplies depending on the switch model After you install at least one power supply you can connect power to the switch CAUTION Do not mix AC and DC power supplies in the same chassis Power supplies with different airflow labels AIR IN AFI and AIR OUT AFO in the same chassis Fan modules with different airflow labels AIR IN AFI and AIR OUT AFO in the same chassis Power supplies and f...

Страница 196: ...talling a power supply in anEX4300switch see InstallinganACPowerSupplyinanEX4300Switch onpage221 Ensure that you have the following parts and tools available A power cord appropriate for your geographical location provided NOTE Each power supply must be connected to a dedicated power source outlet To connect AC power to an EX4300 switch 1 Attach the grounding strap to your bare wrist and to a site...

Страница 197: ... OFF O position 10 Insert the power cord plug into an AC power source outlet 11 If the AC power source outlet has a power switch set it to the ON position 12 Verify that the IN OK and OUT OK LEDs on each power supply are lit green If the OUT OK LED is lit amber remove power from the power supply and replace the power supply see Removing an AC Power Supply from an EX4300 Switch on page 223 Do not r...

Страница 198: ... you install the power supply module first and then install the DC input wire before closing input breaker ON CAUTION Before you connect power to the device a licensed electrician must attach a cable lug to the grounding and power cables that you supply A cable with an incorrectly attached lug can damage the device for example by causing a short circuit To meet safety and electromagnetic interfere...

Страница 199: ... the power supply In a typical power distribution scheme where the return is connected to chassis ground at the battery plant you can use a multimeter to verify the resistance of the 48V and RTN DC cables to chassis ground The cable with very low resistance indicating a closed circuit to chassis ground is positive and will be installed on the V return DC power input terminal The cable with very hi...

Страница 200: ...erminal for connecting the power supply to earth ground see Figure 52 on page 179 The V terminals are shunted internally together as are the V terminals to provide parallel current path 7 Connect one end of the grounding cable to a proper earth ground such as the rack in which the switch is mounted 8 Place the grounding lug attached to the grounding cable over the earthing terminal on the DC power...

Страница 201: ...e terminal adjacent to the terminal on the DC power supply to which you connected the ring lug of the positive DC power source cable from the first DC power source c Secure the ring lug of the positive DC power source cable from the second DC power source to the other terminal on the power supply d Secure the ring lug of the negative DC power source cable from the second DC power source to the ter...

Страница 202: ...rify that the IN OK and OUT OK LEDs on the power supply are lit green and are on steadily Related Documentation DC Power Supply in EX4300 Switches on page 55 DC Power Supply LEDs in EX4300 Switches on page 59 Copyright 2015 Juniper Networks Inc 180 EX4300 Switch Hardware Guide ...

Страница 203: ...0 External Routing Engine This topic also applies to OCX1100 switches You can monitor and manage these devices by using a dedicated management channel Each device has a management port with an RJ 45 connector for out of band management Use the management port to connect the switch or external Routing Engine to the management device Ensure that you have an Ethernet cable with an RJ 45 connector ava...

Страница 204: ...0 Switches Hardware Overview 2 Connect the other end of the Ethernet cable to the management device Figure54 ConnectingaSwitchtoaNetworkforOut of BandManagement Related Documentation Connecting a Switch to a Management Console on page 183 Management Port Connector Pinout Information for an EX2200 Switch Management Port Connector Pinout Information for an EX3200 Switch Management Port Connector Pin...

Страница 205: ... to connect the device to the management console or to a console server The console port accepts a cable with an RJ 45 connector Ensure that you have an Ethernet cable with an RJ 45 connector available An RJ 45 cable and an RJ 45 to DB 9 serial port adapter are supplied with the device Figure 55 on page 183 shows the RJ 45 connector of the Ethernet cable supplied with the device Figure 55 Ethernet...

Страница 206: ...Hardware Overview 2 Connect the other end of the Ethernet cable into the console server see Figure 56 on page 184 or management console see Figure 57 on page 184 To configure the device from the management console see Connecting and Configuring an EX Series Switch CLI Procedure on page 205 or Connecting and Configuring an EX Series Switch J Web Procedure on page 208 or Connecting and Configuring a...

Страница 207: ... your laptop or PC does not have a DB 9 male connector pin or RJ 45 connector pin you can connect your laptop or PC directly to an EX4300 switch by using a mini USB cable that has a Standard A USB connector on one end and a Mini USB Type B 5 pin connector on the other end This section describes the process of connecting an EX4300 switch to the management console by using the Mini USB Type B consol...

Страница 208: ...ent on page 181 Console Port Connector Pinout Information for an EX Series Switch on page 139 Connecting a Fiber Optic Cable to a Switch EX Series and OCX1100 switches support optical transceivers which are field replaceable units FRUs You can connect fiber optic cables to these transceivers Before you begin connecting a fiber optic cable to an optical transceiver installed in a switch ensure that...

Страница 209: ...tion Disconnecting a Fiber Optic Cable from a Switch on page 242 Installing a Transceiver in an EX Series Switch on page 235 Maintaining Fiber Optic Cables in Switches on page 243 Pluggable Transceivers Supported on EX Series Switches Installing a Transceiver in an OCX1100 Switch Pluggable Transceivers Supported on OCX1100 Switches Connecting EX Series Switches in a Virtual Chassis Fabric A Junipe...

Страница 210: ...guring and then cabling QSFP interfaces into Virtual Chassis ports VCPs On EX4300 switches QSFP ports 0 and 1 are configured as VCP by default Non channelized QSFP interfaces on EX4300 switches can be configured into VCPs All fixed SFP interfaces on EX4300 switches can also be configured into VCPs BEST PRACTICE Use 40 Gigabit QSFP ports as VCPs when available Figure 59 on page 189 shows two QFX510...

Страница 211: ...age the interconnected switches as a single chassis Unlike a Virtual Chassis Fabric VCF which is cabled in a spine and leaf topology the QFX Virtual Chassis is cabled in a ring topology For Virtual Chassis Fabric cabling examples see Connecting a QFX5100 Device in a Virtual Chassis Fabric This topic describes how to cable QFX Series switches and EX4300 switches into a QFX Virtual Chassis Before Yo...

Страница 212: ...itches by configuring multiple interfaces between the same two switches into VCPs When multiple VCPs are interconnecting the same two member switches a Link Aggregation Group LAG bundle is automatically formed when the VCPs are on interfaces supporting identical speeds For instance if you have two 40 Gigabit QSFP interfaces configured as VCPs between member switches a LAG with two member links wit...

Страница 213: ...31 32 33 34 35 36 37 38 39 40 41 42 43 44 45 46 47 0 1 2 3 4 5 6 7 8 9 LA ST LA ST LA ST LA ST Q0 Q1 Q2 Q3 24 25 26 27 28 29 30 31 32 33 34 35 36 37 38 39 40 41 42 43 44 45 46 47 0 1 2 3 4 5 6 7 8 9 LA ST LA ST LA ST LA ST Q0 Q1 Q2 Q3 24 25 26 27 28 29 30 31 32 33 34 35 36 37 38 39 40 41 42 43 44 45 46 47 0 1 2 3 4 5 6 7 8 9 Q0 Q1 LA ST LA ST LA ST LA ST Q2 Q3 24 25 26 27 28 29 30 31 32 33 34 35 3...

Страница 214: ... ST Q0 Q1 Q2 Q3 24 25 26 27 28 29 30 31 32 33 34 35 36 37 38 39 40 41 42 43 44 45 46 47 0 1 2 3 4 5 6 7 8 9 LA ST LA ST LA ST LA ST Q0 Q1 Q2 Q3 24 25 26 27 28 29 30 31 32 33 34 35 36 37 38 39 40 41 42 43 44 45 46 47 0 1 2 3 4 5 6 7 8 9 10 11 12 13 14 15 16 17 18 19 20 21 22 23 10 11 12 13 14 15 16 17 18 19 20 21 22 23 10 11 12 13 14 15 16 17 18 19 20 21 22 23 10 11 12 13 14 15 16 17 18 19 20 21 22...

Страница 215: ...X5100 as the master and backup devices when they are available See Figure 63 on page 193 for an example using the 40 Gigabit QSFP ports and Figure 64 on page 194for an example using both 40 Gigabit and 10 Gigabit SFP ports Figure 65 on page 194 shows QFX5100 24Q switches as the master and backup cabled in a ring to QFX3500 and QFX3600 switches Figure 63 QFX3500 and QFX3600 Mixed Using the 40G Port...

Страница 216: ...12 Q13 LA ST LA ST Q14 Q15 LA ST LA ST C1 S C0 C1 C0 S 10 11 12 13 14 15 16 17 18 19 20 21 22 23 10 11 12 13 14 15 16 17 18 19 20 21 22 23 Figure 65 QFX5100 Master Connecting QFX3600 and QFX3500 Using 40G Ports as VCPs LA ST LA ST LA ST LA ST Q0 Q1 Q2 Q3 24 25 26 27 28 29 30 31 32 33 34 35 36 37 38 39 40 41 42 43 44 45 46 47 0 1 2 3 4 5 6 7 8 9 34 35 36 37 38 39 40 41 42 43 44 45 46 47 ST LA ST LA...

Страница 217: ...es Virtual Chassis CLI Procedure Connecting QFX Series and EX Series Switches in a QFX Virtual Chassis Connecting a QFX5100 Device in a Virtual Chassis Fabric 195 Copyright 2015 Juniper Networks Inc Chapter 13 Connecting the Switch to the Network ...

Страница 218: ...Copyright 2015 Juniper Networks Inc 196 EX4300 Switch Hardware Guide ...

Страница 219: ...ces enables IGMP snooping and enables the LLDP and RSTP protocols The following default configuration file is for an EX4300 24T switch NOTE The factory default configuration file has more interfaces for models that have more ports The poe statement does not appear for models without PoE ports Interfaces ge 0 0 0 through ge 0 0 23 are network port interfaces Interfaces ge 0 2 0 through ge 0 2 3 and...

Страница 220: ...et switching vlan members default storm control default ge 0 0 1 unit 0 family ethernet switching vlan members default storm control default ge 0 0 2 unit 0 family ethernet switching vlan members default storm control default ge 0 0 3 unit 0 family ethernet switching vlan members default storm control default ge 0 0 4 unit 0 Copyright 2015 Juniper Networks Inc 198 EX4300 Switch Hardware Guide ...

Страница 221: ...itching vlan members default storm control default ge 0 0 7 unit 0 family ethernet switching vlan members default storm control default ge 0 0 8 unit 0 family ethernet switching vlan members default storm control default ge 0 0 9 unit 0 family ethernet switching vlan members default storm control default 199 Copyright 2015 Juniper Networks Inc Chapter 14 Performing Initial Configuration ...

Страница 222: ...ge 0 0 12 unit 0 family ethernet switching vlan members default storm control default ge 0 0 13 unit 0 family ethernet switching vlan members default storm control default ge 0 0 14 unit 0 family ethernet switching vlan members default storm control default ge 0 0 15 unit 0 family ethernet switching vlan Copyright 2015 Juniper Networks Inc 200 EX4300 Switch Hardware Guide ...

Страница 223: ...bers default storm control default ge 0 0 18 unit 0 family ethernet switching vlan members default storm control default ge 0 0 19 unit 0 family ethernet switching vlan members default storm control default ge 0 0 20 unit 0 family ethernet switching vlan members default storm control default 201 Copyright 2015 Juniper Networks Inc Chapter 14 Performing Initial Configuration ...

Страница 224: ...23 unit 0 family ethernet switching vlan members default storm control default ge 0 2 0 unit 0 family ethernet switching vlan members default storm control default xe 0 2 0 unit 0 family ethernet switching vlan members default storm control default ge 0 2 1 unit 0 family ethernet switching vlan members default Copyright 2015 Juniper Networks Inc 202 EX4300 Switch Hardware Guide ...

Страница 225: ...m control default xe 0 2 2 unit 0 family ethernet switching vlan members default storm control default ge 0 2 3 unit 0 family ethernet switching vlan members default storm control default xe 0 2 3 unit 0 family ethernet switching vlan members default storm control default forwarding options 203 Copyright 2015 Juniper Networks Inc Chapter 14 Performing Initial Configuration ...

Страница 226: ... ge 0 0 14 interface ge 0 0 15 interface ge 0 0 16 interface ge 0 0 17 interface ge 0 0 18 interface ge 0 0 19 interface ge 0 0 20 interface ge 0 0 21 interface ge 0 0 22 interface ge 0 0 23 interface ge 0 0 24 interface ge 0 0 25 interface ge 0 0 26 interface ge 0 0 27 interface ge 0 0 28 interface ge 0 0 29 interface ge 0 0 30 interface ge 0 0 31 interface ge 0 0 32 interface ge 0 0 33 interface...

Страница 227: ...EX Series Switches EX Series Switches Interfaces Overview Connecting and Configuring an EX Series Switch CLI Procedure There are two ways to connect and configure an EX Series switch one method is through the console by using the CLI and the other is by using the J Web interface NOTE EX2200 24T 4G DC switches do not support switch connection and configuration through the J Web interface This topic...

Страница 228: ...nel of an EX4500 Switch See EX4550 Switches Hardware Overview See Switch Fabric and Routing Engine SRE Module in an EX6200 Switch See Switch Fabric and Routing Engine SRE Module in an EX8208 Switch See Routing Engine RE Module in an EX8216 Switch NOTE In EX2200 C EX4300 and EX4550 switches you can also use the Mini USB Type B console port to connect to a laptop or PC For EX2200 C switches see Conn...

Страница 229: ...gement you use a dedicated management channel MGMT port to connect to the management device Specify the IP address and gateway of the management interface Use this IP address to connect to the switch 7 Specify the SNMP read community location and contact to configure SNMP parameters These parameters are optional 8 Specify the system date and time Select the time zone from the list These options ar...

Страница 230: ...ection and configuration through J Web procedure This topic describes the J Web procedure NOTE Before you begin the configuration enable a DHCP client on the management PC that you will connect to the switch so that the PC can obtain an IP address dynamically NOTE Read the following steps before you begin the configuration You must complete the initial configuration by using EZSetup within 10 minu...

Страница 231: ...n press the Enter button 2 Press Menu until you see ENTER EZSetup Then press Enter If EZSetup does not appear as an option in the menu select Factory Default to return the switch to the factory default configuration EZSetup is displayed in the menu of standalone switches only when a switch is set to the factory default configuration 3 Press Enter to confirm setup and continue with EZSetup 2 Connec...

Страница 232: ...tional Enter a password and reenter the password Specify the time zone Synchronize the date and time settings of the switch with the management PC or set them manually by selecting the appropriate option button This is optional Click Next 7 Use the Management Options page to select the management scenario NOTE On EX4500 EX6210 and EX8200 switches only the out of band management option is available...

Страница 233: ...ated Documentation Connecting and Configuring an EX Series Switch CLI Procedure on page 205 Installing and Connecting an EX2200 Switch Installing and Connecting an EX3200 Switch Installing and Connecting an EX3300 Switch Installing and Connecting an EX4200 Switch Installing and Connecting an EX4300 Switch on page 155 Installing and Connecting an EX4500 Switch Installing and Connecting an EX4550 Sw...

Страница 234: ...commands See the lcd menu statement for details To disable a menu edit user switch set chassis lcd menu menu item menu name disable To enable a menu edit user switch delete chassis lcd menu menu item menu name disable To disable a menu option edit user switch set chassis lcd menu menu item menu option disable To enable a menu option edit user switch delete chassis lcd menu menu item menu option di...

Страница 235: ...lay message message fpc slot slot number permanent NOTE The buttons on the LCD panel are disabled when the LCD is configured to display a custom message To disable the display of the custom message user switch clear chassis display message You can view the custom message by issuing the show chassis lcd command Related Documentation LCD Panel in EX3200 Switches LCD Panel in EX3300 Switches LCD Pane...

Страница 236: ...Copyright 2015 Juniper Networks Inc 214 EX4300 Switch Hardware Guide ...

Страница 237: ...on page 217 Replacing Power Supply on page 221 Replacing Uplink Module on page 229 Replacing Transceiver on page 235 Maintaining and Replacing Fiber Optic Cable on page 241 Contacting Customer Support and Returning the Chassis or Components on page 245 215 Copyright 2015 Juniper Networks Inc ...

Страница 238: ...Copyright 2015 Juniper Networks Inc 216 EX4300 Switch Hardware Guide ...

Страница 239: ...labels AIR IN AFI and AIR OUT AFO in the same chassis Power supplies with different airflow labels AIR IN AFI and AIR OUT AFO in the same chassis Power supplies and fan modules with different airflow labels AIR IN AFI and AIR OUT AFO in the same chassis AC and DC power supplies in the same chassis Before you install a fan module in the switch Ensure you understand how to prevent electrostatic disc...

Страница 240: ...it is fully seated 5 Tighten the captive screws on the faceplate of the fan module by using your fingers If you are unable to tighten the captive screws by using your fingers use the screwdriver Figure 68 Installing a Fan Module in a 24 Port EX4300 Switch NOTE If you have a Juniper J Care service contract register any addition change or upgrade of hardware components at https www juniper net custo...

Страница 241: ...ag or the antistatic mat on a flat stable surface 2 Loosen the captive screws on the front faceplate of the fan module by using your fingers If you are unable to loosen the captive screws by using your fingers use the screwdriver WARNING To prevent injury do not touch the fan with your hands or any tools as you slide the fan module out of the chassis the fan might still be running 3 Grasp the hand...

Страница 242: ...an Module in an EX4300 Switch on page 217 Installing and Removing EX4300 Switch Hardware Components on page 165 Cooling System and Airflow in an EX4300 Switch on page 41 Field Replaceable Units in EX4300 Switches on page 24 EX4300 Switches Hardware Overview on page 3 Copyright 2015 Juniper Networks Inc 220 EX4300 Switch Hardware Guide ...

Страница 243: ...isrupting switch functions CAUTION Do not mix AC and DC power supplies in the same chassis Power supplies with different airflow labels AIR IN AFI and AIR OUT AFO in the same chassis Fan modules with different airflow labels AIR IN AFI and AIR OUT AFO in the same chassis Power supplies and fan modules with different airflow labels AIR IN AFI and AIR OUT AFO in the same chassis Before you install a...

Страница 244: ...nel Save the cover panel for later use 4 Taking care not to touch power supply pins leads or solder connections remove the power supply from the bag 5 Using both hands place the power supply in the power supply slot on the rear panel of the switch and slide it in until it is fully seated and the ejector lever fits into place Figure 70 Installing an AC Power Supply in an EX4300 Switch NOTE If you h...

Страница 245: ...or a cover panel for the power supply slot CAUTION We recommend that you install either a replacementpower supply or a cover panel in the empty power supply slot to prevent chassis overheating and dust accumulation NOTE The power supply slots are at the right end of the rear panel on 24 port and 48 port switches and at the left end on 32 port switches Figure 71 on page 224 shows how to remove an A...

Страница 246: ...71 Removing an AC Power Supply from an EX4300 Switch Related Documentation Installing an AC Power Supply in an EX4300 Switch on page 221 Installing and Removing EX4300 Switch Hardware Components on page 165 AC Power Supply Specifications for EX4300 Switches on page 97 Field Replaceable Units in EX4300 Switches on page 24 AC Power Cord Specifications for an EX4300 Switch on page 98 EX4300 Switches ...

Страница 247: ... port or 48 port switches The procedure is the same for 32 port switches To install a DC power supply in the switch 1 Ensure that you have the correct power supply The label AIR IN AFI or AIR OUT AFO on the power supply must match the label AIR IN AFI or AIR OUT AFO on the installed fan module 2 Attach the ESD grounding strap to your bare wrist and connect the strap to the ESD point on the chassis...

Страница 248: ...s on page 55 EX4300 Switches Hardware Overview on page 3 Removing a DC Power Supply from an EX4300 Switch The power supply in EX4300 switches is a hot removable and hot insertable field replaceable unit FRU installed in the rear panel of the switch You can remove and replace it without powering off the switch or disrupting switch functions Before you begin removing a power supply from the switch E...

Страница 249: ...he cover either to the left or right 5 Unscrew the locking screws counterclockwise by using the screwdriver 6 Remove the cable lugs from the input DC terminals 7 Slide the ejector lever toward the left until the power supply is unseated 8 Grasp the power supply handle and pull firmly to slide the power supply halfway out of the chassis 9 Taking care not to touch power supply pins leads or solder c...

Страница 250: ...Copyright 2015 Juniper Networks Inc 228 EX4300 Switch Hardware Guide ...

Страница 251: ...ns to prevent ESD damage see Prevention of Electrostatic Discharge Damage on page 299 Ensure that you have the following parts and tools available Electrostatic discharge ESD grounding strap If a grounding strap is not available follow the alternative grounding method described in Step 1 of the following procedure Phillips screwdriver number 2 To install an uplink module in the switch see Figure 7...

Страница 252: ...components pins leads or solder connections remove the uplink module from its bag CAUTION Before you slide the uplink module into the slot on the switch chassis ensure the uplink module is aligned correctly Misalignment might cause the pins to bend making the uplink module unusable 4 Using both hands place the module in the empty slot and slide it in gently until it is fully seated 5 Tighten both ...

Страница 253: ...edure EX4300 Switches Hardware Overview on page 3 Removing an Uplink Module from an EX4300 Switch The uplink module in EX4300 switches is hot removable and hot insertable field replaceable unit FRU You can remove and replace it without powering off the switch or disrupting switch functions Before you begin removing an uplink module from the switch Ensure that you have taken the necessary precautio...

Страница 254: ...gers If you are unable to unscrew the captive screws by using your fingers use the screwdriver 4 Hold both the ejector handles and gently pull the uplink module toward you and out of the module slot 5 Place the uplink module in an antistatic bag or on an antistatic mat placed on a flat stable surface 6 If you are not replacing the uplink module install the cover panel over the slot NOTE After you ...

Страница 255: ...nstalling an Uplink Module in an EX4300 Switch on page 229 Installing and Removing EX4300 Switch Hardware Components on page 165 Field Replaceable Units in EX4300 Switches on page 24 EX4300 Switches Hardware Overview on page 3 233 Copyright 2015 Juniper Networks Inc Chapter 17 Replacing Uplink Module ...

Страница 256: ...Copyright 2015 Juniper Networks Inc 234 EX4300 Switch Hardware Guide ...

Страница 257: ...rks with your Juniper Networks device CAUTION If you are having a problem running a Juniper Networks device that is using a third party optic or cable the Juniper Networks Technical Assistance Center JTAC can help you diagnose the source of the problem Your JTAC engineer might recommend that you check the third party optic or cable and potentially replace it with an equivalent Juniper Networks opt...

Страница 258: ...er light 3 If the port in which you want to install the transceiver is covered with a dust cover remove the dust cover and save it in case you need to cover the port later If you are hot swapping a transceiver wait for at least 10 seconds after removing the transceiver from the port before installing a new transceiver 4 Using both hands carefully place the transceiver in the empty port The connect...

Страница 259: ...e operational commands Before you begin removing a transceiver from a switch ensure that you have taken the necessary precautions for safe handling of lasers see Laser and LED Safety Guidelines and Warnings for Switches on page 285 Ensure that you have the following parts and tools available An antistatic bag or an antistatic mat Rubber safety caps to cover the transceiver and fiber optic cable co...

Страница 260: ...an and prevents accidental exposure to laser light CAUTION Do not bend fiber optic cables beyond their minimum bend radius An arc smaller than a few inches in diameter can damage the cables and cause problems that are difficult to diagnose 3 Remove the cable connected to the transceiver see Disconnecting a Fiber Optic CablefromaSwitch onpage242 Coverthetransceiverandtheendofeachfiber optic cable c...

Страница 261: ...tor lever 5 To remove a CFP transceiver a Loosen the screws on the transceiver by using your fingers b Grasp the screws on the transceiver and gently slide the transceiver approximately 0 5 in 1 3 cm straight out of the port CAUTION To prevent electrostatic discharge ESD damage to the transceiver do not touch the connector pins at the end of the transceiver 6 By using your fingers grasp the body o...

Страница 262: ... Installing a Transceiver in an OCX1100 Switch Pluggable Transceivers Supported on OCX1100 Switches Copyright 2015 Juniper Networks Inc 240 EX4300 Switch Hardware Guide ...

Страница 263: ...at you have taken the necessary precautions for safe handling of lasers see Laser and LED Safety Guidelines and Warnings for Switches on page 285 To connect a fiber optic cable to an optical transceiver installed in a switch WARNING Do not look directly into a fiber optic transceiver or into the ends offiber opticcables Fiber optictransceiversandfiber opticcablesconnected to transceivers emit lase...

Страница 264: ...eiver in an EX Series Switch on page 235 Maintaining Fiber Optic Cables in Switches on page 243 Pluggable Transceivers Supported on EX Series Switches Installing a Transceiver in an OCX1100 Switch Pluggable Transceivers Supported on OCX1100 Switches Disconnecting a Fiber Optic Cable from a Switch EX Series switches and OCX1100 switches have field replaceable unit FRU optical transceivers to which ...

Страница 265: ...s on page 243 Pluggable Transceivers Supported on EX Series Switches Pluggable Transceivers Supported on OCX1100 Switches Maintaining Fiber Optic Cables in Switches Fiber optic cables connect to optical transceivers that are installed in EX Series switches and OCX1100 switches To maintain fiber optic cables When you unplug a fiber optic cable from a transceiver place rubber safety caps over the tr...

Страница 266: ...leaning device such as RIFOCSFiberOpticAdaptorCleaningWands partnumber946 Followthedirections in the cleaning kit you use After cleaning the transceiver make sure that the connector tip of the fiber optic cable is clean Use only an approved alcohol free fiber optic cable cleaning kit such as the Opptex Cletop S Fiber Cleaner Follow the directions in the cleaning kit you use Related Documentation C...

Страница 267: ...cating the Serial Number on an EX4300 Switch or Component on page 246 2 Obtain an Return Materials Authorization RMA number from JTAC as described in Contacting Customer Support to Obtain Return Materials Authorization for Switches on page 250 NOTE Do not return any component to Juniper Networks unless you have first obtained an RMA number Juniper Networks reserves the right to refuse shipments th...

Страница 268: ...is Serial Number ID Label on an EX4300 Switch on page 247 Locating the Serial Number ID Labels on FRUs in an EX4300 Switch on page 247 Listing the Switch and Components Details with the CLI To list the switch and switch components and their serial numbers enter the following CLI command show chassis hardware The following output lists the switch components and serial numbers for an EX4300 48P swit...

Страница 269: ... on FRUs in an EX4300 Switch The power supplies fan modules and uplink modules installed in EX4300 switches are field replaceable units FRUs For each of these FRUs you must remove the FRU from the switch chassis to see the FRU s serial number ID label Power Supply The serial number ID label is on the top of the power supply Figure 85 on page 248 shows the location of the serial number ID label on ...

Страница 270: ...X4300 Switch Fan module The serial number ID label is on the front bottom lip of the fan module Figure 87 on page 248 shows the location of the serial number ID label See Removing a Fan Module from an EX4300 Switch on page 219 Figure 87 Location of the Serial Number ID Label on the Fan Module Used in an EX4300 Switch Copyright 2015 Juniper Networks Inc 248 EX4300 Switch Hardware Guide ...

Страница 271: ... Switch on page 231 Figure 88 Location of the Serial Number ID Label on the QSFP Uplink Module S N RY3113470002 Figure 89 Location of the Serial Number ID Label on the 4 Port SFP Uplink Module g022102 Figure 90 Location of the Serial Number ID Label on the 8 Port SFP Uplink Module g022146 S N RX3114020039 Related Documentation Contacting Customer Support to Obtain Return Materials Authorization fo...

Страница 272: ...Locating the Serial Number on an EX4550 Switch or Component See Locating the Serial Number on an EX4600 Switch or Component See Locating the Serial Number on an EX6200 Switch or Component See Locating the Serial Number on an EX8200 Switch or Component See Locating the Serial Number on an EX9204 Switch or Component See Locating the Serial Number on an EX9208 Switch or Component See Locating the Ser...

Страница 273: ...Shipping Packing an EX4300 Switch or Component for Shipping on page 252 Packing an EX4500 Switch or Component for Shipping Packing an EX4550 Switch or Component for Shipping Packing an EX6200 Switch or Component Packing an EX8200 Switch or Component Packing an EX9200 Switch or Component Packing an EX Series Redundant Power System or Redundant Power System Components for Shipping Returning an EX220...

Страница 274: ...vent electrostatic discharge ESD damage See Prevention of Electrostatic Discharge Damage on page 299 This topic describes 1 Packing an EX4300 Switch for Shipping on page 252 2 Packing EX4300 Switch Components for Shipping on page 253 Packing an EX4300 Switch for Shipping If you need to transport the switch to another location or return the switch to Juniper Networks you need to pack the switch sec...

Страница 275: ...e the screwdriver to remove the rack mounting brackets from the switch chassis 4 Place the switch in an antistatic bag 5 Place the bottom portion of the packaging foam in the shipping carton 6 Place the switch inside the cavity in the bottom packaging foam 7 Place the top portion of the packaging foam on top of the switch 8 If you are returning accessories or field replaceable units FRUs with the ...

Страница 276: ...be able to support the weight of the component Ensure that the components are adequately protected by wrapping them well with packing materials Pack the component in an oversized box if the original box is not available with extra packing material around the unit so that the component is prevented from moving around inside the box Securely tape the box closed Write the RMA number on the exterior o...

Страница 277: ...PART 5 Troubleshooting Alarms and Syslog Messages on page 257 255 Copyright 2015 Juniper Networks Inc ...

Страница 278: ...Copyright 2015 Juniper Networks Inc 256 EX4300 Switch Hardware Guide ...

Страница 279: ...o conditions that might prevent normal operation On a switch the alarm signal is the ALM LED lit on the front of the chassis alarm Failure event that triggers an alarm alarm condition Seriousness of the alarm If the Alarm ALM LED is red this indicates a major alarm If the Alarm LED is yellow this indicates a minor alarm If the Alarm LED is unlit there is no alarm or the switch is halted alarm seve...

Страница 280: ...ates a noncritical condition on the switch that if left unchecked might cause an interruption in service or degradation in performance A yellow alarm condition requires monitoring or maintenance A missing rescue configuration generates a yellow system alarm Related Documentation Checking Active Alarms with the J Web Interface on page 258 Dashboard for EX Series Switches on page 61 Checking Active ...

Страница 281: ...ages on page 259 Dashboard for EX Series Switches on page 61 Understanding Alarm Types and Severity Levels on EX Series Switches on page 257 Monitoring System Log Messages Purpose NOTE This topic applies only to the J Web Application package Use the monitoring functionality to filter and view system log messages for EX Series switches Action To view events in the J Web interface select Monitor Eve...

Страница 282: ... calendar that allows you to select the year month day and time It also allows you to select the local time By default the messages generated in the last hour are displayed End Time shows the current time and Start Time shows the time one hour before End Time Date From To To specify events with a specific ID type the partial or complete ID for example TFTPD_AF_ERR Specifies the event ID for which ...

Страница 283: ...ent details Generate Report NOTE The Generate Report button appears only after event log messages are completely loaded in the Events Detail table The Generate Raw Report button is displayed while event log messages are being loaded Meaning Table 91 on page 261 describes the Event Summary fields NOTE By default the View Events page in the J Web interface displays the most recent 25 events with sev...

Страница 284: ...quire immediate correction such as a corrupted system database Emergency Red Indicates system panic or other conditions that cause the switch to stop functioning Severity The event ID begins with a prefix that indicates the generating software process Some processes on a switch do not use codes This field might be blank in a message generated from such a process An event can belong to one of the f...

Страница 285: ...271 Installation Safety Guidelines and Warnings on page 273 Radiation and Laser Safety Guidelines and Warnings on page 285 Maintenance and Operational Safety Warnings on page 291 Electrical Safety Guidelines and Warnings on page 297 Agency Approvals and Compliance Statements on page 315 263 Copyright 2015 Juniper Networks Inc ...

Страница 286: ...Copyright 2015 Juniper Networks Inc 264 EX4300 Switch Hardware Guide ...

Страница 287: ...se good judgment at all times Perform only the procedures explicitly described in the hardware documentation for this device Make sure that only authorized service personnel perform other system services Keep the area around the device clear and free from dust before during and after installation Keep tools away from areas where people could trip over them while walking Do not wear loose clothing ...

Страница 288: ...tallation screws are fully tightened Related Documentation AC Power Electrical Safety Guidelines on page 301 DC Power Electrical Safety Guidelines on page 304 General Electrical Safety Guidelines and Warnings on page 297 Maintenance and Operational Safety Guidelines and Warnings on page 291 Installation Instructions Warning on page 273 Grounded Equipment Warning on page 282 Definitions of Safety W...

Страница 289: ...arnung Dieses Warnsymbol bedeutet Gefahr Sie befinden sich in einer Situation die zu einer Körperverletzung führen könnte Bevor Sie mit der Arbeit an irgendeinem Gerät beginnen seien Sie sich der mit elektrischen Stromkreisen verbundenen Gefahren und der Standardpraktiken zur Vermeidung von Unfällen bewußt Avvertenza Questo simbolo di avvertenza indica un pericolo La situazione potrebbe causare in...

Страница 290: ...es to hardware devices in the EX Series product family which includes EX Series switches the EX Series Redundant Power System RPS and the XRE200 External Routing Engine This topic also applies to hardware devices in the QFX Series and to OCX1100 switches WARNING Only trained and qualified personnel should install or replace the device Waarschuwing Installatie en reparaties mogen uitsluitend door g...

Страница 291: ...age 301 DC Power Electrical Safety Guidelines on page 304 Warning Statement for Norway and Sweden This topic applies to hardware devices in the EX Series product family which includes EX Series switches the EX Series Redundant Power System RPS and the XRE200 External Routing Engine This topic also applies to hardware devices in the QFX Series and to OCX1100 switches WARNING The equipment must be c...

Страница 292: ...Copyright 2015 Juniper Networks Inc 270 EX4300 Switch Hardware Guide ...

Страница 293: ...ity of the equipment and that all local fire safety and electrical codes and ordinances be observed when you install and operate your equipment Fire Suppression In the event of an electrical hazard or an electrical fire you should first turn power off to the equipment at the source Then use a Type C fire extinguisher which uses noncorrosive fire retardants to extinguish the fire Fire Suppression E...

Страница 294: ...a fire at or near a Juniper Networks switch or other network device provided by Juniper If a dry chemical fire extinguisher is used the unit is no longer eligible for coverage under a service agreement We recommend that you dispose of any irreparably damaged equipment in an environmentally responsible manner Related Documentation General Safety Guidelines and Warnings on page 265 General Electrica...

Страница 295: ...0 External Routing Engine This topic also applies to hardware devices in the QFX Series and to OCX1100 switches WARNING Read the installation instructions before you connect the device to a power source WaarschuwingRaadpleegdeinstallatie aanwijzingenvoordatuhetsysteem met de voeding verbindt VaroitusLueasennusohjeetennenjärjestelmänyhdistämistävirtalähteeseen AttentionAvantdebrancherlesystèmesurla...

Страница 296: ...Connecting AC Power to an EX4200 Switch Connecting AC Power to an EX4300 Switch on page 173 Connecting AC Power to an EX4500 Switch Connecting AC Power to an EX4550 Switch Connecting AC Power to an EX4600 Switch Connecting AC Power to an EX6200 Switch Connecting AC Power to an EX8200 Switch Connecting AC Power to an EX9204 Switch Connecting AC Power to an EX9208 Switch Connecting AC Power to an EX...

Страница 297: ...e Connecting DC Power to a QFX5100 Device Chassis Lifting Guidelines for EX4300 Switches The weight of an EX4300 switch is approximately 13 lb 5 9 kg Observe the following guidelines for lifting and moving the switch Before moving the switch to a site ensure that the site meets the power environmental and clearance requirements specified in the Site Preparation Checklist for EX4300 Switches on pag...

Страница 298: ...t une clé ou tout autre moyen de sécurité L accès aux zones de sécurité est sous le contrôle de l autorité responsable de l emplacement Warnung Diese Einheit ist zur Installation in Bereichen mit beschränktem Zutritt vorgesehen Ein Bereich mit beschränktem Zutritt ist ein Bereich zu dem nur Wartungspersonal mit einem Spezialwerkzeugs Schloß und Schlüssel oder anderer Sicherheitsvorkehrungen Zugang...

Страница 299: ... This topic applies to hardware devices in the EX Series product family which includes EX Series switches the EX Series Redundant Power System RPS and the XRE200 External Routing Engine This topic also applies to hardware devices in the QFX Series and to OCX1100 switches WARNING When installing the device do not use a ramp inclined at more than 10 degrees Waarschuwing Gebruik een oprijplaat niet o...

Страница 300: ...only unit in the rack When mounting the device on a partially filled rack load the rack from the bottom to the top with the heaviest component at the bottom of the rack If the rack is provided with stabilizing equipment install the stabilizers before mounting or servicing the device in the rack Waarschuwing Om lichamelijk letsel te voorkomen wanneer u dit toestel in een rek monteert of het daar ee...

Страница 301: ...ette unité est montée dans un casier partiellement rempli charger le casier de bas en haut en plaçant l élément le plus lourd dans le bas Si le casier est équipé de dispositifs stabilisateurs installer les stabilisateurs avant de monter ou de réparer l unité en casier Warnung Zur Vermeidung von Körperverletzungbeim Anbringen oder Warten dieser Einheit in einem Gestell müssen Sie besondere Vorkehru...

Страница 302: ...nheten i kabinettet Ved montering av denne enheten i et kabinett som er delvis fylt skal kabinettet lastes fra bunnen og opp med den tyngste komponenten nederst i kabinettet Hvis kabinettet er utstyrt med stabiliseringsutstyr skal stabilisatorene installeres før montering eller utføring av reparasjonsarbeid på enheten i kabinettet Aviso Para se prevenir contra danos corporais ao montar ou reparar ...

Страница 303: ...nde riktlinjer ges för att trygga din säkerhet Juniper Networks switch måste installeras i en ställning som är förankrad i byggnadens struktur Om denna enhet är den enda enheten på ställningen skall den installeras längst ned på ställningen Om denna enhet installeras på en delvis fylld ställning skall ställningen fyllasnedifrånochupp meddetyngstaenheternalängstnedpåställningen Omställningenärförse...

Страница 304: ...Warning for EX4300 Switches WARNING When mounting an EX4300 switch chassis in a vertical position orient the front panel of the chassis downward to ensure proper airflow and meet safety requirements in the event of a fire Related Documentation Mounting an EX4300 Switch on a Wall on page 163 Grounded Equipment Warning This topic applies to hardware devices in the EX Series product family which incl...

Страница 305: ...el Dette utstyret skal jordes Forviss deg om vertsterminalen er jordet ved normalt bruk Aviso Este equipamento deverá estar ligado à terra Certifique se que o host se encontra ligado à terra durante a sua utilização normal Atención Este equipo debe conectarse a tierra Asegurarse de que el equipo principal esté conectado a tierra durante el uso normal Varning Denna utrustning är avsedd att jordas S...

Страница 306: ...Copyright 2015 Juniper Networks Inc 284 EX4300 Switch Hardware Guide ...

Страница 307: ...Laser Safety Guidelines on page 285 Class 1 Laser Product Warning on page 286 Class 1 LED Product Warning on page 286 Laser Beam Warning on page 287 General Laser Safety Guidelines When working around ports that support optical transceivers observe the following safety guidelines to prevent eye injury Do not look into unterminated ports or at fibers that connect to unknown sources Do not examine u...

Страница 308: ...oducto láser Clase I Varning Laserprodukt av klass 1 Class 1 LED Product Warning WARNING Class 1 LED product Waarschuwing Klasse 1 LED product Varoitus Luokan 1 valodiodituote Attention Alarme de produit LED Class I Warnung Class 1 LED Produktwarnung WARNING Avvertenza Avvertenza prodotto LED di Classe 1 Advarsel LED produkt i klasse 1 Aviso Produto de classe 1 com LED Atención Aviso sobre product...

Страница 309: ...icken und ihn nicht direkt mit optischen Geräten prüfen WARNING Avvertenza Non fissare il raggio con gli occhi né usare strumenti ottici per osservarlo direttamente WARNING Advarsel Stirr eller se ikke direkte p strlen med optiske instrumenter WARNING Aviso Não olhe fixamente para o raio nem olhe para ele directamente com instrumentos ópticos WARNING Atención No mirar fijamente el haz ni observarl...

Страница 310: ... emittoitua näkymätöntä säteilyä kun kuitukaapelia ei ole kytkettynä vältä säteilylle altistumista äläkä katso avoimiin aukkoihin Attention Des radiations invisibles à l il nu pouvant traverser l ouverture du port lorsqu aucun câble en fibre optique n y est connecté il est recommandé de ne pas regarder fixement l intérieur de ces ouvertures Warnung Aus der Port Öffnung können unsichtbare Strahlen ...

Страница 311: ...bör därför undvika att bli utsatt för strålning genom att inte stirra in i oskyddade öppningar Related Documentation General Safety Guidelines and Warnings on page 265 Laser and LED Safety Guidelines and Warnings for Switches on page 285 Installation Instructions Warning on page 273 Grounded Equipment Warning on page 282 Laser and LED Safety Guidelines and Warnings for the QFX Series 289 Copyright...

Страница 312: ...Copyright 2015 Juniper Networks Inc 290 EX4300 Switch Hardware Guide ...

Страница 313: ...n page 293 Operating Temperature Warning on page 294 Product Disposal Warning on page 295 Battery Handling Warning WARNING Replacing a battery incorrectly might result in an explosion Replace a battery only with the same or equivalent type recommended by the manufacturer Dispose of used batteries according to the manufacturer s instructions Waarschuwing Er is ontploffingsgevaar als de batterij ver...

Страница 314: ...nte Atención Existe peligro de explosión si la batería se reemplaza de manera incorrecta Reemplazar la batería exclusivamente con el mismo tipo o el equivalente recomendado por el fabricante Desechar las baterías gastadas según las instrucciones del fabricante Varning Explosionsfara vid felaktigt batteribyte Ersätt endast batteriet med samma batterityp som rekommenderas av tillverkaren eller motsv...

Страница 315: ...utstyr som er koblet til kraftledninger Metallgjenstander som er koblet til kraftledninger og jord blir svært varme og kan forårsake alvorlige brannskader eller smelte fast til polene Aviso Antes de trabalhar em equipamento que esteja ligado a linhas de corrente retire todas as jóias que estiver a usar incluindo anéis fios e relógios Os objectos metálicos aquecerão em contacto com a corrente e em ...

Страница 316: ...pla loss kablar Operating Temperature Warning WARNING To prevent the device from overheating do not operate it in an area that exceeds the maximum recommended ambient temperature of 104 F 40 C for EX6200 switches EX8208 switches EX8216 switches QFXSeriesdevices OCX1100switches andXRE200ExternalRoutingEngines and 113 F 45 C for EX2200 EX3300 EX3200 EX4200 EX4300 EX4500 and EX4550 switches To preven...

Страница 317: ... er minst 15 2 cm 6 tommer for å forhindre nedsatt luftsirkulasjon Aviso Para evitar o sobreaquecimento do encaminhador Juniper Networks switch não utilize este equipamento numa área que exceda a temperatura máxima recomendada de 40 C Para evitar a restrição à circulação de ar deixe pelo menos um espaço de 15 2 cm à volta das aberturas de ventilação Atención Para impedir que un encaminador de la s...

Страница 318: ... deverá ser efectuada de acordo com os regulamentos e a legislação nacional Atención El desecho final de este producto debe realizarse según todas las leyes y regulaciones nacionales Varning Slutlig kassering av denna produkt bör skötas i enlighet med landets alla lagar och föreskrifter Related Documentation General Safety Guidelines and Warnings on page 265 General Electrical Safety Guidelines an...

Страница 319: ...EX Series product family which includes EX Series switches the EX Series Redundant Power System RPS and the XRE200 External Routing Engine This topic also applies to hardware devices in the QFX Series and to OCX1100 switches WARNING Certain ports on the device are designed for use as intrabuilding within the building interfaces only Type 2 or Type 4 ports as described in GR 1089 CORE and require i...

Страница 320: ... power is disconnected from a circuit Always check the circuit before starting to work Carefully look for possible hazards in your work area such as moist floors ungrounded power extension cords and missing safety grounds Operate the device within marked electrical ratings and product usage instructions To ensure that the device and peripheral equipment function safely and correctly use the cables...

Страница 321: ...y voltages as low as 30 V You can easily generate potentially damaging static voltages whenever you handle plastic or foam packing material or if you move components across plastic or carpets Observe the following guidelines to minimize the potential for electrostatic discharge ESD damage which can cause intermittent or complete component failures Always use an ESD grounding strap when you are han...

Страница 322: ...onnecting them to the system Related Documentation General Safety Guidelines and Warnings on page 265 See EX2200 Switches Hardware Overview for the ESD point location See Rear Panel of an EX3200 Switch for the ESD point location See Rear Panel of an EX3300 Switch for the ESD point location See Rear Panel of an EX4200 Switch for the ESD point location See EX4300 Switches Hardware Overview on page 3...

Страница 323: ...SPD must be used at the AC power source The following electrical safety guidelines apply to AC powered devices Note the following warnings printed on the device CAUTION THIS UNIT HAS MORE THAN ONE POWER SUPPLY CORD DISCONNECT ALL POWER SUPPLY CORDS BEFORE SERVICING TO AVOID ELECTRIC SHOCK ATTENTION CET APPAREIL COMPORTE PLUS D UN CORDON D ALIMENTATION AFIN DE PRÉVENIR LES CHOCS ÉLECTRIQUES DÉBRANC...

Страница 324: ...200 Switch Connecting AC Power to an EX4300 Switch on page 173 Connecting AC Power to an EX4500 Switch Connecting AC Power to an EX4550 Switch Connecting AC Power to an EX4600 Switch Connecting AC Power to an EX6200 Switch Connecting AC Power to an EX8200 Switch Connecting AC Power to an EX9204 Switch Connecting AC Power to an EX9208 Switch Connecting AC Power to an EX9214 Switch Connecting AC Pow...

Страница 325: ...on Avant de travailler sur un châssis ou à proximité d une alimentation électrique débrancher le cordon d alimentation des unités en courant alternatif Warnung Bevor Sie an einem Chassis oder in der Nähe von Netzgeräten arbeiten ziehen Sie bei Wechselstromeinheiten das Netzkabel ab bzw Avvertenza Prima di lavorare su un telaio o intorno ad alimentatori scollegare il cavo di alimentazione sulle uni...

Страница 326: ...itches Minimum of 60 A at 48 VDC for EX8208 switches Minimum of 100 A at 48 VDC for EX8216 switches Minimumof7Aat 48VDCforQFX3500 EX4600 andQFX5100devices Minimum of 8 A at 48 VDC for QFX3600 devices Minimum of 7 A at 48 VDC for OCX1100 switches Incorporate an easily accessible disconnect device into the facility wiring Be sure to connect the ground wire or conduit to a solid office earth ground A...

Страница 327: ...ctrical Safety Guidelines and Warnings on page 297 DC Power Disconnection Warning on page 306 DC Power Grounding Requirements and Warning on page 307 DC Power Wiring Sequence Warning on page 308 DC Power Wiring Terminations Warning on page 310 Connecting DC Power to an EX2200 Switch Connecting DC Power to an EX3200 Switch Connecting DC Power to an EX4200 Switch Connecting DC Power to an EX4300 Swi...

Страница 328: ...ttä se pysyy KATKAISTU asennossa Attention Avant de pratiquer l une quelconque des procédures ci dessous vérifier que le circuit en courant continu n est plus sous tension Pour en être sûr localiser le disjoncteur situé sur le panneau de service du circuit en courant continu placer le disjoncteur en position fermée OFF et à l aide d un ruban adhésif bloquer la poignée du disjoncteur en position OF...

Страница 329: ...kydd som skyddar likströmskretsen och tejpa fast överspänningsskyddets omkopplare i FRÅN läget Related Documentation General Safety Guidelines and Warnings on page 265 General Electrical Safety Guidelines and Warnings on page 297 DC Power Electrical Safety Guidelines on page 304 DC Power Grounding Requirements and Warning on page 307 DC Power Wiring Sequence Warning on page 308 DC Power Wiring Ter...

Страница 330: ...ención Al instalar el equipo conectar la tierra la primera y desconectarla la última Varning Vid installation av enheten måste jordledningen alltid anslutas först och kopplas bort sist Related Documentation General Safety Guidelines and Warnings on page 265 General Electrical Safety Guidelines and Warnings on page 297 DC Power Electrical Safety Guidelines on page 304 DC Power Disconnection Warning...

Страница 331: ...schluss zu Erdanschluss Es ist zu beachten dass der Erdanschluss immer zuerst angeschlossen und als letztes abgetrennt wird AvvertenzaMostralamorsettieradellalimentatoreCC Cablarel alimentatore CC usando i connettori adatti all estremità del cablaggio come illustrato La corretta sequenza di cablaggio è da massa a massa da positivo a positivo da linea ad L e da negativo a negativo da neutro a N Ten...

Страница 332: ...ing terminations such as closed loop or spade type with upturned lugs These terminations must be the appropriate size for the wires and must clamp both the insulation and conductor Waarschuwing Wanneer geslagen bedrading vereist is dient u bedrading te gebruiken die voorzien is van goedgekeurde aansluitingspunten zoals het gesloten lus type of het grijperschop type waarbij de aansluitpunten omhoog...

Страница 333: ...ado e planas com terminais de orelha voltados para cima Estas terminações de cabo deverão ser do tamanho apropriado para os respectivos cabos e deverão prender simultaneamente o isolamento e o fio condutor Atención Cuando se necesite hilo trenzado utilizar terminales para cables homologados tales como las de tipo bucle cerrado o espada con las lengüetas de conexión vueltas hacia arriba Estos termi...

Страница 334: ... Warning This topic applies to hardware devices in the EX Series product family which includes EX Series switches the EX Series Redundant Power System RPS and the XRE200 External Routing Engine This topic also applies to hardware devices in the QFX Series and to OCX1100 switches WARNING The device is designed to work with a TN power system Waarschuwing Het apparaat is ontworpen om te functioneren ...

Страница 335: ...elkraftssystem av TN typ Related Documentation General Safety Guidelines and Warnings on page 265 General Electrical Safety Guidelines and Warnings on page 297 Grounded Equipment Warning on page 282 Multiple Power Supplies Disconnection Warning on page 312 313 Copyright 2015 Juniper Networks Inc Chapter 27 Electrical Safety Guidelines and Warnings ...

Страница 336: ...Copyright 2015 Juniper Networks Inc 314 EX4300 Switch Hardware Guide ...

Страница 337: ...ant Power System RPS and the XRE200 External Routing Engine These hardware devices comply with the following standards Safety CAN CSA C22 2 No 60950 1 Information Technology Equipment UL 60950 1 Information Technology Equipment EN 60950 1 Information Technology Equipment IEC 60950 1 Information Technology Equipment EN 60825 1 Safety of Laser Products Part 1 Equipment classification and requirement...

Страница 338: ...el on page 317 Japan on page 317 Korea on page 318 United States on page 318 FCC Part 15 Statement on page 318 Nonregulatory Environmental Standards on page 319 Canada This Class A digital apparatus complies with Canadian ICES 003 Cet appareil numérique de la classe A est conforme à la norme NMB 003 du Canada The Industry Canada label identifies certified equipment This certification means that th...

Страница 339: ...tion that the electrical ground connections of the power utility telephone lines and internal metallic water pipe system if present are connected together This precaution might be particularly important in rural areas European Community This is a Class A device In a domestic environment this device might cause radio interference in which case the user needs to take adequate measures Israel Transla...

Страница 340: ...ment This equipment has been tested and found to comply with the limits for a Class A digital device pursuant to Part 15 of the FCC Rules These limits are designed to provide reasonable protection against harmful interference in a residential installation This equipment generates uses and can radiate radio frequency energy and if not installed and used in accordance with the instructions might cau...

Страница 341: ...lded intra building cabling or wiring that is grounded at both ends All EX8200 switches Those switch switches meet the following NEBS compliance standards SR 3580 NEBS Criteria Levels Level 4 Compliance GR 1089 CORE EMCandElectricalSafetyforNetworkTelecommunicationsEquipment GR 63 CORE NEBS Physical Protection The equipment is suitable for installation as part of the Common Bonding Network CBN The...

Страница 342: ...al Routing Engine Maschinenlärminformations Verordnung 3 GPSGV der höchste Schalldruckpegel beträgt 70 dB A oder weniger gemäss EN ISO 7779 Translation The emitted sound pressure is below 70 dB A per EN ISO 7779 Related Documentation Agency Approvals for EX Series Switches on page 315 Compliance Statements for EMC Requirements for EX Series Switches on page 316 Copyright 2015 Juniper Networks Inc ...

Отзывы: