background image

66

Using View/Add/Delete Configuration

Follow the steps below to create arrays using View/Add/Delete.  View/Add/Delete
Configuration allows you to associate logical drives with partial and/or multiple physical
arrays (this is called spanning of arrays).  The existing configuration is left intact when you
select view to look at the current configuration.

To use view/add/delete configuration:

1.  Choose Configure from the Management menu.

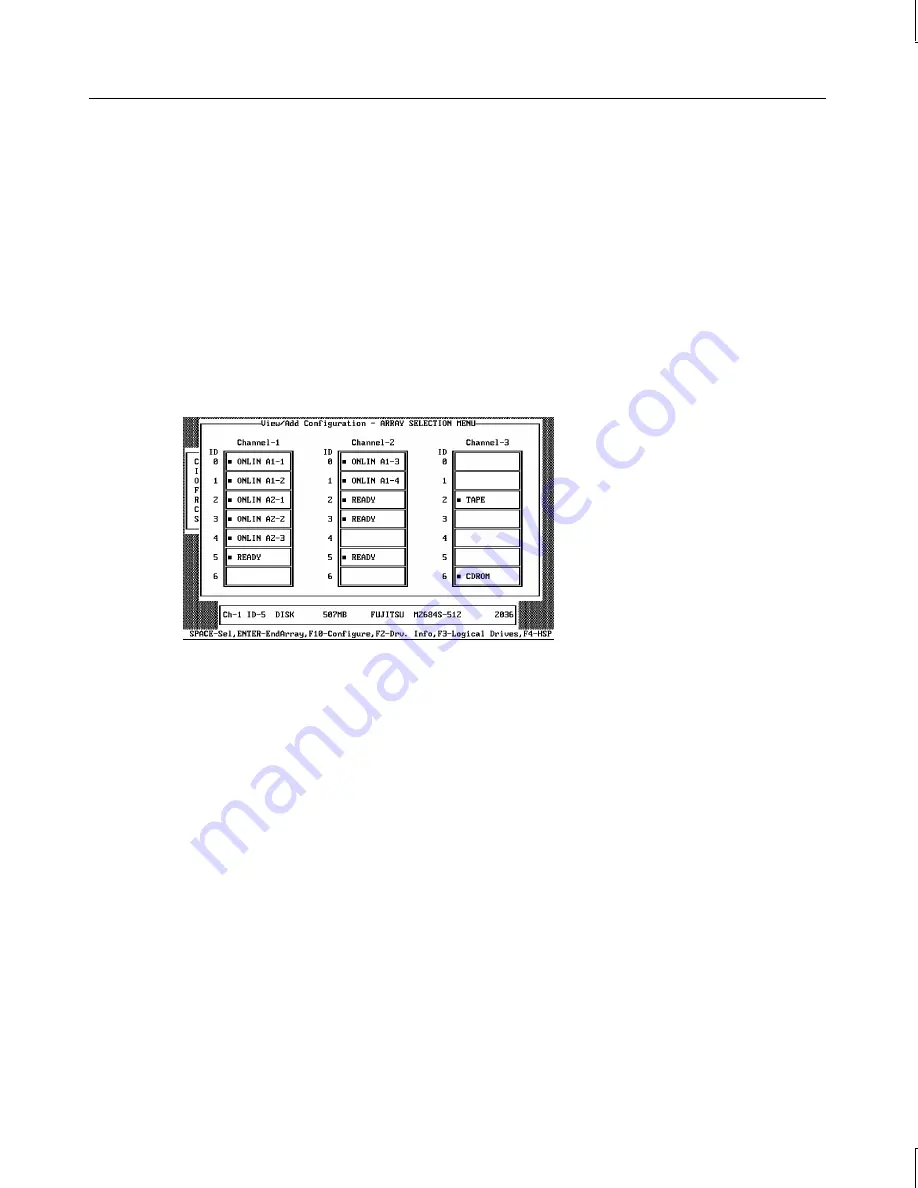
2.  Choose View/Add/Delete Configuration from the Configure menu.  An array selection

window displays showing the devices connected to the current controller.

Hot key information appears at the bottom of the screen.  The hot key functions are as
follows:

F2

Display the manufacturer data and MegaRAID error count for the highlighted
drive.

F3

Display the logical drives that have been configured.

F4

Designate the highlighted drive as a hotspare .

F

5

Delete a logical drive.

F10

Display the logical drive configuration screen.

3.  Press the arrow keys to highlight specific physical drives.  Press the spacebar to

associate the highlighted physical drive with the current array.  The indicator for the
selected drive changes from READY to ONLIN A[array number]-[drive number].  For
example, ONLIN A2-3 means disk array 2, drive 3.


Add physical drives to the current array as desired.  Try to use drives of the same
capacity in a specific array.  If you use drives with different capacities in an array, all the
drives in the array are treated as if they have the capacity of the smallest drive in the
array.

Содержание InterRAID-8e

Страница 1: ...InterRAID 8e Hardware User s Guide February 1998 DHA022310...

Страница 2: ...rademarks of Intergraph Computer Systems Microsoft MS DOS and Windows are registered trademarks of Microsoft Corporation Windows NT is a trademark of Microsoft Corporation Other brands and product nam...

Страница 3: ...uivalent type as recommended by the manufacturer Dispose of used batteries according to the manufacturer s instructions There are no user serviceable parts in the power supply Refer all servicing of t...

Страница 4: ......

Страница 5: ...pplicable Intergraph Systems 3 Returning Equipment to Intergraph Computer Systems 3 Obtain an RGA Log Number 4 Complete the RGA Form and Shipping Label 4 Repackage Disk Drives for Separate Shipment 4...

Страница 6: ...tices 35 Important Software Notices 35 4 Using the Information Control Panel 37 System Status Icon 38 Hardware Menu 38 Component Status 38 Configuration Info 39 POST Results 39 Internal Temp 39 Option...

Страница 7: ...77 Identifying Controller Assignments 77 Fixed Hard Disk Drive 77 InterServe 615 625 635 645 Systems 79 InterServe 8400 and 8000 Systems 80 Starting Power Console 81 Identifying Power Console Options...

Страница 8: ...rmance Options 112 SCSI 2 Command Tagging 112 Write Back Policy 113 Read Ahead Policy 113 Database Applications 113 RAID Mode Performance and Data Integrity Differences 114 9 Troubleshooting 115 Inter...

Страница 9: ...B Software Updates 137 Updating the MegaRAID Driver 137 Installing MegaRAID Utilities 138 C RAID Controller 141 MegaRAID Controller 141 Features 142 PCI Bus Interface 142 AT Compatible BIOS 142 MegaR...

Страница 10: ...x...

Страница 11: ...rack mount single bus and dual bus cabinets u Chapter 4 Using the Information Control Panel discusses the menus of the InterRAID 8e Information Control Panel u Chapter 5 Using the MegaRAID BIOS Config...

Страница 12: ...d and online Windows NT documentation from Microsoft Customer Support Intergraph Computer Systems offers an assortment of customer support options Hardware and Software Support Services Intergraph Com...

Страница 13: ...e Web see the Software Support pages at http www intergraph com 3 At the login prompt key in your user ID If you have not connected before key in new to create a user ID 4 Follow the menus to find wha...

Страница 14: ...product s name or model number u The product s serial number Software product serial numbers are included in the product packaging Hardware product serial numbers are on a sticker affixed to the hardw...

Страница 15: ...essor to alert the user in the event of an abnormal system condition The microprocessor resides on the SCSI bus and communicates the level of fault tolerance to the user through software LEDs and audi...

Страница 16: ...MegaRAID controller board via two 68 pin very high density VHD SCSI connectors The connectors are labeled Channel 0 and Channel 1 I O Interface Board Channel 1 Channel 0 Bus Configurations The InterRA...

Страница 17: ...tion about connecting cabinets to the controller Applicable Intergraph Systems The InterRAID 8e is available in deskside or rack mount configurations for various systems The deskside cabinet is availa...

Страница 18: ...de 2 Complete the form entering the RGA log number obtained from the Customer Response Center Ensure that the address in the From section is the location to which you want the equipment to be returned...

Страница 19: ...epack the equipment 1 Power down the disk array cabinet and wait for the RAID disk drives to completely stop spinning The disk drives could be damaged if removed while still spinning 2 Remove all of t...

Страница 20: ...bottom foam support into the disk array box and then set the cabinet onto the foam See the following figure 8 Place the top foam support onto the cabinet 9 Securely tape the disk array box closed 10 P...

Страница 21: ...rive boxes were not designed to ship disk drives by themselves If shipping disk drives alone order the Intergraph multi pack box CAUTION The type of disk drive box that fits inside the shipping carton...

Страница 22: ...8...

Страница 23: ...s u MegaRAID controller board if included u InterRAID 8e cabinet dual bus only u Disk drive boxes containing up to four drives u Diskettes containing configuration and utility software u Accessories b...

Страница 24: ...ilable PCI InterServe 8000 PCI Slot 4 PCI Slots 5 through 8 NOTE The systems with Not applicable for primary controller slot use a fixed disk drive as the boot drive All installed MegaRAID controllers...

Страница 25: ...Open the base unit by removing the top cover left side panel and PCI access panel on the bottom of the unit 3 Remove the screw and blanking plate from an available PCI slot 4 Install the MegaRAID con...

Страница 26: ...d off 2 Remove the top cover and left side panel from the system 3 Remove the screw and blanking plate from an available PCI slot 4 Install the MegaRAID controller Press firmly and evenly over the PCI...

Страница 27: ...he system 3 Remove the screw and blanking plate from an available PCI slot NOTE Install secondary controllers only in PCI slots 5 through 8 If you install secondary controllers in PCI slots 1 through...

Страница 28: ...ontroller as described next Connecting the Cables This section describes connecting the RAID SCSI cables from the MegaRAID controllers to the disk array cabinets Information for choosing and connectin...

Страница 29: ...e deskside disk array cabinet can be used instead of the lower ports 2 Secure the cables using the thumb screws finger tight only Failure to secure the cables properly can result in intermittent probl...

Страница 30: ...ide disk array cabinet can be used instead of the lower ports 2 Secure the cables using the thumb screws finger tight only Failure to secure the cables properly can result in intermittent problems wit...

Страница 31: ...MegaRAID Controller External Ports on the PCI I O Panel Channel 0 Channel 1 NOTE If necessary the ports at the top of the deskside disk array cabinet can be used instead of the lower ports 2 Secure t...

Страница 32: ...ID disk drives from the drive boxes CAUTION Carefully insert the disk drives to avoid damaging the connector 3 Install the RAID disk drives into the cabinet as follows Extend the drive latching clips...

Страница 33: ...the following important operating and software notices Important Operating Notices u In some instances the audible alarm sounds when you power on the InterRAID 8e cabinet To silence the alarm press th...

Страница 34: ...cally configures the MegaRAID controller board to RAID level 5 MegaRAID controllers support RAID levels 0 1 3 5 10 0 1 30 and 50 To power on and configure the system 1 Power on the InterRAID 8e cabine...

Страница 35: ...gaRAID controller board if included u InterRAID 8e cabinet single or dual bus u Disk drive boxes containing up to four drives u Diskettes containing configuration and utility software u Accessories bo...

Страница 36: ...ve 6x5R Not applicable Any available PCI InterServe 8400 InterServe 650 660 PCI Slot 4 PCI Slots 5 through 8 StudioZ RAX Not applicable PCI Slots 4 though 7 InterServe 8000 PCI slot 4 PCI slots 5 thro...

Страница 37: ...system is powered off 2 Remove the top cover 3 Remove the screw and blanking plate from an available PCI slot 4 Install the MegaRAID controller Press firmly and evenly over the PCI connector to ensur...

Страница 38: ...d blanking plate from an available PCI slot 4 Install the MegaRAID controller Press firmly and evenly over the PCI connector to ensure the board seats completely into the slot 5 Secure the board with...

Страница 39: ...n PCI slots 5 through 8 If you install additional controllers in PCI slots 1 through 3 the system will not boot 4 Install the MegaRAID controller Press firmly and evenly over the PCI connector to ensu...

Страница 40: ...port must be a single channel cabinet The following instructions describe how to install the Channel 2 access cables in the base unit These steps assume the required secondary controllers have been in...

Страница 41: ...he Channel 2 port must be a single channel cabinet The following instructions describe how to install the Channel 2 access cables in the base unit These steps assume the required secondary controllers...

Страница 42: ...ives To install the cabinet 1 Attach the handle brackets to both sides of the InterRAID 8e cabinet Use the eight panhead screws four for each bracket supplied with the InterRAID 8e NOTE The sides of t...

Страница 43: ...8e cabinet on the mounting shelf as shown in the following figure 5 Install tinnerman nuts on the exterior face of the two front mounting posts Using the screws provided secure the handle brackets to...

Страница 44: ...follows u TDZ 612 RAX RenderRAX InterServe 6x5R These systems do not use a primary controller u InterServe 8400 Channels 0 and 1 are used for internal RAID section Channels 0 and 1 are not available...

Страница 45: ...Power Supply Cord Selection instruction sheet included in the accessory pack 5 Connect the power cord to the InterRAID 8e cabinet and to the facility power outlet AC distribution box or uninterruptib...

Страница 46: ...ilable Controllers in PCI slot 5 through 7 use Channels 0 and 1 to connect cabinets and Channel 2 is not available To connect cables 1 Connect the RAID SCSI cable Channel 0 on the primary or secondary...

Страница 47: ...ith the right slot CAUTION High capacity RAID disk drives are susceptible to physical shock Handle all disk drives carefully and avoid unnecessary handling To install and label the RAID disk drives 1...

Страница 48: ...4 ADP X CH X ID 2 3 ADP X CH X ID 1 2 ADP X CH X ID 0 1 right In a dual bus InterRAID 8e cabinet the right four RAID disk drives connect to one channel and the left four RAID disk drives connect to an...

Страница 49: ...next time you power on the system Important Software Notices u You must complete the Windows NT Server installation before using the system Intergraph Computer Systems installs the MegaRAID BIOS conf...

Страница 50: ...etup contains basic information to configure the disk array appropriate for the system See Chapter 5 Using the MegaRAID BIOS Configuration Utility in this document for details about specific procedure...

Страница 51: ...he five function keys two move the Menu Selector up or down The MENU key selects menu options or returns to the main menu ENTER selects the option indicated by the Menu Selector and ESCAPE backs up on...

Страница 52: ...atus This option gives a list and current status of the power supplies and fans installed in the InterRAID 8e cabinet The following is an example display PWR SPLY 1 OK PWR SPLY 2 OK PWR SPLY 3 MISSING...

Страница 53: ...tor the cabinet The following is an example display PROD InterRAID 8e SAF TE SLOT 1 CARD I O INTERFACE RAM REVISION 0 xx ROM REVISION 1 xx ID 64363264h POST Results This option displays the diagnostic...

Страница 54: ...efore you turn off power to the InterRAID 8e cabinet NOTE If you turn off the power to the InterRAID 8e cabinet and then power off the system base unit the RAID controller will mark offline all drives...

Страница 55: ...eds the set value a Temperature Threshold Exceeded message displays in the ICP The RAID cabinet alarm sounds continuously until the problem is corrected SAF TE Chain ID This option is for configuring...

Страница 56: ...SSCODE 0000 Select Lock Options from the Options menu Use the arrow keys to change the code value 0 9 and the ENTER key to move from one field to the next Then press the ENTER key after you have made...

Страница 57: ...ys and logical drives u Rebuilding critical logical drives u Using a pre loaded SCSI drive as is u Saving and restoring a configuration NOTE If you need to load the new driver follow the applicable in...

Страница 58: ...ers PCI Slot Controller BIOS Configuration 1 First 3 2 Second 2 3 Third 1 4 Fourth 0 5 Fifth 4 InterServe 615 625 635 645 Systems InterServe 615 625 635 645 systems are shipped from Intergraph Compute...

Страница 59: ...nterServe 8400 Systems InterServe 8400 systems are shipped from Intergraph Computer Systems with RAID controllers installed in PCI slots 4 through 8 which should remain in these slots On a system with...

Страница 60: ...stems are shipped from Intergraph Computer Systems with RAID controllers installed in PCI slots 4 through 8 which should remain in these slots On a system with multiple RAID controllers always use the...

Страница 61: ...RL M when the following appears MEGARAID CONTROLLER BIOS Version x xx Aug 1 1996 Host Adapter 1 Firmware Version x xx DRAM Size 8 MB 0 Logical Drives found on the Host Adapter 0 Logical Drives handled...

Страница 62: ...IOS Disables the BIOS The following table defines some terms you will see while configuring drives and running the MegaRAID BIOS configuration utility READY Disk drive ready for configuration ONLINE D...

Страница 63: ...ail FlexibleDynamic Sizing DiskSpin up Timings Chip Set Type Cache FlushTimings Rebuild Rate AlarmControl AutoRebuild Logical Drive Initialize CheckConsistency View UpdateParameters PhysicalDrive Rebu...

Страница 64: ...View Add Delete Configuration Select this option to examine the existing configuration and or to specify additional arrays and logical drives View Add Delete Configuration provides the same functions...

Страница 65: ...e parameters The following displays Adapter x Clear Configuration FlexRAID PowerFail DISABLED Disk Spin up Timings Chip Set Type Cache Flush Timings Rebuild Rate Alarm Control Auto Rebuild ENABLED The...

Страница 66: ...al drive and to perform the listed actions The following table describes the Logical Drives options Option Description Initialize Choose this option to initialize the selected logical drive This shoul...

Страница 67: ...elected disk drive Make Online Choose this option to change the state of the selected disk drive to Online Fail Drive Choose this option to change the state of the selected disk drive to Fail Make Hot...

Страница 68: ...ler for the selected channel This option should be used if the selected SCSI channel is terminated with Wide devices at both ends Set PowerOn Defaults Choose this option to have the MegaRAID controlle...

Страница 69: ...k Consistency the parameters of the existing logical drives on the current controller and a selection menu listing the logical drives by number appear Press the arrow keys to highlight the desired log...

Страница 70: ...and Logical Drives You can configure physical arrays and logical drives with Setup using the following options u Easy Configuration u New Configuration u View Add Configuration Each configuration met...

Страница 71: ...ine a maximum of eight 8 logical drives per MegaRAID controller New Configuration In New Configuration you can modify the following logical drive parameters u RAID level u Cache write policy u Read po...

Страница 72: ...rays in Easy New or View Add Configuration mode u From the Objects Physical Drive menu select a physical drive and press ENTER Then select Make Hotspare When you choose any configuration option a list...

Страница 73: ...hot key functions are as follows F2 Display the manufacturer data and error count for the highlighted drive F3 Display the logical drives that have been configured so far F4 Designate the highlighted...

Страница 74: ...he window at the top of the screen shows the logical drive that is currently being configured as well as any existing logical drives The column headings are as follows LD The logical drive number RAID...

Страница 75: ...g Write through caching has a data security advantage over write back caching Write back caching has a performance advantage over write through caching Read Policy This option enables the SCSI read ah...

Страница 76: ...to the Configure menu 10 Initialize the logical drives you have just configured as discussed later in this chapter Using New Configuration Follow the steps below to create arrays using New Configurat...

Страница 77: ...to the current array as desired Try to use drives of the same capacity in a specific array If you use drives with different capacities in an array all the drives in the array are treated as if they h...

Страница 78: ...logical drive Highlight Span from the bottom window of the logical drive configuration screen and press ENTER The choices are as follows CanSpan Array spanning is enabled for the current logical drive...

Страница 79: ...e space in the array s being associated with the current logical drive thus accounting for the Span setting and for partially used array space For example if the previous logical drive used only a par...

Страница 80: ...functions are as follows F2 Display the manufacturer data and MegaRAID error count for the highlighted drive F3 Display the logical drives that have been configured F4 Designate the highlighted drive...

Страница 81: ...drives The logical drive configuration screen displays as shown below The window at the top of the screen shows the logical drive that is currently being configured as well as any existing logical dr...

Страница 82: ...ID 10 by spanning two to four contiguous arrays each containing one RAID 1 logical drive The RAID 1 logical drives must have the same stripe size For example you can use the span option to configure u...

Страница 83: ...d to the Save prompt 13 Initialize the logical drives you have just configured as discussed later in this chapter Initializing Logical Drives You should initialize each new logical drive you configure...

Страница 84: ...the Management menu Choose the Logical Drive option from the Objects menu The following displays 2 Select the logical drive to be initialized The following menu displays 3 Choose the Initialize option...

Страница 85: ...e arrow keys to highlight all drives Press the spacebar to select the highlighted physical drive for formatting The indicators for selected drives flashes 3 When you are finished selecting physical dr...

Страница 86: ...n take some time depending on the drive capacity 4 When formatting completes press any key to return to the previous menu Rebuilding Critical Logical Drives NOTE Logical drives are sometimes referred...

Страница 87: ...tspares with enough capacity to rebuild the failed drives To rebuild an individual drive using manual rebuild 1 Choose Objects from the Management menu Choose Physical Drive from the Objects menu A de...

Страница 88: ...1 on the controller to which it is connected You may have a SCSI disk drive that is already loaded with software The drive may be a boot disk containing an operating system You can use the MegaRAID co...

Страница 89: ...pter Configuration Manager Ver x xx July 8 1996 Adapter 1 found at Base port 0xec10 Irq 0xb Save Config to File 1 Restore Config from File 2 Display Adapter Config 3 Display File Config 4 Exit 5 Enter...

Страница 90: ...e for setting the registers causing damage to the RAID controller board The board must be replaced 2 Key in the filename for the configuration file at the prompt Do not include directory paths If you...

Страница 91: ...u Identifying Controller Assignments u Starting Power Console u Identifying Power Console Options u Performing Power Console Tasks u Securing Power Console Identifying Controller Assignments If you ha...

Страница 92: ...Two Controllers PCI Slot Controller Power Console 1 First 0 2 Second 1 Three Controllers PCI Slot Controller Power Console 1 First 0 2 Second 1 3 Third 2 Four Controllers PCI Slot Controller Power Co...

Страница 93: ...oller the controller resides in PCI slot 1 The following tables show how Power Console lists the installed controllers One Controller PCI Slot Controller Power Console 1 First 0 Boot Two Controllers P...

Страница 94: ...ler the controller resides in PCI slot 4 The following tables show how Power Console lists the installed controllers One Controller PCI Slot Controller Power Console 4 First 0 Boot Two Controllers PCI...

Страница 95: ...bar Chapter 7 describes the options of the top menu bar The following table defines some terms you will see while configuring drives and running Power Console READY Disk drive ready for configuration...

Страница 96: ...cons u Logical Drives Icons and Logical Drive x menu u Channels Icons and Channel x menu Configuration Icons The icons are described below Display configuration click on this icon to display the curre...

Страница 97: ...bort the process View log click here to display a list of MegaRAID activities Rebuild rate click on this icon to set the RAID rebuild drive rate Rescan when you click on this icon the currently select...

Страница 98: ...nconsistency will automatically be corrected This could cause loss or corruption of data Trash drag the drive icon that represents the drive to be deleted to this icon and then drop it Logical Drives...

Страница 99: ...dd Drive options extend from the Advanced Menu For more details on these options refer to Creating an Array in this chapter NOTE The trash can icon in the lower right corner of the MegaRAID Power Cons...

Страница 100: ...annel x pull down menu The menu lists the bolded options available for that physical device The Deactivate option lasts for 60 seconds when invoked During this period the RAID controller ceases to iss...

Страница 101: ...closure and Device Status Power Console allows you to monitor the fan status power supply status and temperature status Each separate enclosure displays the status of a SCSI channel A green light on a...

Страница 102: ...apter_x where x is the RAID controller board number 2 Select OK at the Do you want to change Adapter dialog Creating an Array You can configure multiple hard disk drives into one single volume or arra...

Страница 103: ...example by spanning two contiguous RAID 1 logical drives Data storage that justifies the 100 redundancy of mirrored arrays and needs the enhanced I O performance of striped arrays Four Six or Eight 3...

Страница 104: ...ssigned by the system for the new array 5 Select OK The Create Logical Drive dialog displays as shown below 6 Select the appropriate values for RAID type Stripe Size Write Policy Read Policy and Cache...

Страница 105: ...ed viewing select OK Changing RAID Level CAUTION Be sure you backup all data before changing RAID levels You can change RAID levels of an existing system drive without degrading the RAID subsystem For...

Страница 106: ...3 Add drives RAID 0 RAID 0 Add drives The Advanced Menu from the Logical Drive x pulldown menu allows you to change a configuration or add a drive to an existing configuation You can define a maximum...

Страница 107: ...the reconstruction operation being performed as shown next 6 Review the changes that have been made and select OK when finished Add Drive Add Drive from the Advanced Menu of the Logical Drive x pulldo...

Страница 108: ...e The following dialog displays 4 Select the physical drive in Ready state to be added using the left button A check appears on the drive 5 Select Apply The Reconstructing Dialog displays You can clic...

Страница 109: ...device icon the drive type and the capacity of the selected drive displays at the bottom of the Power Console main menu To undo configuration of a hotspare 1 From the Power Console main menu place th...

Страница 110: ...re and Auto Rebuild was configured as Enabled the RAID controller will automatically rebuild the failed drive to a hotspare To determine if rebuild has been enabled default restart the system and pres...

Страница 111: ...ain menu place the cursor on the logical drive for which you want to change the RAID policy and click the right mouse button 2 Select Change Policy from the Logical Drive x pulldown menu The following...

Страница 112: ...98...

Страница 113: ...bject identification enable or disable sound enable or disable alarm control and exit Power Console Physical Drv Choose this option to rebuild abort rebuild and format You can run diagnostics select t...

Страница 114: ...lect this option to display an event log The events are stored in the RAID log file Diagnostics This option not available Firmware Download This option not available Enclosure Management Select this o...

Страница 115: ...Alarm Control Select this option to enable or disable the system alarm when a drive failure occurs Exit Select this option to quit Power Console You cannot exit if disk operations are ongoing New con...

Страница 116: ...ves that define the stripe width common to one RAID type Arrays are combined into logical drives Logical drives can be created out of part of an array or can be a combination of several arrays if the...

Страница 117: ...stored in the RAID log file Diagnostics This option in not available Firmware Download This option in not available Enclosure Management Select this option from the Adapter Menu to manage the physical...

Страница 118: ...ing on Hide Toolbox in the Adapter menu The option will then change to Display Toolbox Performance Monitor On Off Click the left mouse button on a logical drive icon and select Performance Monitor fro...

Страница 119: ...log Enable Disable Sound Choose this option from the Adapter menu to enable or disable the onboard tone generator To silence a sounding alarm choose Disable Sound and Disable Alarm Control Enable Disa...

Страница 120: ...Select Rebuild to perform this function The rebuild process can take place while the RAID system is still running although performance may be affected Abort Rebuild Select this option to stop the rebu...

Страница 121: ...on to create arrays Delete Deleting a logical drive is not supported in Power Console Initialize Select this option to initialize logical drives Check Parity Select this option to check parity Propert...

Страница 122: ...nitialize Choose this option from the Logical Drv menu to initialize logical drives A dialog such as the following appears Choose the logical drives to be initialized and click on the Go button CAUTIO...

Страница 123: ...buttons Window Choose this option from Power Console to view the progress of a disk rebuild diagnostic initialization parity check reconstruction or to view the performance monitor Window also display...

Страница 124: ...110...

Страница 125: ...ss data and thereby improves data throughput Mirroring places a copy of the data on two mirrored drives to offer data protection in the event a hard disk drive should fail Striped RAID Performance You...

Страница 126: ...into the second pack on the second I O channel of the RAID controller Notice that mirroring increases the size to 8 GB By creating two packs on separate channels and mirroring the first pack to the s...

Страница 127: ...require less seeking time Also place I O intensive tables at the beginning of the disk Use tablespaces in Oracle or segments and devices in Microsoft SQL Server and Sybase Systems to segregate the da...

Страница 128: ...data and only one disk for parity and redundancy information RAID 3 is similar to RAID 5 except it stores all parity information on a single disk in the pack rather than distribute it among the disks...

Страница 129: ...t might occur during the disk array s Power On Self Test POST It also provides hardware and software troubleshooting for various problems The following figure shows the InterRAID 8e LED locations Powe...

Страница 130: ...isk drive rebuild in progress in the disk array or failed disk drive present in the disk array Alternating green and amber Firmware checksum error Firmware has become corrupted Call the Customer Respo...

Страница 131: ...ve with the cabinet door closed Refer to the disk drive manufacturer s specifications for information pertaining to the Disk Activity LED Drive Status LEDs The eight Drive Status LEDs on the front of...

Страница 132: ...tarily displays the failure and then continues with POST To view the results select Hardware Menu at the Main Menu and choose POST Results Microprocessor Failures If POST detects a microprocessor fail...

Страница 133: ...failed to respond to a reset command or another device has control of the SCSI bus After the alarm sounds the microprocessor attempts to initialize the SCSI controller Normal operations will be imposs...

Страница 134: ...te but in the event of a power supply failure the remaining power supply may not be sufficient to operate the cabinet and associated disk drives in all circumstances The following table illustrates po...

Страница 135: ...aRAID Power Console Intergraph Computer Systems recommends that you use MegaRAID BIOS Setup to format RAID disk drives in your InterRAID 8e disk array CAUTION These anomalies while intermittent can ex...

Страница 136: ...he file system type then select Start 16 In the next dialog that displays select OK 17 In the next dialog that displays select Yes 18 When told formatting is complete select OK 19 Select Close to clos...

Страница 137: ...tch not in the proper position Be sure that the power switch on the front of the system base unit is in the ON position Error System hangs when scanning devices Reason Solution Cable connection fault...

Страница 138: ...drive error counts using InterRAID 8e utilities Format the drive Rebuild the drive If the drive continues to fail replace the drive with another drive with the same capacity and rebuild Error InterRA...

Страница 139: ...e LED steady amber or blinking amber Reason Solution A disk drive assigned to a pack has failed or a rebuild operation is in progress Disk array is in a non fault tolerant state Replace the failed dis...

Страница 140: ...ling fan failed Identify the failed fan using the Information Control Panel Refer to Chapter 10 Servicing the Disk Array for details on replacing the cooling fan Cooling fan vent blocked inadequate ve...

Страница 141: ...et To minimize the possibility of electrostatic discharge observe the following precautions when working with the internal components of a system or a cabinet u Touch the bare metal of the base unit o...

Страница 142: ...n remove the defective board 3 Install the new MegaRAID controller board into the same PCI slot in the system s base unit The following figure is an example 4 Secure the MegaRAID controller board with...

Страница 143: ...pment to Intergraph Computer Systems in Chapter 1 Replacing Power Supplies The InterRAID 8e has hot swap power supplies You do not have to turn off power to the InterRAID 8e cabinet to replace a power...

Страница 144: ...failed power supply and pull the supply out of the cabinet 4 Remove the new power supply from its packaging Save the packaging material 5 Slide the new power supply into the cabinet until it locks Pow...

Страница 145: ...r Systems Refer to Returning Equipment to Intergraph Computer Systems in Chapter 1 Replacing Cooling Fans The InterRAID 8e has hot swap cooling fans You do not have to turn off power to the InterRAID...

Страница 146: ...ews 7 Reconnect the in line connector of the power cable 8 Close the cooling fan panel and tighten the two screws to secure the panel to the back of the cabinet Replacing a Fuse WARNING Disconnect pow...

Страница 147: ...off power to the cabinet to be replaced 5 Disconnect the AC power cord and RAID SCSI cable s from the old cabinet 6 Connect the AC power cord and RAID SCSI cable s to the new cabinet 7 Remove the dis...

Страница 148: ...134...

Страница 149: ...mperes typical 3 x 150 watts Mean Time Between Data Loss 5 000 000 hours Dimensions H x W x L 18 75 inches x 7 00 inches x 23 25 inches Weight disk drives not installed 51 0 pounds Number of Drives Su...

Страница 150: ...136...

Страница 151: ...Program Manager open Windows NT Setup 3 From the Options menu select Add Remove SCSI Adapters 4 Select the MegaRAID driver then select Remove 5 Select OK at the Warning dialog then select OK again 6 A...

Страница 152: ...system before shipment In the event you need to reload the Windows NT operating system you can reinstall the MegaRAID utilities A menu item will be automatically created in the Power Console program g...

Страница 153: ...yed default directory or a specified directory you designate after selecting Browse 5 To copy the files to the displayed destination directory select Next Otherwise select Browse and type a new direct...

Страница 154: ...140...

Страница 155: ...ut the battery backup option is shown in the following figure NOTE On the two channel MegaRAID controller the components for the internal Channel 2 are not populated Channel 1 External Flash EEPROM Ca...

Страница 156: ...controller then intercepts all INT13 BIOS calls and translates them into the appropriate RAID control codes MegaRAID Controller Firmware The MegaRAID controller firmware programs stored on the flash E...

Страница 157: ...M stores the MegaRAID firmware programs and the configuration data Since it is re writeable it allows the firmware to be upgraded without replacing any hardware As the disk configurations change for e...

Страница 158: ...144...

Страница 159: ...speed memory buffer that contains the most recently accessed data from the DRAM memory system cache flush An operation where all unwritten blocks in a write back cache are written to the target disk...

Страница 160: ...e that achieves maximum data transfer bandwidth by constantly keeping two I O requests for adjacent data outstanding A software component begins a double buffered I O stream by issuing two requests in...

Страница 161: ...important features the controller provides to achieve automatic non stop service with a high degree of fault tolerance Rebuild occurs when a SCSI disk drive fails and both of the following conditions...

Страница 162: ...of bus interface features the most desirable being high speed data transfer rates that are close to or exceed local bus or CPU bus speeds physical pack A group of individual disk drives preferably ide...

Страница 163: ...rs perform all RAID algorithms onboard the controller RAID SCSI Also known as Fast Wide SCSI 2 or Ultra SCSI RAID SCSI is a version of the Small Computer System Interface version 2 that provides 16 bi...

Страница 164: ...dary RAID controller The RAID controller in the system base unit that connect to additional disk arrays session The period of time between any two consecutive system shutdowns single bus A SCSI cable...

Страница 165: ...system level utility or after a rebuild stripe order The order in which SCSI drives appear within a physical pack stripe width The number of SCSI drives within a physical pack striping Data spread acr...

Страница 166: ...to the SCSI drive before a completion status is returned to the host operating system This caching strategy is considered more secure since a power failure will be less likely to cause loss of data H...

Страница 167: ...g 71 initialization 69 rebuild 74 Boot disk drive 145 Bus configuration 2 C Cabinet deskside setting up 14 repackage 5 replacing 133 Cabinet monitoring 1 Cables connecting 14 30 dual bus cabinets 31 I...

Страница 168: ...gnments MegaRAID BIOS fixed hard disk drive 43 InterServe 615 625 635 645 systems 44 InterServe 8000 systems 46 InterServe 8400 systems 45 MegaRAID BIOS utility 43 Power Console 77 fixed hard disk dri...

Страница 169: ...Drive state 60 64 67 Dual bus 146 Duplexing 146 Dynamic Random Access Memory DRAM 146 E Easy configuration 50 57 59 102 Enable disable alarm control 101 105 sound 101 105 Enclosure management 100 103...

Страница 170: ...121 InterRAID 8e power supply 120 Windows NT server 120 Hardware menu component status 38 configuration information 39 internal temperature 39 POST results 39 Help 109 Hide display toolbox 100 101 104...

Страница 171: ...8 installing MegaRAID controller 22 setting up 21 unpacking equipment 21 InterServe 6x5 systems cable connections 15 PCI slots 11 InterServe 6x5R systems PCI slots 23 InterServe 80 systems cable conne...

Страница 172: ...nterServe 8400 systems 24 InterServe 8400 650 660 Channel 2 expansion 26 Render RAX systems 23 StudioZ RAX systems 24 TDZ 610 systems 11 TDZ 612 RAX systems 23 replacing 128 MegaRAID utilities install...

Страница 173: ...9 35 Power Console adapter menu 100 channels icons and channel x menu 86 help 109 icons configuration 82 drag and drop 83 identifying controller assignments 77 logical drv menu 107 menus using 99 opti...

Страница 174: ...tripe set 121 disk drives installing 18 33 labeling 18 33 level 89 changing 91 mode performance 114 number of drives per RAID level 60 63 67 performance options 112 SCSI 149 technology 111 Register re...

Страница 175: ...up installing the MegaRAID controller deskside 10 rack mount 22 InterRAID 8e deskside cabinet 14 InterRAID 8e deskside 9 InterRAID 8e rack mount 21 Shipping label 4 Single Inline Memory Module SIMM 15...

Страница 176: ...sy configuration 59 Information Control Panel ICP 37 hardware menu 38 options menu 40 system status icon 38 MegaRAID BIOS 43 new configuration 62 Power Console GUI 77 menus 99 pre loaded SCSI drive 74...

Страница 177: ...onse Center From Customer Name Customer Contact Phone Mail Address Reason for Return NOTE All returned equipment MUST be shipped in original Intergraph Computer Systems packaging to obtain warranty se...

Страница 178: ...oration 9805 Kellner Road Huntsville AL 35894 TO Repair Depot RGA No ________________________ Intergraph Corporation 9805 Kellner Road Huntsville AL 35894 TO Repair Depot RGA No ______________________...

Отзывы: