21
GB
7) Use the button “Disconnect” to disconnect
the data connection and then confirm the
confirmation message. If desired, connect
another DRM-880LAN to the USB port of the
computer and continue with step 3.
Then go to the interface desired for controlling
and configuring the units (
chapter 6.2.8).
6.2.10 Exiting the program
Use the button “Exit” or the icon
⊠
in the upper
right corner to exit the program. Then confirm the
confirmation message.
6.3 Views
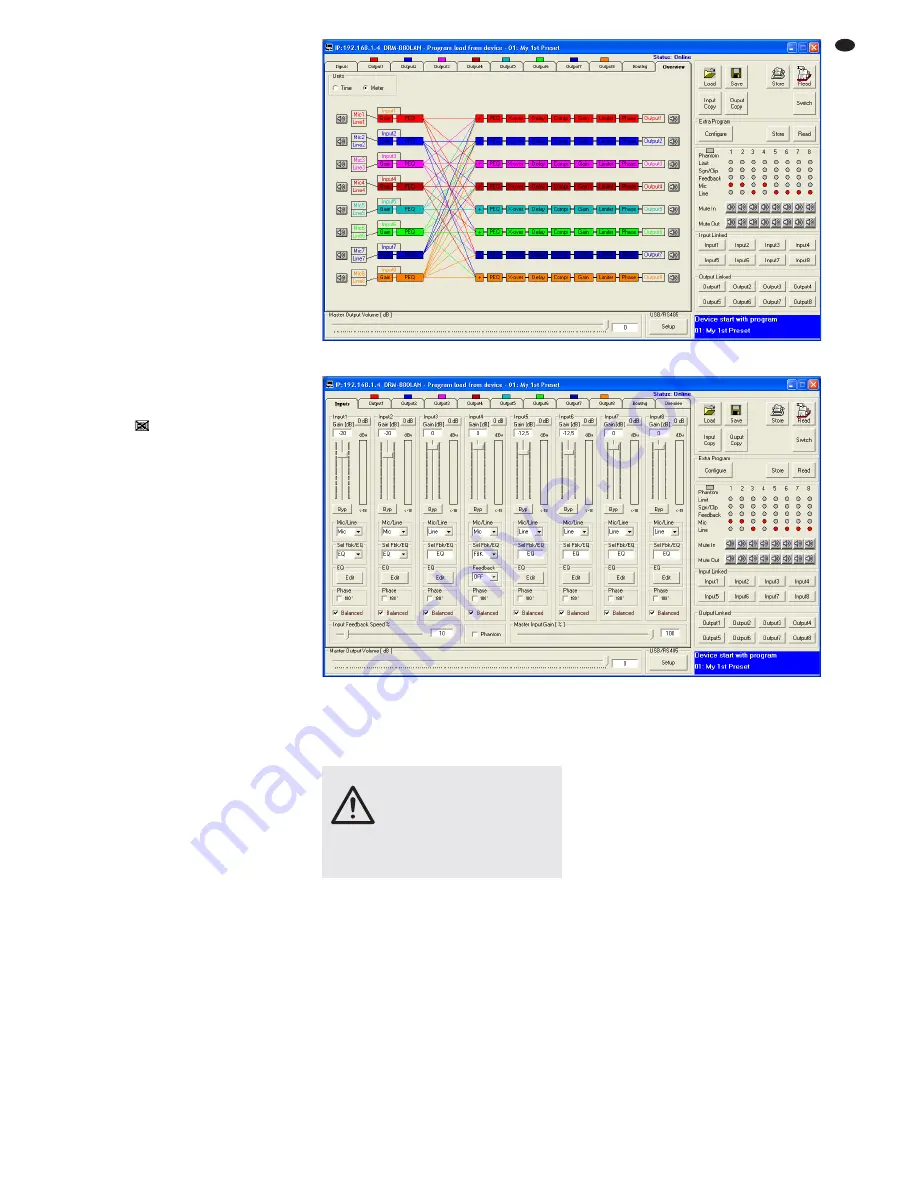
In the configuration window of a unit, the user
can switch between the views that are repre-
sented by tabs: “Overview”, “Routing”, “Inputs”
and the settings for each output channel. When
a unit window is opened, the view “Overview”
(fig. 13) is initially displayed. It provides a quick
overview of the configuration: the left-hand side
shows the eight input channels, and the right-
hand side shows the eight output channels. The
lines in between represent the assignment of the
outputs to the inputs. Click one of the function
blocks in the diagram to go to the corresponding
view.
The icon
indicates that the respective
input channel or output channel has been muted.
6.3.1
Unit for signal delay
The signals of all inputs and outputs can be indi-
vidually delayed. This is useful, e. g. when
speakers are not equally distant from the lis-
tener. To balance the different sound delay times
that arise from the different distances, the signal
of the speaker located close to the listener is
delayed so that it will not reach the listener ear-
lier than the sound of the more distant speaker.
The user does not need to calculate the
sound delay time, i. e. the user can enter the dis-
tance instead of the delay time. The calculations
performed by the system are based on a speed-
of-sound value of 340 m/s.
In the view “Overview” (fig. 13), under “Units”
(upper left of the view), define if the delay is to be
entered as a time value (Time) or a distance
value (Meter). The setting defined will apply to all
outputs and may be changed at any time.
6.4 Configuring inputs
The signals of the inputs may already be
processed before they are actually split to the
outputs. While being processed, the signals take
the processing path shown in figure 4. To con-
figure the inputs, select the view “Inputs” (fig. 14)
which provides a clearly arranged overview of
the most important parameters of all inputs.
Inputs may be linked (
chapter 6.8) so that
multiple inputs can simultaneously be set to the
same values.
6.4.1
Selecting the signal level
Use the list field “Mic / Line” to define if the signal
source provides a microphone level (Mic) or a
line level (Line).
6.4.2
Selecting the signal transmission
type
A tick in the box “Balanced” indicates that a bal-
anced signal is present at the corresponding
input. For an unbalanced signal, click the tick to
remove it. The signal level will then be increased
by 6 dB.
6.4.3
Phantom power supply
Tick the box “Phantom” to supply all inputs
defined as microphone inputs (
chapter 6.4.1)
with a phantom power of 48 V. Some micro-
phones require this phantom power supply for
operation.
6.4.4
Gain
The input gain can be adjusted to values
between -127 and +12 dB. To change the gain,
move the slider under “Gain” by means of the
mouse, or (with the slider selected) use the
arrow keys or the “Pg Up” or “Pg Down” keys on
the keyboard. To quickly reset the gain to 0 dB,
click the button “0 dB” above the slider. To tem-
porarily adjust the gain to 0 dB, click the button
“Byp”; the button will appear in red. To reset the
gain to the value that has been adjusted by
means of the slider, click the button again.
6.4.4.1 Main control “Master Input Gain”
To change the input gain of all inputs at the same
time, adjust the control “Master Input Gain”.
Unlike the adjustment made for linked inputs
(
chapter 6.8), this will not adjust all controls
to the same values – only the gain values will be
proportionately reduced in accordance with the
adjustment of the main control.
6.4.5
Equalization (EQ)
If the signal level “Mic” was selected for an input,
the option “EQ” must be selected under “Sel
Fbk/EQ” so that the equalization function can be
used.
To adjust the equalization, click the button
“Edit” under “EQ”. The window “Inputs EQ” (fig.
15) is displayed, indicating the sound adjust-
ments for the input selected. Use the tabs in the
upper section of the window to select other
inputs.
Under “EQ”, the 3 independent filters of the input
channel can be adjusted (fig. 16). The following
filter types are available:
Peaking_Eq / PEAK EQ (Peaking Equalizer)
Filter with bell characteristic with adjustable
gain/attenuation (dB), center frequency (Hz)
and quality factor (Q)
Hi-Shelv_Q / HiSHF Q (High Shelving Filter Q)
Symmetric high frequency filter with shelving
characteristic
For the adjustable cut-off frequency (Hz), the
level is half of the gain/attenuation adjusted
CAUTION
Signal sources with unbalanced
signal outputs may be damaged
by the phantom power supply.
Make sure that no phantom power
is supplied to inputs with unbal-
anced signals (e. g. by inadvertent
switchover to another configura-
tion).
⑭
View of the input channels “Inputs”
⑬
View “Overview”


