background image

5-2

5

COMMON SETTING

Tool 


(MENU 

w

 Tool)

List


D

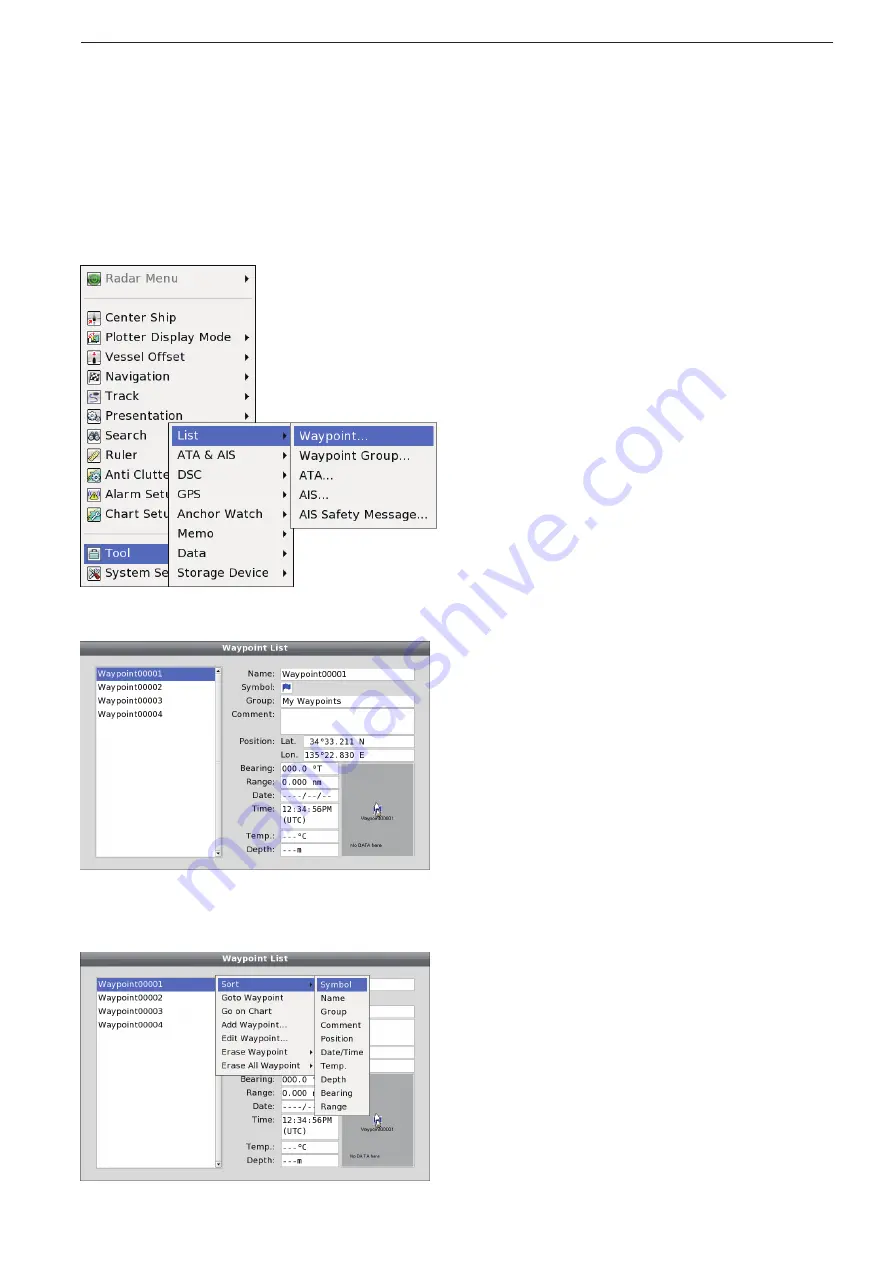
 Waypoint List

  (MENU 

w

 Tool 

u

 List 

u

 Waypoint...)

The registered Waypoints are listed.

 Push [MENU] to enter the Menu screen.


q

 Rotate [DIAL] until the “Tool” menu becomes high-


w

lighted.
 Push [ENTER] to enter the “Tool” menu.


e
r

  Rotate  [DIAL]  until  the “List”  menu  becomes  high-

lighted, and push [ENTER].

t

  Rotate [DIAL] until the “Waypoint...” menu becomes 

highlighted, and push [ENTER].

  • The Waypoint List is displayed.
  •  When [SUB] is pushed, the following operations can be 

made:

    - Sort
    - Goto Waypoint
    - Go on Chart
    - Add Waypoint
    - Edit Wapoint
    - Erase Waypoint
    - Erase All Waypoint)

y

  Rotate [DIAL] to select the desired Waypoint.

  • The selected Waypoint data are displayed.

u

  Push [CLEAR] to exit the “Waypoint...” menu.

<Waypoint List menu>

<Waypoint List screen>

<Sort menu>

 Waypoint List

Sort

The  registered  Waypoint  data  can  be  sorted  by  its 
Symbol,  Name,  Group,  Comment,  Position,  Date/

Time, Temperature, Depth, Bearing and Range.

 When the Waypoint List is displayed, push [SUB] to 


q

display the Waypoint Sub Menu screen.
 Push [ENTER] to enter the “Sort” menu.


w

 Rotate [DIAL] until your desired sort option becomes 


e

highlighted, and push [ENTER].

r

  The registered Waypoint data are sorted by the se-

lected option.

Содержание MarineComander MXS-5000

Страница 1: ...INSTRUCTION MANUAL MARINECOMMANDER SYSTEM MXS 5000 ...

Страница 2: ...FOREWORD i IMPORTANT i EXPLICIT DEFINITIONS i TABLE OF CONTENTS i Section 1 BASIC OPERATION DESCRIPTION 1 1 Section 2 PLOTTER OPERATION 2 1 Section 3 RADAR OPERATION 3 1 Section 4 SOUNDER OPERATION 4 1 Section 5 COMMON SETTING 5 1 Jeppesen 2011 All rights reserved Please inquire the purchase of C MAP Max Chart and the question concerning C MAP Max Chart to Jeppesen Customer Support Italy Spain Por...

Страница 3: ...1 1 BASIC OPERATION Section 1 MXD 5000 Display unit 1 2 Turn ON or OFF the power 1 6 Quick Menu 1 operation 1 7 Screen selection 1 8 Screen arrangement 1 12 ...

Страница 4: ... 3 seconds to cancel the func tion e RANGE UP DOWN SWITCHES Push or to set a suitable screen range r FOCUS DISPLAY LAYOUT SWITCH FOCUS LAYOUT Push to change the active screen An orange border indicates the active screen Hold down for 3 seconds to open the display se lection screen t UP DOWN LEFT RIGHT KEYS Ù Ú Ω Push arrow Ù Ú Ω or to move the cur sor up down left or right on the active screen Pus...

Страница 5: ... Ship and Perspec tive Angle functions On the Radar screen Quick Menu 2 includes the GAIN SEA RAIN Radar TX menu and Heading line OFF functions On the Sounder screen Quick Menu 2 includes the GAIN 50kHz GAIN 200kHz STC 50kHz and STC 200kHz control func tions 1 SD CARD PORT Insert an SD Card which contains C MAP MAX chart by JEPPESEN Chart data is not supplied by Icom An unmount operation should be...

Страница 6: ...ed for 1 minute After 1 minute has passed invalid data will appear ePALETTE2 Shows various information Default COG Shows your vessel s course over ground T shows true north bearing and M shows magnetic north bearing rPALETTE3 Shows various information Default SOG Shows your vessel s speed over ground If no speed data is found will appear tPALETTE4 Shows various information Default Depth Shows the ...

Страница 7: ...a companion Icom transceiver is connected to the Main unit 1FISH FINDER ICON Display as an animation when a companion Icom fish finder is connected and operating Appears but not as an animation when the fish finder is connected but not operating An X appears on the icon when the fish finder is not connected to the main unit 2AIS UNIT ICON Appears but with an X below the icon when the AIS unit is n...

Страница 8: ...een push EN w w TER to enter the operating screen Hold down e e for 3 seconds to turn OFF the pow er At the first turning ON the MarineCommandertm or after performing Factory Reset Initial Setting screen p 5 33 appears before opening screen is displayed MENU WPT FOCUS LAYOUT MOB CLEAR SUB BRILL RANGE ENTER Turn ON or OFF the power Opening screen Power OFF screen ...

Страница 9: ... Push to open Quick Menu 1 q q Push w w u once to select the Radar TX setting If necessary push t to move to left tab Rotate DIAL to select the setting TX or STBY e e button r Push ENTER to set and exit Quick Menu 1 Push CLEAR to cancel and exit Quick Menu 1 Push to open Quick Menu 1 q q Push w w u three times to select the Color Palette Rotate DIAL to select the setting Day or Night e e button r ...

Страница 10: ... Rotate DIAL to select the desired operating screen w w then push ENTER Two split screens or three split screens can be selected in default setting Push CLEAR to cancel and return to the previous screen before entering the screen selection mode The screen layouts can be customized See page 1 12 for details MENU WPT FOCUS LAYOUT MOB CLEAR SUB BRILL RANGE DIAL ENTER CLEAR LAYOUT Screen selection Scr...

Страница 11: ...FOCUS LAYOUT MOB CLEAR SUB BRILL RANGE FOCUS Selecting Active screen D D Push FOCUS one or more times to select the Fo q q cus Bar The back color of the Focus bar changes to orange Rotate DIAL to select the desired item then push w w ENTER The outside frame of the active icon changes to white Push CLEAR to cancel and return to the Focus e e bar r Push FOCUS to return to the active screen MENU WPT ...

Страница 12: ...u w w Quick Menu 1 appears Rotate DIAL to select the TX or STBY button e e r Push ENTER to set and return to the Focus bar The AIS List displays receiving AIS Rotate DIAL to select the third icon from the left q q The outside frame of the active icon changes to white Push ENTER to enter the AIS List menu w w Rotate DIAL to select the ship s Name MMSI e e r Push SUB to enter the Sub menu t Rotate D...

Страница 13: ...ster ID Erase Message and Erase All Message y Push CLEAR to exit the screen and return to the Focus bar Sounder Icon shows the transducer is properly con nected Sounder Icon When Icom transceiver is connected and it s power ON transceiver icon can be selected Rotate DIAL to select the fifth icon from the left q q The outside frame of the active icon changes to white Push ENTER to enter the Send DS...

Страница 14: ...four split screen type can be selected Push CLEAR to return to the previous screen r Rotate DIAL to select the desired application to the screen then push ENTER Push CLEAR to return to the previous screen t Repeat step r until all split screens are selected their application MENU WPT FOCUS LAYOUT MOB CLEAR SUB BRILL RANGE DIAL ENTER CLEAR LAYOUT Screen arrangement Make New Layout D D You can make ...

Страница 15: ...t screen Four split screen is selected Plotter Radar Sounder Video Nav Course Monitor Nav Depth Graph Nav Navigation Nav Temperature Graph Nav Navigation Graphic Detail Nav Navigation Graphic Simple Nav Waypoint Nav Engine Nav Engine Graphic Selectable Application D D Plotter Radar Sounder Video Nav Course Monitor Nav Depth Graph Nav Temperature Graph Nav Navigation Nav Navigation Graphic Detail N...

Страница 16: ... screen layout D D Move a screen layout D D Hold down LAYOUT FOCUS for 3 seconds to en q q ter the screen selection mode Rotate DIAL to select the desired screen to be w w erased then push SUB Push CLEAR to cancel and return to the previous screen before entering the screen selection mode Rotate DIAL to select Erase then push EN e e TER Confirmation screen appears r Rotate DIAL to select Yes then ...

Страница 17: ...Ship function 2 4 Vessel Offset function 2 5 Plotter Display Mode selection 2 5 Waypoint operation 2 6 Route navigation function 2 10 Track function 2 18 Search function 2 24 Ruler function 2 27 Presentation 2 28 Anti Clutter function 2 37 Alarm Setup 2 38 Chart Setup 2 43 Cursor menu operation 2 52 ...

Страница 18: ... COG Course Over Ground When both the heading and COG information are re ceived the vessel icon is displayed as Ô eNAVIGATION SCREEN Appears only when the Navigation function is ON It shows the destination information rPLOTTER DISPLAY INFORMATION Shows the selected plotter display mode display scale radar overlay status and an arrow which indi cates the north The selected plotter display mode icon...

Страница 19: ...urse up AC UP True Motion TM Automatic Range AR Push ENTER to exit the menu screen MENU WPT FOCUS LAYOUT MOB CLEAR SUB BRILL RANGE ENTER CLEAR MENU or RANGE BRILL Basic operation Display brilliance adjustment screen Display range readout Mode Description N UP The top of the plotter display represents North C UP The top of the plotter display represents the direction your course is heading AC UP Th...

Страница 20: ...ons or to change various settings The following summarizes the menu operation flow Push MENU q q The Main menu screen appears The currently selected menu is highlighted Rotate DIAL to select the desired menu and push w w ENTER The Submenu screen appears On the Submenu screen the currently selected menu is highlighted Rotate DIAL to select the desired menu and push e e ENTER r Repeat step e until t...

Страница 21: ...than 3 knots the Vessel Offset function can be used MENU WPT FOCUS LAYOUT MOB CLEAR SUB BRILL RANGE DIAL ENTER CLEAR MENU Vessel Offset menu Original position When the offset value is 2 3 the icon is shift ed to two third from the center of the display Plotter Display Mode selection MENU w Plotter Display Mode The plotter display has five modes and it can be se lected in the Plotter Display Mode m...

Страница 22: ...m and push ENTER See the next page for details If you don t change the waypoint contents go to step e e eRotate DIAL to select Save then push ENTER to save the Waypoint and return to the previous screen If Cancel is selected the setting will be cancelled MENU WPT FOCUS LAYOUT MOB CLEAR SUB BRILL RANGE DIAL ENTER CLEAR Ω WPT NOTE The displayed latitude longitude date time temperature and depth data...

Страница 23: ...lecting p 5 6 q Rotate DIAL to select Group and push EN TER e Rotate DIAL to select the desired group then push ENTER to set and return to the previous screen If CLEAR is pushed the setting will be cancelled Symbol selection q Rotate DIAL to select Symbol and push EN TER w Rotate DIAL to select the desired symbol to indi cate the waypoint on the plotter display then push ENTER to set and return to...

Страница 24: ...d Push Ω to move the cursor backward Time data programming q Rotate DIAL to select Time and push ENTER w Rotate DIAL to set the current UTC time data then push ENTER to input it Push to move the cursor forward Push Ω to move the cursor backward Select AM or PM when the time format is set to 12 hours Temperature data programming q Rotate DIAL to select Temp and push EN TER w Rotate DIAL to set the ...

Страница 25: ...navigate to the destination from the current position See page 2 13 for details When the Goto Waypoint menu is selected Navigation menu Navigation screen Depth data programming q Rotate DIAL to select Depth and push EN TER w Rotate DIAL to set the desired depth data then push ENTER to input it Push to move the cursor forward Push Ω to move the cursor backward Comment programming q Rotate DIAL to s...

Страница 26: ... cursor to the point where you want to begin the route and push ENTER If the cursor points to the present waypoint the cursor menu shows At Way point instead of At Cursor In this case the navigation route will be created using the pres ent waypoint Push r r Ù Ú Ω or to move the cursor to the next waypoint and push ENTER Up to 50 waypoints can be create in one route A blue frag appears on the creat...

Страница 27: ...Comment programming q Rotate DIAL to select Comment and push EN TER w Input a comment of up to 32 characters See page 5 31 for programming details e Rotate DIAL to select OK then push ENTER to set and return to the previous screen If Cancel is selected the Setting Change screen will appear Select Yes if you want to continue to program or select No if you want to cancel the program Color selection ...

Страница 28: ...then push ENTER Rotate DIAL until the Follow Route menu is w w highlighted then push ENTER Rotate DIAL to select the desired route from the e e route list When SUB is pushed the following operations can be made View Detail p 2 14 Reverse Route p 2 15 Push ENTER to start the route navigation r r The navigation screen appears D D Stop Navigation MENU w Navigation u Stop Navigation To cancel the navi...

Страница 29: ...ENU w Navigation u Back Waypoint While Follow Route navigation is ON this function sets the previous waypoint as the destination Push MENU then rotate DIAL until the Naviga q q tion menu is highlighted then push ENTER Rotate DIAL until the Back Waypoint menu is w w highlighted then push ENTER The previous waypoint is set as the destination Reset XTE Cross Track Error D D MENU w Navigation u Reset ...

Страница 30: ...the Route List screen is displayed rotate q q DIAL until the desired route is highlighted then push SUB The Route List Sub Menu screen is displayed Rotate DIAL until the Go on Chart menu is high w w lighted then push ENTER The Route List Sub Menu screen disappears and the cursor automatically moves to the start point of the se lected route Push Route detail screen When the View Detail menu is sele...

Страница 31: ... Reverse Route Waypoint order of a route can be reversed on the Route List Sub Menu screen When the Route List screen is displayed rotate q q DIAL until the desired route is highlighted then push SUB The Route List Sub Menu screen is displayed Rotate DIAL until the Reverse Route menu is w w highlighted then push ENTER The Waypoint order of the route are reversed Navigation screen When the Follow R...

Страница 32: ...NTER to set and return to the previous screen If Cancel is selected the Setting Change screen will appear Select Yes if you want to continue to program or select No if you want to cancel the program Comment programming q Rotate DIAL to select Comment and push EN TER w Input a comment of up to 32 characters See page 5 31 for programming details e Rotate DIAL to select OK then push ENTER to set and ...

Страница 33: ...The Route List Sub Menu screen is displayed Rotate DIAL until the Erase All Route menu is w w highlighted then push ENTER e eRotate DIAL to select OK then push ENTER to erase all route and return to the previous screen If Cancel is selected the Route List erasing will be can celled Calculation Setup menu Calculation Setup D D MENU w Navigation u Calculation Setup The calculation method for distanc...

Страница 34: ...DIAL until the Start Track menu is high w w lighted then push ENTER The track function starts NOTE When 10 track is stored the track function cannot start In this case delete one track data before starting the track function Stop Track D D MENU w Navigation u Stop Track To cancel the tracking follow the steps as described below Push MENU then rotate DIAL until the Track q q menu is highlighted the...

Страница 35: ...ge 5 31 for programming details e Rotate DIAL to select OK then push ENTER to set and return to the previous screen If Cancel is selected the Setting Change screen will appear Select Yes if you want to continue to program or select No if you want to cancel the program Color q Rotate DIAL to select Color and push EN TER w Rotate DIAL to select the desired color then push ENTER to set and return to ...

Страница 36: ...ursor automatically moves to the start point of the selected track Track List D D MENU w Navigation u Track List The track list can be checked Push MENU then rotate DIAL until the Track q q menu is highlighted then push ENTER Rotate DIAL until the Track List menu is high w w lighted then push ENTER The Track List screen is displayed When SUB is pushed the following operations can be made Go on Cha...

Страница 37: ... return to the previous screen If Cancel is selected the Setting Change screen will appear Select Yes if you want to continue to program or select No if you want to cancel the program Comment programming q Rotate DIAL to select Comment and push EN TER w Input a comment of up to 32 characters See page 5 31 for programming details e Rotate DIAL to select OK then push ENTER to set and return to the p...

Страница 38: ... OK then push ENTER to erase all track and return to the previous screen If Cancel is selected the track erasing will be can celled Track List Change Route This function enables a Waypoint to be automatically added to the saved track line When the Track List screen is displayed rotate q q DIAL until the desired track is highlighted then push SUB Rotate DIAL until the Change Route menu is w w highl...

Страница 39: ... as de scribed below Rotate DIAL to select the track method to between Time and Distance Time The system stores and plots the track at the specified interval time Distance The system stores and plots the track at the specified interval distance The tracking interval can be set in the Track Interval Time or Track Interval Distance menu Track Interval Time To change the tracking interval time follow...

Страница 40: ...R to input it See page 5 31 for programming details r rRepeat step e to input a keyword for a port name of up to 20 characters t tRotate DIAL to select OK then push ENTER to search the port by the edited port name If Cancel is selected the setting will be cancelled y Rotate DIAL until the desired port name is high lighted then push ENTER The Port Information screen is displayed On the Port Informa...

Страница 41: ...the Nearest menu is highlight e e ed then push ENTER Nearst Search screen appears Rotate DIAL until the desired menu is highlighted r r then push ENTER Rotate DIAL until the desired port name is high t t lighted then push ENTER The Port Information screen is displayed On the Port Information screen rotate DIAL to select an object The selected object s information is shown on the Information screen...

Страница 42: ...n appears See page 2 12 to stop the navigation e e Port Information Go on Chart This function enables the cursor to move to the speci fied port position on the plotter display When the Port Information screen is displayed ro q q tate DIAL until the desired port is highlighted then push SUB The Port Information Sub Menu screen is displayed Rotate DIAL until the Go on Chart menu is high w w lighted ...

Страница 43: ...on upper right of the cursor instead of From Push r r Ù Ú Ω or to move the cursor to the destination position and push ENTER The distance and the bearing between the two posi t t tions are displayed in the cursor field y If you want to continuously measure the distance to another point push ENTER on the same point as step r Maximum of nine points can be measured u Repeat step r to measure to anoth...

Страница 44: ... can be set only when the Waypoint icon is turned ON in the Show item as described above The Waypoint indication type can be specified to each icon or group The Waypoint icon and group is specified in the Way point List screen p 2 7 Push SUB to display the Sub menu then push q q ENTER to select the desired tab Rotate DIAL until the desired icon or group is high w w lighted then push ENTER Push ENT...

Страница 45: ...displayed on the plotter display Setup MENU w Presentation u Route u Setup The individual Route line indication can be turned ON or OFF This item can be set only when the Route line is turned ON in the Show item as described above NOTE Maximum twenty Route lines can be dis played on the plotter display Push ENTER then rotate DIAL until the desired q q route becomes highlighted Push w w Ω or to tur...

Страница 46: ...u Track u Setup The individualTrack Route line indication can be turned ON or OFF This item can be set only when the Track Route line is turned ON in the Show item as above NOTE Only one Track Route line can be displayed on the plotter display except for the Current Push ENTER then rotate DIAL until the desired q q track is highlighted Push w w Ω or to turn the selected Track Route line indication...

Страница 47: ...nt where the call is transmitted to r Push ENTER to set then exit the DSC menu NOTE When there is an unread message including the position information in Received Call Log the DSC position icon is displayed with bold text DSC Auto Position D D MENU w Presentation u DSC Auto Position The DSC Automatic Position Log indication can be turned ON or OFF Push MENU then rotate DIAL until the Presen q q ta...

Страница 48: ...sh MENU then rotate DIAL until the Presen q q tation menu is highlighted then push ENTER Rotate DIAL until the Memo menu is highlighted w w then push ENTER Rotate DIAL to turn the Memo icon indication ON e e or OFF OFF The Memo icon is not displayed on the plot ter display ON The Memo icon is displayed on the plotter display r Push ENTER to set then exit the Memo menu Memo menu ...

Страница 49: ... set then exit the ATA Symbol menu Description of the icons Icon Description Selected uncalculated mark Normal calculated mark Selected calculated mark CPA TCPA alarm mark The target is close to within a minimum range and time Alarm emit indicator Push CLEAR to cancel the alarm When the tracking of a target disap pears Reset ATA Track D D MENU w Presentation u Reset ATA Track The ATA Track data ca...

Страница 50: ...rm mark in Red The tar get is close to within a minimum range and time The icon blinks and alarm emits Push CLEAR to cancel the alarm AIS data error There is the lack of data in the received AIS signal When the AIS signal has not updated received for a specific time of period the icon starts to blink and alarm emits If the AIS signal has not still updated received for a specific time of period the...

Страница 51: ...n the DSC Automatic Position e e Log indication ON or OFF OFF The course vector is not displayed on your vessel s direction ON The course vector is displayed on your ves sel s direction r Push ENTER to set then exit the Course Vector menu Smart Information D D MENU w Presentation u Smart Information The Smart information function shows an object infor mation when the object is pointed by the curso...

Страница 52: ...e Radar Overlay function overlays a radar display on the plotter display while in the radar transmission status Push MENU then rotate DIAL until the Presen q q tation menu is highlighted then push ENTER Rotate DIAL until the Radar Overlay menu is w w highlighted then push ENTER Rotate DIAL to turn the Radar Overlay function ON e e or OFF OFF A radar display is not overlaid on the plotter display O...

Страница 53: ... plotter screen Push MENU then rotate DIAL until the Anti Clut q q ter menu is highlighted then push ENTER Rotate DIAL to turn the Anti Clutter function ON w w or OFF OFF Normal display ON Some objects disappear and you can eas ily watch the plotter screen Push ENTER to set then exit the Anti Clutter e e menu Anti Clutter menu MENU WPT FOCUS LAYOUT MOB CLEAR SUB BRILL RANGE DIAL ENTER CLEAR MENU Ù...

Страница 54: ...setting push CLEAR Arrival Alarm D D MENU w Alarm Setup u Arrival Alarm When your vessel enters the alarm zone around the destination alarm sounds While the Route navigation when your vessel passes the vertical line of the Waypoint alarm sounds Push MENU then rotate DIAL until the Alarm Set q q up menu is highlighted then push ENTER Rotate DIAL until the Arrival Alarm menu is high w w lighted then...

Страница 55: ...rm zone the beeps will stop If the vessel exits the alarm zone again beeps sound r rPush ENTER to set then exit the XTE Alarm menu To cancel the setting push CLEAR To set the XTE alarm range see XTE Alarm Range setting as described below XTE Alarm range Beeps Destination XTE Alarm Range setting D D MENU w Alarm Setup u XTE Alarm Range Push MENU then rotate DIAL until the Alarm Set q q up menu is h...

Страница 56: ...essel Only when the Guardian zone menu is set to Visible See Guardian Alarm Zone setting as described below r rPush ENTER to set then exit the Guardian Alarm menu To cancel the setting push CLEAR To set the Guardian Alarm range see Guardian Alarm Range setting as described to the right Alarm Setup MENU w Alarm Setup Continued Guardian Alarm Pop up setting D D MENU w Alarm Setup u Guardian Alarm Po...

Страница 57: ... DIAL to set the Guardian Alarm Depth to between 1 m and 2800 m Default 9 m r rPush ENTER to set then exit the Guardian Alarm Depth menu To cancel the setting push CLEAR Guardian Alarm Range menu Guardian Alarm Depth menu Guardian Alarm Zone setting D D MENU w Alarm Setup u Guardian Alarm Zone The alarm zone appearance as a red triangle can be set It appears in your COG direction to search for dan...

Страница 58: ...n is ON A pop up screen appears when the navigation line turns red blue or yellow after the safety check as described above Push ENTER to set then exit the Safety Check r r menu To cancel the setting push CLEAR Safety Check Range setting D D MENU w Alarm Setup u Safety Check Range Push MENU then rotate DIAL until the Alarm Set q q up menu is highlighted then push ENTER Rotate DIAL until the Safety...

Страница 59: ...ush ENTER Rotate DIAL until the desired menu is highlighted e e then push ENTER NOTE While in the Perspective View function is ON TM True Motion cannot be used p 2 5 While in the Radar Overlay function is ON the Per spective View function cannot be used p 2 36 Perspective View Angle MENU w Chart Setup u Perspective View u Angle This item can be set only when the Perspective View function is turned...

Страница 60: ... on the plotter display Push MENU then rotate DIAL until the Chart q q Setup menu is highlighted then push ENTER Rotate DIAL until the Chart Offset menu is high w w lighted then push ENTER Rotate DIAL to turn the Chart Offset function ON e e or OFF OFF The Chart Offset function is OFF ON The plotter map shifts according to the off set value without changing vessel s current position data r rPush E...

Страница 61: ...out changing vessel s current latitude longitude data Push MENU then rotate DIAL until the Chart q q Setup menu is highlighted then push ENTER Rotate DIAL until the Set Offset N S menu is w w highlighted then push ENTER Rotate DIAL to set the offset value at latitude to e e between 3280 ft and 3280 ft in 1 feet steps Push ENTER to set then exit the Set Offset N S r r menu To cancel the setting pus...

Страница 62: ...n is ON grid line is dis played on the plotter display screen Push MENU then rotate DIAL until the Chart q q Setup menu is highlighted then push ENTER Rotate DIAL until the Chart Border Lines menu is w w highlighted then push ENTER Rotate DIAL to turn the Chart Border Lines func e e tion ON or OFF OFF The Chart Border Lines function is OFF ON The border line appears on the plotter dis play screen ...

Страница 63: ...e menu w w is highlighted then push ENTER Rotate DIAL to select the Chart Display Mode from e e All Simple and Manual All All objects appear Simple Natural Features Road Railway Sea bed Type Track Routes Light Sector and Light Animation objects disappear The sounding value disappears when it is deeper than 3 0 meters The water depth value of wrecks and obstructions Rock Wreck Obstruction Defuses d...

Страница 64: ...depth becomes shal lower Manual Shading You can manually set the water depth values Shal low and Deep to change the color of the ocean surface Safety Contour Manual Shallow MENU w Chart Setup u Manual Display Mode u Safety Contour u Manual Shallow This item can be set only when Manual Shading is selected in the Shading Mode item The color of the ocean surface is changed to the Shal low when the wa...

Страница 65: ...etween 0 m and 2800 m in 1 meter step Default 305 m NAV AIDS Lights Buoys Signals Light Sectors Light Animation MENU w Chart Setup u Manual Display Mode u NAV AIDS u Lights Buoys Signals Light Sectors Light Animation This item enables a NAV AIDS aids to navigation icon to be displayed on the plotter display The following NAV AIDS objest s icon indication can be turned ON or OFF Light Lighthouse Bu...

Страница 66: ...ses Depth This item enables the water depth of wrecks and ob structions to be displayed on the plotter display Rotate DIAL until the desired object menu is high q q lighted then push ENTER Rotate DIAL to turn the selected object indication w w ON or OFF OFF The selected object s water depth value is not displayed on the plotter display ON The selected object s water depth value is displayed on the...

Страница 67: ... list Chinese Danish Dutch English Finnish French Ger man Greek Italian Japanese Korean Norwegian Polish Russian Spanish Swedish and Thai are select able r rPush ENTER to set then exit the Chart language menu To cancel the setting push CLEAR Chart Language menu Others MENU w Chart Setup u Manual Display Mode u Natural Features River Lakes Cultural Features Roads Railways Ports Service Landmarks Se...

Страница 68: ... q qAfter pushing ENTER the Memo edit screen ap pears w wRotate DIAL to select Save then push ENTER to save the memo and return to the previous screen If Cancel is selected the setting will be cancelled If you change the memo contents see page 5 28 Ruler CURSOR MENU w Ruler Using the cursor permits you to measure the distance and bearing between two points easily q qAfter pushing ENTER From appear...

Страница 69: ... be started See page 2 15 for details Follow Route Reverse CURSOR MENU w Follow Route Reverse Waypoint order of a Route can be reversed and the Route Navigation automatically starts See page 2 12 to stop the navigation View Detail CURSOR MENU w View Detail You can check a Route detail information See page 2 14 for details Edit Route Info CURSOR MENU w Edit Route Info A Route information can be edi...

Страница 70: ...View Detail Edit Memo Move Memo and Erase Memo When the cursor points to the Memo icon push q q SUB to display the Memo cursor menu Rotate DIAL until the desired menu is highlighted w w then push ENTER Cursor menu operation Continued On the Track line D D The cursor menu on the Track line includes the View Detail Edit Track Info Change Route and Erase Track When the cursor points to the Track line...

Страница 71: ...e AIS icon D D The cursor menu on the AIS icon includes the Select View Detail and Send Individual Call When the cursor points to the AIS icon push SUB q q to display the AIS cursor menu Rotate DIAL until the desired menu is highlighted w w then push ENTER Cursor menu On the ATA icon Select CURSOR MENU w Select The selected ATA target s information appears on the lower right of the display It show...

Страница 72: ...ransceiver is connected you can transmit an Individual DSC call to the selected DSC caller See page 5 16 for details On the DSC position icon D D The cursor menu on the DSC position icon includes the View Detail and Send Individual Call When the cursor points to the DSC position icon q q push SUB to display the DSC cursor menu Rotate DIAL until the desired menu is highlighted w w then push ENTER C...

Страница 73: ...Shift function 3 14 Heading Line OFF function 3 15 Power Save function 3 16 IR function 3 17 Presentation 3 18 Radar setup 3 20 Distance measurement 3 22 Bearing and Distance measurement 3 24 Advanced measurements 3 25 Alarm zone setting 3 27 ATA Automatic Tracking Aid and AIS Automatic Identification System 3 28 ATA menu setting 3 28 ATA operation 3 29 Plotting marks 3 29 Course speed vector and ...

Страница 74: ...HAIR CURSOR Appears on the screen when is pushed While the cross hair cursor is displayed push SUB to open the cursor menu See the page 3 34 for details y HEADING LINE Heading line indicates the ship bow u NORTH MARK The north mark shows the true north direction i ZONE ALARM INDICATOR Displayed when the Zone Alarm function is ON p 3 27 o FUNCTION INDICATOR Displayed when these functions below are ...

Страница 75: ...ode menu becomes high lighted Push ENTER and then rotate DIAL to select one of Head up H UP North up N UP Course up C UP or True Motion TM screens N UP and C UP screens require external Heading data TM screen requires Heading position COG and SOG data See p 3 10 for details Push ENTER and then push CLEAR to exit the menu screen CAUTION When setting the SEA in maximum level close targets are blanke...

Страница 76: ...hoes q Push MENU and then ENTER to enter the GAIN menu w Rotate DIAL until the GAIN menu becomes highlighted e Push ENTER to GAIN level adjustment mode The GAIN level indicator appears r Rotate DIAL to adjust the GAIN level NOTE DO NOT reduce the reflection echoes too much otherwise you may miss weaker targets t Push ENTER to exit the GAIN adjustment mode GAIN level indicator GAIN function menu ME...

Страница 77: ...tion menu This function serves to eliminate echoes from waves at close range Reduce the receiver gain for close ob jects within a radius of 8 nm to eliminate sea clutter D SEA function q Push MENU and then ENTER to enter the GAIN menu w Rotate DIAL until the SEA menu becomes highlighted e Push ENTER to turn the SEA level indicator r Rotate DIAL to adjust SEA level t Push ENTER to exit the SEA adju...

Страница 78: ...l the RAIN menu becomes highlighted e Push ENTER to turn the RAIN level indicator r Rotate DIAL to adjust the RAIN level NOTE DO NOT reduce the reflection echoes too much otherwise you may miss weaker targets t Push ENTER to exit the RAIN adjustment screen Adjust RAIN control Small echos RAIN menu MENU WPT FOCUS LAYOUT MOB CLEAR SUB BRILL u DIAL ENTER CLEAR MENU LAYOUT RAIN function menu ...

Страница 79: ... enter the GAIN menu w Rotate DIAL until the TUNE menu becomes highlighted e Rotate DIAL to select Manual menu r Push ENTER and then rotate DIAL to adjust the TUNE level The Tuning window appears t Push ENTER to exit the TUNE adjustment mode D Automatic tuning q Push MENU and then ENTER to enter the GAIN menu w Rotate DIAL until the TUNE menu becomes highlighted e Rotate DIAL to select Auto menu 1...

Страница 80: ...s menu becomes highlighted r Push ENTER and then rotate DIAL until the Stretch menu becomes highlighted t Push ENTER and then rotate DIAL to turn the function ON Push ENTER ES appears in the upper left of the screen when the function is activated y Push ENTER and then push CLEAR to exit the menu screen NOTE Turn OFF this function during normal opera tion With Stretch function ON Echo Stretch indic...

Страница 81: ...enter the Menu screen w Rotate DIAL until the Radar Setup menu be comes highlighted e Push ENTER and then rotate DIAL until the Signal Process menu becomes highlighted r Push ENTER and then rotate DIAL until the Pulse menu becomes highlighted t Push ENTER and then rotate DIAL to select a desired pulse type Short or Long y Push ENTER SP or LP appears in the upper left of the screen u Push CLEAR to ...

Страница 82: ... of the screen indi cates own ship s heading North up N UP The top of the radar display represents North Course up C UP The top of the radar display represents the heading True Motion TM The plotter display is fixed and your vessel icon moves on the map When your vessel icon approach to the edge of the display the radar map will automatically switch e Push ENTER and then CLEAR to exit the menu scr...

Страница 83: ... and direction defined by the calculated true or relative course and speed The vector will be displayed on the target Display accuracy may increase by the self ship and course change of target or acceleration slowdown etc Tracking the target q Push MENU and then rotate DIAL until the Ac quire Target becomes highlighted w Push ENTER A white squre cursor appears on the screen e Push to move the M cu...

Страница 84: ...w Push ENTER and then rotate DIAL to select the ON option e Push ENTER to activate the Zoom function The Zoom window appears in the lower left of the screen r Push to move the dotted box to the de sired target t Push ENTER to set the focused area With Zoom function ON Zoom window Normal screen Zoom function menu MENU WPT FOCUS LAYOUT MOB CLEAR SUB BRILL u DIAL ENTER CLEAR MENU LAYOUT ...

Страница 85: ...DIAL until the Trail Setup menu becomes highlighted r Push ENTER and then rotate DIAL until the Trail Color menu becomes highlighted t Push ENTER then rotate DIAL to select a de sired trail color Push ENTER Blue Yellow Green Red Orange White and Multi mixed color are selectable Default Blue y Push CLEAR to exit the menu screen Using the Trail function MENU w Trail u Trail q Push MENU to enter the ...

Страница 86: ...ter the Menu screen w Rotate DIAL until the Center Shift menu be comes highlighted e Push ENTER and then rotate DIAL to select the ON option r Push ENTER to activate the Center Shift function The Cursor window appears in the upper right of the screen t Push to move the cursor where you want to shift the center of the screen Max offsetting is up to 75 of the screen y Push ENTER to shift the screen ...

Страница 87: ...Heading Line hides while holding down ENTER e Release ENTER to return The Heading Line can be also hidden as below q Push ENTER to enter the Quick Menu 2 and then push u four times to select the Heading Line menu w Hold down ENTER to hide the Heading Line Release ENTER to return The Heading Line disappers while holding down ENTER The Heading Line Heading Line OFF function menu 1 2 3 4 5 6 7 8 9 10...

Страница 88: ...he scanning standby time q Push MENU and then rotate DIAL until Save menu becomes highlighted w Push ENTER and then rotate DIAL to select the Save menu e Rotate DIAL until the Save Time menu becomes highlighted r Rotate DIAL to select the standby time option 1 5 10 15 20 and 30 minutes are available Default 5 minutes t Push ENTER and then push CLEAR to exit the menu screen D Using the power save f...

Страница 89: ...rotate DIAL until the Signal Process menu becomes highlighted r Push ENTER and then rotate DIAL until the IR menu becomes highlighted t Push ENTER and then rotate DIAL to select the IR function 1 2 or OFF Default 2 IR1 or IR2 appears in the upper left of the screen when the function is activated y Push ENTER and then push CLEAR to exit the menu screen With IR function ON IR 1 IR indicator appears ...

Страница 90: ... highlighted and then push ENTER e Rotate DIAL until the desired menu is highlighted and then push ENTER Show The Waypoint icon indication can be turned ON or OFF ON The Waypoint icon is displayed on the radar display OFF The Waypoint icon is not displayed on the radar display Setup The Waypoint icon can be selected from the list This item can be set only when the Waypoint icon is turned ON in the...

Страница 91: ...D EBL Bearing Reference except HDG and CSE TRUE True or magnetic direction 360 R Relative direction PT SB Bow direction Graduated ring Weak Strong Blue Green Yellow Orange Echo level Graduated ring Weak Strong Blue Green Yellow Orange Echo level PPI area Narrow D PPI Area Select Narrow to hide the area outside the gradu ated ring D Ring Select the fixed range ring brightness OFF Turn OFF the fixed...

Страница 92: ...ge You can distinguish between weak reflections and strong re flections easily SEA Slope The SEA function has 4 selectable levels Select the level from 1 to 4 for high resolution de pending the radar antenna position Pulse Select the pulse width Short Short pulse Long Long pulse D Range Setup Set the selectable Radar ranges MENU WPT FOCUS LAYOUT MOB CLEAR SUB BRILL u DIAL ENTER CLEAR MENU LAYOUT T...

Страница 93: ...R Tune Level indicator S Tune Level indicator Setting the TX inhibit area TX inhibit area Scanner Monitor screen Tuning Level indicator Setting the TX inhibit area D Timing Adjust Correct the distance from 0 to 30 Default 25 D HDG Adjust Adjust the SHM position from 180º to 180º in 0 2º Default 0 D ANT Rotate Select OFF to stop the antenna rotation D Scanner Monitor Displays the Scanner informatio...

Страница 94: ...rom your own ship to a target VRM2 Functions as same as VRM1 Two measurement procedures are available Operat ing them separately or jointly is possible The Distance unit nautical mile nm Statute mile sm or kilometer km is selected in the Initial Set ting in the General menu of the System Setup menu p 5 33 q Push MENU to enter the Menu screen w Rotate DIAL until the Presentation menu be comes highl...

Страница 95: ...is displayed in the VRM1 readout Or the degree between the ship and target is displayed in the EBL1 readout t Push ENTER The yellow dotted circle becomes red dotted circle Or yellow dotted line becomes red dotted line y Rotate DIAL until the VRM2 menu or EBL2 menu becomes highlighted u Push ENTER then rotate DIAL to set the marker The yellow dotted circle appears Or yellow dotted line appears The ...

Страница 96: ...menu becomes highlighted r Push ENTER and then rotate DIAL to set the marker The yellow dotted line appears The EBL1 EBL2 readout indicates the target bearing 0 to 360 R Relative direction when 360 R is se lected in the EBL Bearing Reference menu see p 3 19 P S 0 to 180 Bow direction when PT SB is selected in the EBL Bearing Reference menu see p 3 19 0 to 360 T True or magnetic bearing when select...

Страница 97: ...ush ENTER The yellow dotted circle becomes red dotted circle q Push MENU to enter the Menu screen w Rotate DIAL until the EBL VRM menu becomes highlighted e Push ENTER and then rotate DIAL until the EBL1 menu becomes highlighted Measure the distance between two targets Measure the bearing between two targets y Rotate DIAL until the Offset EBL VRM1 menu becomes highlighted u Push ENTER and then rot...

Страница 98: ... your ship is stationary during the plotting time the converted speed and direction become absolute The converted speed unit is knots or kilometers hour when the unit selected in the Initial Setup menu is nau tical miles nm sea miles sm or kilometers km re spectively r The EBL1 readout shows the course direction of the target Measuring the distance and course from a waypoint q Display a waypoint s...

Страница 99: ...e Alarm Setup menu becomes highlighted w Push ENTER and then rotate DIAL to select Zone Alarm1 or Zone Alarm2 Two Zones can be set for diferent directions and targets e Push ENTER and then rotate DIAL to select IN or OUT IN Alarm sounds when the target comes into the zone OUT Alarm sounds when the target goes out of the zone r Push ENTER and then push to move the cursor to where you want to set th...

Страница 100: ...ng Set the ATA AIS menu items before using the ATA or AIS function q Push MENU and then rotate DIAL until the Tool menu becomes highlighted w Push ENTER and then rotate DIAL until the ATA AIS menu becomes highlighted e Push ENTER and then rotate DIAL to select the item D ATA AIS Alarm The ATA and AIS Alarm function can be turned ON or OFF OFF The ATA and AIS Alarm function is OFF ON The ATA and AI...

Страница 101: ... get is deleted from the ATA list When a target advances within a setting value the mark changes to a triangle blinks and sounds alarm sound D Target information q Push to move the cursor on the de sired target w Push ENTER The selected target information is displayed on the information window D Select the target on the information window q Push to move the cursor on the target information window ...

Страница 102: ... select ATA Track and then se lect ON e Push ENTER D Setting the update interval q Push MENU and then rotate DIAL until the Tool menu becomes highlighted w Push ENTER and then rotate DIAL to select ATA AIS e Push ENTER and then rotate DIAL to select Target Track r Push ENTER and then rotate DIAL to select the target update interval Default 1min D Course and speed vector D Plots Course speed vector...

Страница 103: ...lected AIS target Push SUB on the target to open MMSI code Course Speed Closest Point of Approach Time to Closest Point of Approach D Course and speed vector D Plotting marks Vector Current position Vector time Target s predicted positon ATA AIS Course vector ROT Vector time D Plots The plot displays the past position of targets as dots Target goes straight Target turns right Target reduces speed ...

Страница 104: ...push SUB w Select an option and then push ENTER Select The selected target information is displayed on the information win dow View Detail The selected target s full AIS data is displayed on the information window Send Visual Call Open the Send DSC window Note A companion Icom transceiver must be connected to the Main unit to make a DSC call D Select the target on the information window q Push to ...

Страница 105: ...desired item and push ENTER See the page 2 7 for details If you don t change the waypoint contents go to step e e Rotate DIAL to select Save and then push ENTER to save the waypoint and return to the previous screen If Cancel is selected the setting will be can celled The waypoin can be also added as below q Push to move the cursor on the de sired position q Push SUB and select Add Waypoint and th...

Страница 106: ...e can be at tached to each memo q qAfter pushing ENTER the Memo edit screen ap pears w wRotate DIAL to select Save and then push EN TER to save the contents and return to the previous screen If Cancel is selected the setting will be cancelled To change the memo contents see the page 5 28 Acquire Target CURSOR MENU w Acquire Target The target can be tracked as below See the page 3 11 for details q ...

Страница 107: ...aypoint icon includes the Go to Waypoint View Detail Edit Waypoint Move Way point Change Memo and Erase Waypoint When the cursor points to the Waypoint icon push q q SUB to display the Waypoint cursor menu Rotate DIAL until the desired menu is highlighted w w then push ENTER Cursor menu On the Memo icon Go to Memo CURSOR MENU w Go to Memo The Goto Memo navigation means that the vessel is navigated...

Страница 108: ...con includes the Select View Detail and Send Individual Call When the cursor points to the AIS icon push SUB q q to display the AIS cursor menu Rotate DIAL until the desired menu is highlighted w w then push ENTER Cursor menu On the ATA icon Select CURSOR MENU w Select The selected ATA target s information appears on the lower right of the display It shows the CSE SPD CPA TCPA and ATA No informati...

Страница 109: ...URSOR MENU w Send Individual Call When a transceiver is connected you can transmit an Individual DSC call to the selected DSC position See the page 5 16 for details On the DSC position icon D D The cursor menu on the DSC position icon includes the View Detail and Send Individual Call When the cursor points to the DSC position icon q q push SUB to display the DSC cursor menu Rotate DIAL until the d...

Страница 110: ...ort ranges and as a result of large strongly reflective targets They can be reduced with proper adjustment of the SEA control See p 3 5 for the SEA function Radar uses a form of electromagnetic radiation which like light can be reflected Because of this property some objects may cause false echoes on the screen where in fact no targets actually exist These echoes may appear if a large vessel bridg...

Страница 111: ...hort range is very important Minimum range is determined primarily by transmitter pulse length vertical beam width and height of the scanner unit The shorter the transmission time the quicker the return echoes can be received and their distance measured The ability to see targets very close to the ship is de creased if the scanner is mounted too high off the water because the bottom of the vertica...

Страница 112: ... horizontal beam width and transmit pulse width Sometimes it is difficult to detect two targets which are separated by short distances or which are in the same direction Distance resolution When two targets are separated by more than the pulse width they appear as two echoes When two targets are not separated by more than the pulse width they appear as 1 echo Transmit pulse Echoes Target 1 Target ...

Страница 113: ...4 11 STC Setting of Immunity to Air Bubbles 4 13 Frequency Setting 4 14 Manual Setting of Depth Range 4 15 Zoom Mode operation 4 17 Setting the Display speed 4 21 Alarm Setup 4 22 Bottom Line 4 25 Cursor setting 4 26 Depth Digit 4 27 Display Color setting 4 28 Depth Lines setting 4 29 Sounder Setup 4 30 Waypoint operation 4 33 ...

Страница 114: ...ock A Scope These screens cannot be selected on 1 4 screen Screen name Indication Screen name Indication Standard screen This screen shows an image of underwater that is detected at ei ther of a high H or low L frequency Standard Bottom Zoom in screen This screen con sists of the Standard screen and the Bot tom zoom screen The zoomed area is the bottom Dual screen This screen shows two images of u...

Страница 115: ...28 The image sensitivity should be adjusted so that the portion close to the sea bottom is indicated in red If this portion has a yellow green color the depth or the shape of sea bottom may not be detected due to weak reflection from the sea bot tom e DEPTH This field shows the current depth of water If the level of reflections from the bottom is low this may not be displayed r OPERATION MODE When...

Страница 116: ...qPush MENU to enter the Menu screen w Rotate DIAL until the Frequency Mode menu be comes highlighted e Push ENTER to enter the Frequency Mode menu t Rotate DIAL to select the function 50kHz 200kHz and Dual are selectable y Push ENTER to set then exit the Frequency Mode menu To cancel the setting push CLEAR Dual screen D D MENU w Frequency Mode u Dual Frequency Mode menu Highfrequency image Lowfreq...

Страница 117: ... 2 5 10 20 30 40 50 60 70 80 90 100 and 150 m are selectable Default 20 m y Push ENTER to set then exit the Marker Zoom Range menu To cancel the setting push CLEAR Turning ON the Marker Zoom qPush MENU to enter the Menu screen w Rotate DIAL until the Zoom menu becomes high lighted ePush ENTER to enter the Zoom menu r Rotate DIAL until the Zoom Mode menu becomes highlighted and push ENTER t Rotate ...

Страница 118: ...0 50 60 70 80 90 100 and 150 m are selectable Default 20 m y Push ENTER to set then exit the Bottom Zoom Range menu To cancel the setting push CLEAR Turning ON the Bottom Zoom qPush MENU to enter the Menu screen w Rotate DIAL until the Zoom menu becomes high lighted ePush ENTER to enter the Zoom menu r Rotate DIAL until the Zoom Mode menu becomes highlighted and push ENTER t Rotate DIAL to select ...

Страница 119: ...Rotate DIAL to select the range 2 5 10 m are selectable Default 5 m y Push ENTER to set then exit the Bottom Lock Range menu To cancel the setting push CLEAR Turning ON the Bottom Lock qPush MENU to enter the Menu screen w Rotate DIAL until the Zoom menu becomes high lighted ePush ENTER to enter the Zoom menu r Rotate DIAL until the Zoom Mode menu becomes highlighted and push ENTER t Rotate DIAL t...

Страница 120: ... in red due to large amplitude y STANDARD IMAGE This image is the same as that on the Standard screen Turning ON the A Scope qPush MENU to enter the Menu screen w Rotate DIAL until the A Scope menu becomes highlighted ePush ENTER to enter the A Scope menu r Rotate DIAL to turn ON the function t Push ENTER to set then exit the A Scope menu To cancel the setting push CLEAR The A scope image represen...

Страница 121: ...or one or more times to select the depth w w range The display range readout shows the maximum range of the screen Push BRILL e e then adjust the display brilliance backlighting of the key and color mode day night p 1 7 r Push ENTER then adjust the gain 50kHz 200kHz or STC 50kHz or 200kHz pp 1 3 4 12 4 13 MENU WPT FOCUS LAYOUT MOB CLEAR SUB BRILL RANGE DIAL ENTER BRILL MENU LAYOUT RANGE RANGE Basi...

Страница 122: ...system however permits the bottom image to be al ways displayed on the screen To use Auto Mode operation proceed as follows Push MENU and push ENTER to enter the Auto q q Mode menu Rotate DIAL to turn the Auto Mode operation ON w w or OFF e Push ENTER to set then exit the Auto Mode menu Push CLEAR to cancel and return to the previous menu MENU WPT FOCUS LAYOUT MOB CLEAR SUB BRILL RANGE DIAL ENTER ...

Страница 123: ...becomes highlighted Push ENTER then rotate DIAL until the desired e e setting Range or Range GAIN become high lighted Range Automatically sets the Depth range Range Gain Automatically sets the Depth range and Gain r Push ENTER to set the setting t Push CLEAR one or more times to exit the Menu screen MENU WPT FOCUS LAYOUT MOB CLEAR SUB BRILL RANGE DIAL ENTER CLEAR MENU Auto Mode Setup menu Item sel...

Страница 124: ... then rotate DIAL until the desired w w frequency gain 50kHz GAIN or 200kHz GAIN become highlighted Push CLEAR to return to the previous menu Push ENTER to enter the Gain adjustment mode e e then rotate DIAL to adjust the gain r Push ENTER to exit the GAIN menu MENU WPT FOCUS LAYOUT MOB CLEAR SUB BRILL RANGE DIAL ENTER CLEAR MENU GAIN menu Gain adjustment readout The sensitivity setting is critica...

Страница 125: ...0kHz STC or 200kHz STC become highlighted Push CLEAR to return to the previous menu Push ENTER to enter the STC adjustment mode e e then rotate DIAL to adjust to the desired immunity level r Push ENTER to exit the STC menu MENU WPT FOCUS LAYOUT MOB CLEAR SUB BRILL RANGE DIAL ENTER CLEAR MENU STC menu STC adjustment readout This setting set the STC effective from 1 2 or 3 1 STC setting is effective...

Страница 126: ...the Menu screen Push CLEAR to cancel and return to the previous menu Push q q p q t or u to move the cursor on the frequency icon The icon s color change to orange Push SUB to change the frequency w w MENU WPT FOCUS LAYOUT MOB CLEAR SUB BRILL RANGE DIAL ENTER CLEAR MENU Frequency Low L High H Directivity directional angle High large Low small Depth coverage Deep Shallow Resolution detection of fis...

Страница 127: ...creen image stands To set the depth shift proceed as follows Push MENU and rotate DIAL until the Range q q Shift menu becomes highlighted Push ENTER to enter the Range Shift adjustment w w mode then rotate DIAL to adjust the Range Shift To return to the previous screen push CLEAR e Push ENTER to exit the Range Shift menu MENU WPT FOCUS LAYOUT MOB CLEAR SUB BRILL RANGE RANGE RANGE MENU WPT FOCUS LA...

Страница 128: ...OFF t Repeat step r until all of your desired ranges turn ON y Push CLEAR one or more times to exit the Menu screen MENU WPT FOCUS LAYOUT MOB CLEAR SUB BRILL RANGE DIAL ENTER CLEAR MENU Range Setup menu Range Setup D D MENU w Sounder Setup u Range Setup Sounder Range Setup readout Unit of the Depth range Standard depth ranges m meters default 2 5 10 20 30 40 50 60 70 80 90 100 150 200 250 300 350 ...

Страница 129: ...tance from vessel Push MENU and rotate DIAL until the Zoom q q menu becomes highlighted Push ENTER then rotate DIAL until the Zoom w w Mode menu becomes highlighted Push ENTER then rotate DIAL to select the de e e sired Zoom operations from Maker Zoom Bottom Zoom or Bottom Lock r Push ENTER to set the Zoom operation and exit the Menu screen t Rotate DIAL to set the Zoom area Push CLEAR to cancel a...

Страница 130: ... Marker Zoom Range w w Push CLEAR one or more times to exit the Menu e e screen Marker Zoom expands the specified under water area The Marker Zoom Range is specified distance from vessel Marker Zoom Range menu Marker Zoom readout Marker Zoom operation D D Marker Zoom Range setting D D MENU w Zoom u Marker Zoom range Appears The Zoom area can be changed by rotating DIAL Zoom area ...

Страница 131: ...10 m steps and 150 m Default 20 m Push ENTER to set the Bottom Zoom Range w w Push CLEAR one or more times to exit the Menu e e screen Bottom Zoom expands the specified under water area The Bottom Zoom Range is specified distance from bottom Bottom Zoom Range menu Bottom Zoom operation D D Bottom Zoom Range setting D D MENU w Zoom u Bottom Zoom range Bottom Zoom readout Appears ...

Страница 132: ... m Push ENTER to set the Bottom Zoom Range w w Push CLEAR one or more times to exit the Menu e e screen Bottom Lock expands the specified under water area The zoom area is around bottom Bottom Lock menu Bottom Lock operation D D Bottom Lock Range setting D D MENU w Zoom u Bottom Lock range Bottom Lock readout Appears ...

Страница 133: ... w w sired Scroll speed The selectable speed are Auto 2 1 1 2 1 4 1 8 and Pause Default 1 To return to the previous screen push CLEAR Push ENTER to set the scroll speed and exit the e e Menu screen Push CLEAR to cancel and return to the previous menu When Auto is selected scroll speed will change de pending on the SOG Speed Over Ground or STW Speed Through the Water MENU WPT FOCUS LAYOUT MOB CLEAR...

Страница 134: ...w Alarm is displayed on the screen When the ship leaves the area an alarm sound stops Deep Alarm When the ship enters an area where the depth of water exceeds the speci fied limit an alarm sounds and Deep Alarm is displayed on the screen When the ship leaves the area an alarm sound stops Fish Alarm When a fish school is detected with in the specified bounds an alarm sounds Fish Alarm is displayed ...

Страница 135: ...EAR one or more times to exit the Menu e e screen Shallow Alarm Depth menu Shallow Alarm Depth setting D D MENU w Alarm Setup u Shallow Alarm Depth Rotate DIAL to adjust the Deep Alarm Depth q q The adjustable depth are 0 1 to 99 9 m in 0 1 m steps and 100 m to 2400 m in 1 m steps Default 0 1 m Push ENTER to set the Deep Alarm Depth w w Push CLEAR one or more times to exit the Menu e e screen Deep...

Страница 136: ...ish Alarm Shallow setting D D MENU w Alarm Setup u Fish Alarm Shallow Fish Alarm Deep setting D D MENU w Alarm Setup u Fish Alarm Deep Rotate DIAL to adjust the Temp Alarm Lower q q The adjustable range are 0 0 to 40 0 C in 0 1 C steps Default Temp Alarm Lower 15 C Temp Alarm Upper 25 C Push ENTER to set the Temp Alarm Upper w w Push CLEAR one or more times to exit the Menu e e screen Temp Alarm L...

Страница 137: ...a q q tion menu becomes highlighted Push ENTER then rotate DIAL to select the Bot w w tom Line Push ENTER then rotate DIAL to turn the Bottom e e Line ON or OFF r Push ENTER to set then push CLEAR one or more times to exit the Menu screen MENU WPT FOCUS LAYOUT MOB CLEAR SUB BRILL RANGE DIAL ENTER CLEAR MENU Bottom Line MENU w Presentation u Bottom Line Bottom Line readout Bottom line ...

Страница 138: ...omes highlighted Push ENTER then rotate DIAL to select the de e e sired cursor type r Push ENTER to set then push CLEAR one or more times to exit the Menu screen MENU WPT FOCUS LAYOUT MOB CLEAR SUB BRILL RANGE DIAL ENTER CLEAR MENU Cursor setting MENU w Presentation u Cursor The cursor is set to Range The cursor is set to Time The cursor is set to Normal Time difference 1 min 04 sec Depth 21 3 m P...

Страница 139: ...il the Depth w w Digit menu becomes highlighted Push ENTER then rotate DIAL to set to the de e e sired Depth Digit Small Large and OFF r Push ENTER to set then push CLEAR one or more times to exit the Menu screen MENU WPT FOCUS LAYOUT MOB CLEAR SUB BRILL RANGE DIAL ENTER CLEAR MENU Depth Digit MENU w Presentation u Depth Digit Depth Digit Depth Digit The Depth Digit is set to Large The Depth Digit...

Страница 140: ...until the Color w w Palette menu becomes highlighted Push ENTER then rotate DIAL to set to the de e e sired Color Palette r Push ENTER to set then push CLEAR one or more times to exit the Menu screen MENU WPT FOCUS LAYOUT MOB CLEAR SUB BRILL RANGE DIAL ENTER CLEAR MENU Display Color setting MENU w Presentation u Color Palette The Color Palette is Multi Blue The Color Palette is Multi Black The Col...

Страница 141: ... MENU and rotate DIAL until the Presenta q q tion menu becomes highlighted Push ENTER then rotate DIAL until the Depth w w Line menu becomes highlighted Push ENTER then rotate DIAL to turn the Depth e e Line ON or OFF r Push ENTER to set then push CLEAR one or more times to exit the Menu screen Depth Lines menu MENU WPT FOCUS LAYOUT MOB CLEAR SUB BRILL RANGE DIAL ENTER CLEAR MENU The Depth Line is...

Страница 142: ...en push CLEAR one or more times to exit the Menu screen MENU WPT FOCUS LAYOUT MOB CLEAR SUB BRILL RANGE DIAL ENTER CLEAR MENU Sounder Setup menu The system has an interference rejection function that removes inductive interference derived by a generator on the ship or noise disturbance caused by a Sounder of other ships Default ON OFF Turn OFF the Interference Rejection function ON Turn ON the Int...

Страница 143: ...een Default OFF OFF Turn OFF the Clutter function 1 to 5 Turn ON the Clutter function and set the un displayed color level as shown below Clutter menu Clutter setting D D MENU w Sounder Setup u Clutter The transmission of the sounder can be paused for maintenance the transducer OFF Pause the transmission ON Restart the transmission Transmission menu Transmission Pause D D MENU w Sounder Setup u Tr...

Страница 144: ...g causes an error to occur adjust the pulse rate while referring to the speed reading displayed on the screen r When you finish correcting the ship speed push ENTER t Rotate DIAL to select the Save button then push ENTER The following describes how to correct the water tem perature detected by the temperature sensor Select the Temp on the Sounder Adjustment q q screen Push ENTER to enter the tempe...

Страница 145: ...inue to program or select No if you want to cancel the program Push WPT to create the waypoint to the your cur q q rent position The Waypoint setting screen appears Rotate DIAL to select the desired item and push w w ENTER If you do not change the waypoint contents go to step e Name See page 2 6 Group See page 2 6 Symbol See page 2 7 Position See page 2 7 Date See page 2 7 Time See page 2 8 Temper...

Страница 146: ......

Страница 147: ...5 1 COMMON SETTING Section 5 Tool 5 2 Text programming 5 31 Video Screen operation 5 38 Navigation Screen operation 5 41 GPS Setup Datum Abbreviation 5 43 Specification 5 45 ...

Страница 148: ... Sort Goto Waypoint Go on Chart Add Waypoint Edit Wapoint Erase Waypoint Erase All Waypoint y Rotate DIAL to select the desired Waypoint The selected Waypoint data are displayed u Push CLEAR to exit the Waypoint menu Waypoint List menu Waypoint List screen Sort menu Waypoint List Sort The registered Waypoint data can be sorted by its Symbol Name Group Comment Position Date Time Temperature Depth B...

Страница 149: ...e e e comes highlighted and push ENTER r The Goto Waypoint navigation starts The navigation screen appears Goto Waypoint menu Navigation screen Waypoint List Go on Chart This function enables the cursor to move to the se lected Waypoint on the plotter display When the Waypoint List is displayed rotate DIAL q q until the desired waypoint is highlighted then push SUB The Waypoint Sub Menu screen is ...

Страница 150: ... setting will be cancelled Add Waypoint menu Waypoint List Edit Waypoint A waypoint contents can be edited on the Waypoint Sub Menu screen When the Waypoint List is displayed rotate DIAL q q until the desired waypoint becomes highlighted Push SUB to display the Waypoint Sub Menu w w screen Rotate DIAL until the Edit Waypoint menu be e e comes highlighted and push ENTER Waypoint screen appears r Ro...

Страница 151: ...select OK then push ENTER to erase the Waypoint and return to the previous screen If Cancel is selected the waypoint erasing will be can celled Erase Waypoint menu Waypoint List Erase All Waypoint A waypoint can be erased on the Waypoint Sub Menu screen NOTE If the waypoint is set as destination or is part of a route it can not be erased When the Waypoint List is displayed push SUB to q q display ...

Страница 152: ...nt Group List Add Waypoint Group A new Waypoint Group can be created on the Way point Sub Menu screen NOTE The maximum number of waypoints in a Way point Group is 100 When the Waypoint Group List is displayed push q q SUB to display the Waypoint Group Sub Menu screen Push ENTER to enter the Add Group menu w w Rotate DIAL until the Group Name menu be e e comes highlighted and push ENTER See page 5 ...

Страница 153: ...aypoint Group menu Waypoint Group List Erase Group A Waypoint Group can be erased on the Waypoint Group Sub Menu screen When the Waypoint Group List is displayed rotate q q DIAL until the desired waypoint group becomes highlighted Push SUB to display the Waypoint Group Sub w w Menu screen Rotate DIAL until the Erase Group menu be e e comes highlighted and push ENTER r Rotate DIAL to select OK then...

Страница 154: ...displayed on the ATA list can be cleared on the ATA Sub Menu screen When the ATA List is displayed rotate DIAL until q q the desired target is highlighted Push SUB to display the ATA Sub Menu screen w w Rotate DIAL until the Clear Target menu is high e e lighted and push ENTER r Rotate DIAL to select OK then push ENTER to clear the ATA and return to the previous screen If Cancel is selected the AT...

Страница 155: ... can be made View Detail Send Individual Register ID r rPush CLEAR to exit the AIS menu AIS List screen View Detail screen Time to Closest Point of Approach Closest Point of Approach MMSI Code Speed Course AIS List View Detail The detail screen shows information about the select ed AIS target When the AIS List is displayed rotate DIAL until q q the desired target is highlighted Push SUB to display...

Страница 156: ...nd Individual menu is e e highlighted and push ENTER The Send DSC screen is displayed Rotate DIAL r r to select the desired Intership chan nel and push ENTER Rotate DIAL t t to select TX and push ENTER Sending Individual Call appears If Channel 70 is busy the transceiver stands by until the channel becomes clear If the transceiver cannot make the call TX Error ap pears Select Retry or Exit and pus...

Страница 157: ...y the AIS Sub Menu screen Rotate DIAL until the Register ID menu be w w comes highlighted and push ENTER If you want to change its name rotate DIAL to select Name then push ENTER Text programming screen appears then program its name e eRotate DIAL to select Save then push ENTER to save the ID and name and return to the previous screen If Cancel is selected the AIS target IDs and its name registrat...

Страница 158: ...ed on the Safety Message List Sub Menu screen When the Safety Message List is displayed rotate q q DIAL until the desired Source ID becomes high lighted Push SUB to display the Safety Message List Sub w w Menu screen Rotate DIAL until the Erase Message menu be e e comes highlighted and push ENTER r Rotate DIAL to select OK then push ENTER to erase the selected Message and return to the previ ous s...

Страница 159: ...nd TCPA reaches the limit CPA MENU w Tool u ATA AIS u CPA This setting helps you find a dangerous target to avoid a collision with alarm when both CPA Closest Point of Approach and TCPA Time to CPA becomes below this setting value the approach watch area Rotate DIAL to set the CPA value to between 0 50 nm and 12 0 nm in 0 01 nm step Default 0 50 nm TCPA MENU w Tool u ATA AIS u TCPA This setting he...

Страница 160: ...h is transmitted in the Range setup setting area are dis played Range of AIS Range Setup MENU w Tool u ATA AIS u Range of AIS u Range Setup Rotate DIAL to set the AIS information display range to between 0 25 nm and 24 00 nm in 1 nm step Default 0 50 nm Vector Mode MENU w Tool u ATA AIS u Vector Mode True True vector The predicted true motion of a target as the result of your own ship s direction ...

Страница 161: ...ived ON The AIS Safety message is displayed on the pop up screen and the beep sounds when it is received When Broadcast is displayed in the Destina tion ID the message is sent to all AIS equipped vessels AIS Target Number Limit Alarm MENU w Tool u ATA AIS u AIS Target Number Limit Alarm When the number of detected AIS targets expands the setting value of Number of AIS this function sounds alarm OF...

Страница 162: ...ER Individual Call Group Call All Ships Call Position Re quest Position Report or Polling Request can be select ed Rotate DIAL to select the Address then push EN w w TER When the Individual ID is preprogrammed the prepro grammed MMSI or Name can be selected When Manual input is selected Input DSC Address screen appears Rotate DIAL to select a Category then push EN e e TER Depending on the connecte...

Страница 163: ...h CLEAR to exit the screen and return to the e e Focus bar Received Call Log screen When the selected call included its position data push ENTER to put the transmitted station s position on the map when the Call has been transmitted Received Call Log Filter The call log type which appears on the screen can be selected on the Received Call Log Sub Menu screen When the Received Call Log screen is di...

Страница 164: ...g Sub Menu screen is displayed Rotate DIAL until the Send ACK menu is high w w lighted then push ENTER The Send DSC screen is displayed When e e Individual Call is selected in step q rotate DIAL to select Able to Comply Propose New Channel or Unable to Comply is highlighted then push ENTER r rRotate DIAL to select TX then push ENTER to transmit the acknowledgement Call Received Call Log Send ACK m...

Страница 165: ...oute is highlighted then push SUB The Route List Sub Menu screen is displayed Rotate DIAL until the Erase All Message menu is w w highlighted then push ENTER Rotate DIAL e e to select OK then push ENTER to erase all message and return to the previous screen If Cancel is selected the all message erasing will be cancelled Received Call Log Erase Message menu Received Call Log Erase All Message menu ...

Страница 166: ...er the Add Individual ID w w menu Individual ID screen appears Rotate DIAL to select the desired item and push e e ENTER See below for details r Rotate DIAL to select Save then push ENTER to save the Individual ID and return to the previous screen If Cancel is selected the setting will be cancelled MMSI code programming q Rotate DIAL to select MMSI and push EN TER w Rotate DIAL to set the code the...

Страница 167: ... the Individual ID Sub Menu screen When the Individual ID List is displayed rotate q q DIAL until the desired Individual ID becomes high lighted Push SUB to display the Individual ID Sub Menu w w screen Rotate DIAL until the Erase Individual ID menu w w becomes highlighted and push ENTER r Rotate DIAL to select OK then push ENTER to erase the Individual ID and return to the previous screen If Canc...

Страница 168: ... Group ID screen appears Rotate DIAL to select the desired item and push e e ENTER See below for details r Rotate DIAL to select Save then push ENTER to save the Group ID and return to the previous screen If Cancel is selected the setting will be cancelled MMSI code programming q Rotate DIAL to select MMSI and push EN TER w Rotate DIAL to set the code then after inputting the 9 digit code push ENT...

Страница 169: ...up ID can be erased on the Group ID Sub Menu screen When the Group ID List is displayed rotate DIAL q q until the desired Group ID becomes highlighted Push SUB to display the Group ID Sub Menu w w screen Rotate DIAL until the Erase Group ID menu be w w comes highlighted and push ENTER r Rotate DIAL to select OK then push ENTER to erase the Group ID and return to the previous screen If Cancel is se...

Страница 170: ...turn the DSC Dialog function ON or OFF OFF The DSC Dialog function is OFF ON The DSC Dialog function is ON When the DSC call including the position information is received from the specified station its position log is automatically plot ted on the Auto Position Log screen DSC Setup Auto Position 1 2 3 MENU w Tool u DSC u DSC Setup u Auto Position 1 2 3 You can select the desired station whose pos...

Страница 171: ...menu is highlighted then push ENTER Rotate DIAL until the GPS menu is highlighted w w then push ENTER Rotate DIAL until the desired menu is highlighted e e then push ENTER Status MENU w Tool u GPS u Status GPS Status screen is displayed Reset MENU w Tool u GPS u Reset Select OK to reset the GSP In this case the GPS receiver starts as a cold start GPS Status menu GPS Reset menu GPS Status screen ...

Страница 172: ... smoothing interval time to between 0 and 9 in 1 digit step Unit second 0 The position data is displayed in real time 1 to 9 Set the smoothing level The higher setting more smoothes the raw data If the setting is too high the response time will be too long GPS Setup SPD CSE Smoothing Set the SPD and CSE smoothing interval time to be tween 0 and 9 in 1 digit step Unit second 0 The SOG and COG data ...

Страница 173: ...on is OFF ON The SBAS function is ON NOTE When the SBAS satellite signal is received SDGPS 3D Fix or SDGPS 2D Fix will activate GPS Setup SBAS Search Mode Set the SBAS search function to Manual or Auto This function should normally be set to Auto Manual You have to manually select the SBAS sat ellite This option can be useful when your vessel is in an area where 2 satellite zones over lap Auto The...

Страница 174: ...to open the picture select window 2 Select the desired picture and then push ENTER When the memo is recalled the picutre is reloaded from the USB memory stick Note The picture must be stored in the MarineCommander Picture folder in the USB memory The picture format must be JPG BMP or PNG The picture name not including the extention must be 8 characters or less Attach 1 Ro and sele 2 Sel W the Note...

Страница 175: ...Memo Memo List Edit Memo Memo list screen Go on Chart Memo list screen Edit Memo Memo list screen Erase Memo Memo list screen Erase All Memo The memo can be edit on the Memo List q When the Memo List is displayed rotate DIAL until the desired memo is highlighted and then push SUB to display the Memo Sub Menu screen w Rotate DIAL until the Edit Memo menu is highlighted and then push ENTER The Memo ...

Страница 176: ...to the desired data file NOTE When the data exceeds the limit the alart window appears and the copying is aborted Receive List from Network Import the Receive List from another MXP 5000 The list includes Waypoints Routes Tracks Memos and DSC Addresses Storage Device D D Caution If the USB memory stick or SD card is removed without the unmount operation below the MarineCommandertm automati cally tu...

Страница 177: ...push ENTER to move the cursor back ward Select SPACE then push ENTER to input a space Select Back Space then push ENTER to delete a character Select All Clear then push ENTER to clear all charac ters Push CLEAR to cancel Rotate DIAL e e to select OK then push ENTER to set and return to the previous screen If Cancel is selected the Setting Change screen will appear Select Yes if you want to continu...

Страница 178: ...TD Loran C Time Difference TD Setup Select the Loran station TD and correction time Local Time Offset Set the UTC time offset 13 30 to 13 30 Time Display Select the 12 hour or 24 hour time format Date Display Select the date format YYYY MM DD example 2011 08 12 MM DD YYYY example 08 12 2011 DD MM YYYY example 12 08 2011 Bearing Mode Select the bearing mode True True north bearing Magnetic Magnetic...

Страница 179: ...tput For future use When using two MarineCommanders assign 1 to one and assign 2 to another to identify them Select the language Select the units ETA TTG Manual SOG Input the ship speed to calculate the ETA TTG Initial Setting Set the seldom changed settings Version Displays the version information DHCP Service For future use For future use When using two MarineCommanders assign 1 to one and assig...

Страница 180: ...A Use the data source from the speed sensor connected with NMEA System Setup Reset menu System Setup NMEA Source Setup System Setup NMEA2000 Setup System Setup NMEA2000 Output Setup ers another ers another NMEA Source Setup Select the data format for each equipment from NMEA0183 or NMEA2000 Note This setting is neccesary when using external equipment Select the properly data format Data Master Set...

Страница 181: ... Factory Reset Radar Menu GAIN GAIN K K SEA K K Auto SEA K K RAIN K K TUNE K K Acquire Target Plotter Display Mode K K Vessel Offset K K Naviga tion Goto Waypoint Follow Route Stop Navigation Next Waypoint Back Waypoint Reset XTE Create Route Route List K Calculation Setup K K Track Start Track Stop Track Track List K Track Setup Track Method K K Track Interval Time K K Track Interval Distance K K...

Страница 182: ...lope K K Pulse K K Range Setup K TX Inhibit K Timing Adjust K HDG Adjust K ANT Rotate K Scanner Monitor TUNE Monitor Radar items K The item to be reset K The item to be reset Sounder items Menu Item Reset Type Setting Reset Factory Reset Sounder Setting Reset Sounder Factory Reset Auto Mode K K GAIN K K STC K K Frequency Mode K K Range Shift K K Zoom Zoom Mode K K Marker Zoom Range K K Bottom Zoom...

Страница 183: ...to Position 3 K K GPS Status Setup K K Anchor Watch Anchor Alarm K K Radius K K Memo New Memo Memo List K System Setup Display Data Bar Setup K K Status Bar Setup K K Power Control Synchronization K K General Key Beep K K Position Display K K TD Setup K K Local Time Offset K K Time Display K K Data Display K K Bearing Mode K K Variation K K Manual Variation K K Vector Time K K ETA TTG Calculation ...

Страница 184: ...uts will be displayed in order Push MENU and rotate DIAL until the Cycle q q Video menu becomes highlighted Push ENTER then rotate DIAL to select the Cycle w w Video ON or OFF Push ENTER to set the Cycle Video and exit the e e Menu screen Input Source and interval setting is selectable See the page 5 40 for details MENU WPT FOCUS LAYOUT MOB CLEAR SUB BRILL RANGE DIAL ENTER CLEAR MENU MENU WPT FOCU...

Страница 185: ...NTER then rotate DIAL to select the de e e sired setting The selectable settings are Contrast Brightness Color and Rename Push ENTER to enter the adjustment mode r r Contrast Adjustable range are 0 to 100 in 1 steps Default 50 Brightness Adjustable range are 0 to 100 in 1 steps Default 50 Color Adjustable range are 0 to 100 in 1 steps Default 50 Rename Up to 10 characters are input See page 5 31 f...

Страница 186: ...ect the desired input source t t then push ENTER y Repeat step t until all Video inputs will be set u Rotate DIAL to select the Save button then push ENTER to set and exit the screen When this setting is set to ON video number or name is displayed upper right corner Push MENU and rotate DIAL until the Video q q Setup menu becomes highlighted Push ENTER then rotate DIAL to select Show w w Video Sou...

Страница 187: ...screens are Navigation Navigation Graphic Navigation Simple Graphic Waypoint Engine Engine Graphic Depth Graph Temp Graph and Course Monitor Push ENTER to set the selected screen and exit e e the Menu screen If you make New Layout screen that included a Navi gation screen you can make the following operation MENU WPT FOCUS LAYOUT MOB CLEAR SUB BRILL RANGE DIAL ENTER CLEAR MENU Panel Select menu Pa...

Страница 188: ...te Interval Adjustable range are 1 to 60 seconds in 1 second steps This setting is used for only the Depth Graph or Tem perature Graph Depth Graph Range Adjustable range are 5 10 20 30 and 40 This setting is used for only the Depth Graph Temp Graph Range Adjustable range are 1 2 5 5 30 and 40 This setting is used for only the Temperature Graph Number of Engine Selectable number is 1 or 2 This sett...

Страница 189: ...asmania Australian geodetic 1984 EST Estonia EUR M Mean Solution Europe 1950 EUR A Western Europe 1950 EUR E Cyprus EUR G England Channel Islands Scotland and Shetland Islands EUR K England Ireland Scotland and Shetland Islands EUR B Greece EUR I Italy Sardinia EUR J Italy Sicily EUR L Malta EUR C Finland and Norway EUR D Portugal and Spain EUS Mean Solution European 1979 HJO Iceland IRL Ireland O...

Страница 190: ...Tristan da Cunha ANO Cocos Islands GAA Republic of Maldives IST Diego Garcia KEG Kerguelen Island MIK Mahe Island REU Mascarene Islands AMA American Samoa Islands ATF Iwo Jima TRN Tern Island ASQ Marcus Island IBE Efate and Erromango Islands CAO Phoenix Islands CHI Chatham Island New Zealand GIZ Gizo Island New Georgia Islands EAS Easter Island GEO New Zealand GUA Guam DOB Guadalcanal Island JOH J...

Страница 191: ...one Alarm Unit Distance nm sm km Souneder Range 2m to 1200m Souneder Display Mode Single 50 or 200 kHz Dual 50 and 200 kHz Zoom A Scope Zoom Mode Marker Zoom Bottom Zoom Bottom Lock Alarm Shallow Alarm Deep Alarm Fish Alarm Temp Alarm Unit Depth m ft fa AIS Number Maximum 100 nearer from the vessel Message type Message1 2 3 Class A Position report Message5 Class A Static and voyage related data Me...

Страница 192: ...MEMO ...

Страница 193: ...MEMO ...

Страница 194: ...1 1 32 Kamiminami Hirano ku Osaka 547 0003 Japan A 6754H 1EX 0a Printed in Japan 2011 Icom Inc ...

Отзывы: