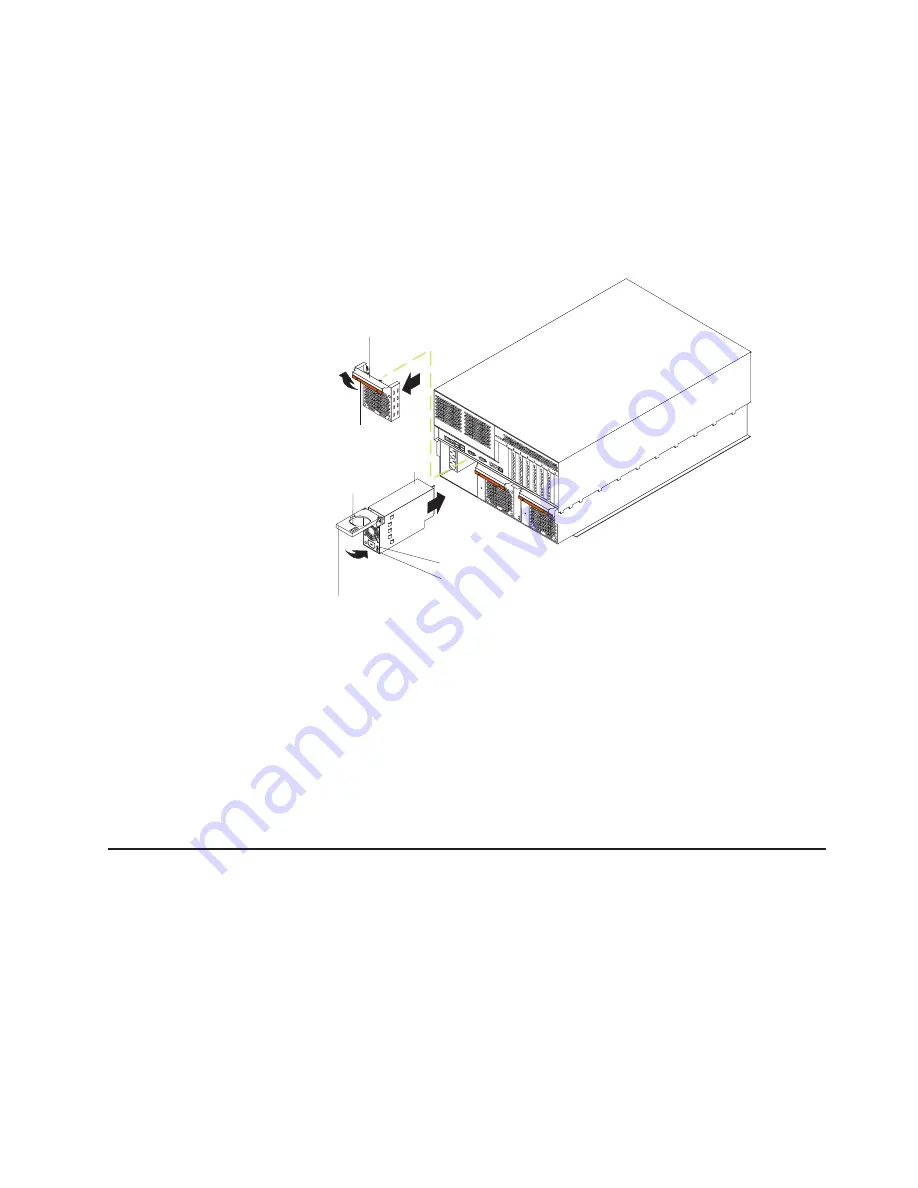
Complete
the
following
steps
to
install
an
additional
power
supply:
1.
Review
the
information
in
“Before
you
begin”
on
page
39,
“Handling
static-sensitive
devices”
on
page
40,
and
“Safety
information”
on
page
167.
2.
Select
the
power-supply
bay
in
which
you
want
to
install
the
power
supply.
3.
Remove
the
fan
assembly
that
covers
the
power-supply
bay
(see
“Replacing
a
hot-swap
fan”).
4.
Move
the
handle
on
the
power
supply
to
the
up
(open)
position.
5.
Slide
the
power
supply
into
the
chassis,
and
lower
(close)
the
handle.
Handle
(open position)
AC power LED
DC power LED
Power supply
Release latch
Hot-swap fan
Release
latch
6.
Plug
one
end
of
each
power
cord
into
the
corresponding
connector
on
the
back
of
the
server;
then,
plug
the
other
end
of
each
power
cord
into
a
properly
grounded
electrical
outlet.
Power
supplies
1
and
2
(PS1
and
PS2,
respectively)
are
connected
to
the
bottom
power-cord
connector
in
power-supply
bay
1.
Power
supplies
3
and
4
(PS3
and
PS4,
respectively)
are
connected
to
the
top
power-cord
connector
in
power-supply
bay
1.
7.
If
the
server
is
not
on,
turn
on
the
server.
8.
Verify
that
the
dc
power
LED
and
the
ac
power
LED
on
the
power
supply
are
lit,
indicating
that
the
power
supply
is
operating
properly.
9.
Reinstall
the
fan
assembly
in
front
of
the
power-supply
bay.
Replacing
a
hot-swap
fan
Your
server
comes
with
nine
hot-swap
fans:
six
internal
and
three
external.
The
internal
fans
consist
of
the
front,
center,
and
top
rear
fans.
The
front
fans
(
1
and
2)
are
located
inside
the
server
in
front
of
the
air
baffle,
the
top
rear
fans
(fans
3
and
4)
are
located
inside
the
server
at
the
rear
of
the
air
baffle,
and
the
center
fans
(fans
5
and
6)
are
located
inside
the
server
near
the
adapters.
The
external
fans
(fans
7
through
9)
are
located
on
the
outside
of
the
server
in
front
of
the
power
supplies.
When
a
fan
has
failed
or
is
operating
slowly,
the
amber
LED
illuminates
on
that
fan.
You
do
not
need
to
turn
off
the
power
to
the
server
to
replace
a
hot-swap
fan.
Chapter
4.
Customer
replaceable
units
99
Содержание XSERIES 255 TYPE 8685
Страница 1: ...xSeries 255 Type 8685 Hardware Maintenance Manual and Troubleshooting Guide ERserver...
Страница 2: ......
Страница 3: ...xSeries 255 Type 8685 Hardware Maintenance Manual and Troubleshooting Guide ERserver...
Страница 6: ...iv xSeries 255 Type 8685 Hardware Maintenance Manual and Troubleshooting Guide...
Страница 20: ...10 xSeries 255 Type 8685 Hardware Maintenance Manual and Troubleshooting Guide...
Страница 126: ...116 xSeries 255 Type 8685 Hardware Maintenance Manual and Troubleshooting Guide...
Страница 189: ...Appendix B Related service information 179...
Страница 190: ...180 xSeries 255 Type 8685 Hardware Maintenance Manual and Troubleshooting Guide...
Страница 191: ...Appendix B Related service information 181...
Страница 192: ...182 xSeries 255 Type 8685 Hardware Maintenance Manual and Troubleshooting Guide...
Страница 193: ...Appendix B Related service information 183...
Страница 194: ...184 xSeries 255 Type 8685 Hardware Maintenance Manual and Troubleshooting Guide...
Страница 195: ...Appendix B Related service information 185...
Страница 196: ...186 xSeries 255 Type 8685 Hardware Maintenance Manual and Troubleshooting Guide...
Страница 209: ...Appendix B Related service information 199...
Страница 210: ...200 xSeries 255 Type 8685 Hardware Maintenance Manual and Troubleshooting Guide...
Страница 211: ...Appendix B Related service information 201...
Страница 212: ...202 xSeries 255 Type 8685 Hardware Maintenance Manual and Troubleshooting Guide...
Страница 213: ...Appendix B Related service information 203...
Страница 214: ...204 xSeries 255 Type 8685 Hardware Maintenance Manual and Troubleshooting Guide...
Страница 224: ...214 xSeries 255 Type 8685 Hardware Maintenance Manual and Troubleshooting Guide...
Страница 225: ......
Страница 226: ...Part Number 24P2936 1P P N 24P2936...


