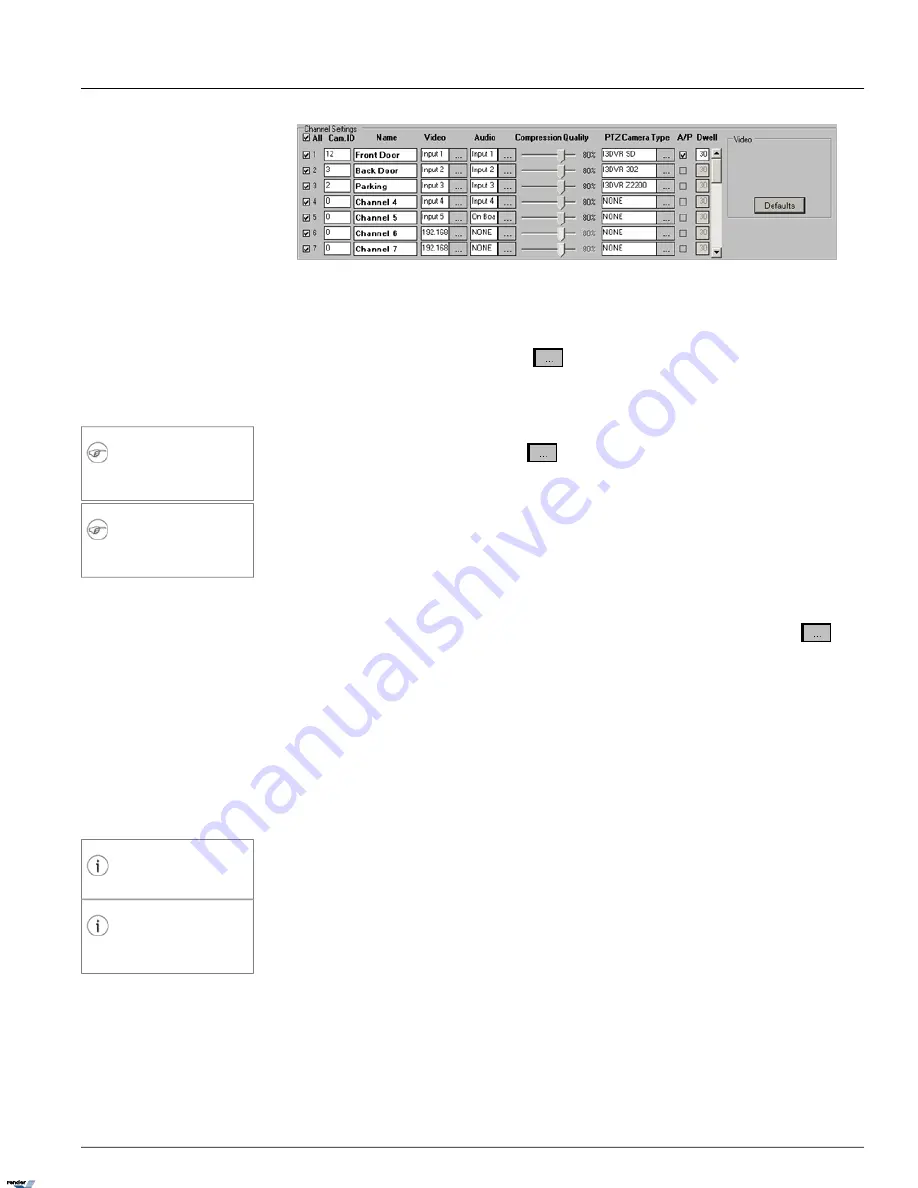
To setup all connected video sources, do the following:
1. Check the
All
checkbox to enable all channels OR enable desired channels by checking individual channel checkboxes.
2.
In the Video field, click the
Browse
button
to display all available video sources connected to the DVMS
(analog/IP cameras). The input number corresponds the number of physical BNC connector in the back of the DVMS.
IP camera inputs are distinguished by IP address. (See IP Camera setup section on instructions on adding IP cameras
to the Video Source list). Select desired video input to display on the corresponding video channel.
Note
The number of supported IP channels is
SPK-dependent.
3.
In the Audio field, click the
Browse
button
to display all available audio inputs. If audio card is not installed
on the DVMS, on-board audio can be used. Select desired audio input to be used with the corresponding video channel.
See Audio Recording in Search Mode section for information on playing back the audio recording.
Note
The number of supported audio channels is
SPK-dependent.
4. Assign a descriptive
Name
to each channel. For example, the channel could be named based on the video source
location (e.g. Front Door).
5. Adjust video
Compression Quality
. The lower the number, the higher the compression (20% - best compression,
100% - best quality).
6.
Choose the correct PTZ Camera Type for all connected PTZ video sources. Click the
Browse
button
to see
the list of supported protocols. If the wrong protocol is selected, the camera may not respond to user commands.
The following PTZ camera protocols are supported:
BOSCH, Checkpoint, ELMO: PTC Series, ELMO: Speed
Dome, I3DVR 302, I3DVR SD, I3DVR Z1200, I3DVR Z2200, Panasonic CS854, PELCO-D Mini, PELCO-
D SpecII, PELCO-D SpecIII, PELCO-P SD
.
7. Enter
Cam. ID
number for each channel that has been assigned a PT/Z camera video source. Cam. IDs help to distin-
guish between the different PT/Z cameras connected to the same parallel connection. Most Speed Domes have their
Cam. ID assigned by dip-switches in the back of the camera; Camera ID for zoom cameras is normally assigned through
camera menu. Cam. ID must match that of the assigned Video Source. If the Cam ID. has been entered incorrectly,
the PT/Z camera will not respond to user commands.
Tip
Fixed cameras do not have a Cam. ID.
Tip
The BNC connector number does not have
to match the Cam. ID number.
The PTZ cameras are controlled based on the entered Cam ID. For example, if the Cam ID. for Input 1 is assigned to
Input 2 in the Hardware Setup, Input 1 will be controlled when the user attempts to control Input 2 from PTZ Advanced
Control Panel.
8. Check the
A/P (Auto-Pan)
checkbox for the installed Speed Domes. This feature allows the speed dome to return
to the programmed auto pan after the PTZ settings have been adjusted remotely.
9. Assign
Dwell
time for the A/P setting. This is the time that will pass before the Auto-Pan (A/P) feature will be activated.
In the above example, Channel 1 will return to the original pan after 30 seconds.
10. Click
Defaults
to assign default video source to each channel. By default, video sources (cameras) 1-16 will be assigned
to channels 1-16 in a sequence. All configured IP cameras (if any) will be assigned to the channels 17-32. If no IP
cameras have been configured, channels 17-32 will be assigned no video source.
60
Hardware Setup - Channel Settings
Chapter 1. SRX-Pro Server
XML to PDF by RenderX XEP XSL-FO Formatter, visit us at
http://www.renderx.com/
Содержание SRX PRO
Страница 137: ...Below is the example of an advanced setup for ARECONT IP camera 133 IP Camera Chapter 1 SRX Pro Server...
Страница 200: ...Appendix 3Topics Covered i SRX Pro Player i Watermark Tool Web Search Liebert MultiLink Viewer Configuration 196...
Страница 217: ...213 Liebert MultiLink Viewer Configuration Chapter 3 Appendix...


