background image

c.

In the

Include Image of Channel

field, click the

Browse

button

to select the desired channel from the

list. A snapshot from this channel will be sent out. In the example above, snapshot from Channel 2 will be sent
out every hour to the configured email address.

d. Enter the

Email Title

for the server status e-mail alerts (Optional).

4.

Intelli-Guard™ alert

Intelli-Guard™ function can be configure to sent out an email alert every time the motion has been detected. (See
Intelli-Guard™ section for more information).

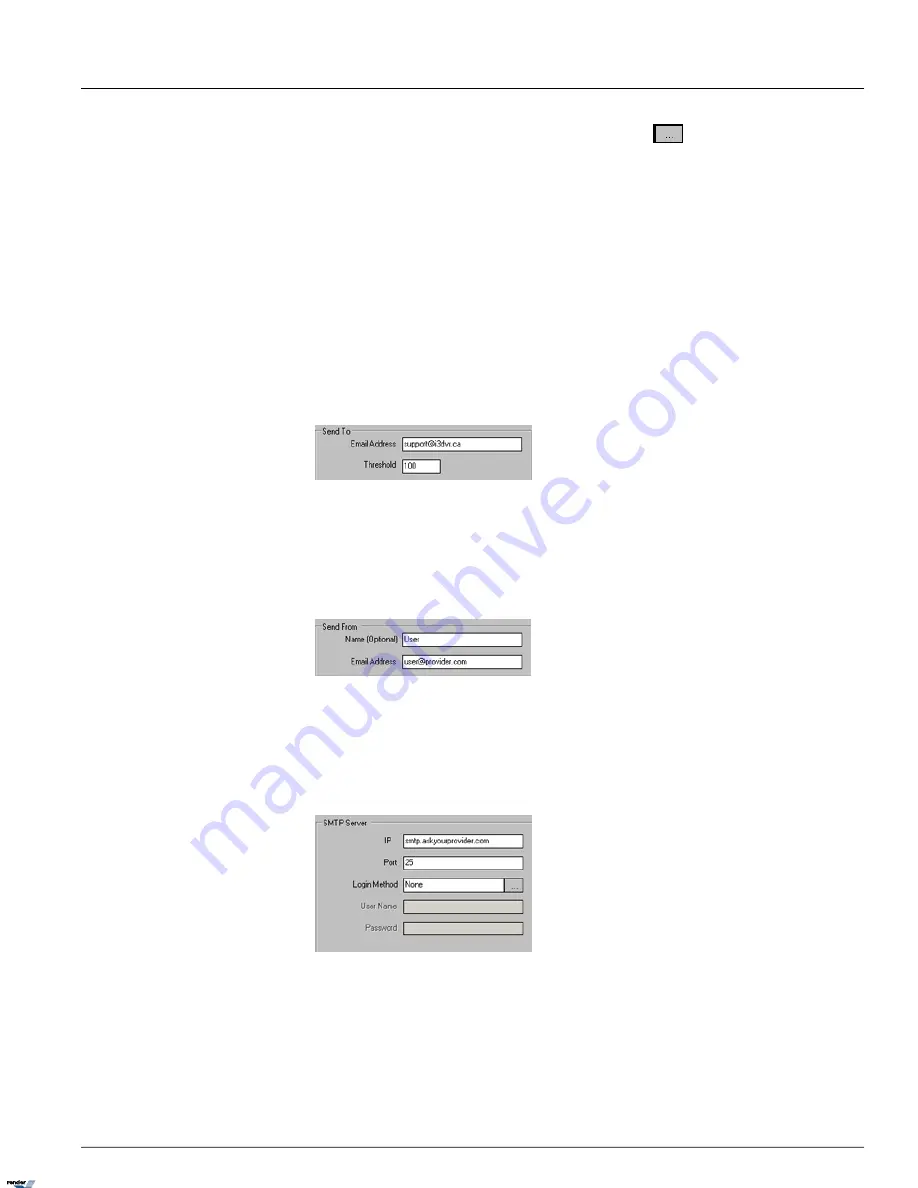
1.4.24.1. Configuring Email Setup

1. Check off the

Enable Email

checkbox to enable Email feature.

2. Fill in the

Send To

section:

a. Enter the Email Address of the recipient

b. Enter the Threshold number. This value refers to the total number of emails sent when a sensor is triggered or

video loss is detected.

3. Fill in the

Send From

section:

a. Enter the Name of the sender (Optional)

b. Enter the Email Address of the sender

4. Fill in the

SMTP Server

section: Depending on the location, each Internet provider has specific SMTP information.

Obtain this information from your Internet provider.

a. Enter the

IP

Address of the SMTP server. Ask your provider for SMTP server address.

b. Enter the

Port

number. It is not usually necessary to change the port number. Most SMTP servers have a default

port. For more information on default Ports, contact the email account manager.

c. Select the

Login Method

. "None" is the default method; otherwise, contact the email account manager.

142

E-Mail Setup

Chapter 1. SRX-Pro Server

XML to PDF by RenderX XEP XSL-FO Formatter, visit us at 

http://www.renderx.com/

Содержание SRX PRO

Страница 1: ...User Manual v 2 0 INNOVATIONS AT THE SPEED OF THOUGHT 2011 i International Inc The contents of this user manual are protected under copyright and computer program laws...

Страница 2: ...d to have been caused directly or indirectly by this information Furthermore i International Inc reserves the right to revise this publication and to make changes to the content at any time without no...

Страница 3: ...2 First Login 34 1 3 3 SRX Pro Main Screen Features 35 1 3 4 Screen Divisions 37 1 3 5 Menu Bar 37 1 3 6 Real time Display vs Mux Display 42 1 3 7 PTZ mode 48 1 3 8 Two way Audio 56 1 4 Configuring SR...

Страница 4: ...SRX Pro Remote 181 2 2 SRX Pro Remote Setup 185 2 3 Managing Remote Sites 186 2 3 1 Creating a New Connection 186 2 3 2 Editing an Existing Remote Site Connection 187 2 3 3 Deleting a Remote Site 187...

Страница 5: ...SRX Pro Server 1Topics Covered Introduction SRX Pro Server Installation Upgrade Starting SRX Pro Server Configuring SRX Pro Server Search and Playback on SRX Pro Server Backup on SRX Pro Server 1...

Страница 6: ...ted or reproduced without prior written permission If the system needs to be modified or repaired a certified i Dealer Installer must be contacted Otherwise the system warranty will be voided With any...

Страница 7: ...System recovery DVD also taped to the inside of the DVMS top cover SRX Pro Server and Remote software CD SRX Pro video tutorial CD Motherboard manual and or CD s Nero software CD Video card driver CD...

Страница 8: ...in system and its connecting cables have sufficient space system is placed on an even surface system is situated far from electronic equipment such as microwaves radios fridge compressors or any type...

Страница 9: ...e Begin connecting the BNC video cables to the i server s BNC ports Ensure they are secure and locked into position Once completed ensure that the 75O impendance dip switches are in the upward positio...

Страница 10: ...E AN UNINTERRUPTIBLE POWER SUPPLY MIN 500VA MUST ALWAYS BE USED OTHERWISE ALL WARRANTIES WILL BE VOIDED Step 6 Turn the power switch in the back of the system to the ON position The system will then p...

Страница 11: ...VMS model The diagram will vary based on the DVMS model 1 1 7 Core Features These are the key features that can be found in this latest version of SRX Pro Server For a more detailed explanation of fea...

Страница 12: ...P3301 M1011 M1031 Q1755 209 Series via VAPIX Version 2 and 3 firmware 4 xx and 5 xx MAVIX MediaRacer 100 MediaRacer 150 ARECONT AV1300 AV1355 AV2100 AV2155 AV3100 AV3155 AV5100 AV5155 IQINVISION IQ501...

Страница 13: ...e applicable frame rate Video Analytics and number of POS lanes available to the user SPK configuration may be upgraded remotely to increase the supported number of channels frame rate video analytics...

Страница 14: ...ramework must be installed onto the system Microsoft Visual C 2005 SP1 Re distributable Package x86 version 8 0 56336 must be installed onto the system OS Windows XP Embedded Pro CPU Core 2 Duo Graphi...

Страница 15: ...X Pro series software you must install NET 3 0 framework before upgrading your SRX Pro Server software to version 1 500 and up Important All users of SRX Pro Ultra Lite and Lite software must be logge...

Страница 16: ...tion window may be minimized in this case you will be able to locate the NET Framework installation icon in the Windows taskbar 5 Wait for the Setup Complete window to be displayed and click Exit to c...

Страница 17: ...tance of Visial C library may be present on the system at one time Important All users of SRX Pro Ultra Lite and Lite software must be logged in as Administrator into XP Embedded OS before completing...

Страница 18: ...HASP key into the USB port on the local system Only then can the SRX Pro Server software be installed on the client PC The HASP drivers can be found on the Software CD that came along with the SRX Pro...

Страница 19: ...creen check off Install new drivers checkbox and click Next to proceed 6 Wait for the final installation screen and click Finish This completes the driver installation process 15 Installing HASP Drive...

Страница 20: ...he entries are present in the list the drivers were installed correctly If not try re installing the drivers by following steps 1 7 If the HASP key is still not recognized by the system please contact...

Страница 21: ...My Computer icon right click and select Manage in the context menu 2 Select Device Manager in the Computer Management tree list in the left pane Note On XP Embedded OS SRX Pro Ultra Lite and Lite Dev...

Страница 22: ...list of specific location Advanced radio button and click Next 7 Select Don t search I will choose the driver to install radio button and click Next 18 Upgrading AD 2016 AD 2816 Capture Card Drivers C...

Страница 23: ...ave Disk 9 Install From Disk window will be displayed Click Browse locate the inf driver file in the driver folder and click Open Click OK to close the Install From Disk window 19 Upgrading AD 2016 AD...

Страница 24: ...elow Click Next to proceed with the driver upgrade 11 In Hardware Installation window click Continue Anyway 12 Wait for Completing the Hardware Update Wizard window to be displayed Click Finish to com...

Страница 25: ...2 5 First Time SRX Pro Server Installation This section applies to the customers that have purchased the software separately for an NVR integration and are using their own Server system to install SR...

Страница 26: ...ro Server software then click Next 6 In Confirm Installation screen click Next to proceed with the installation 7 Wait while the SRX Pro Server software is installing onto the local system Important I...

Страница 27: ...ion of the SRX Pro Server software on their DVMS Important All users of SRX Pro Ultra Lite and Lite software must be logged in as Administrator into XP Embedded OS before completing this step If no In...

Страница 28: ...ogram is being uninstalled from the DVR 7 Close Add or Remove Programs window Close the Control Panel window 8 Remove i3Pro Server folder from the computer usually drive C by right clicking on the fol...

Страница 29: ...er installation file Setup exe and double click it to initiate the installation 11 In the installation Welcome screen click Next 12 In the License Agreement screen scroll down to the end of the docume...

Страница 30: ...ve and folder by clicking Browse or keep the default in stallation folder recommended Select Everyone radio button and click Next 14 In Confirm Installation screen click Next to proceed with the insta...

Страница 31: ...it while the SRX Pro Server software is installing onto the local system 16 Wait for the Installation Complete screen to be displayed and click Close 27 Traditional Manual Upgrade Chapter 1 SRX Pro Se...

Страница 32: ...uthorized user must be logged into the system 2 Go to Tools Server Update The Update window will be displayed 3 Contact i Technical Support at 1 877 877 7241 for a valid user name and password 4 Enter...

Страница 33: ...is process may take a while Once the software update has completed restart your DVR 1 2 8 First Software Startup First software startup will occur immediately after the system restart following the so...

Страница 34: ...The Storage window will contain the list of hard drives partitions available for video recording Note that C and D are not available for video recording and will not be displayed in the list of availa...

Страница 35: ...ck OK in Format Option window Note that the format is pre set to NTSC 7 Wait for the following message to be displayed Storage drives have been allocated and click OK to finish SRX Pro Server software...

Страница 36: ...therefore imperative that you configure the time zone setting on the first system startup according to the physical location of the unit If the DVMS is later re located to a different time zone this...

Страница 37: ...s and erase video data recorded in a different time zone 5 Click OK in the All old data will be formatted warning window Allocation window will be displayed in the top left corner 6 Wait until the Sta...

Страница 38: ...contact the local dealer for information on how to reset them To log into the SRX Pro Server do the following 1 After the SRX Pro software loads up the login window is automatically displayed 2 If lo...

Страница 39: ...er Tree View 2 Live Mode 15 Channels Controls Sensors Panel currently active Not available in Simple View 3 Search Mode 16 Advanced Control Panel PTZ Not available in Simple View 4 Setup Mode 17 Advan...

Страница 40: ...d if the Portal Card Access software is installed 2 way Audio brings up Server s 2 way audio communication window At least one SRX Pro Remote client must be connected to SRX Pro Server in order to est...

Страница 41: ...n the Main Display Screen Use the mouse scroll wheel to display the next 13 channels Displays the first 16 available channels in a 16 channel Screen division on the Main Display Screen Use the mouse s...

Страница 42: ...n Division in the View menu reset Digital Zoom Presets Reset Text Overlays initiate the Rotate feature or configure Spot Out Divisions AD 3016 card only or switch between Mux and Real time display AD...

Страница 43: ...isplay Select Default from the View menu list to return all video channels in their default screen division positions i e Channel 1 will be displayed in the first screen division Channel 2 will be dis...

Страница 44: ...isplay LPR Mode The LPR view shows the current license plate being detected as well as the most recent database match for the found license plate numbers Compare Simple Advanced and Tree View displays...

Страница 45: ...this feature Once the connection is established with the FTP server the software is automatically updated See Internet Upgrade section for more information E Map Viewer This feature is only active in...

Страница 46: ...played all channels at the 30 frames per second rate Real time mode is best to be used for monitoring and surveillance Real time display mode does not reflect the quality of the video recording I e If...

Страница 47: ...lay feature is supported The channels are marked according to the physical video input number BNC connector number in the back of the DVMS Note Real time display is supported only on models with a sep...

Страница 48: ...e same regardless of the location on the main screen Channel Name is configured in the Hardware Setup DZ Digital Zoom indicator signifies that the video can be zoomed into digitally See Digital Zoom s...

Страница 49: ...el Go to View Reset Digital Zoom Presets to view See Emergency Frame Rate Recording section for more information 1 3 6 2 Drag and Drop feature on Mux display Mux display allows the user to drag and dr...

Страница 50: ...ected main screen division position In order to move swap video channel positions on the main screen do the following 1 Position the mouse cursor over the desired screen division position and press th...

Страница 51: ...mpty the video channel will be moved to the empty position If the position is taken by another video channel the channels will be swapped In the example below video Channels 1 and 3 have been swapped...

Страница 52: ...must be used for PTZ control PTZ cameras can be controlled from 1 SRX Pro Server authorized users only 2 SRX Pro Remote authorized users only 3 SRX Pro WebSearch authorized users only In the PTZ windo...

Страница 53: ...rly configured in Hardware Setup Correct PTZ Camera Type and Cam ID must be entered in the Hardware Setup Channel Settings 2 Double click the video image Selected channel will be displayed in full scr...

Страница 54: ...e PTZ Control Wheel b Adjust camera zoom by clicking Zoom In Zoom Out buttons on the panel c Adjust camera focus by clicking Focus In Focus Out buttons on the panel d Adjust camera brightness by click...

Страница 55: ...he context menu 1 3 7 3 3 Renaming Presets To rename the configured preset s do the following 1 Select the desired preset in the Presets drop down menu 2 Right click inside the Presets field 3 Select...

Страница 56: ...ding checkboxes 5 Enter the Dwell Time Sec value to determine the delay time between two consecutive presets In the example above the Preset Tour 1 will cause the PTZ camera to switch between Preset 1...

Страница 57: ...and or in cameo mouse function See Programming Presets for more information 5 Right click inside the Patterns field 6 Select Create Pattern Set Pattern Start from the context menu The pattern start p...

Страница 58: ...Control Wheel 2 Right click the channel number The context menu will be displayed Note The context menu will vary based on the PTZ model The following context menu will be displayed for i3DVR SD PTZ c...

Страница 59: ...PTZ speed dome from start point to end point and back until inter rupted by user This is different from Pattern since the Auto Pan feature does not record the custom speed dome path instead it pans in...

Страница 60: ...ed to the Server at the time of the two way connection initiation Two way audio feature utilizes on board audio input both on Server and Remote side It is the user s responsibility to ensure that the...

Страница 61: ...is checked off 3 On the SRX Pro Server select the connected SRX Pro Remote IP address in the Speak to drop down menu 4 On the SRX Pro Server speak into the microphone The sound will be coming out of t...

Страница 62: ...to drop down menu 7 To interrupt the 2 way audio connection on SRX Pro Remote side click Close in the 2 way Audio Remote Online window or disconnect from remote SRX Pro Server To temporarily mute the...

Страница 63: ...to enter desired alphanumeric characters 1 4 1 Hardware Setup Channel Settings 1 4 1 1 Overview Tip Hardware Setup tab can be hidden from select users in User Management setup tab Channel Settings all...

Страница 64: ...Checkpoint ELMO PTC Series ELMO Speed Dome I3DVR 302 I3DVR SD I3DVR Z1200 I3DVR Z2200 Panasonic CS854 PELCO D Mini PELCO D SpecII PELCO D SpecIII PELCO P SD 7 Enter Cam ID number for each channel that...

Страница 65: ...stay turned on after being triggered by sensor This does not apply when the control is turned on manually from the main screen In other words if the control is turned on manually from the main screen...

Страница 66: ...owing 1 Check the All checkbox to enable all sensors or enable desired sensors by checking individual sensor checkboxes 2 Assign a descriptive Name to each sensor For example the sensor could be named...

Страница 67: ...b can be hidden from select users in User Management setup tab The Spot Monitor section allows the user to view selected video inputs on an spot monitor if available The spot monitor should be connect...

Страница 68: ...l Screen mode After the configured Dwell Sec time elapses the spot monitor will return to the original sequence In this example after displaying the channel currently in full screen mode for 3 seconds...

Страница 69: ...e selected motion detection zone The higher the Sensitivity the less change in an image is needed to set off the alarm If the Sensitivity is set to Low the change in an image will have to be dramatic...

Страница 70: ...the same channel where the motion has occurred 4 Set the Dwell Time sec for the Full Screen Channel function In the example above Channel 1 will remain in Full Screen mode for 5 seconds after motion...

Страница 71: ...p 1 4 6 User Management Setup 1 4 6 1 Overview In the User Management Setup user accounts can be created deleted and modified User Management setup allows limiting system access for the selected users...

Страница 72: ...kmark in the corresponding checkbox If unchecked the setting will be treated as Disabled 4 Certain functions can be Enabled or Disabled E g Mux or RealTime display on Live mode 5 Some functions can be...

Страница 73: ...he only user without password the user may only view selected video channels on Live Mux mode Real time display and all PTZ camera functions are disabled for the LOGOUT user this account allows the us...

Страница 74: ...is not supported the password must be manually re entered 3 Configure the user s Live Search Backup Setup and other privileges See following sections for more information Warning When limiting user s...

Страница 75: ...lable to the user When Live mode is unchecked disabled the opposite is true no video channels will be displayed on Live mode and no PTZ privileges are given to the user By default the Live mode both M...

Страница 76: ...ntrol them Channels 6 8 will be available for viewing and can be controlled by the user Note that even though Channel 1 is set to PTZ in the example below the checkbox is not checked which makes Chann...

Страница 77: ...accessed completed by the user 1 4 6 7 Configuring user Setup privileges By configuring user Setup privileges it is possible to Warning When limiting user s privileges in any way make sure to hide Us...

Страница 78: ...reated as hidden disabled Note Setup tabs will vary based on SRX Pro software a Click the plus sign next to Setup Enableentry and then next to All Setups Modify entry to display the list of all availa...

Страница 79: ...isting user accounts It is possible to change password and or privileges for existing user accounts Note Privileges for administrator user i3dvr cannot be changed Only administrator user i3dvr can cha...

Страница 80: ...ding Display setup tab The recording frame rate will go back to the original setting 10 seconds after the sensor has been triggered or after the motion has ceased See Emergency Frame Rate Recording se...

Страница 81: ...he following 1 Right click anywhere on the timeline 2 Select Zoom Out from the context menu Repeat if desired 1 4 7 3 Basic recording schedule To create a basic recording schedule do the following 1 S...

Страница 82: ...k Apply Settings to in order to apply created recording schedule to other channels A new window will be displayed Check the video channel checkboxes to apply existing recording schedule to the selecte...

Страница 83: ...tically to select more than one day at a time 4 To deselect repeat step 3 on the previously selected area on the timeline graph 5 In the Recording Type menu check desired checkbox Select on of the fol...

Страница 84: ...g Day holidays schedule The custom schedule title will be highlighted pink on the schedule graph b Select the Month radio button to rotate the new customer schedule monthly For monthly rotation select...

Страница 85: ...e Save button to save the configured settings 1 4 7 6 Delete a custom schedule To delete a custom schedule do the following 1 Select a custom schedule by clicking in the custom schedule title on the g...

Страница 86: ...on SRX Pro Server Server ID is comprised of up to 31 alphanumeric characters Please note that Server ID value is case sensitive Tip Remember this entry for remote access 2 IP Address You may enter a n...

Страница 87: ...rent date 8 Note optional 9 Check uncheck Display User Server ID and Location checkbox When checked the current User logged into the SRX Pro Server server Location and Server ID will be displayed on t...

Страница 88: ...d French To change system language select English or Fran ais from the System Language drop down menu This will translate the SRX Pro Server interface into the appropriate language Click the Save butt...

Страница 89: ...e and Contrast for the selected camera using the horizontal sliders 3 In Color Monochrome frame choose between Color and Monochrome recording Color recording provides more realistic video images Monoc...

Страница 90: ...he configured settings 1 4 10 System Setup 1 4 10 1 Overview In the System Setup tab the user can 1 Configure server software restart time 2 Enable watermarking feature 3 View PTZ Settings 4 Configure...

Страница 91: ...re or System where Software is SRX Pro Server software and System is the DVMS Depending on your selection SRX Pro Server software or the entire DVMS will be restarted at the configured day and time 4...

Страница 92: ...ate audible alarm after the video loss detection 4 Set Working Time for an audio alarm and selected control In the example above after the video loss has been detected on one or more video channels th...

Страница 93: ...es and to return to the Setup 5 Click the Save button to save the configured settings In the example above When the Panic button is clicked or sensors 1 or 8 are activated the encrypted backup will be...

Страница 94: ...rom the drop down menu 2 Select from 3 available options DD MM YYYY MM DD YYYY YYYY MM DD 3 Click the Browse button in the Time Format field to select desired time format from the drop down menu 4 Sel...

Страница 95: ...me 24 hour clock The system time will be synchronized daily based on the con figured time The process may take several minutes To select an NTP server click NTP Server List In the NTP Server List wind...

Страница 96: ...ds privileges and other server configurations can be easily applied by importing them from that folder This function may be used to apply same set of settings to multiple SRX Pro Server systems or to...

Страница 97: ...s folder Note Configuration files may vary based on SPK To import the system settings do the following 1 Click Import 2 In the Browse for Folder window locate and select i3Pro Settings folder Click OK...

Страница 98: ...ruary 16 2011 1 4 11 2 Overview The Storage Setup displays the following Important The settings in this Setup tab cannot be changed in any way through SRX Pro Re mote Note Drives C and D are protected...

Страница 99: ...ve for video recording or to format hard drive with video information do the fol lowing 1 Check off the corresponding checkbox in the Use for Recording column to allocate new drive OR 1 Check off the...

Страница 100: ...an existing digital drawing map The map appears on the main screen and allows quick access to the desired channel by simply clicking on its representative icon Clicking on a channel s icon will displ...

Страница 101: ...on the tab directly underneath the drawing 4 In the right side of the drawing area choose the Channel Control or Sensor to be positioned on the E Map a Click on the Channel icon to display all availa...

Страница 102: ...ensor icon in the E Map image 2 Drag and drop the channel control or sensor icon from the image back to the list of channels controls sensors on the right The icon will disappear from the image 1 4 12...

Страница 103: ...r activity in the Log Records Setup Video data can be erased from the DVMS by administrator user however the Log Records cannot be altered by any user Log Records track the following activities user l...

Страница 104: ...nifies changes made to the specific setup tab The word Succeeded signifies successful completion of an operation such as user login The word Failed signified failed operation The description will show...

Страница 105: ...red log files you can filter the log info based on 1 A User 2 An Operation 3 A period of Time Start End 4 An IP Address 1 4 13 4 Advanced Filter Advanced filtering based on date is available in the Lo...

Страница 106: ...ured Intelli Guard is an intelligent feature offered exclusively by i The Intelli Guard feature detects motion within a defined area of the channel s view and can respond with audio alarm or emergency...

Страница 107: ...wing 1 Select the Channel in the Current Channel frame Click the Browse button to select the desired channel from the list selected channel will be displayed in the live view window 2 Configure Interv...

Страница 108: ...the selected control After the control has been activated it will remain on for the set period of time In the example above Control 1 will remain on for 5 seconds after the motion has been detected in...

Страница 109: ...t to 10 pixels the bird will represent 1 block therefore the alarm will be triggered However if the Detection Size is set to 20 pixels the bird will no longer represent 1 block and will be omitted by...

Страница 110: ...d even the static environment will set off the alarm Related Topics Hardware Setup Control Settings Email Setup 1 4 15 Communication Setup 1 4 15 1 Overview Communication Setup contains the network ty...

Страница 111: ...ection to be possible Unless a port designated as a default is required for another application do not to change Important The ports cannot be changed via SRX Pro Remote the port numbers Port default...

Страница 112: ...ction has been correctly configured the Status will change from DISCONNECTED to CONNECTED 1 4 16 Text Overlay Setup 1 4 16 1 Overview The SRX Pro Server can be configured to display and capture curren...

Страница 113: ...the background is dark the text color would be white If the background is bright the text color would be black 4 In Intelligent mode adjust the Brightness according to the desired background sensitiv...

Страница 114: ...Intelli Zone will work from 12 00 AM to 11 00 PM on Channel 1 Note Active Time will remain the same for all detection areas on the selected channel 5 Adjust Sensitivity The higher the Sensitivity the...

Страница 115: ...mming Presets section for more information In the example above Channel 1 will move to Preset 3 when motion is detected on area1 4 Set the Percent of Change between 1 and 99 This value determines the...

Страница 116: ...8 VideoLogix 1 4 18 1 Overview Note The availability of this feature is SPK depend ent Caution VideoLogix and VisionCount technologies are mutually exclusive Only one technology can be used on any giv...

Страница 117: ...is 13 FPS When the channel is configured for VideoLogix the frame rate is automatically adjusted to 13 FPS 3 Choose the Control in the drop down menu for the selected VideoLogix channel When the alar...

Страница 118: ...After configuring the common channel settings choose and configure the desired type of human object detection 1 4 18 3 Configuring Detection Settings To configure the Detection Settings do the followi...

Страница 119: ...to define the area starting point hold down the left mouse button and drag to draw a rectangular area b For polygon area Click on the live view screen to define each vertex of the polygon Click on the...

Страница 120: ...long the wav file will play 6 Configure the Detection Type Setting for the selected detection zone by selecting one of the following conditions a In the Condition drop down menu choose any to trigger...

Страница 121: ...etection zone click on start end point hold down the left mouse button and drag in desired location to expand shrink or change the direction of the Crossed Line detection zone To delete the last detec...

Страница 122: ...e 1 4 18 8 Configuring Stop alarm Important Human or Vehicle must be chosen in the Object Type menu in order to activate Missing alarm type Stop alarm will not work with All Objects object type The St...

Страница 123: ...shrink or change the direction of the Crossed Line detection zone To delete the last detection zone click Undo To delete all detection zones for the selected camera click Clear e Name the detection zo...

Страница 124: ...y on registry and or drivethrough that exceeded set time period When properly configured VisionCount can be extremely beneficial to managers loss prevention officers VisionCount should be set up only...

Страница 125: ...of view 4 The vehicle should occupy at least 75 of the drawn area 5 Vehicles must move in one direction only right to left 6 The customer must reach his her hand over to the drive through window to c...

Страница 126: ...is clicked Important The counter will be reset every midnight Uncheck the Count All checkbox and enter desired Period of Time in minutes and seconds This function counts vehicles based on the period o...

Страница 127: ...on the live view screen to define each vertex of the polygon Click on the first point defined to complete the polygon c To adjust the detection zone position on the screen click on the desired detecti...

Страница 128: ...pports a number of IP modules and IP cameras Before using the SRX Pro Server all IP modules and IP cameras must be properly installed and configured Refer to the respective manuals in order to properl...

Страница 129: ...Y Since the Internet connection is less reliable than the network connection the video recording is a lot more stable and reliable on LAN Currently SRX Pro Server supports the following IP modules ANN...

Страница 130: ...55 209 Series via VAPIX Version 2 and 3 firmware 4 xx and 5 xx MAVIX MediaRacer 100 MediaRacer 150 Arecont AV1300 AV2100 AV3100 AV5100 IQinvision IQ501 IQ511 IQ511DV IQ702 IQ752 IQ703 IQ753 IQ705 IQ75...

Страница 131: ...s per input 2 704x240 max 4 video inputs per IP module max 10 fps per input 3 704x480 max 2 video inputs per IP module max 10 fps per input ANNEXXUS 316 module supports the following resolutions 1 176...

Страница 132: ...ress of the ANNEXXUS module IP camera is known and or when the ANNEXXUS IP module IP camera is located on WAN To add IP input do the following 1 Click the Add button 2 Add IP Camera window will be dis...

Страница 133: ...ssword of user if applicable who will have permission to view this IP input Each ANNEXXUS module allows adding a list of users that are permitted to connect to the IP camera s If the user name passwor...

Страница 134: ...ed to any number of video Channels In the example above Channel 1 will display IP input at 192 168 10 63 Channel 7 will display IP input at 192 168 10 99 etc Video channels can also be linked with IP...

Страница 135: ...r the following window to appear 2 Click the Browse button to select the IP Module IP Camera Model from the list Caution Automatic Search function is currently not supported by ANNEXXUS 304 device To...

Страница 136: ...selected IP input do the following 1 Select desired camera in the All Cameras list 2 Click the Edit button Edit IP Camera window will be displayed as shown below 3 After editing desired settings click...

Страница 137: ...Below is the example of an advanced setup for ARECONT IP camera 133 IP Camera Chapter 1 SRX Pro Server...

Страница 138: ...n advanced setup for ANNEXXUS 104 module Below is the example of an advanced setup for ANNEXXUS 300 series module Below is the example of an advanced setup for ANNEXXUS 400 series module 134 IP Camera...

Страница 139: ...alue and resolution individually for each camera The user may choose to increase the frames per second FPS rate and or resolution for the cameras facing locations that are deemed most im portant or wh...

Страница 140: ...to each camera click Default button Note that in 32 channel software only 16 cameras are shown at a time To see settings for cameras 17 32 click the appropriate tab 1 4 22 2 Configuring Recording Disp...

Страница 141: ...will take effect until 10 seconds have elapsed since the sensor activation or since motion has ceased After 10 seconds have elapsed since the motion stopped or sensor has been activated the regular re...

Страница 142: ...orage Note that with the higher resolutions will cause the total number of FPS to drop Resolution setup allows disabling video recording on selected cameras video sources When selected camera is disab...

Страница 143: ...d 4 In the Degree frame enter the Start Point value of the ruler This number will be shown at the starting point of the ruler 5 In the Degree frame enter the End Point value of the ruler This number w...

Страница 144: ...tton and drag it in a straight line 5 Adjust or move the ruler if necessary To erase the ruler click Clear Example For example the height of the door entrance is exactly 84 inches The ruler starts wit...

Страница 145: ...Server Status Note A first e mail is sent after changes to this setting are saved and on the SRX Pro Server startup The SRX Pro Server will then send e mails according to the set schedule In the abov...

Страница 146: ...Address of the recipient b Enter the Threshold number This value refers to the total number of emails sent when a sensor is triggered or video loss is detected 3 Fill in the Send From section a Enter...

Страница 147: ...rds to send out emails if this is the case enter them accordingly 5 Enter the Email Transmission Delay This option sets the amount of time that will pass before email transmission Related Topics Hardw...

Страница 148: ...the following 1 Right click on the desired channel in the Live Mode 2 Select the Search Mode from the context menu 3 Repeat steps 1 and 2 for all desired channels 4 The 24 hour timeline with control...

Страница 149: ...ed camera in the Search Mode b Select the Live Mode in the context menu c Repeat steps 1 and 2 for all desired cameras The exact time will be displayed inside the timeline on the mouse cursor roll ove...

Страница 150: ...on for search 8 24 hour timeline 9 Current Time Date 1 5 2 1 Screen Division Panel Use the screen division panel the same way as on the Main Screen to switch between 4 6 9 10 13 16 25 and 36 screen di...

Страница 151: ...red are days for which there is recorded data A day highlighted in grey indicates a day selected for a search A day circled with a red oval indicates the current day of recording In this example Ther...

Страница 152: ...ur clock This timeline represents a single day chosen in the Calendar Timeline can be expanded to simplify a search Right click the 24 hour time line A context window will appear Choose Zoom In to exp...

Страница 153: ...gency Frame Rate Recording section for more information 1 5 2 5 Switching to Daylight Saving Time Setting the time forward one hour will cause no system confusion The particular hour jumped will simpl...

Страница 154: ...make it full screen and click the Resize button to enlarge the image to fit the display window Print Click the Print button to print the still image on the connected printer Backup Click the Backup b...

Страница 155: ...audio channel for playback click on the audio icon next to the corresponding video channel The audio icon for the selected audio channel will turn red In the example below audio on video channel 1 has...

Страница 156: ...previously created backup files Encrypted or AVI or open the backup image files BMP or JPG To access the Advanced Data Manager ADM do the following 1 Click Advanced Data Manager panel located in the S...

Страница 157: ...humans that enter the detection area outside of the zoomed scene will be ignored Digitally zoom in out of the live video in the Live Mode Digitally zoom in out of the video during the Instant Search...

Страница 158: ...y button to start playback 6 Right click on the video to Zoom In up to 18 times 7 To zoom out click on the plus sign on the tools panel it will become a minus sign Right click on the video to Zoom Out...

Страница 159: ...earch Time window or by clicking directly on the timeline 3 Choose one or more channels in the Timeline bar by clicking on the appropriate channel activation buttons 4 Right click inside the time pane...

Страница 160: ...window or by clicking directly on the timeline 4 Select the desired screen division 4 9 or 16 by clicking on the corresponding buttons on the Screen Division panel 5 Start playback by clicking the Pl...

Страница 161: ...the size of the image without affecting its resolution 8 To drag the enlarged image choose the Drag button on the Tools panel click the image hold down the right mouse button and drag the image 1 5 1...

Страница 162: ...s This information can be further filtered by isolating sensor triggered video recording based on either Sensor or Channel number By Sensor Number a The first column will display all the sensors trigg...

Страница 163: ...click the desired entry on the right most panel in the index search window The selected instance will be displayed in the search timeline bar By Channel Number a Click Switch to Search by Channel Now...

Страница 164: ...n the index search window The selected instance will be displayed in the search timeline bar 1 5 10 1 3 Motion Index Search Select Motion Search to view all video recorded based on motion detection Th...

Страница 165: ...number 4 To view a specific instance click the desired entry on the right most panel in the index search window The selected instance will be displayed in the search timeline bar By Channel number 1...

Страница 166: ...s about motion triggered video recording Begin Time End Time and Filter where Filter value is the Motion detection area number 4 To view a specific instance click the desired entry on the right most p...

Страница 167: ...earch window will be displayed over the SRX Pro Control Center 5 Define the detection area a Place the cursor over the start point on the live view window b Hold the left mouse button down and drag to...

Страница 168: ...ided video has been recorded at 30 frames per second only one out of 900 frames will be checked for motion 30 seconds x 30 frames If None is selected every frame will be checked 8 Select the Display b...

Страница 169: ...ht left icon to increase decrease image brightness Contrast Click the right left icon to increase decrease image contrast Sharpness Click the right left icon to increase decrease image sharpness Noise...

Страница 170: ...p does not require any additional software and can be opened on any PC that operates on Windows O S AVI backup allows adding embedded text caption to the video clip with such information as Channel nu...

Страница 171: ...ition the mouse cursor over the desired start time on the timeline 4 Right click on the timeline and select Mark Start in the context menu In the example below the start time is 11 42 00 AM The start...

Страница 172: ...et the start time in the Calendar window or by clicking directly on the timeline 5 Right click inside the 24 hour timeline The context menu will appear Select Mark Start to choose the start time Start...

Страница 173: ...backup sessions are stored in a backup queue list pending the user action The saved backup clips may be previewed edited deleted or finalized Brand new backup sessions can be created from scratch and...

Страница 174: ...until completed by the user Note that by default all Quick backup sessions are saved in i3DVR Compression encrypted format To change format go to Channels Video Settings tab In order to proceed with t...

Страница 175: ...t Click the Channels Video Settings tab to choose the backup video format from i3dvr Compression default and AVI Encrypted backup does not require any additional settings while AVI backup may be furth...

Страница 176: ...8 To terminate an active backup session before completion check off the checkbox es for the desired backup clip s and click the Stop button 9 To delete the backup session from the list check off the...

Страница 177: ...etermining which video channel or which date time the backup was recorded from after the backup has already been completed 4 Check off the Embed Text checkbox 5 Select the AVI text caption alignment f...

Страница 178: ...ing 1 In the Search mode select the camera for playback 2 Double click on the selected camera to display it in the full screen mode in the live view screen 3 Click the Play button on the Playback Cont...

Страница 179: ...format To change the snapshot format click Browse button in the Image Format field Choose BMP or JPEG format in the drop down menu 3 Change image quality To change the image quality adjust the Image...

Страница 180: ...R Compression If scheduling AVI backup click Setting for mode AVI codec settings 3 For AVI backup file configure AVI Embedded Text Settings tab 4 In the Recording Settings tab select channel s for sch...

Страница 181: ...the scheduled backup on desired day s every selected number of weeks d Month Set Start Time and Duration H M Select the day s in month s or check off All Days or All Months It will repeat the schedule...

Страница 182: ...duled backup session Delete existing scheduled backup session Terminate active scheduled backup session Interrupts the scheduled backup session already in progress Saves the created percentage of the...

Страница 183: ...ore than one DVMS Warning The SRX Pro Remote version MUST match the SRX Pro Server version Before installing the SRX Pro Remote software onto your PC make sure the following minimum hardware software...

Страница 184: ...ed by SRX Pro software at this time Provided the required Nero software version has not been previously installed on your computer you must install Nero 6 6 1 15 software before using SRX Pro Server a...

Страница 185: ...tion CD into the optical drive or double click the Setup exe file located inside the installation package folder The installation screen will be displayed Click Next to proceed with the installation 2...

Страница 186: ...4 Click Next in the Confirm Installation window to proceed with the software installation 5 Wait while the software is installing on the PC 182 Installing SRX Pro Remote Chapter 2 SRX Pro Remote...

Страница 187: ...the installation 7 On the Desktop double click the SRX Pro Remote icon Minimum requirement check will run and a report will be displayed notifying the user whether the current system has sufficient re...

Страница 188: ...will be displayed This step requires the user to configure the SRX Pro Remote password and must only be done once By default the password will be requested on every SRX Pro Remote startup The authori...

Страница 189: ...o image In cases when DirectX is not installed on the system or is not available is used by another program select RGB display mode Usually video cards with less than 64MB will not support DirectX Che...

Страница 190: ...X Pro Remote software supports multiple ports therefore if multiple DVRs are using different ports of the same IP address enter the port number after the IP address following this format 192 168 10 15...

Страница 191: ...t do the following 1 Select the remote site in the Servers list 2 Click the Settings icon or right click on the selected remote site and select Delete option from the menu 3 Click OK in the Delete Ser...

Страница 192: ...ive 2 3 6 Disconnecting from a Remote Site To disconnect from the remote site do the following 1 Select the remote site in the Servers list 2 Click the Settings icon or right click on the selected rem...

Страница 193: ...Remote Sites Added remote site connections can be sorted into groups and subgroups To create a new Group do the following 1 Click the New Group icon New Group folder will be added to the Servers root...

Страница 194: ...nd the Favorites list and drop one several or all channels into the LIVE screen on the right SRX Pro Remote will automatically connect to necessary remote DVRs to display Favorite channels on the scre...

Страница 195: ...s editing deleting user accounts or changing port settings To access the setup mode of the specific remote Server do the following 1 Connect to the remote Server and ensure it is active See Activating...

Страница 196: ...Computer List of drives partitions of the Local Computer Total and free memory RAM information of the Local Computer 2 4 1 1 Language Two languages are currently supported on the SRX Pro Remote Engli...

Страница 197: ...or more channels in the list To select multiple channels press and hold Ctrl button on your keyboard while selecting desired channels from the list To select all or a number of consecutive channels cl...

Страница 198: ...ve servers 4 Expand the Channels list of the connected active Server 5 Select one or more channels in the list To select multiple channels press and hold Ctrl button on your keyboard while selecting d...

Страница 199: ...t backup data will be played back inside the Search Mode screen The AVI backup data will be played by Windows Media player An image viewer will display the JPG or BMP backup files 3 In the top right o...

Страница 200: ...Appendix 3Topics Covered i SRX Pro Player i Watermark Tool Web Search Liebert MultiLink Viewer Configuration 196...

Страница 201: ...layback panel and the video slider in the bottom of the screen To increase the playback speed use the Speed slider Available playback speeds 1 6X 1 5X 1 4X 1 2X 1X 2X 16X 32X If the video backup inclu...

Страница 202: ...er folder on the encrypted backup CD DVD 1 Double click on the file to launch the WaterMark checker The following window will be displayed 2 Click the Browse button and locate the JPEG or BMP snapshot...

Страница 203: ...5 If the snapshot has been tampered with and is no longer authentic the following message will be displayed 199 i Watermark Tool Chapter 3 Appendix...

Страница 204: ...Explorer window 2 In the Address field type in the IP address of the remote Server Follow the example http 72 89 63 133 Tip Server s IP Address is located in the Setup Server Info tab If no changes ha...

Страница 205: ...ctly the split screen with all connected video channels will be displayed Note If the Server is currently in the Setup mode the connection will not be established Wait until the Server is on Live or S...

Страница 206: ...ble 8 Double click again to return to the split screen mode Note If during the Web Search remote connection the setup mode is accessed on connected Server the connection will be broken and the followi...

Страница 207: ...hannels or 1 64 Channels if available Note Web Search does not support drag and drop features which means it is impossible to change each individual channel s position on the screen 3 For example sele...

Страница 208: ...seen or played back on this version on Web Search Use SRX Pro Remote software to play back audio recording Individual Search option is also unavailable via Web Search The Control Panel and Timeline fu...

Страница 209: ...the top right hand corner of the timeline The Calendar window will be attached to the Timeline Calendar window functions the same way as in Search Mode on SRX Pro Server See Time Panel section for mo...

Страница 210: ...Advanced Shutdown v3 5 installed on the DVR Follow these instructions on the DVR system 1 Exit SRX Pro Server software and access the Desktop by pressing Ctrl Alt Shift F4 on the keyboard Enter the m...

Страница 211: ...mmand line argument of the MultiLink Viewer 6 Open the MultiLink Viewer via the Start menu 7 Go Configure Edit My Device List menu 8 Select connected UPS from the drop down list and click Edit 9 In th...

Страница 212: ...r each available event an action may be chosen such as Notify Email Shutdown Command Log etc Decide which events will cause SRX Pro Server and the DVR to shut down For each such event both Shutdown an...

Страница 213: ...column of the first chosen event Green checkmark will be displayed and configuration options will be displayed in the window pane directly below Repeat the steps below for Command actions of all desi...

Страница 214: ...vent i recommends the following settings For Battery Capacity 10 or less and for Output Overload events a Check off Enable Shutdown Action checkbox b In Operating System Shutdown area i Check off Enab...

Страница 215: ...eckbox ii Set the Delay time to 42 min 0 sec d Check off Auto reboot UPS output checkbox 16 To configure Email action for the desired events click on the Email column of the first chosen event Green c...

Страница 216: ...c e Configure Email parameters such as mail server recipient etc 17 To save all configured settings go MultiLink Save Event Configurations menu 18 Close Multilink Viewer window and restart the DVR 19...

Страница 217: ...213 Liebert MultiLink Viewer Configuration Chapter 3 Appendix...

Страница 218: ...ving time 149 default users 69 delete remote connection 187 detection sensitivity 105 detection size 105 digital zoom 153 DirectX 185 disable PTZ functions 71 disconnect from connected site 188 disk f...

Страница 219: ...95 new video backup 171 NTP time server 91 NTP time sync 91 O object search 163 organizing remote site 189 overwrite old data 94 P panic backup setup 88 panic button 36 panorama 156 playback control p...

Страница 220: ...udio 56 types of backup 166 types of video recording 76 U unpacking 2 update server manually 23 update server via internet 28 upgrade instructions 10 user accounts create 70 user accounts delete 75 us...

Отзывы: