6-5
W
hat to do in an emer
g
ency
6
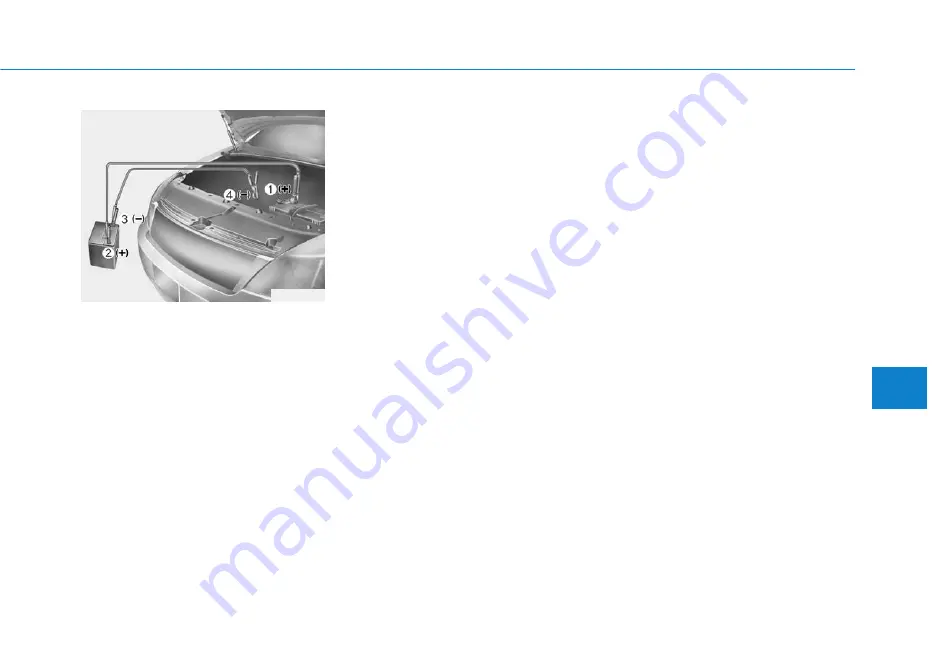
4. Connect the jumper cables in the
exact sequence shown in the illustra-
tion. First connect one jumper cable to
the red, positive (+) jumper terminal of
your vehicle (1).
5. Connect the other end of the jumper
cable to the red, positive (+) battery/
jumper terminal of the assisting vehi-
cle (2).
6. Connect the second jumper cable to
the black, negative (-) battery/ chassis
ground of the assisting vehicle (3).
7. Connect the other end of the second
jumper cable to the black, negative (-)
chassis ground of your vehicle (4).
Do not allow the jumper cables to con-
tact anything except the correct bat-
tery or jumper terminals or the correct
ground. Do not lean over the battery
when making connections.
8. Start the engine of the assisting vehi-
cle and let it run at approximately
2,000 rpm for a few minutes. Then
start your vehicle.
If your vehicle will not start after a few
attempts, it probably requires servicing.
In this event please seek qualified assis-
tance. If the cause of your battery dis-
charging is not apparent, have your vehi-
cle checked by an authorized HYUNDAI
dealer.
Disconnect the jumper cables in the
exact reverse order you connected them:
1. Disconnect the jumper cable from the
black, negative (-) chassis ground of
your vehicle (4).
2. Disconnect the other end of the
jumper cable from the black, negative
(-) battery/chassis ground of the
assisting vehicle (3).
3. Disconnect the second jumper cable
from the red, positive (+) battery/
jumper terminal of the assisting vehi-
cle (2).
4. Disconnect the other end of the
jumper cable from the red, positive (+)
jumper terminal of your vehicle (1).
1VQA4001


