background image


41 

HT130003 / HT130042
HT130030 / HT130043

User Manual

CorTemp

®


Data Recorder v4.3 
9001 Series 


DETECT SIGNAL: 

Toggles DETECT SIGNAL 
ON / OFF 

Press

F2

Returns to 

STANDARD 
PROGRAMMING 
MENU


Press 

READ 


(Scrolls through 
Standard 
Programming 
Menus) 

Press 

ENTER 


(Exit Standard 
Programming 
Menu) 

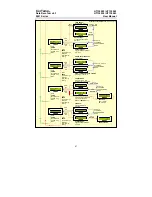
STANDARD PROGRAMMING MENUS (continued, Page 3) 

Press

F2

After entry, returns to 

STANDARD 
PROGRAMMING 
MENU


Press 

READ 


(Scrolls through 
Standard 
Programming 
Menus) 

Press 

ENTER 


(Exit Standard 
Programming 
Menu) 

Press

F1

Returns to 

STANDARD 
PROGRAMMING 
MENU 


Press 

READ 


(Scrolls through 
Standard 
Programming 
Menus) 

Press 

ENTER 


(Exit Standard 
Programming 
Menu) 

Press

F1

Press

F2

Returns to 

STANDARD 
PROGRAMMING 
MENU 


Press 

READ 


(Scrolls through 
Standard 
Programming 
Menus) 

Press 

ENTER 


(Exit Standard 
Programming 
Menu) 

Press

F1

Press 

RUN / STOP 

Press

F2

CorTemp

®


CorTemp

®


LBAT RESET: 

Resets LBAT error

LBAT 

ERROR

Press

F1

CorTemp

®


DETECT LBAT: 

Toggles DETECT LBAT 
ON / OFF 

Press 

F1

, then 

press 

ENTER

CorTemp

®


CorTemp

®


CorTemp

®


HIGH / LOW HEART RATE ALARMS: 

Enter High / Low Limits 

HEART RATE INTERVAL: 

Enter Interval

CorTemp

®


SPORTS MODE: 

Enter Player # to take 
readings of multiple players 

CorTemp

®

CorTemp

®


CorTemp

®


CorTemp

®


CorTemp

®


BARCODE: 

YES to Accept 
NO to Reject 

TIME R3.X: 

Toggles TIME R3.X 
OFF / ON 

SPORTS MENU: 

Toggles 

SPORTS MENU 

OFF / ON


CorTemp

®

Press

ENTER

SPORTS MENU 

Press 

ENTER

CorTemp

®


Press

ENTER

CorTemp

®


Enter Player #, then SCAN 
sensor package label 

OR

press

ENTER

to exit 

Содержание CorTemp HT130003

Страница 1: ...CorTemp Data Recorder v4 3 9001 Series HT130003 HT130030 HT130042 HT130043 User Manual...

Страница 2: ...A 10 Temperature Scale 10 A 11 RF Real Time Option 10 A 12 Initializing the Data Recorder 11 A 13 Clearing Data 11 A 14 Adding Sensors 12 A 15 Changing Active Sensor 13 A 16 ID Number 13 A 17 Sensor...

Страница 3: ...rder 30 A 5 Resetting LBAT 31 A 6 Sports Menu Option 31 A 7 Adding Sensors 32 A 8 Sensor Test 32 B Monitoring Core Body Temperature Sports Menu 33 B 1 Administering the Sensor and Checking the Signal...

Страница 4: ...This system has obvious advantages over a wired probe for monitoring individuals performing strenuous activities or working in hazardous environments The recorder captures the core body temperature o...

Страница 5: ...t Description Data Recorder Pouch HT300001 Soft pouch with belt loop for wearing Data Recorder AUTO RUN MODE Data Recorder Storage Case HT300002 Molded plastic carrying case for Data Recorder Data Tra...

Страница 6: ...Data Recorder Alarm HT150008 Audio Visual alarm that can be positioned on the monitored subject up to 3ft from the Data Recorder AUTO RUN MODE RF Remote Unit HT150009 914Mhz OR HT150014 433Mhz Transm...

Страница 7: ...eld unit SPORTS MODE to collect individual temperature heart rate readings from multiple players easily switching back and forth between players active sensors The data when downloaded displays the ac...

Страница 8: ...rns the recorder to the EXIT STBY mode READ From the Standard Programming Menus pressing READ will move to the next Standard Programming Menu screen From the AUTO RUN MODE pressing READ will take a ma...

Страница 9: ...to the following will display The Firmware Revision Heart Rate option and System Frequency are noted as below The system frequency for HT130003 HT130042 is 262kHz and no system frequency is displayed...

Страница 10: ...readings at a set temperature collection interval To initiate AUTO RUN MODE do the following 1 From EXIT STBY mode press RUN STOP 2 Temperature Heart Rate readings will display at the end of the set...

Страница 11: ...n Interval The temperature collection interval can be programmed anywhere between every 10 seconds to once every 24 hours 23 59 59 Data is collected at the END of the set interval The default interval...

Страница 12: ...ws the user to transfer collected data to terminal programs such as HyperTerminal To initiate DATA TRANSFER do the following 1 From EXIT STBY mode press MENU 2 Press READ until the DATA TRANSFER PC LI...

Страница 13: ...F RT screen displays 3 Press F1 to set the DEGREE status DEGREE will toggle between F Fahrenheit and C Celsius NOTE Default is F 4 Press ENTER to return to EXIT STBY mode NOTE Always Download Data the...

Страница 14: ...ode press MENU 2 Press READ until the INITIALIZE CLEAR DATA screen displays 3 Press F1 to INITIALIZE The following screen will display 4 Press F1 to initialize recorder To cancel press F2 5 Press ENTE...

Страница 15: ...ogram the Serial 7 Enter the 6 digit Serial from the sensor package label 8 Press F2 to program the Calibration 9 Enter the 8 digit Calibration from the sensor package label 10 When the sensor Serial...

Страница 16: ...s ID will appear in the downloaded data The recorder unit can be used as the ID to identify which recorder the collected data was downloaded from To assign an ID do the following 1 From EXIT STBY mode...

Страница 17: ...3 Press F2 to initiate SENSOR TEST 4 The recorder will continuously check for an active signal and will display SENSOR ON or SENSOR OFF depending on the actual status of the signal 5 Press ENTER to r...

Страница 18: ...ure may not be useful in all situations If the battery completely drains the recorder will shutdown without losing data or programmed parameters It is important not to let the recorder stay in this co...

Страница 19: ...nal feature do the following 1 From EXIT STBY mode press MENU 2 Press READ until the SET BAT DETECT SIG screen displays 3 Press F2 to set the DETECT SIG status DETECT SIG will toggle between ON and OF...

Страница 20: ...mode A 22 High Low Heart Rate Alarms High and Low Heart Rate Alarms display on the recorder screen when a reading is outside the programmed parameters When using a Data Recorder Alarm this reading wil...

Страница 21: ...git Player Sensor 6 Press RUN STOP to terminate SPORTS MODE 7 Press ENTER to return to EXIT STBY mode A 24 Barcode This feature has been replaced by using the Barcode Scanner System in conjunction wit...

Страница 22: ...or The following screen will display 7 Scan the barcode on the CorTemp Core Body Temperature Sensor package label 8 When the barcode is scanned the following screen will display 9 Verify that the Seri...

Страница 23: ...one keystroke from the two most used options PC LINK and SPORTS MODE The SPORTS MENU also contains a quick link to the following programming menus LBAT RESET SPORTS MENU ADD SENSOR and SENSOR TEST Onc...

Страница 24: ...active signal using the SENSOR TEST function 3 Remove the sensor Warranty Seal 4 Give the sensor to the subject player as per your organization s protocol B 2 Placement of the Data Recorder AUTO RUN...

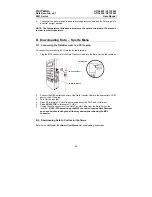
Страница 25: ...AUTO RUN MODE Standard Menu To start monitoring data collection in AUTO RUN MODE do the following 1 From EXIT STBY mode press RUN STOP to initiate AUTO RUN MODE 2 Place recorder in the Data Recorder...

Страница 26: ...from the body To verify that a sensor has passed from the body do the following 1 Use the SENSOR TEST function to verify that the sensor has passed from the body 2 Move the recorder to several positio...

Страница 27: ...T31 non coded Heart Rate Belt is required Refer to the diagram below for instructions on how to wear the POLAR Heart Rate Belt 1 Attach the transmitter to the chest belt strap 2 Adjust the strap leng...

Страница 28: ...o initiate PC LINK for communication to the CorTrack II Software OR press F1 to initiate DATA TRANSFER to a terminal program 7 Press RUN STOP to terminate PC LINK or DATA TRANSFER 8 Press ENTER to ret...

Страница 29: ...or player number the date of the collection period and time correlated temperature heart rate readings The SPORTS MENU allows the athletic trainer to be one keystroke from the two most used options PC...

Страница 30: ...ng Menus ENTER From the Sports Programming Menus pressing ENTER returns the recorder to the SPORTS MENU From the SPORTS MENU pressing ENTER will initiate the Exit Routine READ From the Sports Programm...

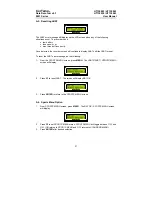
Страница 31: ...llowing will display The Firmware Revision Heart Rate option and System Frequency are noted as below The system frequency for HT130003 HT130042 is 262kHz and no system frequency is displayed on the re...

Страница 32: ...ual readings of multiple players by entering the Player To initiate SPORTS MODE do the following 1 From SPORTS MENU screen press F2 to initiate SPORTS MODE The following screen will display the LAST a...

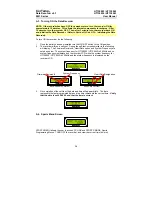
Страница 33: ...en will display 3 Press F2 to toggle OFF the SPORTS MENU then press ENTER The recorder will return to the STANDARD MENU in the EXIT STBY mode Refer to Section III Part A CorTemp Data Recorder Standard...

Страница 34: ...reset To reset the LBAT error message do the following 1 From the SPORTS MENU screen press MENU The LBAT RESET SPORTS MENU screen will display 2 Press F1 to reset LBAT The screen will display BAT OK 3...

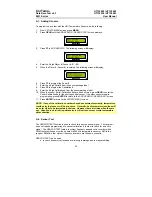
Страница 35: ...gramming press ENTER to return to the ADD SENSOR SENSOR ACT screen 11 Press ENTER to return to the SPORTS MENU screen NOTE If any of the calibration numbers have been entered incorrectly temperature r...

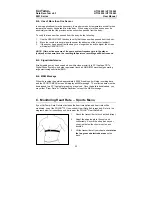
Страница 36: ...DD SENSOR SENSOR TEST screen 5 Press ENTER to return to the SPORTS MENU screen B Monitoring Core Body Temperature Sports Menu Once all parameters DATE TIME CALIBRATION ACTIVE SENSOR ETC have been prog...

Страница 37: ...C Celsius SPORTS MODE Sports Menu To start monitoring data collection in SPORTS MODE do the following 1 From the SPORTS MENU screen press F2 to initiate SPORTS MODE 2 Approach the player and hold the...

Страница 38: ...e Erratic readings may be observed when within close proximity to PC Laptops CRTs Digital Phone Systems and other equipment such as NMR MRI machines generating large electromagnetic fields EMF B 6 MEM...

Страница 39: ...ata Transfer Cable into the Data Port on the recorder 2 Connect the DB9 serial connector of the Data Transfer Cable to the appropriate COM port on the PC Laptop 3 Turn ON the recorder 4 Press F1 to in...

Страница 40: ...nreasonable 1 Check Active Sensor designation 2 Check if Serial Calibration s were entered into recorder correctly Heart Rate readings No readings 1 Check placement of heart rate transmitter 2 Check i...

Страница 41: ...call 941 721 7588 8 00 am 5 00 pm EST Monday Friday An RMA number must be obtained before returning any product for service The RMA number must appear on both the outside of the package and on all cor...

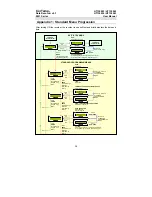
Страница 42: ...ROGRAMMING MENUS CorTemp TURN ON Data Recorder TURN OFF Data Recorder Press RUN STOP Press RUN STOP CorTemp CorTemp Press F1 CorTemp CorTemp TEMPERATURE COLLECTION INTERVAL Enter Interval HIGH LOW TEM...

Страница 43: ...it Standard Programming Menu Press F1 INITIALIZE YES to Initialize NO to Cancel CorTemp CorTemp CorTemp ACTIVE SENSOR Enter SENSOR Returns to STANDARD PROGRAMMING MENU Press READ Scrolls through Stand...

Страница 44: ...ogramming Menu Press F1 Press F2 Returns to STANDARD PROGRAMMING MENU Press READ Scrolls through Standard Programming Menus Press ENTER Exit Standard Programming Menu Press F1 Press RUN STOP Press F2...

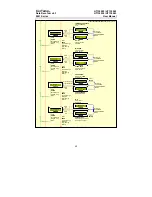
Страница 45: ...ss MENU Access to Sports Programming Menus Returns to SPORTS MENU Press ENTER Exit CorTemp Data Recorder Resets LBAT error and returns to SPORTS PROGRAMMING MENU CorTemp STANDARD MENU Press READ Scrol...

Страница 46: ...Seconds Key Pressed R No Read S Break in data stream indicates data collection was interrupted and then restarted T Active Sensor Player was changed U Time has incremented to the 11th hour of day 2 R...

Страница 47: ...l CorTemp Data Recorder v4 3 9001 Series Appendix 4 Default Parameters F 01 ON ON 0 OFF 00 00 00 00 00 00 CorTemp CorTemp 00 00 10 000 0 000 0 CorTemp OFF CorTemp CorTemp 000000000 CorTemp CorTemp Cor...

Страница 48: ...www hqinc net HQ Inc 210 9th Street Drive West Palmetto FL 34221 4802 USA PL1033 Rev 0 HT130003 HT130030 HT130042 HT130043 User Manual Printed in USA...

Отзывы: