


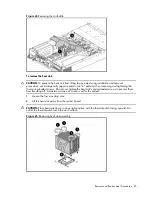


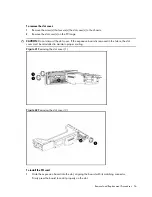


Removal and Replacement Procedures 46
IMPORTANT:
If the heat sink has been removed for any reason on a previously installed processor,
it is critical that you apply more thermal interface material to the integrated heat spreader on the
processor to ensure proper thermal bonding between the processor and the heat sink.
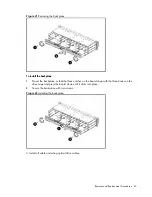
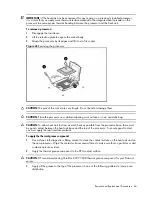
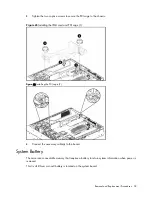
To remove a processor:
1.
Disengage the load lever.
2.
Lift the retention plate to expose the socket body.
3.
Grasp the processor by its edges and lift it out of its socket.
Figure 26
Removing the processor
CAUTION:
The pins of the socket are very fragile. Do not bend or damage them.
CAUTION:
Place the processor on a static-dissipating work surface or in an anti-static bag.
CAUTION:
To allow heat sink to draw as much heat as possible from the processor base, there must
be good contact between the heat sink base and the top of the processor. To ensure good contact,
you must apply thermal interface material.
To apply the thermal grease compound:
1.
Use a clean cloth dipped in rubbing alcohol to clean the contact surface on the heat sink and on
the new processor. Wipe the contact surfaces several times to make sure that no particles or dust
contaminants are evident.
2.
Apply the thermal grease compound to the CPU contact surface.
CAUTION:
HP recommends using Shin-Etsu X-23-7783D thermal grease compound for your ProLiant
server.
3.
Apply all the grease to the top of the processor in one of the following patterns to insure even
distribution.
Содержание ProLiant DL180 G
Страница 1: ...HP ProLiant DL180 Server Maintenance and Service Guide Part number 448409 001 First edition July 2007 ...
Страница 12: ...Customer self repair 12 ...
Страница 13: ...Customer self repair 13 ...
Страница 14: ...Customer self repair 14 ...
Страница 15: ...Customer self repair 15 ...
Страница 19: ...Illustrated parts catalog 19 ...
Страница 79: ...Diagnostic tools and Setup Utilities 79 Main Menu Figure 67 Main menu of the BIOS Setup Utility ...
Страница 82: ...Diagnostic tools and Setup Utilities 82 ...
Страница 83: ...Diagnostic tools and Setup Utilities 83 Security Menu Figure 71 Security menu of the BIOS Setup Utility 1 ...
Страница 84: ...Diagnostic tools and Setup Utilities 84 Figure 72 Security menu of the BIOS Setup Utility 2 ...


