background image

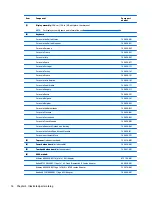
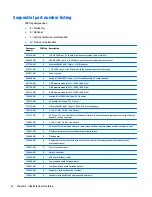
Spare part

number

CSR flag Description

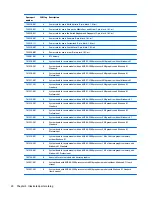
763021-601

N

System board with AMD A6-5200 processor with UMA graphics in models with Windows 8.1 Professional

(touch screen)

763999-001

N

System board with AMD A8-6410 processor with UMA graphics for use in models without Windows 8.1

763999-501

N

System board with AMD A8-6410 processor with UMA graphics for use in models with Windows 8.1

Standard

763999-601

N

System board with AMD A8-6410 processor with UMA graphics for use in models with Windows 8.1

Professional

764000-001

N

System board with AMD A8-6410 processor with UMA graphics for use in models without Windows 8.1

(touch screen)

764000-501

N

System board with AMD A8-6410 processor with UMA graphics for use in models with Windows 8.1

Standard (touch screen)

764000-601

N

System board with AMD A8-6410 processor with UMA graphics for use in models with Windows 8.1

Professional (touch screen)

764001-001

N

System board with AMD A4-6210 processor with UMA graphics for use in models without Windows 8.1

764001-501

N

System board with AMD A4-6210 processor with UMA graphics for use in models with Windows 8.1

Standard

764001-601

N

System board with AMD A4-6210 processor with UMA graphics in models with Windows 8.1 Professional

764002-001

N

System board with AMD E2-6110 processor with UMA graphics for use in models without Windows 8.1

764002-501

N

System board with AMD E2-6110 processor with UMA graphics for use in models with Windows 8.1

Standard

764002-601

N

System board with AMD E2-6110 processor with UMA graphics for use in models with Windows 8.1

Professional

764003-001

N

System board with AMD E1-6010 processor with UMA graphics for use in models without Windows 8.1

764003-501

N

System board with AMD E1-6010 processor with UMA graphics for use in models with Windows 8.1

Standard

764003-601

N

System board with AMD E1-6010 processor with UMA graphics for use in models with Windows 8.1

Professional

764004-001

N

System board with AMD A4-6210 processor with 1 GB of discrete graphics memory for use in models

without Windows 8.1

764004-501

N

System board with AMD A4-6210 processor with 1 GB of discrete graphics memory for use in models with

Windows 8.1 Standard

764004-601

N

System board with AMD A4-6210 processor with 1 GB of discrete graphics memory for use in models with

Windows 8.1 Professional

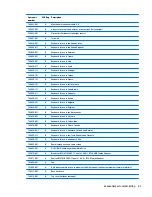
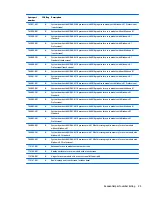
774163-001

N

Antennas for use in models with a touch screen

774164-001

N

Display enclosure for use in models with a touch screen

774166-001

N

Hinges for use in models with a touch screen (left and right)

774167-001

N

Raw display panel, touch screen, includes bezel

Sequential part number listing

25

Содержание 255 G3

Страница 1: ...HP 255 G3 Notebook PC Maintenance and Service Guide ...

Страница 2: ...ng an additional warranty HP shall not be liable for technical or editorial errors or omissions contained herein First Edition August 2014 Document Part Number 793334 001 Product notice This guide describes features that are common to most models Some features may not be available on your computer Not all features are available on all editions of Windows 8 1 This computer may require upgraded and ...

Страница 3: ...w another hard surface such as an adjoining optional printer or a soft surface such as pillows or rugs or clothing to block airflow Also do not allow the AC adapter to contact the skin or a soft surface such as pillows or rugs or clothing during operation The device and the AC adapter comply with the user accessible surface temperature limits defined by the International Standard for Safety of Inf...

Страница 4: ...iv Safety warning notice ...

Страница 5: ... 15 Miscellaneous parts 18 Display assembly subcomponents 19 Mass storage devices 20 Plastics Kit 21 Rubber Kit 21 Sequential part number listing 22 4 Removal and replacement procedures preliminary requirements 27 Tools required 27 Service considerations 27 Plastic parts 27 Cables and connectors 27 Drive handling 28 Grounding guidelines 28 Electrostatic discharge damage 28 Packaging and transporti...

Страница 6: ...rs 60 Heat sink assembly 61 RTC battery 64 Memory module 65 Display assembly 66 7 Using Setup Utility BIOS and HP PC Hardware Diagnostics UEFI in Windows 8 1 73 Starting Setup Utility BIOS 73 Updating the BIOS 73 Determining the BIOS version 73 Downloading a BIOS update 74 Using HP PC Hardware Diagnostics UEFI 74 Downloading HP PC Hardware Diagnostics UEFI to a USB device 75 8 Using Setup Utility ...

Страница 7: ... in Windows 8 1 89 Creating recovery media and backups 89 Creating HP Recovery media 89 Restore and recovery 90 Recovering using HP Recovery Manager 91 What you need to know 91 Using the HP Recovery partition select models only 91 Using HP Recovery media to recover 92 Changing the computer boot order 92 Removing the HP Recovery partition select models only 92 12 Backing up restoring and recovering...

Страница 8: ... partition select models only 97 Recovering using the recovery media 97 Changing the computer boot order 97 13 Backup and Recovery in SUSE Linux 99 Backing up your information 99 Performing a system recovery 99 14 Statement of Volatility 101 Non volatile memory usage 103 Questions and answers 105 15 Power cord set requirements 107 Requirements for all countries 107 Requirements for specific countr...

Страница 9: ... HD 8330 Graphics A4 5000 AMD Radeon HD 8280 Graphics E2 3800 AMD Radeon HD 8210 Graphics E1 2100 AMD Radeon R5 Graphics AMD Radeon R4 Graphics AMD Radeon R3 Graphics AMD Radeon R2 Graphics Switchable discrete graphics AMD Sun LE 18W Radeon HD 8570M with up to 1024MB MB of dedicated video memory Support HD decode DX11 1 and HDMI Support PX7 Panel 39 6 cm 15 6 in high definition HD light emitting d...

Страница 10: ...r second HP TrueVision HD HD camera fixed no tilt with activity LED 1280 720 by 30 frames per second Ethernet Integrated 10 100 network interface card NIC Wireless Integrated wireless local area network WLAN options by way of wireless module One or two WLAN antennas built into display assembly Compatible with Miracast certified devices Single antenna support Support for the following WLAN formats ...

Страница 11: ...rofile sensor reserve for SMBus Power requirements AC adapters AC Adapter 65 W Smart nPFC 3 pin RC 4 5mm connector non slim for use in discrete models AC Adapter 45 W Smart nPFC 3 pin RC 4 5mm connector non slim for use in UMA models 1 meter power cord 4 cell 41 Whr Li ion battery 3 cell 31 Whr Li ion battery Security Kensington Security Lock Operating system Preinstalled Windows 8 1 Windows 8 1 P...

Страница 12: ...4 Chapter 1 Product description ...

Страница 13: ...he Start screen type camera and then select Camera from the list of applications 5 Internal microphone Records sound 6 Internal display switch Turns off the display and initiates Sleep if the display is closed while the power is on NOTE The internal display switch is not visible from the outside of the computer The antennas are not visible from the outside of the computer For optimal transmission ...

Страница 14: ...on 1 USB 2 0 ports 2 Connect an optional USB device such as a keyboard mouse external drive printer scanner or USB hub 2 Optical drive select models only Depending on your computer model reads an optical disc or reads and writes to an optical disc NOTE For disc compatibility information go to the Help and Support web page Follow the web page instructions to select your computer model Select Suppor...

Страница 15: ...elevision any compatible digital or audio component or a high speed HDMI device 7 RJ 45 network jack status lights Connects a network cable White The network is connected Amber Activity is occurring on the network 8 USB 3 0 port Connects an optional USB device such as a keyboard mouse external drive printer scanner or USB hub 9 Audio out headphone Audio in microphone jack Connects optional powered...

Страница 16: ...f power to the display and other unneeded components Off The computer is off or in Hibernation Hibernation is a power saving state that uses the least amount of power Top TouchPad Component Description 1 TouchPad zone Moves the on screen pointer and selects or activates items on the screen NOTE The TouchPad also supports edge swipe gestures 2 Left TouchPad button Functions like the left button on ...

Страница 17: ...on Hibernation is a power saving state that uses the least amount of power 2 Caps lock light On Caps lock is on which switches the keys to all capital letters 3 Mute light Amber Computer sound is off Off Computer sound is on 4 Wireless light On An integrated wireless device such as a wireless local area network WLAN device and or a Bluetooth device is on NOTE On some models the wireless light is a...

Страница 18: ...Hibernation CAUTION Pressing and holding down the power button will result in the loss of unsaved information If the computer has stopped responding and shutdown procedures are ineffective press and hold the power button down for at least 5 seconds to turn off the computer To learn more about your power settings see your power options In Windows 8 1 from the Start screen type power select Power an...

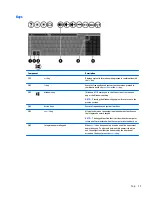
Страница 19: ...urn you to the previous screen 4 Action keys Execute frequently used system functions 5 num lk key Alternates between the navigational and numeric functions on the integrated numeric keypad NOTE The keypad function that is active when the computer is turned off is reinstated when the computer is turned back on 6 Integrated numeric keypad When num lk has been enabled it can be used like an external...

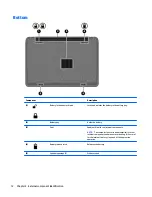
Страница 20: ...t Enable airflow to cool internal components NOTE The computer fan starts up automatically to cool internal components and prevent overheating It is normal for the internal fan to cycle on and off during routine operation 4 Battery release latch Releases the battery 5 Speaker openings 2 Produce sound 12 Chapter 2 External component identification ...

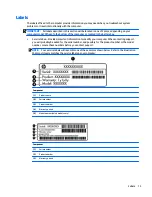
Страница 21: ... important information to identify your computer When contacting support you will probably be asked for the serial number and possibly for the product number or the model number Locate these numbers before you contact support NOTE Your service labels will resemble one of the examples shown below Refer to the illustration that most closely matches the service label on your computer Component 1 Prod...

Страница 22: ...ovide s regulatory information about the computer Wireless certification label s Provide s information about optional wireless devices and the approval markings for the countries or regions in which the devices have been approved for use 14 Chapter 2 External component identification ...

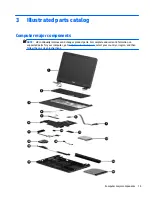
Страница 23: ...TE HP continually improves and changes product parts For complete and current information on supported parts for your computer go to http partsurfer hp com select your country or region and then follow the on screen instructions Computer major components 15 ...

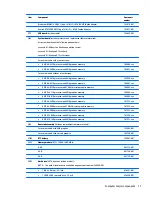
Страница 24: ...sia 749658 251 For use in Bulgaria 749658 261 For use in Belgium 749658 A41 For use in the Netherlands 749658 B31 For use in Slovenia 749658 BA1 For use in Switzerland 749658 BG1 For use in French Canada 749658 DB1 For use in Denmark Finland and Norway 749658 DH1 For use in the Czech Republic and Slovakia 749658 FL1 For use in northwest Africa 749658 FP1 3 Top cover includes touchpad 754214 001 4 ...

Страница 25: ...rocessor and 1 GB of discrete graphics memory 764004 xxx AMD E2 6110 processor and UMA graphics memory 764002 xxx AMD E1 6010 processor and UMA graphics memory 764003 xxx AMD A6 5200 processor and UMA graphics memory 761533 xxx AMD A4 5000 processor and 1 GB of discrete graphics memory 761534 xxx AMD A4 5000 processor and UMA graphics memory 761532 xxx AMD E2 3800 processor and UMA graphics memory...

Страница 26: ...rt AC adapter AC adapter 65 W non PFC 4 5 mm 710412 001 45 W non PFC non slim HP Smart AC adapter for use in all countries and regions except for the People s Republic of China and India 741727 001 Power cord 3 pin black 1 00 m For use in Europe the Middle East and Africa 755530 021 For use in Denmark 755530 081 For use in Israel 755530 BB1 For use in North America 755530 001 For use in South Afri...

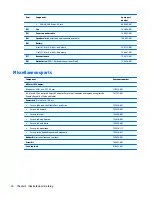
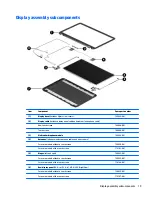
Страница 27: ...Antennas includes wireless antenna cables and transceivers For use in models without a touch screen 749638 001 For use in models with a touch screen 774163 001 5 Hinges left and right 749655 001 For use in models without a touch screen 749655 001 For use in models with a touch screen 774166 001 6 Raw display panel 39 6 cm 15 6 in HD WLED BrightView For use in models without a touch screen 750635 0...

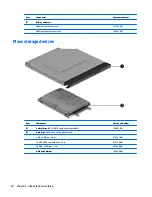
Страница 28: ... Mass storage devices Item Component Spare part number 1 Optical drive DVD RW Double Layer SuperMulti 750636 001 2 Hard drive SATA does not include bracket 1 GB 5400 rpm 2 5 in 676521 001 750 GB 5400 rpm hard drive 2 5 in 634250 001 500 GB 5400 rpm 7 mm 669299 001 Hard drive bracket 749648 001 20 Chapter 3 Illustrated parts catalog ...

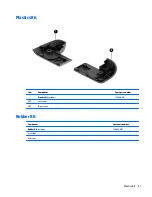
Страница 29: ...ics Kit Item Component Spare part number Plastics Kit includes 749656 001 1 Left cover 2 Right cover Rubber Kit Component Spare part number Rubber Kit includes 749652 001 Front feet Rear feet Plastics Kit 21 ...

Страница 30: ... W non PFC 4 5 mm 733476 001 A Atheros AR9565 802 11bgn 1x1 WiFi BT4 0 combo Adapter 740715 001 A 4 cell 41 Whr 2 8 Ah Li ion battery 741727 001 A 45 W non PFC non slim HP Smart AC adapter for use in all countries and regions except for the People s Republic of China and India 746641 001 A 3 cell 31 Whr 2 8 Ah Li ion battery 749638 001 N Antennas for use in models without a touch screen includes w...

Страница 31: ...y 749658 251 B Keyboard for use in Russia 749658 261 B Keyboard for use in Bulgaria 749658 A41 B Keyboard for use in Belgium 749658 B31 B Keyboard for use in the Netherlands 749658 BA1 B Keyboard for use in Slovenia 749658 BG1 B Keyboard for use in Switzerland 749658 DB1 B Keyboard for use in French Canada 749658 DH1 B Keyboard for use in Denmark Finland and Norway 749658 FL1 B Keyboard for use in...

Страница 32: ...8 1 Professional 761532 001 N System board for use in models with an AMD A4 5000 processor UMA graphics without Windows 8 1 761532 501 N System board for use in models with an AMD A4 5000 processor UMA graphics and Windows 8 1 Standard 761532 601 N System board for use in models with an AMD A4 5000 processor UMA graphics and Windows 8 1 Professional 761533 001 N System board for use in models with...

Страница 33: ...ows 8 1 Professional 764002 001 N System board with AMD E2 6110 processor with UMA graphics for use in models without Windows 8 1 764002 501 N System board with AMD E2 6110 processor with UMA graphics for use in models with Windows 8 1 Standard 764002 601 N System board with AMD E2 6110 processor with UMA graphics for use in models with Windows 8 1 Professional 764003 001 N System board with AMD E...

Страница 34: ...26 Chapter 3 Illustrated parts catalog ...

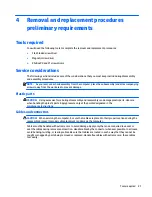
Страница 35: ... and reassembly can damage plastic parts Use care when handling the plastic parts Apply pressure only at the points designated in the maintenance instructions Cables and connectors CAUTION When servicing the computer be sure that cables are placed in their proper locations during the reassembly process Improper cable placement can damage the computer Cables must be handled with extreme care to avo...

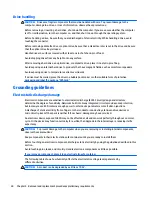
Страница 36: ... Electronic components are sensitive to electrostatic discharge ESD Circuitry design and structure determine the degree of sensitivity Networks built into many integrated circuits provide some protection but in many cases ESD contains enough power to alter device parameters or melt silicon junctions A discharge of static electricity from a finger or other conductor can destroy static sensitive dev...

Страница 37: ...ers Always be properly grounded when touching a component or assembly Store reusable ESD sensitive parts from assemblies in protective packaging or non conductive foam Use transporters and conveyors made of antistatic belts and roller bushings Be sure that mechanized equipment used for moving materials is wired to ground and that proper materials are selected to avoid static charging When groundin...

Страница 38: ...ps on both feet with a minimum of one megohm resistance between the operator and ground To be effective the conductive must be worn in contact with the skin The following grounding equipment is recommended to prevent electrostatic damage Antistatic tape Antistatic smocks aprons and sleeve protectors Conductive bins and other assembly or soldering aids Nonconductive foam Conductive tabletop worksta...

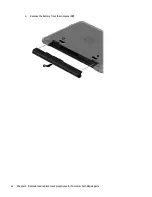
Страница 39: ...on page 13 for details This chapter provides removal and replacement procedures for Customer Self Repair parts There are as many as 5 screws that must be removed replaced or loosened when servicing Customer Self Repair parts Make special note of each screw size and location during removal and replacement Battery Description Spare part number 4 cell 41 Whr 2 8 Ah Li ion battery 740715 001 3 cell 31...

Страница 40: ...3 Remove the battery from the computer 3 32 Chapter 5 Removal and replacement procedures for Customer Self Repair parts ...

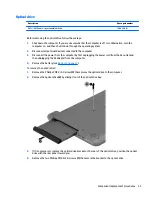
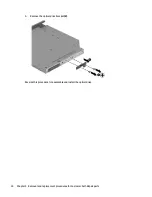
Страница 41: ... first unplugging the power cord from the AC outlet and then unplugging the AC adapter from the computer 4 Remove the battery see Battery on page 31 To remove the optical drive 1 Remove the Phillips PM2 5 5 0 screw 1 that secures the optical drive to the computer 2 Remove the optical drive 2 by sliding it out of the optical drive bay 3 If it is necessary to replace the optical drive bracket on the...

Страница 42: ...5 Remove the optical drive bracket 2 Reverse this procedure to reassemble and install the optical drive 34 Chapter 5 Removal and replacement procedures for Customer Self Repair parts ...

Страница 43: ...49658 B31 Keyboard for use in Slovenia 749658 BA1 Keyboard for use in Switzerland 749658 BG1 Keyboard for use in French Canada 749658 DB1 Keyboard for use in Denmark Finland and Norway 749658 DH1 Keyboard for use in the Czech Republic and Slovakia 749658 FL1 Keyboard for use in northwest Africa 749658 FP1 Before removing the keyboard follow these steps 1 Shut down the computer If you are unsure wh...

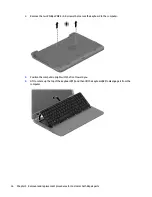
Страница 44: ...ard to the computer 3 Position the computer upright with the front toward you 4 Lift to rotate up the top of the keyboard 1 and then lift the keyboard 2 to disengage it from the computer 36 Chapter 5 Removal and replacement procedures for Customer Self Repair parts ...

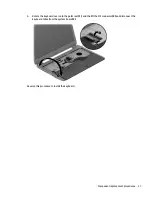
Страница 45: ...he keyboard over onto the palm rest 1 and the lift the ZIF connector 2 and disconnect the keyboard cable from the system board 3 Reverse this procedure to install the keyboard Component replacement procedures 37 ...

Страница 46: ...38 Chapter 5 Removal and replacement procedures for Customer Self Repair parts ...

Страница 47: ...d location during removal and replacement Display subcomponents bezel webcam panel This section describes removing display subcomponents that do not require that you remove the entire display assembly from the computer You can remove the display bezel webcam microphone module and display panel while the display assembly is still attached to the computer To remove the remaining display subcomponent...

Страница 48: ...Flex the inside of the top edge 1 the left and right sides 2 and the bottom edge 3 of the display bezel until the bezel disengages from the display enclosure 3 Remove the display bezel 4 4 To remove the webcam microphone module a Position the display assembly with the top edge toward you b Lift to disengage the adhesive that secures the webcam microphone module to the display and then remove the m...

Страница 49: ...display panel a Remove the four Phillips PM2 5 3 5 screws that secure the display panel to the enclosure b Rotate the display panel onto the keyboard to gain access to the display cable connection on the back of the panel 1 Component replacement procedures 41 ...

Страница 50: ...es the display panel cable to the display panel and then disconnect the cable 3 Reverse this procedure to reassemble and install the display bezel webcam microphone module and display panel 42 Chapter 6 Removal and replacement procedures for Authorized Service Provider parts ...

Страница 51: ...ower from the computer by first unplugging the power cord from the AC outlet and then unplugging the AC adapter from the computer 4 Remove the battery see Battery on page 31 5 Remove the keyboard see Keyboard on page 35 To remove the top cover 1 Position the computer upside down with the front toward you 2 Remove the rear covers by prying off the two rubber feet 1 removing the two Phillips PM2 5 8...

Страница 52: ...you 6 Disconnect the power button board cable 1 and the touchpad button board cable 2 7 Remove the four Phillips PM2 5 5 0 screws 3 that secure the top cover to the computer 8 Lift the rear edge of the top cover 1 until it disengage from the base enclosure 44 Chapter 6 Removal and replacement procedures for Authorized Service Provider parts ...

Страница 53: ...9 Remove the top cover 2 Reverse this procedure to install the top cover Component replacement procedures 45 ...

Страница 54: ... cord from the AC outlet and then unplugging the AC adapter from the computer 4 Remove the battery see Battery on page 31 5 Remove the keyboard see Keyboard on page 35 6 Remove the top cover see Top cover on page 43 To remove the power button board 1 Position the top cover upside down 2 Remove the Phillips PM2 0 3 0 screw 1 that secures the power button board to the top cover 3 Lift the board and ...

Страница 55: ...ter 3 Disconnect the power from the computer by first unplugging the power cord from the AC outlet and then unplugging the AC adapter from the computer 4 Remove the battery see Battery on page 31 5 Remove the keyboard see Keyboard on page 35 6 Remove the top cover see Top cover on page 43 To remove the TouchPad button board 1 Position the top cover upside down with the front toward you 2 Disconnec...

Страница 56: ...4 Remove the TouchPad button board and cable Reverse this procedure to install the power button board and cable 48 Chapter 6 Removal and replacement procedures for Authorized Service Provider parts ...

Страница 57: ...n through the operating system 2 Disconnect all external devices connected to the computer 3 Disconnect the power from the computer by first unplugging the power cord from the AC outlet and then unplugging the AC adapter from the computer 4 Remove the battery see Battery on page 31 5 Remove the keyboard see Keyboard on page 35 6 Remove the top cover see Top cover on page 43 To remove the hard driv...

Страница 58: ...3 0 4 0 screws 1 that secure the bracket to the hard drive 5 Remove the hard drive bracket from the hard drive 2 Reverse this procedure to reassemble and install the hard drive 50 Chapter 6 Removal and replacement procedures for Authorized Service Provider parts ...

Страница 59: ...n contact support Before removing the WLAN module follow these steps 1 Shut down the computer If you are unsure whether the computer is off or in Hibernation turn the computer on and then shut it down through the operating system 2 Disconnect all external devices connected to the computer 3 Disconnect the power from the computer by first unplugging the power cord from the AC outlet and then unplug...

Страница 60: ...ennas are not connected to the terminals on the WLAN module the protective sleeves must be installed on the antenna connectors as shown in the following illustration Reverse this procedure to install the WLAN module 52 Chapter 6 Removal and replacement procedures for Authorized Service Provider parts ...

Страница 61: ...ill located on the left side of the computer Before removing the fan heat sink assembly follow these steps 1 Shut down the computer If you are unsure whether the computer is off or in Hibernation turn the computer on and then shut it down through the operating system 2 Disconnect all external devices connected to the computer 3 Disconnect the power from the computer by first unplugging the power c...

Страница 62: ...4 Remove the fan from the computer 3 Reverse this procedure to install the fan 54 Chapter 6 Removal and replacement procedures for Authorized Service Provider parts ...

Страница 63: ...d then unplugging the AC adapter from the computer 4 Remove the battery see Battery on page 31 and then remove the following components Keyboard see Keyboard on page 35 Top cover see Top cover on page 43 Display see Display assembly on page 66 To remove the power connector cable 1 Position the computer upright 2 Remove the two Phillips PM2 5 5 0 screws 1 that secure the cable to the computer 3 Dis...

Страница 64: ...00 processor and UMA graphics memory 761533 xxx AMD A4 5000 processor and 1 GB of discrete graphics memory 761534 xxx AMD A4 5000 processor and UMA graphics memory 761532 xxx AMD E2 3800 processor and UMA graphics memory 761530 xxx AMD E1 2100 processor and UMA graphics memory 761531 xxx Before removing the system board follow these steps 1 Shut down the computer If you are unsure whether the comp...

Страница 65: ...ry module on page 65 Heat sink assembly see Heat sink assembly on page 61 To remove the system board 1 Position the computer upright and then disconnect the following cables from the system board 1 Power connector cable 2 Speaker cable 3 Fan cable 4 Display cable 2 Remove the two Phillips PM2 5 5 0 screws 5 that secure the system board to the computer Component replacement procedures 57 ...

Страница 66: ...OTE Be careful not to inadvertently disconnect the speaker cable when lifting the system board 4 Flip the system board upside down to gain access to the speaker connector 1 5 Disconnect the USB board cable from the system board 2 Reverse this procedure to install the system board 58 Chapter 6 Removal and replacement procedures for Authorized Service Provider parts ...

Страница 67: ...ter from the computer 4 Remove the battery see Battery on page 31 and then remove the following components Keyboard see Keyboard on page 35 Top cover see Top cover on page 43 WLAN module see WLAN module on page 51 System board see System board on page 56 Hard drive see Hard drive on page 49 To remove the USB board 1 Position the computer upright 2 Disconnect the USB board cable from the system boa...

Страница 68: ... the computer 4 Remove the battery see Battery on page 31 and then remove the following components Keyboard see Keyboard on page 35 Top cover see Top cover on page 43 WLAN module see WLAN module on page 51 Hard drive see Hard drive on page 49 System board see System board on page 56 To remove the speakers 1 Remove the four Phillips broadhead PM2 0 2 0 screws 1 that secure the speakers to the compu...

Страница 69: ...displaced through the ventilation grill located on the left side of the computer Before removing the heat sink assembly follow these steps 1 Shut down the computer If you are unsure whether the computer is off or in Hibernation turn the computer on and then shut it down through the operating system 2 Disconnect all external devices connected to the computer 3 Disconnect the power from the computer...

Страница 70: ...3 Remove the heat sink assembly 2 from the system board Discrete graphics UMA graphics 62 Chapter 6 Removal and replacement procedures for Authorized Service Provider parts ...

Страница 71: ...iated heat sink area 1 2 as well as the graphics chip and associated heat sink area 3 4 UMA graphics Thermal paste is used on the heat sink 1 and the processor 2 Reverse this procedure to reassemble and install the heat sink assembly Component replacement procedures 63 ...

Страница 72: ...d from the AC outlet and then unplugging the AC adapter from the computer 4 Remove the battery see Battery on page 31 and then remove the following components Keyboard see Keyboard on page 35 Top cover see Top cover on page 43 WLAN module see WLAN module on page 51 System board see System board on page 56 To remove the RTC battery 1 Position the system board upside down 2 Using a thin tool or scre...

Страница 73: ...omputer by first unplugging the power cord from the AC outlet and then unplugging the AC adapter from the computer 4 Remove the battery see Battery on page 31 and then remove the following components Keyboard see Keyboard on page 35 Top cover see Top cover on page 43 WLAN module see WLAN module on page 51 System board see System board on page 56 To remove a memory module 1 Spread the retaining tab...

Страница 74: ...able For use in non touch screen models includes display panel cable and webcam microphone cable 749646 001 For use in touch screen models includes display panel cable and webcam microphone cable 764888 001 Display enclosure touch screen models Touch screen models 774164 001 Non touch screen models 749641 001 Hinges left and right Non touch screen models 749655 001 Touch screen models 774166 001 W...

Страница 75: ...ing the following screws Failure to support the display assembly can result in damage to the display assembly and other computer components 4 Remove the four Phillips PM2 5 5 0 screws 1 two from each hinge and one Phillips PM2 5 3 5 screw 2 on the right hinge that secures the display assembly to the computer 5 Remove the display assembly 3 If it is necessary to replace any of the display assembly ...

Страница 76: ...T be connected to the computer as shown in the following image 2 To remove the webcam microphone module a Position the display assembly with the top edge toward you b Disconnect the cable 1 from the module c Remove the webcam microphone module 2 The module is attached to the display enclosure with double sided tape 3 To remove the display panel 68 Chapter 6 Removal and replacement procedures for A...

Страница 77: ...nel onto the keyboard to gain access to the display cable connection on the back of the panel 1 c On the back of the display panel release the adhesive strip 2 that secures the display panel cable to the display panel and then disconnect the cable 3 NOTE In this procedure the display will NOT be connected to the computer as shown in the following image 4 To remove the display hinges Component repl...

Страница 78: ... to the display panel b Remove the display hinges 2 5 To remove the wireless antenna cables and transceivers release the wireless antenna cables from the clips built into the display enclosure 70 Chapter 6 Removal and replacement procedures for Authorized Service Provider parts ...

Страница 79: ... the display enclosure 2 7 If replacing the display enclosure be sure that the subcomponents including the webcam microphone module the antenna receivers and all associated cables and hardware are transferred to the new enclosure Reverse this procedure to reassemble and install the display assembly Component replacement procedures 71 ...

Страница 80: ...72 Chapter 6 Removal and replacement procedures for Authorized Service Provider parts ...

Страница 81: ...ite Most BIOS updates on the HP website are packaged in compressed files called SoftPaqs Some download packages contain a file named Readme txt which contains information regarding installing and troubleshooting the file Determining the BIOS version To determine whether available BIOS updates contain later BIOS versions than those currently installed on the computer you need to know the version of...

Страница 82: ...S make a note of the path to the location on your hard drive where the BIOS update is downloaded You will need to access this path when you are ready to install the update NOTE If you connect your computer to a network consult the network administrator before installing any software updates especially system BIOS updates BIOS installation procedures vary Follow any instructions that are revealed o...

Страница 83: ...s for downloading HP PC Hardware Diagnostics UEFI are provided in English only There are two options to download HP PC Hardware Diagnostics to a USB device Option 1 HP PC Diagnostics homepage Provides access to the latest UEFI version 1 Go to http hp com go techcenter pcdiags 2 Click the UEFI Download link and then select Run Option 2 Support and Drivers pages Provide downloads for a specific prod...

Страница 84: ...76 Chapter 7 Using Setup Utility BIOS and HP PC Hardware Diagnostics UEFI in Windows 8 1 ...

Страница 85: ...in Setup Utility BIOS Errors can prevent the computer from operating properly Updating the BIOS Updated versions of the BIOS may be available on the HP website Most BIOS updates on the HP website are packaged in compressed files called SoftPaqs Some download packages contain a file named Readme txt which contains information regarding installing and troubleshooting the file Determining the BIOS ve...

Страница 86: ...ard drive where the BIOS update is downloaded You will need to access this path when you are ready to install the update NOTE If you connect your computer to a network consult the network administrator before installing any software updates especially system BIOS updates BIOS installation procedures vary Follow any instructions that are displayed on the screen after the download is complete If no ...

Страница 87: ... for downloading HP PC Hardware Diagnostics UEFI are provided in English only There are two options to download HP PC Hardward Diagnostics to USB device Option 1 HP PC Diagnostics homepage Provides access to the latest UEFI version 1 Go to http www hp com go techcenter pcdiags 2 Click the UEFI Dowload link and then select Run Option 2 Support and Drivers pages Provides downloads for a specific pro...

Страница 88: ...80 Chapter 8 Using Setup Utility BIOS and System Diagnostics in Windows 7 ...

Страница 89: ...omputer Setup Navigating and selecting in Computer Setup To navigate and select in Computer Setup follow these steps 1 Turn on or restart the computer and then press esc while the Press the ESC key for Startup Menu message is displayed at the bottom of the screen To select a menu or a menu item use the tab key and the keyboard arrow keys and then press enter or use a pointing device to click the i...

Страница 90: ... the on screen instructions or Use the arrow keys to select File Save Changes and Exit and then press enter Your changes go into effect when the computer restarts NOTE Your password settings and security settings are not changed when you restore the factory settings Updating the BIOS Updated versions of the BIOS may be available on the HP Web site Most BIOS updates on the HP Web site are packaged ...

Страница 91: ...country us en wwcontact_us html 2 Follow the on screen instructions to identify your computer and access the BIOS update you want to download 3 Click the option for software and driver downloads type your computer model number in the product box and then press enter Follow the on screen instructions to identify your computer and access the BIOS update you want to download 4 Click your specific pro...

Страница 92: ...nostics to USB device Option 1 HP PC Diagnostics homepage Provides access to the latest UEFI version 1 Go to http www hp com go techcenter pcdiags 2 Click the UEFI Dowload link and then select Run Option 2 Support and Drivers pages Provides downloads for a specific product for earlier and later versions 1 Go to http www hp com 2 Point to Support located at the top of the page and then click Downlo...

Страница 93: ...W 19 V dc 4 74 A or 19 5 V dc 4 62 A 90 W Temperature Operating 5 C to 35 C 41 F to 95 F Nonoperating 20 C to 60 C 4 F to 140 F Relative humidity noncondensing Operating 10 to 90 Nonoperating 5 to 95 Maximum altitude unpressurized Operating 15 m to 3 048 m 50 ft to 10 000 ft Nonoperating 15 m to 12 192 m 50 ft to 40 000 ft NOTE Applicable product safety standards specify thermal limits for plastic...

Страница 94: ... treatment Anti glare Contrast ratio 300 1 typical Response time 8 ms Brightness 200 nits typical Viewing angle SVA Backlight LED Luminance uniformity 13 points 1 4 typ 1 6 max Lifetime 1 2 luminance 12 000 hours Color coordinate white 0 313 0 329 Color tolerance White 0 02 Color tolerance W R G B 0 03 Color gamut 45 typical 86 Chapter 10 Specifications ...

Страница 95: ...ecurity ATA security ATA security Seek times typical read including setting Single track 1 4 ms 1 5 ms 3 ms 3 ms Average read write 10 ms 11 ms 13 ms 13 ms Maximum 12 ms 14 ms 24 ms 24 ms Logical blocks 1 938 921 461 1 465 149 168 1 048 576 000 625 142 448 Disk rotational speed 5400 rpm 5400 rpm 5400 rpm 5400 rpm Operating temperature 0 C to 60 C 32 F to 140 F 1 GB 1 billion bytes when referring t...

Страница 96: ...iameter Standard disc 12 cm 4 72 in Mini disc 8 cm 3 15 in Disc thickness 1 2 mm 0 047 in Track pitch 0 74 μm Access time CD DVD Random 175 ms 230 ms Full stroke 285 ms 335 ms Audio output level Line out 0 7 Vrms Cache buffer 2 MB Data transfer rate 24X CD ROM 3 600 KB sec 8X DVD ROM 10 800 KB sec 24X CD R 3 600 KB sec 16X CD RW 2 400 KB sec 8X DVD R 10 800 KB sec 4X DVD RW 5 400 KB sec 8X DVD R 1...

Страница 97: ...sonal information For more information and steps see Help and Support From the Start screen type help and then select Help and Support Creating HP Recovery media HP Recovery Manager is a software program that offers a way to create recovery media after you successfully set up the computer HP Recovery media can be used to perform system recovery if the hard drive becomes corrupted System recovery r...

Страница 98: ...ger on page 91 Restore and recovery There are several options for recovering your system Choose the method that best matches your situation and level of expertise Windows offers several options for restoring from backup refreshing the computer and resetting the computer to its original state For more information and steps see Help and Support From the Start screen type help and then select Help an...

Страница 99: ...Image Recovery What you need to know HP Recovery Manager recovers only software that was installed at the factory For software not provided with this computer you must either download the software from the manufacturer s website or reinstall the software from the media provided by the manufacturer Recovery through HP Recovery Manager should be used as a final attempt to correct computer issues HP ...

Страница 100: ...tion You can change the selection for an optical drive or a USB flash drive To change the boot order 1 Insert the HP Recovery media you created 2 Restart the computer quickly press esc and then press f9 for boot options 3 Select the optical drive or USB flash drive you want to boot from 4 Follow the on screen instructions Removing the HP Recovery partition select models only HP Recovery Manager so...

Страница 101: ...them in a safe place HP Recovery Manager examines the computer and determines the required storage capacity for the flash drive or the number of blank DVD discs that will be required Use DVD R DVD R DVD R DL DVD R DL discs or a flash drive Do not use rewriteable discs such as CD RW DVD RW double layer DVD RW and BD RE rewritable Blu ray discs they are not compatible with HP Recovery Manager softwa...

Страница 102: ... the state it was on the previous day the software will be uninstalled and you won t be able to use it What you need to know If you restore to a restore point and then change your mind you can undo the restoration You should create system restore points Before you add or change software or hardware Periodically whenever the computer is running normally System Restore also saves shadow copies of fi...

Страница 103: ...age device before you back up You should back up Before adding or changing software or hardware Before the computer is repaired or restored On a regular schedule to be sure you have recent copies of personal information After you add many files for example if you saved videos from a birthday party Before using antivirus software to remove a malicious program After adding information that is hard t...

Страница 104: ...store 1 Select Start Control Panel System and Security Backup and Restore 2 Follow the on screen instructions to restore your backup NOTE Windows includes the User Account Control feature to improve the security of the computer You may be prompted for your permission or password for tasks such as installing software running utilities or changing Windows settings See Help and Support for more infor...

Страница 105: ...very Manager from the list or Turn on or restart the computer and then press esc while the Press the ESC key for Startup Menu message is displayed at the bottom of the screen Then press f11 while the F11 System Recovery message is displayed on the screen 2 Click System Recovery in the HP Recovery Manager window 3 Follow the on screen instructions Recovering using the recovery media 1 If possible b...

Страница 106: ... a USB port 2 Restart the computer 3 Press esc while the computer is restarting and then press f9 for boot options 4 Select the flash drive from the boot options window 98 Chapter 12 Backing up restoring and recovering in Windows 7 ...

Страница 107: ...gularly scheduled time To immediately back up your information click the Backup Now check box NOTE Before you back up your information be sure you have designated a location to save the backup files 4 Click Save and Backup to start the backup and to save the backup settings To restore backup files 1 Select Computer More Applications Tools Backup Manager Restore 2 Click Backup Source and then selec...

Страница 108: ...n a recovery disc To restore the computer from the recovery disc follow these steps 1 If possible back up all personal files 2 Insert the HP Factory Image Restore DVD into the optical drive and restart the computer 3 As the computer is restarting press f9 to open the Computer Setup boot option menu 4 Press the down arrow to select Restore SLED HP BNB preload image from the Linux boot menu and then...

Страница 109: ...ecommended a Enter BIOS F10 Setup by powering on the system and pressing F10 when prompted near the bottom of the display or press the ESC key to display the start up menu then press F10 If the system has a BIOS administrator password enter the password at the prompt b Select the File menu then Restore Defaults c Select the System Configuration menu then Restore Security Defaults d If an asset or ...

Страница 110: ...tment of Defense DOD 5220 22 M approved To run HP Disk Sanitizer enter BIOS Setup by powering on the system and pressing F10 when prompted near the bottom of the display or press ESC to display the start up menu then press F10 Select the Security menu and scroll down to the Utilities menu Select Disk Sanitizer and select the desired drive For a higher level of protection select Optimum NOTE This p...

Страница 111: ...Serial Presence Detect SPD configuration data 256 Bytes per memory module 128 Bytes programma bl e not customer accessible No Yes Stores memory module information Programmed by the memory vendor Data cannot be written to this memory when the module is installed in a PC The specific write protection method varies by memory vendor System BIOS 4 to 5 MBytes Yes Yes Store system BIOS code and PC confi...

Страница 112: ... calibration data Programmed at the factory Tools for writing data to this memory are not made public A utility is required for writing data to this memory and is typically not made available to the public unless a firmware upgrade is necessary to address a unique issue Web camera 64K bit No Yes Store Web Cam configuration and firmware Using a utility from the device manufacturer that can be run f...

Страница 113: ...able to read SPD memory 3 Does the Firmware Hub for System BIOS contain the BIOS program Is this chip writable and if so how The Firmware Hub does contain the BIOS program and is writable A utility is required to perform the write function 4 In some PC systems the Firmware Hub for System BIOS is a flash memory chip so that updates can be written by the customer Is this true for these BIOS chips Ye...

Страница 114: ...106 Chapter 14 Statement of Volatility ...

Страница 115: ...ng requirements are applicable to all countries and regions The length of the power cord set must be at least 1 5 m 5 0 ft and no more than 2 0 m 6 5 ft All power cord sets must be approved by an acceptable accredited agency responsible for evaluation in the country or region where the power cord set will be used The power cord sets must have a minimum current capacity of 10 A and a nominal voltag...

Страница 116: ...land SANZ 1 Norway NEMKO 1 The People s Republic of China CCC 4 Saudi Arabia SASO 7 Singapore PSB 1 South Africa SABS 1 South Korea KTL 5 Sweden SEMKO 1 Switzerland SEV 1 Taiwan BSMI 6 Thailand TISI 1 The United Kingdom ASTA 1 The United States UL 2 1 The flexible cord must be Type HO5VV F 3 conductor 0 75mm2 conductor size Power cord set fittings appliance coupler and wall plug must bear the cert...

Страница 117: ...guration 4 The flexible cord must be Type RVV 3 conductor 0 75mm2 conductor size Power cord set fittings appliance coupler and wall plug must bear the CCC certification mark 5 The flexible cord must be Type H05VV F 3X0 75mm2 conductor size KTL logo and individual approval number must be on each element Corset approval number and logo must be printed on a flag label 6 The flexible cord must be Type...

Страница 118: ...110 Chapter 15 Power cord set requirements ...

Страница 119: ...CD panel and the backlight When you remove these components handle them carefully NOTE Materials Disposal This HP product contains mercury in the backlight in the display assembly that might require special handling at end of life Disposal of mercury may be regulated because of environmental considerations For disposal or recycling information contact your local authorities or see the Electronic I...

Страница 120: ...e display bezel until the bezel disengages from the display assembly 3 Remove the display bezel 3 4 Disconnect all display panel cables 1 from the display inverter and remove the inverter 2 5 Remove all screws 1 that secure the display panel assembly to the display enclosure 112 Chapter 16 Recycling ...

Страница 121: ... screws that secure the display panel frame to the display panel 9 Use a sharp edged tool to cut the tape 1 that secures the sides of the display panel to the display panel frame 10 Remove the display panel frame 2 from the display panel 11 Remove the screws 1 that secure the backlight cover to the display panel Display 113 ...
Страница 122: ...klight cover 2 and swing it outward 13 Remove the backlight cover 14 Turn the display panel upright 15 Remove the backlight cables 1 from the clip 2 in the display panel 16 Turn the display panel upside down 114 Chapter 16 Recycling ...

Страница 123: ...dling the backlight to avoid damaging this component and causing exposure to the mercury 18 Remove the backlight from the backlight frame 19 Disconnect the display cable 1 from the LCD panel 20 Remove the screws 2 that secure the LCD panel to the display rear panel 21 Release the LCD panel 3 from the display rear panel Display 115 ...

Страница 124: ...22 Release the tape 4 that secures the LCD panel to the display rear panel 23 Remove the LCD panel 24 Recycle the LCD panel and backlight 116 Chapter 16 Recycling ...

Страница 125: ...vice considerations 27 D deleted files restoring 90 96 display assembly illustrated 16 removing 39 66 spare part numbers 16 display assembly subcomponents illustrated 19 removing 39 66 display bezel illustrated 19 removing 40 67 display cable illustrated 19 removing 69 spare part number 22 display enclosure illustrated 20 removing 71 spare part number 22 display panel illustrated 19 66 product des...

Страница 126: ...crophone product description 2 minimized image creating 91 minimized image recovery 91 model name 1 mute light identifying 9 N network jack identifying 7 num lk key identifying 11 O operating system 3 optical drive illustrated 18 20 precautions 28 product description 2 removing 33 spare part number 23 specifications 88 optical drive rear bracket removing 33 optical drive identifying 6 original sys...

Страница 127: ...ting 13 serviceability product description 3 slots memory card 6 security cable 7 speakers illustrated 18 removing 60 spare part number 22 specifications computer 85 display 86 DVD RW SuperMulti DL Drive 88 hard drive 87 optical drive 88 supported discs 93 recovery 89 system board removing 56 spare part number 17 system recovery 91 96 system restore point creating 89 system restore points 94 creat...

Страница 128: ...WLAN module illustrated 16 removing 51 spare part number 22 workstation guidelines 29 WWAN antennas identifying 5 120 Index ...

Отзывы: