horsch Maestro 1630 SW Скачать руководство пользователя страница 49

¾


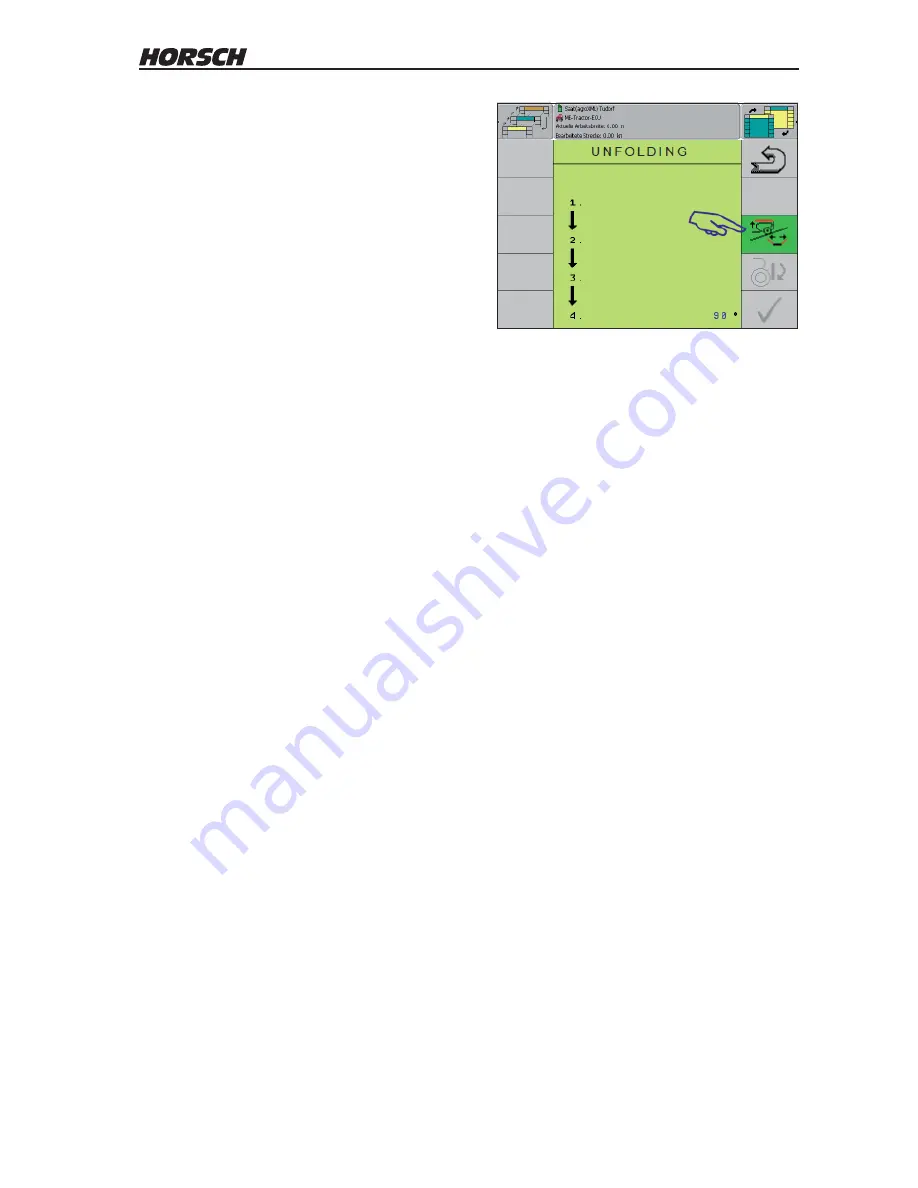
The symbol for lifting and unfolding the wings


changes to black.

¾


Press the key. The symbol appears in fron

t


of


a green background.

¾


Lift both wings out of the transport brackets


and completely unfold the wings.

¾


At 75° the symbol to lower the attachment


block changes to black. 

49

Содержание Maestro 1630 SW

Страница 1: ...Issued March 2016 Maestro SW Dry Fertilizer Owner s Manual Serial Numbers Maestro SW 1630 SN 510163016005...

Страница 2: ......

Страница 3: ......

Страница 4: ...g 30 Menu Folding 30 Unfolding 34 Use in the field 37 At the headland 37 Pneumatic system 38 Solid fertilizer facility 38 Fan fertilizer 40 Direct drive 40 Fan speeds 41 Fan speeds 47 Retightening the...

Страница 5: ...libration 82 In use 83 Pneumatic brake 84 Hydraulic brake 86 Parking brake 87 Filling screw 88 Service and maintenance 90 Maintenance intervals 90 Storage 90 Lubricating the machine 91 Service 91 Main...

Страница 6: ...ermined by facing the direction of forward travel respectively HORSCH reserves the right to alter illustrations as well as technical data and weights contained in this manual at any time without notic...

Страница 7: ...later than four weeks after the damage occurred No warranty claims will be accepted to machines under the warranty waiver start date except any related Technical Service Bulletins 3 In the case of del...

Страница 8: ......

Страница 9: ..._ Name of the Service Technician Dealer representative Dealer Customer Name ______________________________ Name _______________________________________ Address ____________________________ Address ___...

Страница 10: ......

Страница 11: ...Name of the Service Technician Dealer representative Dealer Customer Name ______________________________ Name _______________________________________ Address ____________________________ Address ____...

Страница 12: ......

Страница 13: ...Name of the Service Technician Dealer representative Dealer Customer Name ______________________________ Name _______________________________________ Address ____________________________ Address ____...

Страница 14: ......

Страница 15: ...t must be observed when transporting the machine in field and on public roads When the machine is transported on a road or highway at night or during the day accessory lighting and devices should be u...

Страница 16: ......

Страница 17: ...elow on the machine with the above mentioned information It is located on the main frame cross member tube directly behind the front hitch just off center towards the left hand side of each machine Re...

Страница 18: ...re of your machine After this you should return the machine registration form to HORSCH This confirms your formal accept ance receipt of the machine The warranty period starts with the date of deliver...

Страница 19: ...orrect operation and adequate application accuracy Compensation claims for damages which have not been caused by the machine are excluded This also includes that any liability for conse quential damag...

Страница 20: ...be remedied immediately The machine must only be operated serviced and repaired by persons who are familiar with it and have been made aware of the dangers involved see Permitted operators Spare parts...

Страница 21: ...ecially endangered Keep children away from the machine Especially when starting to drive and before triggering machine movements you must make sure that the danger zone is free of children Shut down t...

Страница 22: ...20 of the tractor weight For road transport the machine must be set to transport position The machine must have been folded up and secured see chapter Folding and Hitching up and transport position Cl...

Страница 23: ...mage or unexpected changes in travel behaviour Immediately shut down and secure the ma chine If possible locate and rectify the faults by fol lowing these operating instructions Rectify possible cause...

Страница 24: ...if not in use Pressure accumulator The hydraulic system is equipped with a pres sure accumulators Do not open or work welding drilling on pres sure accumulators Even when empty the ac cumulator is st...

Страница 25: ...igh electric volt ages on the outside of the machine This results in extreme voltage differences at the ground around the machine Wide strides laying on the ground or supporting yourself with your han...

Страница 26: ...nd may be damaged when reversing Changing equipment wear items Secure the machine against unintended roll ing away Secure raised frame parts you have to work under with suitable supports Caution Dange...

Страница 27: ...to the maintenance plan see chapter Care and maintenance Only perform the work described in these operating instructions Before starting maintenance and service work park the machine on level and firm...

Страница 28: ...0380054 Before starting operation of the machine you should read and follow the operating instructions 00380055 Watch out for fluids spraying out under high pressure follow the operating instructions...

Страница 29: ...ompliance with the instructions in the technical manual 00380252 Inordertopreventeye injuries donot look directly at the beam area when the radar sensor is switched on 00380894 Position of safety stic...

Страница 30: ...equipment can be transported on public roads either attached to a tractor or on a trailer or low loader The permissible dimensions and weights for transport must be complied with The tractor must be...

Страница 31: ...660 800 x 660 Filler opening seed wagon fertilizer 800 x 660 800 x 660 800 x 660 Drilling depth in 0 6 3 5 0 6 3 5 0 6 3 5 Dropping height seed in 17 17 17 Disc Opener in 15 15 15 Tire size 520 85 R4...

Страница 32: ...kg Allgemein toleranz Horsch Maschinen GmbH nderungen sind untersagt Landwirtschaft aus Leidenschaft HORSCH Maschinen GmbH Sitzenhof 1 92421 Schwandorf www horsch com Verladema e Maestro 16 80 SW Tra...

Страница 33: ...leranz Horsch Maschinen GmbH nderungen sind untersagt Landwirtschaft aus Leidenschaft HORSCH Maschinen GmbH Sitzenhof 1 92421 Schwandorf www horsch com Verladema e Maestro 24 70 SW 13 5 13 8 Transport...

Страница 34: ...ess steps 6 Fan Seed on Demand SOD 7 Fan fertilizer 8 Fan vacuum 9 Single grain metering unit 10 Hydraulic cylinder for coulter pressure 11 Hose fertilizer 12 Hose seed Seed on Demand 13 Not Shown 14...

Страница 35: ...essure gauge 7 Hydraulic motor fan Seed on Demand 8 Fan Seed on Demand 9 Hydraulic motor fan vacuum 10 Fan vacuum left 11 Fan vacuum right 12 Leak oil return line pressureless 13 Pressure retaining va...

Страница 36: ...lar intervals Hydraulic function WARNING Accidental hydraulic movements e g caused by passengers or children can lead to severe accidents and injuries Secure or lock the control units on the tractor I...

Страница 37: ...atum Entw Dateiname Zeichnungsnummer nung 00110681 7 00110682 00110684 00110686 00110687 Folding unfolding the machine ed Nov06 Datum Entw Dateiname Zeichnungsnummer Maschine Zeichnung Aufkleber 00110...

Страница 38: ...St ck Benennung Ma stab Werkstoff Maschinen DIN Rohma 3 D C A D Zeichnung nderungen am Rei brett sind u n t e r s a g t Urheberschutz F r diese technische Unterlage behalten wir uns alle Rechte vor W...

Страница 39: ...ine Zeichnung 00380879 00380879 O F F O N Z E R O alle Verladehacken ed Sept 03 Datum Entw Dateiname Zeichnungsnummer Maschine Zeichnung 00380880 00380880 Loading hook attach lifting tackle chains rop...

Страница 40: ...nderungen sind untersagt Landwirtschaft aus Leidenschaft HORSCH Maschinen GmbH Sitzenhof 1 92421 Schwandorf www horsch com schwarze und rote Schrift auf wei em Grund Material 3M 3690 mit Schutzlaminat...

Страница 41: ...ing hydraulics to a double acting control unit 5 Plug the hydraulic quick release connectors for fan drives into the control units with flow control 6 Connect the lighting equipment 7 Connect the bra...

Страница 42: ...ay tilt back and cause severe injury to persons Lower the machine correctly before unhitching Parking 1 Always park the machine horizontally on firm ground in a shed or outdoors shut down the tractor...

Страница 43: ...units are precision components Outdoors they may get damaged by weather influences etc Before the start of the season Close the cover on the Venturi area Reassemble the cleaning cover on the frame le...

Страница 44: ...e conditions for the next work step are fulfilled the display of symbols will change from shaded to full colour and the next step can be executed Menu Folding If the folding process Unfold or fold is...

Страница 45: ...folding menu this notice will appear The folding menu will only be enabled at a speed of less than 2 km h The warning reminds you of the railing on the access steps The railing must be folded to trans...

Страница 46: ...when folding These must move evenly Once the wings have been completely folded in press the button for laying down the wings in transport position Keep lifting the attachment block until the wings re...

Страница 47: ...machine to transport position Once the wings are in transport position the axle adjustment is released The note for driving with a speed of 2 10 km h appears When driving with this speed the symbol fo...

Страница 48: ...wing steps Do not place any clips on the lift cylinders The machine would not reach drilling posi tion and not receive a work signal Hitch the machine Switch on the E Manager Machine folded in Switch...

Страница 49: ...the wings changes to black Press the key The symbol appears in front of a green background Lift both wings out of the transport brackets and completely unfold the wings At 75 the symbol to lower the...

Страница 50: ...appears against a green background and the block can be lowered At 50 the seed boxes are automatically ex tended At 20 the P button changes to black Press P The folding menu is closed and the machine...

Страница 51: ...ering units drop directly on the field fertilizer needs approx 1 2 sec longer for this depending on the working speed fertilizer will only drop after the first few meters In E Manager one can set a de...

Страница 52: ...sts of Pressure hopper with 7000 l capacity Metering unit with Venturi area Fan Distributor tower with hoses fertilizer coulters on the drill units The fan is directly driven by the tractor hydraulics...

Страница 53: ...ndles completely down Hopper lid lock open closed Each time a lid had been opened you should check the leak tightness with the fan running by simply listening and feel ing with your hand around the li...

Страница 54: ...eed should therefore be set as high as possible Depending on the number of drill units 4500 rpm is recommended for achieving uniform trans verse distribution Distributor For fertilizer distribution th...

Страница 55: ...per on the fan shaft see chapter Fan Flange Fan speeds The required fan speed depends on the fertilizer quantity Travel speed weight and shape of fertilizer in form of granules or powder and other fac...

Страница 56: ...e fertilizer fan and the two vacuum fans The flow control valves 1 2 are used to regu late the oil flow and thus the fan speed The pressure for the fan drives increases pro portionally with the fan sp...

Страница 57: ...d check pressure on fan Change hydraulic oil and filter No draught on coulters Air hoses clogged Intake air grid blocked with dirt Clean the intake air grid Coulter pressure The coulter pressure is hy...

Страница 58: ...the fan wheel and additionally clamps on the drive shaft The clamping taper on the fan drive may come loose The impeller can thus move along the drive shaft and damage the fan After approx 50 hours re...

Страница 59: ...depth is set 33 mm below the seed placement a b c Depth setting fertilizer coulter a 0 in b 1 1 4 in c 2 1 8 in Adjust all coulters to the same depth Adjustment between 0 and 1 1 4 inch in depth d Se...

Страница 60: ...case the discs must be renewed or re adjusted 1 2 3 Loosen the screws 1 and take them off to gether with the coulter disc Loosen the screws 2 and take them off to gether with the bearing Depending on...

Страница 61: ...m The hydraulic fan for vacuum generation is di rectly driven by the tractor hydraulics The tractor must be equipped with a flow control valve to control the fan speed The hydraulic pump must deliver...

Страница 62: ...ed Seed on Demand distributor open All hoses connections and Seed on Demand distributor must be leak tight and firmly mounted Air leaks lead to drilling and metering errors Fault messages in E Manager...

Страница 63: ...y for leak tightness and tight fit Check the screen for cleanliness clean if necessary Clean the distributor every week and remove foreign objects from under the grille Changing settings Blockage in t...

Страница 64: ...it with the bore facing down so that no water can run into the housing Rotors Various cell rotors are available for the place ment of the various fertilizer types and quanti ties The choice of rotors...

Страница 65: ...rew the side cover Pull out the rotor with the drive shaft Rotor change Remove lock washer and washer Pull out the drive shaft and install it in the new rotor Changing the rotor The setting of sealing...

Страница 66: ...so that it projects approx 1 mm into the roller recess Take off the side cover do not move the lip any more and tighten it Assemble the side cover check the setting once again and reassemble rotor Ma...

Страница 67: ...th oil rust remover or any similar substances These parts would become brittle and break Single grain metering Any changes and settings to assembly groups on drill body which have an ef fect on the pl...

Страница 68: ...that the housing parts are easily fitted by hand and fastened with the handle screws Tighten both handle screws only hand tight 2 1 3 Metering unit 1 Clearing valve 2 Protective suction grid 3 Cleari...

Страница 69: ...bled and used again at a later date the me tering discs must be marked and always installed into the same metering unit Opening the metering unit The metering unit is made of high precision components...

Страница 70: ...tation is required As a rule of thumb the required vacuum level needs to be adjusted higher for smaller metering disc holes slots than for bigger ones For sun flowers the vacuum must always be set as...

Страница 71: ...nager the cause may be a too narrow gap between metering disc and metering housing Remove the backing disc and add an ad ditional shim Should the number of faults increase the cause may be a too narro...

Страница 72: ...dirt Dressing and dust deposits would impair its function Sliding bridge The sliding bridge is mounted in the exit to the downpipe It interrupts the vacuum and ensures grain transfer from the metering...

Страница 73: ...6 Inside scraper 7 Grain feed gate Grain feed cover for all except soy Grain feed cover for soy For soy we have a special grain feed cover available It is part of the Soy Kit and must be exchanged ag...

Страница 74: ...hinen GmbH Sitzenhof 1 92421 Schwandorf Gewicht kg Aufkleber 1 1 16 12 2010 Thomsen Aufkl Abstreifereinstellung Maisdosierer 00384062 A4 Bema ungen in mm Fehler Keine Referenz schwarze Schrift auf wei...

Страница 75: ...scraper must be freely moveable and reliably abut against the metering disc inside the closed metering unit This can be checked through the open ing in the dust protection Wear and inspection of insi...

Страница 76: ...disc with the smallest bore holes or slots After choosing the metering discs one should strictly check the settings in E Manager The selection and setting must be iden tical otherwise drilling faults...

Страница 77: ...Sun flower 24018934 2 2 5 40 80 A A 1 Standard Sun flower 24018936 2 2 5 40 80 A A 1 Standard Sun flower 24018935 2 2 5 40 80 A A 1 Standard Sun flower 24018939 2 2 5 40 80 A A 1 Standard Sorghum use...

Страница 78: ...100 24018939 24018935 24018936 24018934 Choose the article number of the matching metering disc in accordance with these criteria In overlapping area test the distribution always with the smaller bott...

Страница 79: ...If changes are still be made to the metering unit all other metering units would have to be emptied again 1 2 3 Converting the metering unit Force the tongues 1 on the Seed On Demand elbow carefully...

Страница 80: ...from the side so that they will not be displaced in the seed bed Measure the placement depth and the seed spacing The E Manager shows the nominal grain spacing Any changes to the metering unit can in...

Страница 81: ...en me tering unit and frame vacuum system shows cracks Check all hoses thoroughly for signs of damage cracks A too low vacuum caused by cracks is not indicated by the presure gauge display too many do...

Страница 82: ...d fastened a Standard downpipe a Catching hook Installing the downpipe The catching hook on the downpipe fastens the downpipe on the drill unit Catching hook engaged Guide the downpipe down at the fro...

Страница 83: ...f the seal on the pipe inlet The connection must be leak tight so that no foreign particles can fall in causing incorrect grain signals Note Faults and double seeds are not evaluated for all fruit typ...

Страница 84: ...the trap roller must be adjusted one bore up per step Bl Benennung Zeichnungsnummer Blatt Datum Name Bearb Gepr Norm Name Datum nderung Index Lfd Nr St ck Benennung Ma stab Werkstoff DIN Rohma Urheber...

Страница 85: ...eneinstellung Maestro Allgemein toleranz Landwirtschaft aus Leidenschaft HORSCH Maschinen GmbH Sitzenhof 1 92421 Schwandorf www horsch com schwarze und rote Schrift auf wei em Grund Material 3M 3690 m...

Страница 86: ...n sind untersagt Landwirtschaft aus Leidenschaft HORSCH Maschinen GmbH Sitzenhof 1 92421 Schwandorf www horsch com 3 mbar 2 00385569 schwarze Schrift auf wei em Grund 60 80 Coulter pressure adjustment...

Страница 87: ...reduce due to wear and the discs will no longer have contact In this case the discs must be renewed or re adjusted 1 2 Adjustment of coulter discs picture of drill unit Unscrew the depth guide wheels...

Страница 88: ...rease nipples once every week Check the setting of the placement depth every day Scraper There is a scraper arranged between the coulter discs This scraper prevents sticking and block ing of the coult...

Страница 89: ...press rollers available narrow version 25 mm for maize sun flower soy sorghum sugar beet wide version 50 mm for sugar beet and sorghum On the narrow version the with of the gap be tween the rollers ca...

Страница 90: ...move the bolt lock and pull out the bolt c Pull out the clearing stars and store in a safe place If possible ask a second person to assist when disassembling Maintenance Check setting and fastening ev...

Страница 91: ...sembly or replace the downpipe Trap roller incorrectly adjusted Adjust trap roller to coulter height or 5 mm lower see instructions Trap roller defective or hard to move Replace the trap roller Downpi...

Страница 92: ...er 2 Hopper empty sensor 3 Air hose 4 Metering screw 5 Shut off valve Adjustment and operation Depending on the granulate quantity the meter ing unit can be fitted with two different augers The theore...

Страница 93: ...In case of deviating densities or working widths these data must be adapted accordingly Calibrate the screw a The second screw will automatically be adjusted a Fill the hopper with granulate Run the...

Страница 94: ...gate valve further or increase the fan speed Transverse distribution The effect of insufficient air and poor transverse distribution is difficult to recognized or only after the seed has come up You...

Страница 95: ...fferent factors The differences in operating conditions weather influences driving and working speeds dust conditions and type of soil as well as the seed fertilizer and dressing etc used have an effe...

Страница 96: ...aulic oil in the tractor mixes with the hydraulic oil in the machine The hydraulic system of the machine is filled with Renolin B 46 HVI HVL P 46 DIN 51524 part 3 ex factory Service The company HORSCH...

Страница 97: ...y grease to the top x Sliding axle seed bar Apply grease to top of axle x Parallel guide of drill units lubricate 2 each x Pendulum bearing depth guidance lubricate 2 each x Distributor tower support...

Страница 98: ...at least once per year x Rotor Check for sticking cells clean x Motor bearing and housing cover Check for condition and smooth running x fertilizer distributor tower Check distributor and hoses for d...

Страница 99: ...ressed air and brush check for damage Clean the machine Do not spray plastic parts with oil or similar Piston rods Spray with anti corrosion oil Hydraulic hoses Check the hydraulic hoses regularly for...

Страница 100: ...Lubrication points Bolt wing mounting Parallel guide and depth guidance Sliding axle seed bar only 16 SW 100 Stroke arm Wheel hub support wheel Support wheel mounting...

Страница 101: ...6 1 8 9 10 4 6 1 00 5 5 6 8 10 4 15 3 17 9 7 1 00 9 3 11 5 17 2 25 30 8 1 25 13 6 16 8 25 37 44 8 1 00 14 5 18 27 40 47 10 1 50 26 6 33 50 73 86 10 1 25 28 35 53 78 91 12 1 75 46 56 86 127 148 12 1 2...

Страница 102: ...3 0 31 2 35 2 44 7 50 2 7 16 11 1 33 9 36 6 50 2 55 6 70 5 78 6 1 2 12 7 47 5 54 2 77 3 86 8 108 5 122 0 9 16 14 3 67 8 81 3 108 5 122 0 156 0 176 3 5 8 15 9 95 0 108 5 149 1 169 5 216 0 244 0 3 4 19...

Страница 103: ...0 56 92 E Emptying residues 52 F Fan fertilizer 40 93 Fan flange 47 Fan motor 40 Fan speed adjustment 45 Fan speeds 47 Fan vacuum 50 fertilizer 12 fertilizer coulter 48 fertilizer metering unit 93 fer...

Страница 104: ...10 Servicing the metering unit 55 Setting the drilling depth 74 Shed 28 Shims 60 Single grain coulter discs 76 Single grain discs 76 Single grain metering 56 Single grain metering unit 57 Single grai...

Страница 105: ...NOTES...

Страница 106: ...USA Tel 855 446 7724 Fax 701 532 1101 E Mail info us horsch com Internet www horsch com All details on technical speci ications and pictograms are approximate and for information only Subject to tech...

Отзывы: