


VISTA-128BPT/VISTA-250BPT Installation and Setup Guide
3-24
RS-232 Connectivity
Serial Port Configuration
The enhanced serial port on the Vista Turbo Series operates at a speed of 9600bps. Earlier Vista series panels used a
speed of 1200bps. (Please note that 1200bps option has been deleted and is no longer supported on Vista Turbo.)
Depending on your application, you may need to adjust the configuration of your printer, home automation system or
external software package to match the new faster speed. Consult the documentation for your external hardware or
software for directions on how to do this. In some cases you may need to contact the vendor of this external hardware or
software for an update patch or new driver.
Serial Port Connections
The J8 connector is no longer used for direct connect, serial printer or home automation applications. On all Vista Turbo
Series panels, there are two methods of connecting to the serial (printer/automation) port:
NOTE:
TB4 and J9 support WIN-PAK and Pro-Watch, however if you want to connect to a printer you
must
use TB4 in
order to get printer DSR supervision ("Printer Off Line").
Using flying leads from terminal block TB4 to a 9- or 25-pin serial connector.
Plugging the VT-SERCBL cable into header J9. This connector terminates in a 9-pin serial connector. To connect this to
a PC, you must use a standard straight through serial cable with a 9-pin connector on the panel end and the appropriate
connector for your PC on the other end.
The TB4 method is intended for permanent wiring, e.g. when connecting to WIN-PAK or Pro-Watch. The J9 method is
ideal for direct-connect programming, where the serial connection being made is only temporary.
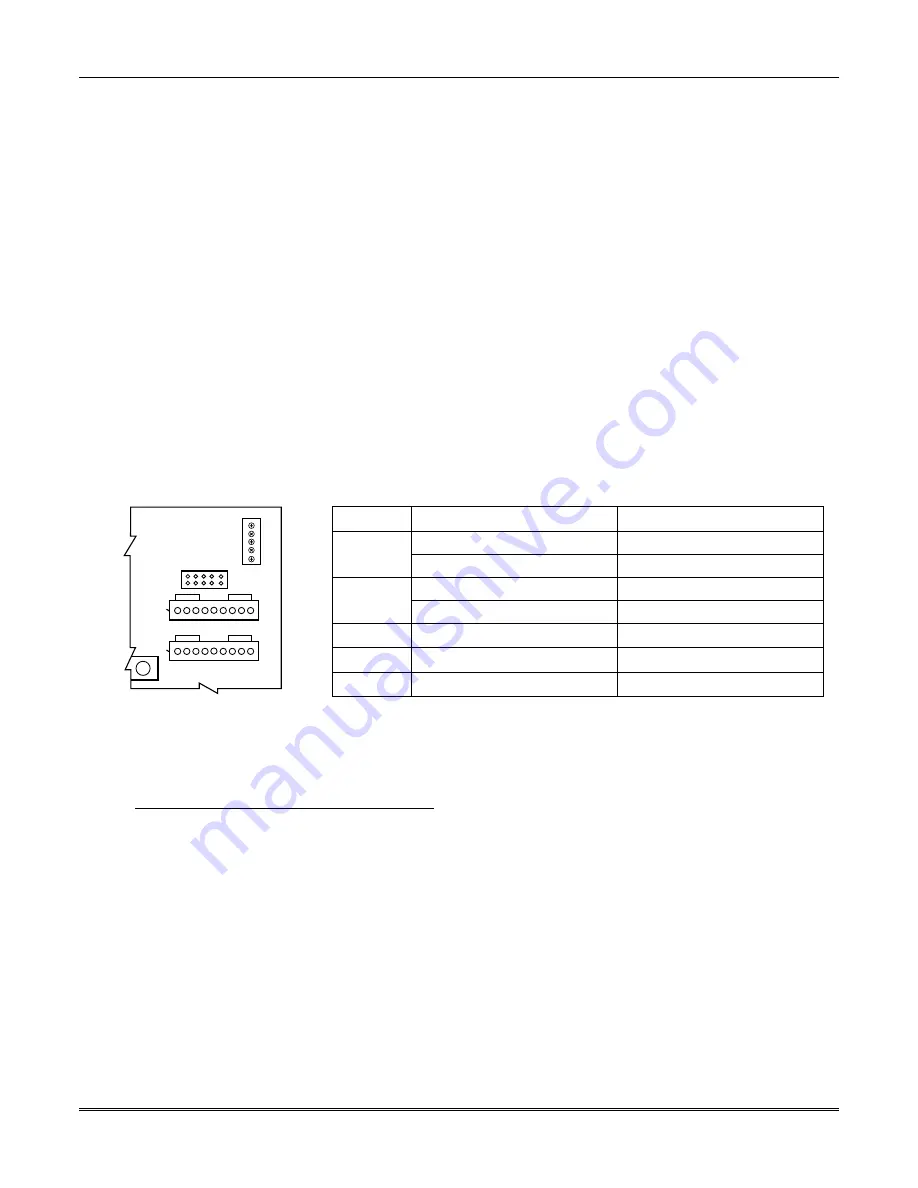
When connecting via TB4, observe the TB4 pin configuration shown on the Summary of Connections label.
30
J7
1 2 3 4 5 6 7 8 9
J8
1 2 3 4 5 6 7 8 9
TXD
RXD
RTS/DTR
CTS/DSR
GND
TB4
V128BPT-001-V2
Control Panel
PC Board
J9
Panel
9-Pin
25-Pin
TXD
3 (EBI-IPPS)
2 (EBI-IPPS)
2 (All Other Configurations)
3 (All Other Configurations)
RXD
2 (EBI-IPPS)
3 (EBI-IPPS)
3 (WIN-PAK or Pro-Watch)
2 (WIN-PAK or Pro-Watch)
RTS/DTR
8 (WIN-PAK or Pro-Watch)
5 (WIN-PAK or Pro-Watch)
CTS/DSR
4 (Printer Only)
20 (Printer Only)
GND
5 (All Configurations)
7 (All Configurations)
When connecting via J9, use the VT-SERCBL cable assembly. To connect this to a PC, you must use a standard straight
through serial cable with a 9-pin connector on the panel end and the appropriate connector for your PC on the other end.
IMPORTANT:
When connecting the VT-SERCBL cable into header J9, the red strip (pin 1) on the ribbon cable should
be to the left.
NOTES:
1.
TB4 and J9 cannot be used simultaneously
. If you are using one of these connection points to communicate
with the panel, you MUST temporarily disconnect the other wiring.
2.
You cannot use WIN-PAK or Pro-Watch and the Printer at the same time.
Serial Programming Options for Automation Applications
NOTE:
You cannot simultaneously use a serial printer and Home/Facility Automation.
The following group of fields must be set to use the serial port for automation applications:
*05 Enter 1 to send System Event Messages via RS232 port
*14 Enter 1 to enable Home/Facility Automation Control Input
1*78 Extended Home Control Events (Enter 1 for extended)
1*79 Home Control Event Types (Enter 1 for each event type to be enabled; 0 to disable)
1*80
Enter 1 to improve automation performance by disabling fault/restore messages over the automation port. If you
require live mapping while the system is disarmed, you must enter 0 here.
Содержание VISTA-128BPT
Страница 2: ......
Страница 46: ......
Страница 56: ...VISTA 128BPT VISTA 250BPT Installation and Setup Guide 4 10 ...
Страница 88: ...V128BPT V250BPT Installation and Setup Guide 8 2 ...
Страница 104: ...VISTA 128BPT VISTA 250BPT Installation and Setup Guide C 2 ...
Страница 112: ...VISTA 128BPT VISTA 250BPT Installation and Setup Guide Glossary 6 ...
Страница 118: ...VISTA 128BPT VISTA 250BPT Installation and Setup Guide Index 6 ...
Страница 120: ...For the latest warranty information please go to www honeywell com security hsc resources wa ...
Страница 121: ...NOTES ...
Страница 122: ...NOTES ...
Страница 123: ...NOTES ...