background image

43

ALPHA

Tyre safety

Should it be necessary to replace tyres it is recom-
mended to leave this to a specialist and follow the men-
tioned rules.

Always clean and inspect the rim before mounting.

Always check that the rim diameter corresponds ex-
actly to the rim diameter moulded on the tyre.

Always inspect inside of the tyre for cuts, penetrating
objects or other damages. Repairable damages
should be repaired before installing the tube. Tyres
with unrepairable damages must never be used.

Also inspect inside of the tyre for dirt or foreign bod-
ies and remove them before installing the tube.

Always use tubes of recommended size and in good
condition. When fitting new tyres always fit new
tubes.

Before mounting always lubricate both tyre beads
and rim flange with approved lubricating agent or
equivalent anti-corrosion lubricant. Never use petro-
leum based greases and oils as they may cause
damage to the tyre. Using the appropriate lubricant
the tyre will never slip on the rim.

Always use specialized tools as recommended by the
tyre supplier for mounting the tyres.

Make sure that the tyre is centred and the beds are
perfectly seated on the rim. Otherwise, there may be
danger of bed wire tear.

Inflate the tyre to 100-130 kPa then check whether
both beds are seated perfectly on the rim. If any of
the beds does not seat correctly, deflate the assem-
bly, and re-centre the beds before starting inflation of
the tyre. If the beds are seated correctly on the rim at
100-130 kPa, inflate the tyre to a max. of 250 kPa un-
til they seat perfectly on the rim.

Never exceed the max. mounting pressure moulded
on the tyre!

After mounting tyres, adjust inflation pressure to op-
eration pressure recommended by the tyre manufac-
turer.

Do not use tubes in tubeless tyres.

WARNING!

 Non observance of mounting in-

structions will lead to bad seating of the tyre on
the rim and may make the tyre burst and

thereby cause serious injury or death!

Never mount or use damaged tyres or rims!

Use of damaged, ruptured, distorted, welded or brazed
rim is not allowed!

Off-season storage

When the spraying season is over you should devote
some extra time to the sprayer.

If chemical residues are left over in the sprayer for
longer periods, it can reduce the life of the individual
components.

To preserve the sprayer intact and protect the compo-
nents, carry out the following off-season storage pro-
gramme:

1. Clean the sprayer thoroughly - inside and outside - as

described under “Cleaning of the sprayer”. Make sure
that all valves, hoses and auxiliary equipment have
been cleaned with detergent and flushed with clean
water afterwards, so no chemical residues are left in
the sprayer.

2. Renew possible damaged seals and repair possible

leaks.

3. Empty the sprayer completely and let the pump work

for a few minutes. Operate all valves and handles to
drain as much water off the spraying circuit as possi-
ble. Let the pump run until air is coming out of all noz-
zles. Remember to drain the rinsing tank also.

4. Pour approx. 100 litre anti-freeze mixture consisting

of

1

/

3

 automotive anti-freeze and 

2

/

3

 water into the

tank.

5. Engage the pump and operate all valves and func-

tions on the MANIFOLD, operating unit, FILLER etc.
allowing the anti-freeze mixture to be distributed
around the entire circuit. Open the operating unit
main on/off valve and distribution valves so the anti-
freeze is sprayed through the nozzles as well.
The anti-freeze will also prevent O-rings, seals, dia-
phragms etc. from drying out.

6. Lubricate all lubricating points according to the lubri-

cating scheme regardless of intervals stated.

7. Change hydraulic oil and hydraulic oil filters as de-

scribed in section on “Maintenance”.

8. When the sprayer is dry, remove rust from possible

scratches or damages in the paint and touch up the
paint.

9. Remove the glycerine-filled pressure gauges and

store them frost free in vertical position. Let anti-
freeze mixture fill the hose for the pressure gauge.

10.Apply a thin layer of anti-corrosion oil (e.g. SHELL

ENSIS FLUID, CASTROL RUSTILLO or similar) on
all metal parts. Avoid oil on rubber parts, hoses, and
tyres.

11.Fold the boom in transport position and relieve pres-

sure from all hydraulic functions.

12.Remove the control boxes and the HARDI PILOT

control box + display from the cab and store them dry
and clean (in-house).

13.Apply grease on all hydraulic ram piston rods which

are not fully retracted in the barrel to protect against
corrosion.

Содержание ALPHA 2000

Страница 1: ...ilable in certain countries only can be shown Please pay attention to para graphs dealing with precisely your model Published and printed by HARDI INTERNATIONAL A S EC Declaration of Conformity Manufa...

Страница 2: ...Operational problems spraying equipment 44 Technical specifications 46 Contents Foreword 2 Use of the sprayer 2 Safety precautions 2 Roadworthyness 4 Plant protection chemicals 4 Identification plates...

Страница 3: ...struction book remains un clear after reading it contact your HARDI dealer for further explanation before using the equipment Use the handholds and steps when getting on and off the machine to prevent...

Страница 4: ...move soaked clothing instantly and wash with soap and water in stantly Plant protection chemicals will penetrate the skin and affect your health Consult chemical label regarding precautions to be take...

Страница 5: ......

Страница 6: ......

Страница 7: ......

Страница 8: ...h 16 Working lamps switch 17 Wind screen washer switch 18 Auxiliary lights switch 19 Not used 20 Screen wash reservoir 21 On off switch for HARDI PILOT 22 Fuse box 23 Cab interior lamp 24 Fan control...

Страница 9: ......

Страница 10: ...itched on when at least the position lamps are switched on The working lamps must be switched off on public roads Wind screen washer switch Controls the windscreen washer Use plenty of screen wash bef...

Страница 11: ...ed by means of the engine coolant The warm air is distributed via the adjustable air flow louvres placed in the floor of the cab and will ensure effective heating of the cab and defrosting of the wind...

Страница 12: ...hat All oil and fluid levels are correct Nobody is carrying out service or repair jobs on the machine All protection guards are properly fitted Parking brake is activated Pilot lever is in neutral pos...

Страница 13: ...n slippery condi tions where change in weight distribution will cause spinning front wheels IMPORTANT Range 3 should not be used for continu ous driving When conditions are back to normal switch to ra...

Страница 14: ...on oil e g CASTROL RUSTILLO or SHELL ENSIS FLUID on all metal parts in order to avoid chemicals and fertilizers to discolourate the enamel Avoid to apply oil on windows lamps markings and rub ber part...

Страница 15: ...he O rings be fore reassembling the filter and replace if damaged Use of MANIFOLD valve system The following pictograms and colours are used for the visualizing the function of the MANIFOLD valves Gre...

Страница 16: ......

Страница 17: ...illing Device In some areas it is prohibited to fill from open water reservoirs lakes rivers etc It is recommended only to fill from closed reservoirs mobile water tanks etc to avoid contamination WAR...

Страница 18: ...CONTROL UNIT WHILE DRIVING 11 To close the entire boom operate switch A This takes the pressure from the pump The liquid will then return to the tank via the return system and serve as agitation The d...

Страница 19: ...MPORTANT Rinsing device uses spray liquid to rinse containers for concentrated chemicals Always rinse the chemical containers with clean water several times until they are clean before disposal 9 Enga...

Страница 20: ...B unless the multi hole nozzle is covered by a container to avoid spray liquid hitting the operator IMPORTANT Rinsing device uses spray liquid to rinse containers for concentrated chemicals Always rin...

Страница 21: ...pray liquid residues in the spraying circuit for spraying the liquid in the field be fore cleaning the sprayer 1 Empty the sprayer as much as possible Turn the agi tation off and spray till air comes...

Страница 22: ...iquid in the field you have just sprayed 8 Repeat point 3 7 until the rinsing tank is empty WARNING The rinsing nozzles cannot always guarantee a 100 cleaning of the tank Always clean manually with a...

Страница 23: ...5 litres TOTAL Rubia XT 6 cyl 15 5 litres Castrol Powermax Shell Myrina M Mobil Delvac Hydrostatic transmission Hydraulic system 60 litres TOTAL Equivis 46 Hydrostatic steering Castrol Hyspin AWH 46 S...

Страница 24: ......

Страница 25: ......

Страница 26: ......

Страница 27: ......

Страница 28: ......

Страница 29: ...th WARNING Do not detach all stabilizer rods at the same time The boom can fall out of the suspension and cause severe personal injury Break away OLH The function of the break away is to prevent or re...

Страница 30: ......

Страница 31: ......

Страница 32: ......

Страница 33: ......

Страница 34: ...aporate Not maintenance free batteries 3 Check electrolyte level Fill with demineralized water till level reaches 10 mm above cells if levels are low 4 Connect battery charger terminal clips to batter...

Страница 35: ...upper arm 6 The lower arms must be disconnected simultane ously 7 Grease all grease nipples 8 Remove the lifting gear again Ball seat check renewal EC on off valve If the main ON OFF valve does not s...

Страница 36: ......

Страница 37: ......

Страница 38: ......

Страница 39: ......

Страница 40: ......

Страница 41: ......

Страница 42: ......

Страница 43: ...te some extra time to the sprayer If chemical residues are left over in the sprayer for longer periods it can reduce the life of the individual components To preserve the sprayer intact and protect th...

Страница 44: ...se in the junction box Now manually turn the emer gency control knobs Towing In emergency situations the machine can be towed a short distance In case of a engine break down on pub lic road and the ma...

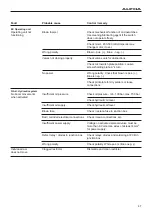
Страница 45: ...ve terminal at battery at vehicle with discharged bat tery This to avoid sparks near the battery when connecting the last cable to terminal Trouble shooting Operational problems spraying equipment In...

Страница 46: ...gauge Check for dirt at inlet of gauge Pressure dropping Filters clogging Clean all filters Fill with cleaner water If using powders make sure agitation is on Nozzles worn Check flow rate and replace...

Страница 47: ...print plate for dry solders or loose connections D A H Hydraulic system No boom movements Insufficient oil pressure Check oil pressure min 130 bar max 150 bar when activated Check hydraulic oil level...

Страница 48: ...ect Sensor defective Renew sensor Engine Please see engine manual Hydrostatic transmission Machine will drive in Neutral position on pilot handle Adjust the linkage till neutral is correct neutral pos...

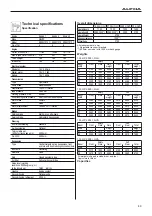
Страница 49: ...ating Engine coolant Air conditioning Optional extra Air conditioning refrigerant R134 A Overall dimensions 18 24 m OLH 27 28 m OLH 24 28 m GVA 30 m GVA Overall length 7150 7320 7200 7490 Overall widt...

Страница 50: ...All units used in this manual are SI units In some occa sions Imperial units are used Use following factors to convert SI units to Imperial units SI unit Imperial unit Factor Weight kg lb x 2 205 Sur...

Страница 51: ......

Страница 52: ...52 ALPHA Notes...

Отзывы: