background image

Wi-Fi Personal Bridge 150 

User Manual 

110 

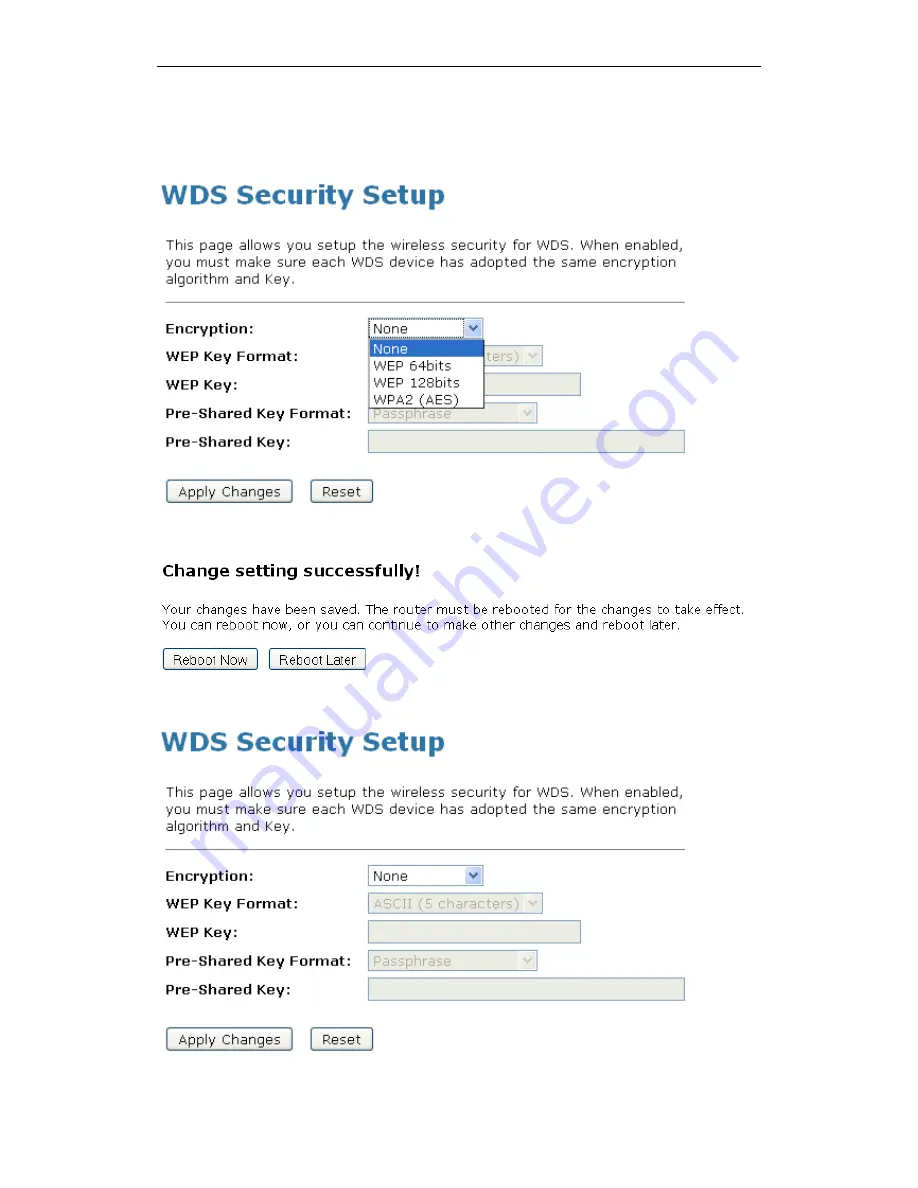
12.  This page allows you setup the wireless security for WDS. When enabled, you must make sure 

each WDS device has adopted the same encryption algorithm and Key. 

13.  Configure each field with the 

Encryption

 that you selected. 

14.  Click 

Apply Changes

 button. 


15.  Change setting successfully! Click on 

Reboot Now

 button to confirm. 


16.  Click 

Close 

button to close and exit the 

WDS Security Setup


Содержание HNW150APBR

Страница 1: ...Wi Fi Personal Bridge 150 Wireless Portable AP Router User Manual HNW150APBR www hamletcom com...

Страница 2: ...nternet 21 Client Mode WAN interface is WLAN interface through WLAN Router xDSL or Cable modem to Internet 22 WiFi AP Mode WAN interface is WAN LAN Port or WLAN interface through WLAN Router xDSL or C...

Страница 3: ...ireless Distribution System only 76 AP Access Point WDS Wireless Distribution System 77 Wireless Security Setup 78 Configuring WEP 64bit ASCII 5 characters security 80 Configuring WEP 64bit Hex 10 cha...

Страница 4: ...ient s operations 119 Wireless Advanced Settings page 120 Operations of AP AP being an enrollee 121 Operations of AP AP being a registrar 130 AP mode 130 Push Button method 133 Wireless Schedule 136 1...

Страница 5: ...IP Address 174 18 VLAN 176 19 QoS 177 20 Route Setup 178 21 Status 179 22 Statistics 180 23 Dynamic DNS 181 Configure DynDNS 183 Configure TZO 184 24 Time Zone Setting 185 SNTP Server and SNTP Client...

Страница 6: ...resses Network Masks and Subnets 205 IP Addresses 205 Structure of an IP address 205 Network classes 205 Subnet masks 206 C UPnP Control Point Software on Windows ME XP 207 UPnP Control Point Software...

Страница 7: ...ponents in compliance with RoHS directives 2002 95 CE with RAEE Directives 2003 96 CE Italian Legislative Decree 2005 151 and following EEC Directives EN 300 328 V1 7 1 05 2006 EN 301 489 1 V1 8 1 04...

Страница 8: ...he internal Ethernet switch allows for a direct connection to a 10 100BASE T Ethernet network via an RJ 45 interface with LAN connectivity for both the Wireless Gateway and a co located PC or other Et...

Страница 9: ...ed for text strings that you type when prompted by the program and to emphasize important points Special messages This document uses the following icons to draw your attention to specific instructions...

Страница 10: ...ove 25MB free disk space Package Contents 802 11n Pocket AP CD ROM Software Manual Quick Installation Guide Ethernet Cable RJ 45 Power Adapter LED meanings activations Top Side The Top Side contains l...

Страница 11: ...sferred WPS green Off WPS link isn t established and active Blink Valid WPS packet being transferred LAN green On LAN link established and active Off No LAN link Blink Valid Ethernet packet being tran...

Страница 12: ...least 3 full seconds and the WPS LED will flash to start WPS Now go to the wireless adapter or device and press its WPS button Make sure to press the button within 120 seconds 2 minutes after pressin...

Страница 13: ...the 802 11n Pocket AP configuration please kindly configure the PC computer as below to have automatic IP address DNS Server For Windows 98SE ME 2000 XP 1 Click on Start Control Panel in Classic View...

Страница 14: ...t Protocol TCP IP 4 Check Obtain an IP address automatically and Obtain DNS server address automatically then click on OK to continue 5 Click Show icon in notification area when connected see screen i...

Страница 15: ...Personal Bridge 150 User Manual 15 For Windows Vista 32 64 1 Click on Start Control Panel View network status and tasks 2 In the Manage network connections click on Manage network connections to cont...

Страница 16: ...r Manual 16 3 Single RIGHT click on Local Area connection then click Properties 4 The screen will display the information User Account Control and click Continue to continue 5 Double click on Internet...

Страница 17: ...Wi Fi Personal Bridge 150 User Manual 17 6 Check Obtain an IP address automatically and Obtain DNS server address automatically then click on OK to continue...

Страница 18: ...Personal Bridge 150 User Manual 18 For Windows 7 32 64 1 Click on Start Control Panel in Category View View network status and tasks 2 In the Control Panel Home click on Change adapter settings to con...

Страница 19: ...Wi Fi Personal Bridge 150 User Manual 19 3 Single RIGHT click on Local Area Connection then click Properties 4 Double click on Internet Protocol Version 4 TCP IPv4...

Страница 20: ...Wi Fi Personal Bridge 150 User Manual 20 5 Check Obtain an IP address automatically and Obtain DNS server address automatically then click on OK to continue...

Страница 21: ...ith your home or small office network setup Refer to the subsequent chapters for additional configuration instructions Connecting the Hardware This section describes how to connect the device to the w...

Страница 22: ...r adapter to the power inlet POWER of your 802 11n Pocket AP Client Mode WAN interface is WLAN interface through WLAN Router xDSL or Cable modem to Internet In this mode the device acts as a WLAN rout...

Страница 23: ...witch the switch to WiFi AP Mode 2 Connect the Ethernet cable to WAN or LAN Port Connect the RJ45 Ethernet cable from your xDSL Cable Modem s Ethernet port to 802 11n Pocket AP s WAN or LAN Port 3 Con...

Страница 24: ...this mode the WAN Port acts as a second LAN port 1 Switch the switch to WiFi AP Mode 2 Connect the Ethernet cable to LAN or WAN Port Connect the supplied RJ45 Ethernet cable from your PC s Ethernet p...

Страница 25: ...D ROM drive 2 The CD should auto start displaying the window shown in 3 below If your CD does not start automatically go to Windows Explorer Select your CD drive and double click autorun exe 3 To conf...

Страница 26: ...l 26 5 Click on Quick Setup menu 6 Select the WAN Access Type DHCP Client Static IP PPPoE PPTP or L2TP and enter related parameters that your ISP Internet Services Provider or Network Administrator pr...

Страница 27: ...7 Examples 6 1 DHCP Client Select DHCP Client Mode from WAN Access Type drop down list Click on Next button 6 2 PPPoE Select PPPoE Mode from WAN Access Type drop down list Enter Username and Password...

Страница 28: ...cess Type drop down list Config IP Address Subnet mask Default Gateway and DNS Server offered by ISP Internet Services Provider or Network Administrator Click on Next button 7 Please enter the SSID an...

Страница 29: ...tected Access AES CCMP Wi Fi Protected Access2 AES CCMP and WPA2 Mixed Mode For example you choose None 10 Click on Finished button 11 Change setting successfully Please wait for a moment while reboot...

Страница 30: ...2 The CD should auto start displaying the window shown in 3 below If your CD does not start automatically go to Windows Explorer Select your CD drive and double click autorun exe 3 To configure the de...

Страница 31: ...l 31 5 Click on Quick Setup menu 6 Select the WAN Access Type DHCP Client Static IP PPPoE PPTP or L2TP and enter related parameters that your ISP Internet Services Provider or Network Administrator pr...

Страница 32: ...2 Examples 6 1 DHCP Client Select DHCP Client Mode from WAN Access Type drop down list Click on Next button 6 2 PPPoE Select PPPoE Mode from WAN Access Type drop down list Enter Username and Password...

Страница 33: ...WAN Access Type drop down list Config IP Address Subnet mask Default Gateway and DNS Server offered by ISP Internet Services Provider or Network Administrator Click on Next button 7 Click on Site Sur...

Страница 34: ...No Encryption 64 Bit Encryption 128 Bit Encryption Wi Fi Protected Access AES CCMP Wi Fi Protected Access2 AES CCMP and WPA2 Mixed Mode For example you choose None 11 Click on Finished button 12 Conne...

Страница 35: ...Wi Fi Personal Bridge 150 User Manual 35 13 Click on Exit to exit this program 14 Now the 802 11n Pocket AP has been configured completed and suitable for Internet Connections...

Страница 36: ...Please insert the supplied CD into your CD ROM drive 3 The CD should auto start displaying the window shown in 3 below If your CD does not start automatically go to Windows Explorer Select your CD dr...

Страница 37: ...lect Client from Mode drop down list 8 Click on Next button 9 Choose the Encryption type if necessary as None No Encryption 64 Bit Encryption 128 Bit Encryption Wi Fi Protected Access AES CCMP Wi Fi P...

Страница 38: ...Wi Fi Personal Bridge 150 User Manual 38 10 Click on Finished button 11 Change setting successfully Please wait for a moment while rebooting 12 Click on Site Survey...

Страница 39: ...Hamlet_Mini_AP is going to connect to 15 Click on Next button 16 Choose the Encryption type if necessary as None No Encryption 64 Bit Encryption 128 Bit Encryption Wi Fi Protected Access AES CCMP Wi...

Страница 40: ...ect successfully The device is booting Do not turn off or reboot the Device during this time Please wait 65 seconds 20 Click on Exit to exit this program 21 Now the 802 11n Pocket AP has been configur...

Страница 41: ...to 10 0 0 x exclude 10 0 0 2 2 Please insert the supplied CD into your CD ROM drive 3 The CD should auto start displaying the window shown in 3 below If your CD does not start automatically go to Win...

Страница 42: ...k on Wireless Basic Settings menu 7 Select Client from Mode drop down list 8 Check on Enable Universal Repeater Mode Acting as AP and client simultaneouly ratio 9 Enter the SSID in SSID of Extended In...

Страница 43: ...Wi Fi Personal Bridge 150 User Manual 43 11 Click on Reboot Later button 12 Click on Wireless Site Survey menu 13 Click on Site Survey button...

Страница 44: ...g to connect to 15 Click on Next button 16 Choose the Encryption type if necessary as None No Encryption 64 Bit Encryption 128 Bit Encryption Wi Fi Protected Access AES CCMP Wi Fi Protected Access2 AE...

Страница 45: ...essfully The device is booting Do not turn off or reboot the Device during this time Please wait 65 seconds 20 Click on Exit to exit this program 21 Now the 802 11n Pocket AP has been configured compl...

Страница 46: ...2 Please insert the supplied CD into your CD ROM drive 3 The CD should auto start displaying the window shown in 3 below If your CD does not start automatically go to Windows Explorer Select your CD...

Страница 47: ...l Bridge 150 User Manual 47 6 Click on Wireless Basic Settings menu 7 Select WDS from Mode drop down list 8 Select Channel Width 9 Select Control Sideband 10 Select Channel Number 11 Click on Apply Ch...

Страница 48: ...tton 13 Click on Wireless WDS settings menu 14 Check on the option Enable WDS 15 Enter the MAC Address of peer AP 16 Enter the Comment 17 If you need to configure the security please click on Set Secu...

Страница 49: ...button 20 Change setting successfully Do not turn off or reboot the Device during this time Please wait 20 seconds 21 Click on Exit to exit this program 22 Now the 802 11n Pocket AP has been configur...

Страница 50: ...2 2 Please insert the supplied CD into your CD ROM drive 3 The CD should auto start displaying the window shown in 3 below If your CD does not start automatically go to Windows Explorer Select your CD...

Страница 51: ...Bridge 150 User Manual 51 6 Click on Wireless Basic Settings menu 7 Select AP WDS from Mode drop down list 8 Select Channel Width 9 Select Control Sideband 10 Select Channel Number 11 Click on Apply...

Страница 52: ...tton 13 Click on Wireless WDS settings menu 14 Check on the option Enable WDS 15 Enter the MAC Address of peer AP 16 Enter the Comment 17 If you need to configure the security please click on Set Secu...

Страница 53: ...button 20 Change setting successfully Do not turn off or reboot the Device during this time Please wait 20 seconds 21 Click on Exit to exit this program 22 Now the 802 11n Pocket AP has been configur...

Страница 54: ...keep the settings You can later change the wireless settings via the wireless configuration menu see user manual on the CD Chapter 9 1 Double click on the wireless icon on your computer and search for...

Страница 55: ...If the wireless network is encrypted enter the network key that belongs to your authentication type and key You can later change this network key via the wireless configuration menu see user manual o...

Страница 56: ...could check what the Internet WAN access of your network is to know how to configure the WAN port of Wireless Gateway Please follow steps below to check what the Internet WAN access if your own Netwo...

Страница 57: ...d by DHCP in Details Internet WAN access is the Static IP If you cannot see any Broadband Adapter in the Network Connections your Internet WAN access is DHCP Client or Static IP 1 Click Local Area Con...

Страница 58: ...see any Broadband Adapter in the Network Connections your Internet WAN access is PPPoE Client 1 Click Broadband Adapter in Broadband and you could see string Assigned by Service Provider in Details F...

Страница 59: ...ollowing A PC or laptop connected to the LAN port on the device A web browser installed on the PC The minimum browser version requirement is Internet Explorer v4 or Netscape v4 For the best display qu...

Страница 60: ...ssword hamlet Note You can change the password at any time or you can configure your device so that you do not need to enter a password See Password 2 Click on OK You are now ready to configure your d...

Страница 61: ...expected you may need to configure your Internet access settings using the information provided by your ISP For details see Internet Access If the LEDs still do not illuminate as expected or the web p...

Страница 62: ...ernet network Typically you will not need to change this address See Network Settings LAN Interface DHCP Dynamic Host Configuration Protocol DHCP server enabled with the following pool of addresses 10...

Страница 63: ...e The Quick Setup page displays useful information about the setup of your device including details of the device s Internet access settings details of the device s VoIP settings details of the device...

Страница 64: ...to connect to internet via ADSL Cable Modem The NAT is enabled and PCs in four LAN ports share the same IP to ISP through WAN port The connection type can be setup in WAN page by using PPPoE DHCP clie...

Страница 65: ...et ports share the same IP to ISP through wireless LAN You must set the wireless to client mode first and connect to the ISP AP in Site Survey page The connection type can be setup in WAN page by usin...

Страница 66: ...L2TP setting determined by your Network Administrator or ISP 2 Click Next Static IP In this mode the device is supposed to connect to internet via ADSL Cable Modem The NAT is enabled and PCs in four L...

Страница 67: ...rnet via ADSL Cable Modem The NAT is enabled and PCs in four LAN ports share the same IP to ISP through WAN port The connection type can be setup in WAN page by using static IP 1 From the WAN Access T...

Страница 68: ...is enabled and PCs in four LAN ports share the same IP to ISP through WAN port The connection type can be setup in WAN page by using static IP 1 From the WAN Access Type drop down list select PPPoE se...

Страница 69: ...st select PPTP setting provided by your Network Administrator or ISP 2 Enter IP Address for example 172 1 1 1 provided by your Network Administrator or ISP 3 Enter Subnet Mask for example 255 255 0 0...

Страница 70: ...t select L2TP setting determined by your Network Administrator or ISP 2 Enter IP Address for example 172 1 1 1 provided by your Network Administrator or ISP 3 Enter Subnet Mask for example 255 255 0 0...

Страница 71: ...Wi Fi Personal Bridge 150 User Manual 71 Wireless Basic Setup This page is used to configure the parameters for wireless LAN clients which may connect to your Access Point...

Страница 72: ...Access Point 1 From the Band drop down list select a Band 2 From the Mode drop down list select AP setting 3 Enter SSID for example 11n Pocket AP 4 From the Channel Width drop down list select a Chan...

Страница 73: ...he parameters for wireless LAN clients which may connect to your Access Point 1 From the Band drop down list select a Band 2 From the Mode drop down list select Client setting 3 From the Network Type...

Страница 74: ...ou have your best luck when you use equipment from the same manufacturer Note When you use WDS as a repeater system as described below it effectively halves the data rate for clients connected to Inte...

Страница 75: ...ur software works you may have to separately access the configuration software on the remote repeater APs to turn on WDS Here are a few things to remember You need to assign any other WDS stations to...

Страница 76: ...and drop down list select a Band 2 From the Mode drop down list select WDS setting 3 From the Channel Width drop down list select a Channel Width 4 From the ControlSideband drop down list select a Con...

Страница 77: ...connect to your Access Point 1 From the Band drop down list select a Band 2 From the Mode drop down list select AP WDS setting 3 Enter SSID for example 11n Pocket AP 4 From the Channel Width drop down...

Страница 78: ...ethod called Temporal Key Integrity Protocol TKIP It runs in a special easy to set up home mode called Pre Shared Key PSK that allows you to manually enter a pass phrase on all the devices in your wir...

Страница 79: ...ing WPA2 AES Passphrase security If you want to use WPA2 AES Wi Fi Protected Access 2 AES HEX 64 characters encryption follow the instructions in Configuring WPA2 AES HEX 64 characters security If you...

Страница 80: ...is for 64bit encryption 1 From the Encryption drop down list select WEP setting 2 From the Key Length drop down list select 64 bit setting 3 From the Key Format drop down list select ASCII 5 characte...

Страница 81: ...is for 64bit encryption 1 From the Encryption drop down list select WEP setting 2 From the Key Length drop down list select 64 bit setting 3 From the Key Format drop down list select Hex 10 character...

Страница 82: ...is for 128bit encryption 1 From the Encryption drop down list select WEP setting 2 From the Key Length drop down list select 128 bit setting 3 From the Key Format drop down list select ASCII 13 chara...

Страница 83: ...is for 128bit encryption 1 From the Encryption drop down list select WEP setting 2 From the Key Length drop down list select 128 bit setting 3 From the Key Format drop down list select Hex 26 charact...

Страница 84: ...this section is for WPA AES Passphrase encryption 1 From the Encryption drop down list select WPA AES setting 2 From the Pre Shared Key Format drop down list select Passphrase setting 3 Type the Pre...

Страница 85: ...is section is for WPA AES HEX 64 characters encryption 1 From the Encryption drop down list select WPA AES setting 2 From the Pre Shared Key Format drop down list select HEX 64 characters setting 3 Ty...

Страница 86: ...this section is for WPA2 AES Passphrase encryption 1 From the Encryption drop down list select WPA2 AES setting 2 From the Pre Shared Key Format drop down list select Passphrase setting 3 Type the Pr...

Страница 87: ...s section is for WPA2 AES HEX 64 characters encryption 1 From the Encryption drop down list select WPA2 AES setting 2 From the Pre Shared Key Format drop down list select HEX 64 characters setting 3 T...

Страница 88: ...hrase encryption The WPA2 Mixed Passphrase encryption supports both WPA AES and WPA2 AES 1 From the Encryption drop down list select WPA2 Mixed setting 2 From the Pre Shared Key Format drop down list...

Страница 89: ...cters encryption The WPA2 Mixed HEX 64 characters encryption supports both WPA AES and WPA2 AES 1 From the Encryption drop down list select WPA2 Mixed setting 2 From the Pre Shared Key Format drop dow...

Страница 90: ...to configure the Wireless features of your device To access the Wireless Network Basic Settings page From the left hand Wireless menu click on Basic Settings The following page is displayed Field Des...

Страница 91: ...mber Choose a Channel Number from the pull down menu Broadcast SSID Broadcast or Hide SSID to your Network Default Enabled WMM Enable disable the Wi Fi Multimedia WMM support Data Rate Select the Data...

Страница 92: ...um sometimes the packet is broken into several segments if the size of packet exceeds that allowed by the network medium The Fragmentation Threshold defines the number of bytes used for the fragmentat...

Страница 93: ...hand Wireless menu click on Security The following page is displayed Field Description Select SSID Select the SSID Encryption Configure the Encryption to Disable WEP WPA WPA2 or WPA Mixed Use 802 1x...

Страница 94: ...ch the mobile node can move includes negotiating pre authentication using a flag in a message header that indicates whether the communication is for establishing a pre authentication security associat...

Страница 95: ...re as once believed 1 From the Encryption drop down list select WEP setting 2 From the Key Length drop down list select 64 bit or 128 bit setting 3 From the Key Format drop down list select ASCII 5 ch...

Страница 96: ...point to another However it has been found that WEP is not as secure as once believed 1 From the Encryption drop down list select WEP setting 2 Check the option of Use 802 1x Authentication 3 Click on...

Страница 97: ...ation instructions In the Personal mode the most likely choice for homes and small offices a pass phrase is required that for full security must be longer than the typical 6 to 8 character passwords u...

Страница 98: ...cards Both provide good security with two significant issues Either WPA or WPA2 must be enabled and chosen in preference to WEP WEP is usually presented as the first security choice in most installati...

Страница 99: ...Manual 99 5 Check the option of TKIP and or AES in WPA WPA2 Cipher Suite if your Encryption is WPA2 Mixed 6 Enter the Port IP Address and Password of RADIUS Server 7 Change setting successfully Click...

Страница 100: ...ending on the MAC Access Policy If you choose Allowed Listed only those clients whose wireless MAC addresses are in the access control list will be able to connect to your Access Point When Deny Liste...

Страница 101: ...Wi Fi Personal Bridge 150 User Manual 101 5 Change setting successfully Click on Reboot Now button to confirm 6 The MAC Address that you created has been added in the Current Access Control List...

Страница 102: ...to connect the Access Point 1 From the Wireless Access Control Mode drop down list select Deny Listed setting 2 Enter the MAC Address 3 Enter the Comment 4 Click Apply Changes button 5 Change setting...

Страница 103: ...her APs like the Ethernet does To do this you must set these APs in the same channel and set MAC address of other APs which you want to communicate with in the table and then enable the WDS To access...

Страница 104: ...tion System only 1 From the left hand Wireless menu click on Basic Settings 2 From the Mode drop down list select WDS 3 From the Channel Number drop down list select a Channel 4 Click Apply Changes bu...

Страница 105: ...e WDS 8 Enter the MAC Address 9 Enter the Comment 10 Click the Set Security 11 This page allows you setup the wireless security for WDS When enabled you must make sure each WDS device has adopted the...

Страница 106: ...150 User Manual 106 14 Change setting successfully Click on Reboot Now button to confirm 15 Click Close button to close and exit the WDS Security Setup 16 Change setting successfully Click on Reboot...

Страница 107: ...l Bridge 150 User Manual 107 17 Click Apply Changes button 18 Change setting successfully Click on Reboot Now button to confirm 19 The MAC Address that you created has been added in the Current Access...

Страница 108: ...m 1 From the left hand Wireless menu click on Basic Settings 2 From the Mode drop down list select AP WDS 3 Enter SSID for example 11n Pocket AP 4 From the Channel Number drop down list select a Chann...

Страница 109: ...i Fi Personal Bridge 150 User Manual 109 7 From the left hand Wireless menu click on WDS settings 8 Check on the option Enable WDS 9 Enter the MAC Address 10 Enter the Comment 11 Click the Set Securit...

Страница 110: ...ed you must make sure each WDS device has adopted the same encryption algorithm and Key 13 Configure each field with the Encryption that you selected 14 Click Apply Changes button 15 Change setting su...

Страница 111: ...l Bridge 150 User Manual 111 17 Click Apply Changes button 18 Change setting successfully Click on Reboot Now button to confirm 19 The MAC Address that you created has been added in the Current Access...

Страница 112: ...tool to scan the wireless network If any Access Point or IBSS is found you could choose to connect it manually when client mode is enabled To access the Wireless Network WDS settings page From the lef...

Страница 113: ...50 User Manual 113 Configure Wireless ISP Wireless client Site Survey 1 From the left hand Operation Mode menu click on Wireless ISP Settings 2 Click Apply Changes button 3 Change setting successfully...

Страница 114: ...m the Mode drop down list select Client 6 Enter SSID of the AP that you want to connect to for example 11n Pocket AP If you don t know what the SSID of the AP that you want to connect to please skip t...

Страница 115: ...ess menu click on Site Survey 10 Click Site Survey button 11 Now you could see the APs that scanned by the Wireless Gateway were listed below 12 Click on the ratio of AP s SSID under the item Select t...

Страница 116: ...Wi Fi Personal Bridge 150 User Manual 116 14 Click Connect button 15 Connect successfully Click on OK button to confirm and return...

Страница 117: ...layed by WPS Status If it already shows Configured some registrars such as Vista WCN will not configure AP Users will need to go to the Save Reload Settings page and click Reset to reload factory defa...

Страница 118: ...s been done the enrollee will receive SSID and security settings from the registrar and then join the network In other words if a station attempts to join a network managed by an access point with bui...

Страница 119: ...ar will inform AP this event AP then conveys the encrypted wireless profile between the device and the external registrar Finally the device will use the wireless profile and associate with AP However...

Страница 120: ...Wi Fi Personal Bridge 150 User Manual 120 Wireless Advanced Settings page Users need to make sure the Broadcast SSID file is set to Enabled Otherwise it might prevent WPS from working properly...

Страница 121: ...by any registrar either through in band EAP or UPnP Here users do not need to do any action on AP side They just need AP s device PIN and enter it into registrar An example from Vista WCN will be giv...

Страница 122: ...with Vista 4 Make sure WCN is enabled Users may need to enable it at the first time They could open the Control Panel click Classic View open Administrative Tools double click Services a User Account...

Страница 123: ...previous steps are done open Windows Explorer Go to the Network section 6 Click on Network discovery and file sharing are turned off Network computers and devices are not visible Click to Change 7 Cl...

Страница 124: ...Wi Fi Personal Bridge 150 User Manual 124 8 Click on No make the network that I am connected to a private network 9 AP s icon will show up Double click on it...

Страница 125: ...Wi Fi Personal Bridge 150 User Manual 125 10 Users could also Click Add a wireless device if the icon is not there Click next 11 Enter AP s Self PIN Number and click next...

Страница 126: ...Wi Fi Personal Bridge 150 User Manual 126 12 Choose a name that people who connect to your network will recognize 13 Enter the Passphrase and then click Next...

Страница 127: ...Account Control screen pops up click Continue 15 AP is successfully configured by WCN 16 Finally AP will become configured see WPS Status The authentication algorithm encryption algorithm and key assi...

Страница 128: ...Wi Fi Personal Bridge 150 User Manual 128 17 The SSID field of Wireless Basic Settings page will also be modified with the value assigned by WCN...

Страница 129: ...nual 129 18 The security settings on the Wireless Security Page will be modified by WCN too The warning message will show up if users try to modify the security settings The reason is the same as we e...

Страница 130: ...page and click Start PIN AP will become a registrar Users must start the PIN method on the station side within two minutes 1 From the left hand Wireless WPS menu The following page is displayed 2 Make...

Страница 131: ...Manual 131 6 Users must start the PIN method on the station side within two minutes 7 If the device PIN is correct and the WPS handshake is successfully done on the station side User s Wi Fi Protected...

Страница 132: ...iately as described in previous sections In this case AP is in un configured state before the station initiates the WPS handshake According to the WPS spec AP will create a wireless profile with WPA2...

Страница 133: ...that starts the PBC method When multiple PBC sessions occur users should try PIN method After users push AP s virtual button Start PBC they must go to station side to push its button within two minut...

Страница 134: ...User Manual 134 5 Users must start the PBC method on the station side within two minutes 6 If the device PCB and the WPS handshake is successfully done on the station side User s Wi Fi Protected stat...

Страница 135: ...iately as described in previous sections In this case AP is in un configured state before the station initiates the WPS handshake According to the WPS spec AP will create a wireless profile with WPA2...

Страница 136: ...e This page allows you setup the wireless schedule rule Please do not forget to configure system time before enable this feature To access the Wireless Schedule page From the left hand Wireless menu c...

Страница 137: ...he setting for IP address subnet mask DHCP etc Note You should only change the addressing details if your ISP asks you to or if you are familiar with network configuration In most cases you will not n...

Страница 138: ...puters devices connected to the device will have their information displayed in the DHCP Client List table The table will show the IP Address MAC Address and Expired Time of the DHCP lease for each cl...

Страница 139: ...sonal Bridge 150 User Manual 139 Changing the LAN IP address and subnet mask To check the configuration of LAN Interface 2 From the left hand Network Settings LAN Interface menu The following page is...

Страница 140: ...P Address and Change default LAN port IP address 4 Click in the IP Address and Subnet Mask box and type a new IP Address and Subnet Mask 5 Change the default DHCP Client Range 6 Click Apply Changes 7...

Страница 141: ...ipcfg dialog Windows NT Windows 2000 Windows XP a Bring up a command window b Type ipconfig release in the command window c Type ipconfig renew d Type exit to close the command window Linux a Bring up...

Страница 142: ...nt To the IP Address MAC Address and Expired Time of the DHCP lease for each client computer device 1 From the left hand Network Settings LAN Interface menu The following page is displayed 2 Click on...

Страница 143: ...access to your device Wireless Gateway supports four methods of obtaining the WAN IP address Option Description Static IP Choose this option if you are a leased line user with a fixed IP address DHCP...

Страница 144: ...Wi Fi Personal Bridge 150 User Manual 144 1 From the left hand Network Settings WAN Interface menu The following page is displayed...

Страница 145: ...User name for PPPoE registration recognized by the Internet service provider Password Password for PPPoE registration recognized by the Internet service provider Service Name Service Name for PPPoE re...

Страница 146: ...Enable Ping Access on WAN Enable or Disable Ping Access on WAN Enable Web Server Access on WAN Enable or Disable Web Server Access on WAN Enable IPsec pass through on VPN connection Enable or Disable...

Страница 147: ...wants you to connect to the Internet using Static IP follow the instructions below 1 From the left hand Network Settings WAN Interface menu The following page is displayed 2 From the WAN Access Type d...

Страница 148: ...ugh a Cable modem line then a dynamic IP will be assigned If your ISP wants you to connect to the Internet using DHCP Client follow the instructions below 1 From the left hand Network Settings WAN Int...

Страница 149: ...r device stores these authentication details so you will not have to enter this username and password every time you login If your ISP wants you to connect to the Internet using PPP follow the instruc...

Страница 150: ...et using PPTP follow the instructions below 1 From the left hand Network Settings WAN Interface menu The following page is displayed 2 From the WAN Access Type drop down list select PPTP setting 3 Ent...

Страница 151: ...Wi Fi Personal Bridge 150 User Manual 151 5 Change setting successfully Click on Reboot Now button to confirm...

Страница 152: ...et using L2TP follow the instructions below 1 From the left hand Network Settings WAN Interface menu The following page is displayed 2 From the WAN Access Type drop down list select L2TP setting 3 Ent...

Страница 153: ...Wi Fi Personal Bridge 150 User Manual 153 5 Change setting successfully Click on Reboot Now button to confirm...

Страница 154: ...ireless Gateway can it s MAC to computer s one that was originally set up for such an ISP This page allows you to enable or disable Clone MAC Address option 1 From the left hand Network Settings WAN I...

Страница 155: ...Wi Fi Personal Bridge 150 User Manual 155 5 Change setting successfully Click on Reboot Now button to confirm...

Страница 156: ...t filter Default setting is Disable Port Range Enter the port range to be filtered for both Outbound and Inbound packet Protocol Select the Protocol to be filtered for both Outbound and Inbound packet...

Страница 157: ...e Port Filtering to enable the port filtering 3 Enter 80 and 80 in Port Range field 4 From the Protocol drop down list select TCP setting 5 Enter HTTP in Comment field 6 Click Apply Changes 7 Now the...

Страница 158: ...ltering 3 Enter 53 and 53 in Port Range field 4 From the Protocol drop down list select UDP setting 5 Enter DNS Resolve in Comment field 6 Click Apply Changes 7 Now the port filter that you created ha...

Страница 159: ...the WAN side When you define an IP filter rule and enable the feature you instruct the ADSL Ethernet router to examine data packets to determine whether they meet criteria set forth in the rule The cr...

Страница 160: ...ified IP 1 From the left hand Firewall IP Filtering menu The following page is displayed 2 Check the option Enable IP Filtering to enable the IP Filtering 3 Enter the IP Address that you want to be de...

Страница 161: ...er Table 8 Now the TCP protocol for both Outbound and Inbound packet has been denied Now The Local IP Address for example 10 0 0 102 that listed in the Current Filter Table cannot visit any applicatio...

Страница 162: ...ified IP 1 From the left hand Firewall IP Filtering menu The following page is displayed 2 Check the option Enable IP Filtering to enable the IP Filtering 3 Enter the IP Address that you want to be de...

Страница 163: ...Table 8 Now the UDP protocol for both Outbound and Inbound packet has been denied Now The Local IP Address for example 10 0 0 102 that listed in the Current Filter Table cannot visit any application...

Страница 164: ...col for specified IP 1 From the left hand Firewall IP Filtering menu The following page is displayed 2 Check the option Enable IP Filtering to enable the IP Filtering 3 Enter the IP Address that you w...

Страница 165: ...rsonal Bridge 150 User Manual 165 7 Now the IP Filter that you created has been added and listed in the Current Filter Table 8 Now the TCP and UDP protocol for both Outbound and Inbound packet has bee...

Страница 166: ...e are used to restrict certain types of data packets from your local network to Internet through the Wireless Gateway Use of such filters can be helpful in securing or restricting your local network 1...

Страница 167: ...ecified MAC Address has the Internet Access 1 From the left hand Firewall MAC Filtering menu The following page is displayed 2 Check the option Enable MAC Filtering to enable the MAC Filtering 3 Enter...

Страница 168: ...rsonal Bridge 150 User Manual 168 6 Now the MAC Filter that you created has been added and listed in the Current Filter Table 7 Now the MAC Address in the Current Filter Table cannot have the Internet...

Страница 169: ...o make any changes to the default Security configuration You only need to edit the configuration if you wish to do one or both of the following allow Internet users to browse the user pages on your lo...

Страница 170: ...Enable Port Forwarding to enable the Enable Port Forwarding 3 Enter the IP Address that the port you want to be forwarded in IP Address field 4 From the Protocol drop down list select TCP setting 5 En...

Страница 171: ...Enable Port Forwarding to enable the Enable Port Forwarding 3 Enter the IP Address that the port you want to be forwarded in IP Address field 4 From the Protocol drop down list select UDP setting 5 En...

Страница 172: ...all URL Filtering menu The following page is displayed URL filtering for specified URL Address Please follow example below to deny LAN users from accessing the Internet 1 From the left hand Firewall U...

Страница 173: ...i Fi Personal Bridge 150 User Manual 173 5 Now the URL Filter that you created has been added and listed in the Current Filter Table 6 Now the URL Address in the Current Filter Table cannot be visited...

Страница 174: ...as Web HTTP servers FTP servers SMTP e mail servers and DNS servers 1 From the left hand Firewall DMZ menu The following page is displayed DMZ Host IP Address Please follow example below to configure...

Страница 175: ...Wi Fi Personal Bridge 150 User Manual 175...

Страница 176: ...le are used to config vlan settings VLANs are created to provide the segmentation services traditionally provided by routers VLANs address issues such as scalability security and network management 1...

Страница 177: ...177 19 QoS Entries in this table improve your online gaming experience by ensuring that your game traffic is prioritized over other network traffic such as FTP or Web 1 From the left hand Firewall QoS...

Страница 178: ...Fi Personal Bridge 150 User Manual 178 20 Route Setup This page is used to setup dynamic routing protocol or edit static route entry 1 From the left hand Route Setup menu The following page is display...

Страница 179: ...the current information for the device It will display the LAN WAN and system firmware information This page will display different information according to WAN setting Static IP DHCP or PPPoE 1 From...

Страница 180: ...50 User Manual 180 22 Statistics This page shows the packet counters for transmission and reception regarding to wireless and Ethernet networks 1 From the left hand Management Statistics menu The foll...

Страница 181: ...IP address of that host Then the server updates the entries for that host and replies back with some return code Above Figure explains one such scenario in which a host gets a dynamic IP address for...

Страница 182: ...ing IP interfaces refer to section Creating IP interfaces Note www dyndns org provides three kinds of services Dynamic DNS Custom DNS and Static DNS You can create different domains in these systems C...

Страница 183: ...NS 4 Select the DynDNS from the Service Provider drop down list 5 Type your own unique User Name Password and Domain Name which you applied from www dyndns com in the relevant boxes They can be any co...

Страница 184: ...TZO from the Service Provider drop down list 4 Type your own unique Email Key and Domain Name which you applied from http www tzo com MainPageWebClient clientsignup html in the relevant boxes They ca...

Страница 185: ...30 SNTP and RFC 1305 NTP SNTP Server and SNTP Client Configuration settings 1 From the left hand Management menu click on Time Zone Setting The following page is displayed 2 From the Time Zone Select...

Страница 186: ...Wi Fi Personal Bridge 150 User Manual 186 6 Change setting successfully Click on Reboot Now button to confirm...

Страница 187: ...y hackers to prevent legitimate users of a service from using that service Denial of Service 1 From the left hand Management menu click on Denial of Service The following page is displayed 2 Check the...

Страница 188: ...Wi Fi Personal Bridge 150 User Manual 188 6 Change setting successfully Click on Reboot Now button to confirm...

Страница 189: ...Enable Log Enable Disable the feature Default Disable system all All system logs will be recorded in the system log wireless The wireless logs will be recorded in the system log DoS The DoS logs will...

Страница 190: ...ption Enable Log 3 Check the option system all wireless or DoS 4 Check the option Enable Remote Log if you 5 Enter the IP Address in the Log Server IP Address field 6 Click Apply Changes 7 Change sett...

Страница 191: ...website to your PC s file directory Once you have downloaded the latest firmware version to your PC you can manually select and install it as follows 1 From the left hand Management menu click on Upg...

Страница 192: ...Wi Fi Personal Bridge 150 User Manual 192 5 Firmware update has been update complete The following page is displayed...

Страница 193: ...but then wish to revert back to the original factory configuration you can do so by resetting the device to factory defaults Save Settings to File It allows you save current settings to a file 1 From...

Страница 194: ...Wi Fi Personal Bridge 150 User Manual 194 2 Click on Save 3 If you are happy with this click Save and then browse to where the file to be saved Or click Cancel to cancel it...

Страница 195: ...rom the file which was saved previously 1 From the left hand Management menu click on Reset factory default The following page is displayed Figure 3 Reset to Defaults page 2 Click on Browse to browse...

Страница 196: ...Wi Fi Personal Bridge 150 User Manual 196 4 Once it finished loading settings form file it ll show the message below...

Страница 197: ...y defaults all previous configuration changes that you have made are overwritten by the factory default configuration Software Reset 1 From the left hand Management menu click on Reset factory default...

Страница 198: ...Wi Fi Personal Bridge 150 User Manual 198 4 Reload setting successfully Please wait for a moment while rebooting 5 Once it finished resetting to factory it ll show the Status page...

Страница 199: ...e the default username and password to your own unique settings To change the default password 1 From the left hand Management menu click on Password The following page is displayed Figure 4 Currently...

Страница 200: ...Wi Fi Personal Bridge 150 User Manual 200 Figure 5 Administration Password 4 Change setting successfully 5 Enter new User name and Password 6 Click Apply...

Страница 201: ...Wi Fi Personal Bridge 150 User Manual 201 30 Logout This page is used to logout Logout To logout 1 From the left hand menu click on Logout The following page is displayed 2 Click Apply Change...

Страница 202: ...corresponding to your network interface card NIC and select Properties Often this icon is labeled Local Area Connection The Local Area Connection dialog box is displayed with a list of currently inst...

Страница 203: ...Internet Protocol TCP IP then the protocol has already been enabled Skip to step 11 4 If Internet Protocol TCP IP does not display as an installed component click Add 5 In the Select Network Componen...

Страница 204: ...gn Internet information to some or all of your PCs directly often called statically rather than allowing the Wireless Gateway to assign it This option may be desirable but not required if You have obt...

Страница 205: ...Internet or intranet Host ID Identifies a particular computer or device on the network The first part of every IP address contains the network ID and the rest of the address contains the host ID The l...

Страница 206: ...ubnet mask identifies these host ID bits For example consider a class C network 192 168 1 To split this into two subnets you would use the subnet mask 255 255 255 128 It s easier to see what s happeni...

Страница 207: ...ly and automatically without leaving any unwanted state behind UPnP Control Point Software on Windows ME To install the control point software on Windows ME 1 In the Control Panel select Add Remove Pr...

Страница 208: ...Service enabled on your Windows XP system to use the UPnP Control point software SSDP Discovery Service is enabled on a default installation of Windows XP To check if it is enabled on your system look...

Страница 209: ...discovery and Control Client Universal Plug and Play If you are using Windows XP SP2 select Internet Gateway Device discovery and Control Client UPnP User Interface 6 Reboot your system Once you have...

Страница 210: ...If it is not correct the address or configure the PC to receive IP information automatically Verify with your ISP that the DNS server specified for the PC is valid Correct the address or configure th...

Страница 211: ...signed You can also test whether access to the Internet is working by typing an external address such as that for www yahoo com 216 115 108 243 If you do not know the IP address of a particular Intern...

Страница 212: ...several addresses associated with an Internet name This is common for web sites that receive heavy traffic they use multiple redundant servers to carry the same information To exit from the nslookup u...

Страница 213: ...is a signal that has had its frequency modified in some way such as by amplifying its strength or varying its frequency in order to add information to the signal The voice component in DSL is an analo...

Страница 214: ...ta between computers that request IP addresses and the DHCP server that assigns the addresses Each of the Wireless Gateway s interfaces can be configured as a DHCP relay See DHCP DHCP server Dynamic H...

Страница 215: ...onnected to the Internet Common uses include uploading new or updated files to a web server and downloading files from a web server Gbps Abbreviation of Gigabits per second or one billion bits per sec...

Страница 216: ...work ID that identifies the particular network the host belongs to and a host ID uniquely identifying the host itself on that network A network mask is used to define the network ID and the host ID Be...

Страница 217: ...rk ID while ignoring the host ID Bits set to 1 mean select this bit while bits set to 0 mean ignore this bit For example if the network mask 255 255 255 0 is applied to the IP address 100 10 50 1 the...

Страница 218: ...k both ends of the connection have to follow the rules of the protocol Remote In a physically separate location For example an employee away on travel who logs in to the company s intranet is a remote...

Страница 219: ...to download files from a remote computer Telnet allows you to log into and use a computer from a remote location TFTP Trivial File Transfer Protocol A protocol for file transfers TFTP is easier to us...

Страница 220: ...of the LAN interface 10 0 0 2 The unnumbered interface is temporary PPP or DHCP will assign a real IP address automatically Upstream The direction of data transmission from the user to the Internet VC...

Страница 221: ...first page that is displayed is called the home page See hyperlink web site Web site A computer on the Internet that distributes information to and gets information from remote users through web brows...

Отзывы: