❏
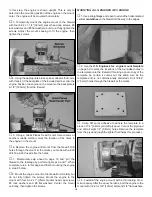
4. Make the rudder pushrod, but before soldering on the
metal clevis, slip a 3/32" [2.4mm] wheel collar, followed by a
1" [25mm] piece of silicone tubing (cut from the 3" [75mm]
silicone tube supplied with this kit), a 4-40 nylon torque rod
horn, another 1" [25mm] piece of silicone tubing and a
wheel collar onto the pushrod. Solder on the clevis. Mount
the rudder control horn to the rudder the same as the
elevator horns, then connect the pushrod.
While we’ve got the fuselage upside-down and we’re
working on the tail end, let’s go ahead and hook up the
tail wheel…
❏
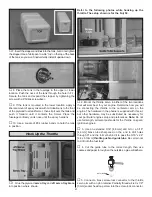
1. File two small flat spots in the tail gear wire for the set
screw in the steering arm and the set screw in the wheel
collar that holds on the wheel.
❏
2. Assemble the tail gear as shown. Apply a small drop
of thread locking compound on all the set screws, then
securely tighten with a 1.5mm hex wrench. Add a few drops
of oil to the wire where it enters the aluminum mount and on
both sides of the tail wheel.
❏
3. Enlarge the hole in the steering arm with a 3/32"
[2.4mm] drill. Mount a 2-56 threaded ball to the arm with a
2-56 nut and a drop of thread locking compound.
❏
4. Position the tail gear mount on the bottom of the
fuselage so the bend in the mount aligns with the aft end of
the fuselage. Using the holes in the mount as a guide, drill
3/32" [2.4mm] holes through the bottom of the fuselage for the
mounting screws. Mount the tail gear to the fuselage with two
#4 x 5/8" [16mm] screws. Remove the screws, harden the
holes with thin CA, allow to harden, then remount the gear.
❏
5. Make the tail steering pushrod from a 2-56 x 12"
[300mm] pushrod, a nylon ball link and a small solder on
clevis. Bend the pushrod as shown. Connect the pushrod to
the steering arm and to the torque rod horn on the rudder
pushrod. Center the rudder and the tail wheel, then fasten
the wheel collars to the rudder pushrod with two 4-40 set
screws and a drop of threadlocker. Note: Squeeze the wheel
collars against the tubing just enough to apply light pressure.
❏
1. Remove the rubber stopper from the fuel tank and
shake out the contents.
If using a gas engine, the fuel tank must be converted
from glow fuel application to gasoline application. The
items suggested for making the conversion are listed
on page 5.
Assemble the Fuel Tank
Mount the Tail Gear
29


