background image

25

If you need to cancel an emergency call for any reason, simply release the 911 

Activation Button and repress it.  This will hang up the phone and cancel the call.

3.4  Cancelling an Emergency Call

3.5  Operating the Base Unit

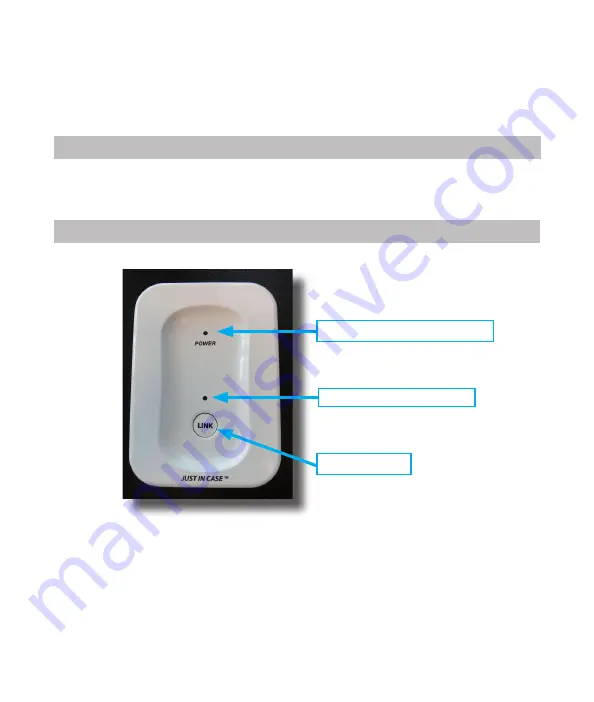
Base Unit Features:

1.  Green POWER LED Light:  A solid green light indicates a successful 

connection to a power source.  When the LED is off, it indicates that there 

is no power to the Base Unit.

2.  Green LINK LED Light:  A blinking green light indicates that the Base Unit 

is ready to LINK to an additional Handset.

3.  LINK Button:  This button is used to LINK an additional Handset to the 

Base Unit.

Green POWER LED Light

LINK Button

Green LINK LED Light

3.  The AC Adapter/Power Cord is disconnected from the Base Unit and/or the 

wall outlet.  

4.  The telephone line is not available (another phone is in use or off the hook) or 

not working properly.  

Содержание Just in Case

Страница 1: ...Additional Handsets You MUST read and understand the instructions in this Owner s Guide BEFORE using the 911 Emergency Phone SERIOUS INJURY and DAMAGE can result from incorrect setup and use JUST IN...
Страница 2: ...Warnings 9 1 5 Warning Label Locations 10 SECTION 2 INSTALLATION 11 2 1 Installing the Batteries 11 Battery Installation Procedures 12 2 2 Locating the Handset s 14 Using the Velcro Strips 15 Waterpr...

Страница 3: ...the Base Unit 25 3 6 Linking Additional Handsets 26 SECTION 4 PERIODIC TESTING 27 4 1 Battery and Signal Test Procedures 28 Initiating the Battery and Signal Tests 28 Battery Test 29 Signal Test 29 SE...

Страница 4: ...4 TROUBLESHOOTING GUIDE 34 FREQUENTLY ASKED QUESTIONS 36 FCCINFORMATION 40 LIMITEDWARRANTYINFORMATION 41 30 DAY MONEY BACK GUARANTEE 43 Copyright 2011 The Great Arnoldi LLC...

Страница 5: ...Emergency Phone Core Unit COMPONENTS Handset Base Unit Phone Cord AAA Alkaline Batteries AC Adapter Power Cord Line Splitter Velcro Strips NOTE If you have purchased an additional Handset the compone...

Страница 6: ...rgency SECTION 1 SAFETY PRECAUTIONS 1 1 Safety Warnings Throughout this Owner s Guide WARNING NOTICE and the SAFETY ALERT SYMBOL will be used This is the safety alert symbol It is used to alert you to...

Страница 7: ...pg 27 for Battery Testing Procedures TEST the batteries in your Handset monthly TEST the batteries after using your Handset to place an emergency call REPLACE the batteries IMMEDIATELY if the battery...

Страница 8: ...y Phone Handset requires the use of your regular telephone line and service for operation If your telephone line is disconnected is in use or is otherwise not working you will not be able to use your...

Страница 9: ...a where they will be exposed to water or other liquids DO NOT disassemble any component of this product Electrical shock can cause SERIOUS INJURY or DEATH To prevent electrical shock ALWAYS take the f...

Страница 10: ...maged or missing warning labels must be replaced immediately To request replacement labels please go to www justincase911 com TEST battery strength in Handset monthly TEST signal strength if relocatin...

Страница 11: ...ed for a long period of time DO NOT mix old batteries with new batteries or different types DO NOT use rechargeable batteries and DO NOT place the provided AAA alkaline batteries in a battery charger...

Страница 12: ...on 4 Insert the negative end of the battery into the compartment first by pushing it against the spring Then lower the positive end into the slot NOTICE DO NOT unscrew or remove the two top small scre...

Страница 13: ...13 Figure 2 Correct battery placement in the battery compartment Polarity Figure 1 Handset screws Top Small Screws DO NOT REMOVE Battery Compartment Screws...

Страница 14: ...tions where you will be most likely to need it during an emergency Examples of locations where you may want to place your Handset s are in the bathroom in the kitchen near the stairway and near your b...

Страница 15: ...ch the Velcro strip to the back of your Handset The Velcro strip should be placed on the top portion of the back of the Handset above the battery compartment door See Figure 3 DO NOT place the Velcro...

Страница 16: ...attery compartment is completely dry install new batteries 7 Conduct a battery and signal strength test NOTICE Although your Handset is designed to be waterproof take the following precautions to prev...

Страница 17: ...2 3 Locating the Base Unit NOTICE To prevent damaging your Base Unit take the following precautions DO NOT locate near any sources of water such as bathroom or kitchen sinks DO NOT locate near any sou...

Страница 18: ...outlet 3 When you have successfully connected your Base Unit to a power source the green POWER LED light on the Base Unit will illuminate See Figure 5 pg 19 WARNING Electrical shock can cause SERIOUS...

Страница 19: ...19 Figure 4 AC Adapter Power Cord and Telephone line connections Back of Base Unit Telephone Line Jack Power Jack Green Power LED Light Figure 5 Green Power LED Light...

Страница 20: ...ne will work with your existing telephone line and phone service It works the same way as a regular cordless phone The ability of the JUST IN CASETM 911 Emergency Phone to work is dependent on the ava...

Страница 21: ...itter IMPORTANT LINE SEIZURE INFORMATION If you have more than one telephone in your home sharing the same number as your JUST IN CASETM 911 Emergency Phone and if one of those phones is in use or is...

Страница 22: ...or it will NOT work 2 You can obtain a DSL filter from your DSL service provider or from an electronics store 3 Plug the DSL filter into the telephone wall jack See Figure 7 4 Plug one end of the supp...

Страница 23: ...This button is used to conduct the battery and signal tests See pg 27 2 Signal Test LED Light This light indicates whether the Handset is within range of the Base Unit 3 Battery Test LED Light This li...

Страница 24: ...GREEN 5 BUSY SIGNAL If you hear a busy signal release the 911 button and repress it This will hang up the call Try to place another emergency call by repeating steps 1 4 NOTE The JUST IN CASETM Hands...

Страница 25: ...ower source When the LED is off it indicates that there is no power to the Base Unit 2 Green LINK LED Light A blinking green light indicates that the Base Unit is ready to LINK to an additional Handse...

Страница 26: ...Handsets to the Base Unit To LINK additional Handsets to the Base Unit complete the following steps 1 Press and hold the LINK button on the Base Unit for two seconds 2 The Green LINK LED Light located...

Страница 27: ...To ensure that your JUST IN CASETM 911 Emergency Phone works properly and is ready to use when you need it during an emergency ALWAYS follow the safety precautions and instructions in this section SEC...

Страница 28: ...o begin DO NOT press the TEST Button again during the test sequence WARNING SIGNAL STRENGTH SAFETY Failure to test the signal strength may result in your Handset not working properly leading to SERIOU...

Страница 29: ...ensure that the Handset continues to work properly replace the batteries as soon as possible c Does not illuminate indicates the batteries are dead and need to be replaced You MUST replace the batteri...

Страница 30: ...owing the Handset is not within Range of the Base Unit the Base Unit is not connected to a power source and or the Base Unit is not connected to a working phone line TEST Button Battery Test LED Light...

Страница 31: ...r Handset ALWAYS perform a Battery Test to ensure that the batteries are installed correctly and working properly To keep your JUST IN CASETM 911 Emergency Phone working properly follow these general...

Страница 32: ...se Unit and Handset Dampen a soft clean cloth with mild all purpose cleaner and gently wipe the outside surface of the Base Unit or Handset clean 5 3 Cleaning ALWAYS unplug the AC Adapter Power Cord f...

Страница 33: ...the power source After reconnecting the power conduct a Signal Test pg 28 During a power failure you will NOT be able to use your JUST IN CASETM 911 Emergency Phone If your Base Unit or AC Adapter Pow...

Страница 34: ...D RED light indicates one or more of the following the Handset is not within range of the Base Unit the Base Unit is not connected to a power source and or the Base Unit is not connected to a working...

Страница 35: ...e Unit will light up when the Base Unit is successfully connected to a power source When the LED is off it indicates that there is no power to the Base Unit Step 4 Check the phone line connections see...

Страница 36: ...nal Test LED Light will be SOLID GREEN 5 BUSY SIGNAL If you hear a busy signal release the 911 button and repress it This will hang up the call Try to place another emergency call by repeating steps 1...

Страница 37: ...old theTEST button on the additional Handset until you feel and hear a click Continue to hold for 2 seconds 5 If the LINK is successful a The Signal Test LED light on the Handset will BLINK GREEN b Yo...

Страница 38: ...the TEST Button again during the test sequence See pages 27 30 for additional information 8 Can I use the JUST IN CASETM 911 Emergency Phone outside of the United States No your JUST IN CASETM 911 Eme...

Страница 39: ...911 emergency service even though your telephone line is disconnected Contact your local telephone service provider for your home to determine if 911 emergency service is available and under what circ...

Страница 40: ...cordance with the instructions may cause harmful interference to radio communications However there is no guarantee that interference will not occur in a particular installation If this equipment does...

Страница 41: ...orized by TGA iv batteries v ordinary wear and tear or cosmetic damage vi transportation shipping or insurance costs vii costs of product removal installation set up service or reinstallation and viii...

Страница 42: ...ECTLY OR INDIRECTLY BY USE OR PERFORMANCE OFTHE PRODUCT OR ARISING OUT OF ANY BREACH OF THIS WARRANTY INCLUDING BUT NOT LIMITED TO ANY DAMAGES RESULTING FROM INCONVENIENCE AND ANY LOSS OF TIME PROPERT...

Страница 43: ...our receiving your returned product Return Instructions Pack the product securely in the original packaging and original box Make sure to include all paperwork Owner s Guide and all components All re...

Отзывы: