69
Model FL4000H
Recharging Instructions
NOTE
:
Charging must be carried out in a non-hazardous area. The charging receptacle is
located inside the housing adjacent to the ON button. To gain access, it is necessary to
unscrew the knurled plug from the body of the unit. The plug is secured to the ON
button by a safety strap to keep it from being lost.
Insert the charging plug into the receptacle. Complete recharging takes 3.5 hours,
minimum.
NOTE
: Replace the plug after charging is complete.
It is recommended that the Test Lamp be kept on charge when not in use to prevent
excessive battery discharge. The batteries may be charged an average of 500 times
before the battery pack must be replaced.
8.5.3 Mounting
Bracket
A mounting bracket is available to mount the FL4000H to a wall, pole, etc. The
mounting bracket design allows for optical alignment adjustments when utilizing to a
fixed installation. Please refer to Figure 16: Detector Mounting and Installation.
8.5.4 Rain
Guard
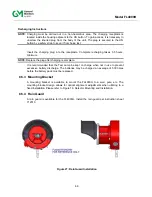
A rain guard is available for the FL4000H. Install the rain guard per instruction sheet
712013.
Figure 27: Rain Guard Installation
Содержание FL4000H
Страница 2: ...ii Model FL4000H This page intentionally left blank ...
Страница 8: ...viii Model FL4000H Figure 2 Mounting Instruction Figure 3 Wall Mounting Assembly ...
Страница 28: ...28 Model FL4000H Figure 16 Detector Mounting and Installation ...
Страница 61: ...61 Model FL4000H 6 2 Final Assembly Figure 26 FL4000H Cross Section View ...


