3
Operating instructions
24
Ettan IPGphor 3 Instrument User Manual 11-0034-58 Edition AB
3.2.4
Sample cups
1
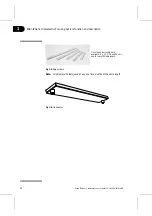
Position a strip of sample cups in the appropriate position, for example ~1 cm
from the end of the gel portion of the IPG strip. Do NOT place the cup with the
feet over a center protrusion.
2
Ensure that the feet of the cups are properly seated at the bottom of the
channel. Use the insertion tool, wiggle the tool gently while pushing it down.
3
Fill the cups with cover fluid to test for proper seating of the cups.
4
Remove the cover fluid after 10 minutes.
3.2.5
Electrode paper wicks
1
Add 150 µl distilled water to each paper wick.
2
Position the wicks on each end of the IPG strips so that one end of the wick
overlaps the end of the gel on the IPG strip.
3.2.6
Positioning the electrodes
1
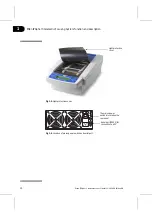
With the electrode cams in the open position, position the electrode
assembly on top of all the wicks. The electrode must be in contact with the
wick.
2
Swivel the cams into the closed position under the external lip of the tray. The
electrodes should not be moved while the cams are in the closed position.
3.2.7
Loading samples into the sample cups.
1
A maximum of 150 µl of sample may be placed in these cups.
2
Check to make sure that there is cover fluid over the samples. When the
sample is introduced into the cups, it will sink through the oil to the bottom of
the cup and come into contact with the IPG strip.
3
Close the Ettan IPGphor 3 lid.
4
Start the Ettan IPGphor 3 from the Ettan IPGphor 3 Control Software. See
section 3.4 for more details,
or
Program and run the Ettan IPGphor 3 from its own control panel display. See
section 3.5.
Содержание Ettan IPGphor 3
Страница 1: ...GE Healthcare Ettan IPGphor 3 Instrument User Manual Ettan...
Страница 2: ......
Страница 4: ......
Страница 54: ...4 Care and maintenance 54 Ettan IPGphor 3 Instrument User Manual 11 0034 58 Edition AB...
Страница 62: ...6 Customer service information 62 Ettan IPGphor 3 Instrument User Manual 11 0034 58 Edition AB...
Страница 63: ......

