Revision D
250 Series Maternal/Fetal Monitor
5-31
2020551-001
Troubleshooting:
FAQs
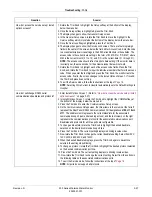
How do I change the Recorder Paper
Speed?
1. Enter the
Install Options Screen 1
.
2. Rotate the Trim Knob to highlight the
Paper Speed:
setting in the
Recorder Setup
section of the
General Setup
screen (center section of the display).
3. The current setting is one of the following:
1, 2,
or
3 cm/min.
4. Once the
Paper Speed:
setting is highlighted, press the Trim Knob again. The
current setting displays in blinking inverse video.
5. Now rotate the Trim Knob to change the current setting. Select a value.
6. Once you set the desired value, press the Trim Knob again to save the value. The
current value setting stops blinking.
7. To exit the Service mode, follow the instructions at the top of
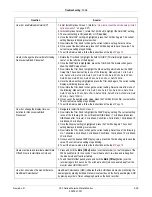
How do I enable the maternal-only recorder
mode?
1. From the
On
state, (The yellow LED above the recorder is illuminated.), press the
Record
button once quickly. The recorder advances, printing the date and time on
the chart paper perpendicular (rather than parallel) to the direction of paper travel.
Then the recorder halts and the yellow LED flashes intermittently to indicate
MATERNAL ONLY mode is enabled.
2. From the
Off
state, (The yellow LED above the recorder is off.), press the
Record
button twice quickly. The recorder advances, printing the date and time on the chart
paper perpendicular (rather than parallel) to the direction of paper travel. Then the
recorder halts and the yellow LED flashes intermittently to indicate MATERNAL
ONLY mode is enabled.
How do I turn off the recorder completely?
From the
On
or MATERNAL ONLY state, (The yellow LED above the recorder is
illuminated or flashing intermittently.), press the
Record
button and hold for 2 seconds,
until the monitor emits a two tone audio beep which indicates that the recorder is off.
The yellow LED is now extinguished.
How do I change the LOW PAPER/NO
PAPER alarm conditions?
1. Enter the
Install Options Screen 1
. Rotate the Trim Knob to highlight the
Paper
Chime
: setting.
2. The current setting is one of the following:
Off
(no audio for any 'no paper' or 'low
paper' condition),
Out Only
(audio tone on 'paper out' only), or
Low/Out
(audio tone
for any
LOW PAPER/NO PAPER
condition).
3. Once the
Paper Chime
: setting is highlighted, press the Trim Knob again. The
current setting displays in blinking inverse video.
4. Now rotate the Trim Knob to change the current setting. Select a value.
5. Once you set the desired value, press the Trim Knob again to save the value. The
current value setting stops blinking.
6. To exit the Service mode, follow the instructions at the top of
How do I change the Heart Rate Recorder
Scale?
1. Enter the
Install Options Screen 1
“How do I access the service setup / install
2. In
Install Options Screen 1
, rotate the Trim Knob to highlight the
Scaling:
setting.
3. The current setting is either
30-240
or
50-210 bpm
.
4. Once the
Scaling
: setting is highlighted, press the Trim Knob again. The current
setting displays in blinking inverse video.
5. Now rotate the Trim Knob to change the current setting. Select a value.
6. Once you set the desired value, press the Trim Knob again to save the value. The
current value setting stops blinking.
7. To exit the Service mode, follow the instructions at the top of
Question
Answer
Содержание Corometrics 250 Series
Страница 2: ......
Страница 6: ...CE CE ii 0086 ...
Страница 14: ...viii 250 Series Maternal Fetal Monitor Revision D 2020551 001 ...
Страница 16: ...1 2 250 Series Maternal Fetal Monitor Revision D 2020551 001 For your notes ...
Страница 28: ...1 14 250 Series Maternal Fetal Monitor Revision D 2020551 001 Introduction Service Requirements ...
Страница 29: ...Revision D 250 Series Maternal Fetal Monitor 2 1 2020551 001 2 Equipment Overview ...
Страница 30: ...2 2 250 Series Maternal Fetal Monitor Revision D 2020551 001 For your notes ...
Страница 54: ...2 26 250 Series Maternal Fetal Monitor Revision D 2020551 001 Equipment Overview Theory of Operation ...
Страница 55: ...3 1 250 Series Maternal Fetal Monitor Revision D 2020551 001 3 Installation ...
Страница 56: ...3 2 250 Series Maternal Fetal Monitor Revision D 2020551 001 For your notes ...
Страница 81: ...Revision D 250 Series Maternal Fetal Monitor 4 1 2020551 001 4 Maintenance ...
Страница 82: ...4 2 250 Series Maternal Fetal Monitor Revision D 2020551 001 For your notes ...
Страница 142: ...4 62 250 Series Maternal Fetal Monitor Revision D 2020551 001 Maintenance Preventative Maintenance Inspection Report ...
Страница 143: ...Revision D 250 Series Maternal Fetal Monitor 5 1 2020551 001 5 Troubleshooting ...
Страница 144: ...5 2 250 Series Maternal Fetal Monitor Revision D 2020551 001 For your notes ...
Страница 194: ...5 52 250 Series Maternal Fetal Monitor Revision D 2020551 001 Troubleshooting General Troubleshooting ...
Страница 195: ...Revision D 250 Series Maternal Fetal Monitor 6 1 2020551 001 6 Parts List Drawings and Replacement ...
Страница 196: ...6 2 250 Series Maternal Fetal Monitor Revision D 2020551 001 For your notes ...
Страница 228: ...A 2 250 Series Maternal Fetal Monitor Revision D 2020551 001 Technical Specifications For your notes ...
Страница 238: ...A 12 250 Series Maternal Fetal Monitor Revision D 2020551 001 Technical Specifications Strip Chart Recorder ...
Страница 239: ...Revision D 250 Series Maternal Fetal Monitor B 1 2020551 001 B Alarms Summary ...
Страница 240: ...B 2 250 Series Maternal Fetal Monitor Revision D 2020551 001 Alarms Summary For your notes ...
Страница 243: ...Revision D 250 Series Maternal Fetal Monitor C 1 2020551 001 C Electromagnetic Compatibility ...
Страница 244: ...C 2 250 Series Maternal Fetal Monitor Revision D 2020551 001 Electromagnetic Compatibility For your notes ...
Страница 251: ......


