Revision D
250 Series Maternal/Fetal Monitor
5-27
2020551-001
Troubleshooting:
FAQs
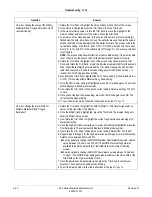
How do I access the service setup / install
options screens?
1. Rotate the Trim Knob to highlight the
Setup
softkey at the bottom of the display,
below the menu bar.
2. Once the
Setup
softkey is highlighted, press the Trim Knob.
3. The display changes to show the
General Setup
screen.
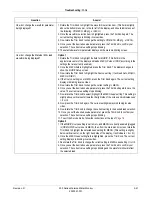
4. In the
General Setup
screen, rotate the Trim Knob to move the highlight to the
Service
softkey which is located at the bottom of the display, below the menu bar.
5. Once the
Service
softkey is highlighted, press the Trim Knob.
6. The display changes to show the
Service Lock
screen. There are four single-digit
fields in the center of the screen, below the field,
Enter Access Code.
Enter the code
to access restricted service settings in the 250 Series Monitors in these fields. The
access code is the current date setting in the form of 'M M D D' or 'D D M M', where
M M is the current month (0 1 to 1 2), and D D is the current date (0 1 through 3 1).
NOTE:
The access code should reflect monitor’s date setting. If the monitor date is
incorrectly set, the access code for the actual calendar date will not work.
7. Rotate the Trim Knob to highlight each of the access code fields. Press the Trim
Knob, and rotate the Trim Knob to input the individual numbers that form the access
code. When you enter the last digit and press the Trim Knob, the monitor tests the
access code. If valid, the screen changes to the
Install Options Screen 1
. If invalid,
the Trim Knob press does nothing.
8. To exit the Service mode, follow the instructions at the top of
NOTE:
Selecting
Store Current to Hospital
automatically sets the
Default Settings:
to
Hospital.
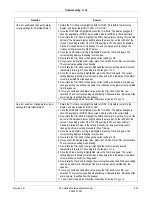
How do I set/change RS232 serial
communications baudrates and protocols?
1. Enter
Install Options Screen 1
“How do I access the service setup / install
2. In
Install Options Screen 1
, rotate the Trim Knob to highlight the
COMM
softkey at
the bottom of the display, below the menu bar.
3. Press the Trim Knob to enter the
Communications Setup
screen.
4. On the
Communications Setup
screen, the three items in the column at the far left
represent the Rear Panel RS232 Communications Port designations
J109, J110
and
J111.
The middle column represents the current
Baudrate
for the associated
communications port (same line reading across), and the last column on the right
represents the communications protocol for the associated communications port.
Baudrates and protocols for all three ports are configurable.
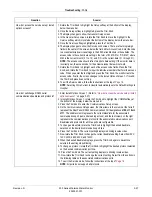
5. To change a
Baudrate
, rotate the Trim Knob to highlight the desired baudrate
selection on the desired communication port line.
6. Press the Trim Knob. The current setting displays in blinking inverse video.
7. Now rotate the Trim Knob to change the current baudrate setting. Select from
600,
1200, 2400, 4800, 9600,
and
19200.
8. When the desired baudrate displays, press the Trim Knob again to save.Once
selected, the setting stops blinking.
9. To change a protocol, rotate the Trim Knob to highlight the desired protocol selection
on the desired communication port line.
10. Press the Trim Knob. The current setting displays in blinking inverse video.
11. Now rotate the Trim Knob to change the current setting. Select from the options in
the following table on the associated communications ports.
12. To exit the Service mode, follow the instructions at the top of
NOTE:
All ports do not support all protocols.
Question
Answer
Содержание Corometrics 250 Series
Страница 2: ......
Страница 6: ...CE CE ii 0086 ...
Страница 14: ...viii 250 Series Maternal Fetal Monitor Revision D 2020551 001 ...
Страница 16: ...1 2 250 Series Maternal Fetal Monitor Revision D 2020551 001 For your notes ...
Страница 28: ...1 14 250 Series Maternal Fetal Monitor Revision D 2020551 001 Introduction Service Requirements ...
Страница 29: ...Revision D 250 Series Maternal Fetal Monitor 2 1 2020551 001 2 Equipment Overview ...
Страница 30: ...2 2 250 Series Maternal Fetal Monitor Revision D 2020551 001 For your notes ...
Страница 54: ...2 26 250 Series Maternal Fetal Monitor Revision D 2020551 001 Equipment Overview Theory of Operation ...
Страница 55: ...3 1 250 Series Maternal Fetal Monitor Revision D 2020551 001 3 Installation ...
Страница 56: ...3 2 250 Series Maternal Fetal Monitor Revision D 2020551 001 For your notes ...
Страница 81: ...Revision D 250 Series Maternal Fetal Monitor 4 1 2020551 001 4 Maintenance ...
Страница 82: ...4 2 250 Series Maternal Fetal Monitor Revision D 2020551 001 For your notes ...
Страница 142: ...4 62 250 Series Maternal Fetal Monitor Revision D 2020551 001 Maintenance Preventative Maintenance Inspection Report ...
Страница 143: ...Revision D 250 Series Maternal Fetal Monitor 5 1 2020551 001 5 Troubleshooting ...
Страница 144: ...5 2 250 Series Maternal Fetal Monitor Revision D 2020551 001 For your notes ...
Страница 194: ...5 52 250 Series Maternal Fetal Monitor Revision D 2020551 001 Troubleshooting General Troubleshooting ...
Страница 195: ...Revision D 250 Series Maternal Fetal Monitor 6 1 2020551 001 6 Parts List Drawings and Replacement ...
Страница 196: ...6 2 250 Series Maternal Fetal Monitor Revision D 2020551 001 For your notes ...
Страница 228: ...A 2 250 Series Maternal Fetal Monitor Revision D 2020551 001 Technical Specifications For your notes ...
Страница 238: ...A 12 250 Series Maternal Fetal Monitor Revision D 2020551 001 Technical Specifications Strip Chart Recorder ...
Страница 239: ...Revision D 250 Series Maternal Fetal Monitor B 1 2020551 001 B Alarms Summary ...
Страница 240: ...B 2 250 Series Maternal Fetal Monitor Revision D 2020551 001 Alarms Summary For your notes ...
Страница 243: ...Revision D 250 Series Maternal Fetal Monitor C 1 2020551 001 C Electromagnetic Compatibility ...
Страница 244: ...C 2 250 Series Maternal Fetal Monitor Revision D 2020551 001 Electromagnetic Compatibility For your notes ...
Страница 251: ......

