


Chapter 6
185
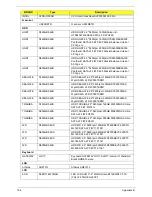
MEMORY
Memory NANYA SO-DIMM DDRIII 1066 1GB
NT1GC64BH8A1PS-BE LF 64*16 0.07um
KN.1GB03.031
Memory MICRON SO-DIMM DDRIII 1066 1GB
MT8JSF12864HZ-1G1F1 LF 128*8 0.065um
KN.1GB04.015
Memory KINGSTON SO-DIMM DDRIII 1066 1GB
ACR128X64D3S1066C7 LF 128*8 0.07um
KN.1GB07.001
Memory ELPIDA SO-DIMM DDRIII 1066 1GB
EBJ10UE8BDS0-AE-F LF 128*8 0.065um
KN.1GB09.012
Memory SAMSUNG SO-DIMM DDRIII 1066 1GB
M471B2874DZ1-CF8 LF
KN.1GB0B.019
Memory SAMSUNG SO-DIMM DDRIII 1066 1GB
M471B2873EH1-CF8 LF 64*16 0.055um
KN.1GB0B.028
Memory HYNIX SO-DIMM DDRIII 1066 1GB
HMT112S6BFR6C-G7 N0 LF 64*16 0.055um
KN.1GB0G.025
Memory NANYA SO-DIMM DDRIII 1066 2GB
NT2GC64B8HA1NS-BE LF 128*8 0.07um
KN.2GB03.012
Memory MICRON SO-DIMM DDRIII 1066 2GB
MT16JSF25664HZ-1G1F1 LF 128*8 0.065um
KN.2GB04.015
Memory KINGSTON SO-DIMM DDRIII 1066 2GB
ACR256X64D3S1066C7 LF 128*8 0.07um
KN.2GB07.001
Memory ELPIDA SO-DIMM DDRIII 1066 2GB
EBJ21UE8BDS0-AE-F LF 128*8 0.065um
KN.2GB09.006
Memory SAMSUNG SO-DIMM DDRIII 1066 2GB
M471B5673DZ1-CF8 LF
KN.2GB0B.005
Memory SAMSUNG SO-DIMM DDRIII 1066 2GB
M471B5673EH1-CF8 LF 128*8 0.055um
KN.2GB0B.012
Memory A-DATA SO-DIMM DDRIII 1066 2GB
HY7YG1B1674ZM LF 128*8 0.065um
KN.2GB0C.002
Memory HYNIX SO-DIMM DDRIII 1066 2GB
HMT125S6BFR8C-G7 N0 LF 128*8 0.055um
KN.2GB0G.014
Memory SAMSUNG SO-DIMM DDRIII 1066 4GB
M471B5273BH1-CF8 LF 256*8 0.055um
KN.4GB0B.007
MIC PHONE
MIC
23.PND07.001
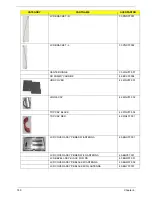
MISCELLANEOUS
LOWER CASE RUBBER FOOT - FRONT
47.WGV07.001
LOWER CASE RUBBER FOOT - REAR
47.WGV07.002
LOWER CASE SCREW RUBBER
47.WGV07.003
LCD SUPPORT RUBBER
47.WGV07.004
FRONT LENS RUBBER
47.WGV07.005
UPPER CASE FRONT RUBBER BLACK
47.WGV07.006
UPPER CASE REAR RUBBER BLACK
47.WGV07.007
TOUCHPAD RUBBER BLACK
47.WGV07.008
LCD BEZEL SCREW MYLAR
47.WGV07.009
FOIL IN PANEL FOR 3G
47.WGV07.010
CATEGORY
PARTNAME
ACERPARTNO.
Содержание EC14T Series
Страница 6: ...vi ...
Страница 10: ...x Table of Contents ...
Страница 13: ...Chapter 1 3 System Block Diagram ...
Страница 32: ...22 Chapter 1 ...
Страница 48: ...38 Chapter 2 ...
Страница 61: ...Chapter 3 51 4 Remove the one 1 screw 5 Remove the 3G module Step Screw Quantity Screw Type 3G Module M2 3 1 ...
Страница 65: ...Chapter 3 55 4 Unlock the FPC 5 Remove the FPC and keyboard ...
Страница 67: ...Chapter 3 57 4 Partially open the LCD module 5 Remove the hinge cap ...
Страница 83: ...Chapter 3 73 6 Remove the CRT cable ...
Страница 89: ...Chapter 3 79 3 Grasp the speaker housings pull the cables free of the adhesive removing the speaker module ...
Страница 96: ...86 Chapter 3 7 Pry up the bezel bottom edge 8 Remove the bezel ...
Страница 106: ...96 Chapter 3 4 Remove the hinge ...
Страница 108: ...98 Chapter 3 7 Remove the antenna cable from the retention guide hooks 8 Peel the left antenna foil off the cover ...
Страница 109: ...Chapter 3 99 9 Peel the antenna off the adhesive 10 Remove the antenna cable from the retention guide hooks ...
Страница 110: ...100 Chapter 3 11 Remove both antenna cables from the cover ...
Страница 124: ...114 Chapter 3 6 Replace the screw covers 7 Insert the stylus ...
Страница 139: ...Chapter 3 129 8 Lock the I O board connector Replacing the Button Board 1 Replace the button board ...
Страница 149: ...Chapter 3 139 4 Press down the keyboard top edge Replacing the 3G Module 1 Replace the 3G module ...
Страница 153: ...Chapter 3 143 2 Replace the HDD in the bay 3 Adhere the black tape 4 Replace the HDD FPC ...
Страница 155: ...Chapter 3 145 2 Press firmly around the edges of the module cover 3 Tighten the five 5 captive screws ...
Страница 157: ...Chapter 3 147 3 Lock the battery Replacing the Dummy Card 1 Insert the dummy card into the slot ...
Страница 158: ...148 Chapter 3 ...
Страница 206: ...196 Appendix B ...
Страница 208: ...198 ...
Страница 211: ...201 ...
Страница 212: ...202 ...


