178
Chapter 6
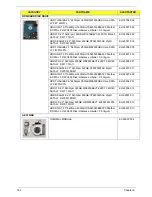
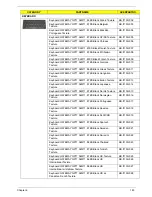
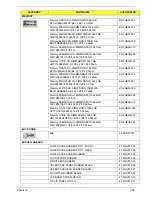
FRU List
CATEGORY
PARTNAME
ACERPARTNO.
ADAPTER
ADAPTER DELTA 30W 19V 1.7X5.5X11 BLACK ADP-30JH BA
LF
AP.03001.001
ADAPTER LITE-ON 30W 1.7X5.5X11 BLACK PA-1300-04AC
LF
AP.03003.001
ADAPTER HIPRO 30W 19V 1.7X5.5X11 BLACK HP-A0301R3
B1LF LF
AP.0300A.001
BATTERY
Battery SANYO UM-2009F Li-Ion 3S2P SANYO 6 cell
5600mAh Main COMMON
BT.00603.105
Battery SIMPLO UM-2009F Li-Ion 3S2P SAMSUNG 6 cell
5600mAh Main COMMON ID:UM09F70
BT.00607.114
BOARD
TP BOARD
55.PL907.004
TOUCH PANEL CONTROL BOARD
55.PND07.001
CRT BOARD
55.WGV07.001
LED BOARB
55.WGV07.002
CARD READER BOARD
55.WGV07.003
Foxconn Bluetooth BRM 2046 BT2.1 (T60H928.33) f/w:861
BH.21100.004
Lan Intel WLAN 112BN.HMWG MM#903341
KI.CPH01.001
Lan Intel WLAN 512AN_HMWG Shirley Peak 5100
MM#895373
KI.SPH01.003
Lan Intel WLAN 512AG_HMWG Shirley Peak 5100
MM#897072
KI.SPH01.005
Foxconn Wireless LAN Atheros HB93 1x2 BGN (HM)
NI.23600.046
Liteon Wireless LAN Atheris HB93 1x2 BGN (HM) WN6602AH
NI.23600.051
Qualcomm Gobi2000
LC.21300.011
CABLE
POWER CORD UK 3PIN
27.A03V7.004
Содержание EC14T Series
Страница 6: ...vi ...
Страница 10: ...x Table of Contents ...
Страница 13: ...Chapter 1 3 System Block Diagram ...
Страница 32: ...22 Chapter 1 ...
Страница 48: ...38 Chapter 2 ...
Страница 61: ...Chapter 3 51 4 Remove the one 1 screw 5 Remove the 3G module Step Screw Quantity Screw Type 3G Module M2 3 1 ...
Страница 65: ...Chapter 3 55 4 Unlock the FPC 5 Remove the FPC and keyboard ...
Страница 67: ...Chapter 3 57 4 Partially open the LCD module 5 Remove the hinge cap ...
Страница 83: ...Chapter 3 73 6 Remove the CRT cable ...
Страница 89: ...Chapter 3 79 3 Grasp the speaker housings pull the cables free of the adhesive removing the speaker module ...
Страница 96: ...86 Chapter 3 7 Pry up the bezel bottom edge 8 Remove the bezel ...
Страница 106: ...96 Chapter 3 4 Remove the hinge ...
Страница 108: ...98 Chapter 3 7 Remove the antenna cable from the retention guide hooks 8 Peel the left antenna foil off the cover ...
Страница 109: ...Chapter 3 99 9 Peel the antenna off the adhesive 10 Remove the antenna cable from the retention guide hooks ...
Страница 110: ...100 Chapter 3 11 Remove both antenna cables from the cover ...
Страница 124: ...114 Chapter 3 6 Replace the screw covers 7 Insert the stylus ...
Страница 139: ...Chapter 3 129 8 Lock the I O board connector Replacing the Button Board 1 Replace the button board ...
Страница 149: ...Chapter 3 139 4 Press down the keyboard top edge Replacing the 3G Module 1 Replace the 3G module ...
Страница 153: ...Chapter 3 143 2 Replace the HDD in the bay 3 Adhere the black tape 4 Replace the HDD FPC ...
Страница 155: ...Chapter 3 145 2 Press firmly around the edges of the module cover 3 Tighten the five 5 captive screws ...
Страница 157: ...Chapter 3 147 3 Lock the battery Replacing the Dummy Card 1 Insert the dummy card into the slot ...
Страница 158: ...148 Chapter 3 ...
Страница 206: ...196 Appendix B ...
Страница 208: ...198 ...
Страница 211: ...201 ...
Страница 212: ...202 ...

