


2. INSTALLATION
Page 25
© 2011 Fluke Calibration
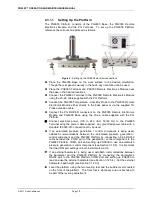
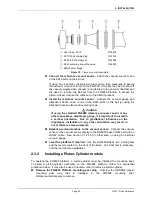
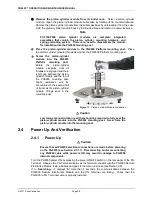
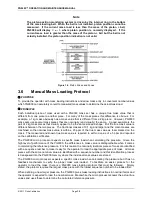
Vent Valve, KF10
KF10/16 Centering Ring
KF40 to KF16 Reducer
KF40 centering ring with screen
AMH bell jar flange
3139838
3133103
3142990
3142830
Figure 10.
Vacuum vent kit assembly
Connect the reference vacuum source:
Attach the vacuum source to one
of the KF40 ports on the bell jar.
If using an oil sealed / lubricated vacuum pump, take measures to assure
that vacuum oil cannot return to the PG9000. Consider the need to shut-off
the vacuum supply when vacuum is not desired in the vacuum chamber and
the need to remove the Bell Jar from the PG9000 Platform to access the
piston-cylinder module, the mass set or the AMH if present.
Install the reference vacuum sensor:
Connect the vacuum gauge and
attached isolation valve to one of the KF40 ports on the bell jar using the
attached reducer, elbow and centering rings.
Caution
If using the standard PG9000 reference vacuum sensor or any
other capacitance diaphragm gauge, it is important to install in
a vertical orientation. Due to gravitational influences on the
diaphragm, installation in any other orientation may result in
out of tolerance measurements.
Establish communications to the vacuum sensor:
Connect the vacuum
sensor or the vacuum sensor display to the PG9000 base COM2 port with an
RS232 cable. See Section 3.12.5.5 for information on using an external
vacuum gauge.
Level the platform if required:
Use the PG9000 Base’s two leveling feet
and the level mounted on the front of the base. (the front foot is stationary,
and the rear feet are adjustable.)
2.3.2
Installing a Piston-Cylinder module
To operate the PG9602 platform, a piston-cylinder must be installed the mounting post.
To install a piston-cylinder assembly on the PG9602 platform, follow the sequential
procedure below. It may also be used in reverse order to remove a piston-cylinder.
Remove the PG9602 Platform mounting post plug.
Unscrew the ORANGE plastic
mounting post plug that is installed in the PG9602
mounting
post.
Rotate counterclockwise to remove.
Содержание PG9000 Series
Страница 10: ...PG9602 OPERATION AND MAINTENANCE MANUAL 2011 Fluke Calibration Page X Notes...
Страница 128: ...PG9602 OPERATION AND MAINTENANCE MANUAL 2011 Fluke Calibration Page 118 Notes...
Страница 164: ...PG9602 OPERATION AND MAINTENANCE MANUAL 2011 Fluke Calibration Page 154 Notes...
Страница 188: ...PG9602 OPERATION AND MAINTENANCE MANUAL 2011 Fluke Calibration Page 178 Notes...
Страница 192: ...PG9602 OPERATION AND MAINTENANCE MANUAL 2011 Fluke Calibration Page 182 Notes...


