


5. MAINTENANCE, ADJUSTMENTS AND CALIBRATION
Page 171
© 2011 Fluke Calibration
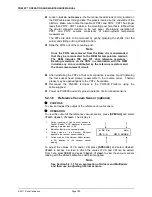
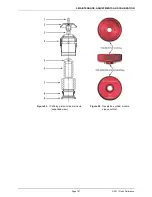
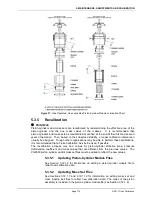
Remove the main module housing (4) by
sliding it upward leaving the piston-cylinder
and sleeve assembly behind.
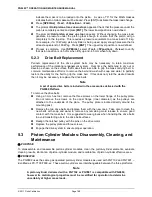
Step 4
Reinstall the piston cap (2) directly onto the
piston head (6). Using the cap as a handle,
slide the piston out of the cylinder. Take care
not to cock the piston in the cylinder at the
point at which it leaves the cylinder.
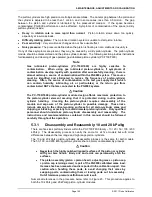
Step 5
Turn over the cylinder sleeve (7) so that the
sleeve nut (10) is facing up.
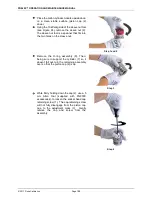
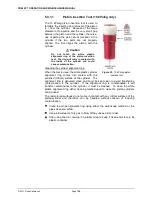
Step 6 and 7
Using the sleeve nut tool (see Figure 24),
remove the sleeve nut (5). The sleeve nut
tool is a spanner that fits into the two holes on
the sleeve nut.
Note
The 50 and 200 kPa/kg module sleeve nuts have
a right hand thread so they are loosened by
turning counter-clockwise.
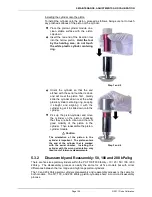
Holding the cylinder (9) in the open end of the cylinder sleeve (7), turn the cylinder
sleeve over and allow the cylinder to gently slide out.
Note
In reassembly, verify that the cylinder O-ring (8) is still located in the top of the
cylinder sleeve (7). It is recommended that a thin film of vacuum grease (Krytox®) be
applied to the top outside edge of the cylinder sleeve (7) where it mates with the main
module housing (4). This must be applied before the sleeve is inserted into the
housing. The end of the cylinder marked with the serial number must enter the main
module housing first.
Содержание PG9000 Series
Страница 10: ...PG9602 OPERATION AND MAINTENANCE MANUAL 2011 Fluke Calibration Page X Notes...
Страница 128: ...PG9602 OPERATION AND MAINTENANCE MANUAL 2011 Fluke Calibration Page 118 Notes...
Страница 164: ...PG9602 OPERATION AND MAINTENANCE MANUAL 2011 Fluke Calibration Page 154 Notes...
Страница 188: ...PG9602 OPERATION AND MAINTENANCE MANUAL 2011 Fluke Calibration Page 178 Notes...
Страница 192: ...PG9602 OPERATION AND MAINTENANCE MANUAL 2011 Fluke Calibration Page 182 Notes...


