eCO Premium™ - Installation & Maintenance
42
FläktGroup DC_9604GB_20190327_R6
Specifications are subject to alteration without notice
INSTALLATION AND FITTING INSTRUCTIONS
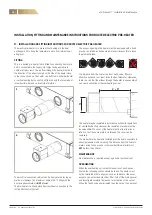
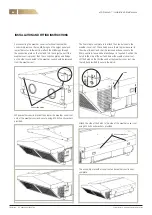
When weather cowl is present then lower the weather cover roof
onto of the weather cowl and secure using M5 bolts and washers
provided.
For connecting the weather cover roof without the weather
cowl simply remove the top M8 fixings on the spigot panel and
lower the roof onto the unit. Re-attach the M8 fixings through
the connec tion plate on the roof and into the spigot panel. If the
weather cowl is present then the connection plates and fixings
on the side to connected to the weather cowl should be removed
from the weather roof.
Connection plates
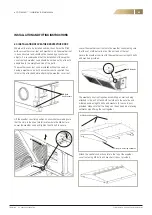
The final step to complete is to attach the side hatches to the
weather cover roof. These hatches are there to provide cover to
the side of the unit and shall be removed when access to the
filters, controls, fans and heat exchanger is required. Position the
hatch to the side of the unit and below the weather cover roof.
Lift the hatch so that it slides under the weather cover roof. Use
the latches provided to secure the hatch.
The assembly of weather cover roof and weather cowl is now
complete.
1
1
2
Latch
Attach the side of the hatch to the side of the weather cover roof
using M5 bolts and washers provided.
M5 bolts and washers
Содержание eCO Premium
Страница 1: ...INSTALLATION AND MAINTENANCE MANUAL eCO PREMIUM...
Страница 47: ......


