N.B.:
to return to the working screen press on any point of the screen, except the edges of the display or else wait three seconds without
touching anything.
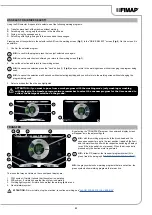
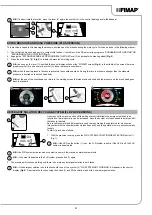
3. On the tutorial screen (
Fig.3
) select the topics you want to study:
• Using the machine.
• Daily maintenance.
• Extraordinary maintenance.
N.B.:
select the “USING THE MACHINE” key (A) to view the video explaining the stages for preparing the machine for work (
Fig.3
).
N.B.:
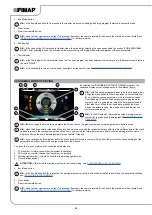
select the “DAILY MAINTENANCE” KEY (B) to view the video explaining the maintenance to be carried out every day (
Fig.3
). When
this button is selected the screen regarding the selection of the videos to view will be displayed (
Fig.4
), you can view the following video
tutorials:
• Draining and cleaning the recovery tank.
• Cleaning the vacuum tube and the squeegee body.
•
Cleaning the suction motor filter.
•
Draining and cleaning the solution tank and the water system filter.
N.B.:
select the “EXTRAORDINARY MAINTENANCE” key (C) to see the video explaining the maintenance to be carried out daily (
Fig.3
).
When this button is selected the screen regarding the selection of the videos to view will be displayed (
Fig.4
), you can view the following
video tutorials:
• Replacing the squeegee rubber blades.
• Replacing the brush head brushes.
• Adjusting the squeegee rubber blades.
VIDEO TUTORIAL
Utilizzo della macchina
Manutenzione giornaliera
Interventi straordinari
Back
3
4
C
B
A
OFFICE
0000.00
100%
ECO mode
0000.00
100%
1
2
1
2
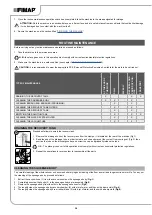
BATTERY DISCONNECT BUTTON
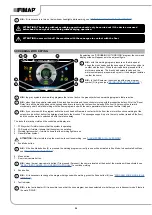
If any serious problems are encountered during the work operations, press the emergency button (1) on the electrical system's carter (
Fig.1
).
CAUTION:
This command interrupts the electrical circuit between the batteries and the machine system.
N.B.:
After having stopped and resolved the problem, the work operations can be resumed by doing the following:
• Set the main machine switch to “0” (
Fig.2
).
• Disengage the mushroom-head emergency button (1) (
Fig.3
).
• Set the main switch to "I" (
Fig.4
).
1
3
1
1
2
4
2
2
LIQUID SUCTION WAND KIT (OPTIONAL)
Upon request, the machine can be fitted with the VACUUM WAND system that vacuums up the detergent solution more accurately. To start it,
proceed as follows.
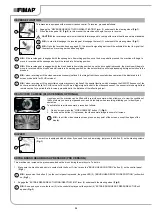
1. Lift the brush head body, and for PRO versions, press the “BRUSH HEAD CONTROL” button (1) on the control panel (
Fig.1
). For PLUS
versions, using the DS selector on the control display (
Fig.2
), select the “transfer ” program (3) (see “
”).
N.B.:
as soon as the button (1) on the control panel is pressed, the green LED (2) (“BRUSH HEAD BODY WORK POSITION”) will switch
off (
Fig.1
).
2. For PRO versions, lift the squeegee body and press the “SQUEEGEE CONTROL” button (4) on the control panel (
Fig.1
).
N.B.:
As soon as the button (4) on the control panel is pressed, the green LED (5) (“SQUEEGEE BODY WORK POSITION”) will switch
off (
Fig.1
).
3. Remove all the vacuum kit components from the storage compartment (
Fig.3
).
4. Assemble the steel extension tube (
Fig.4
).
35


