SCRUBBING WITHOUT DRYING
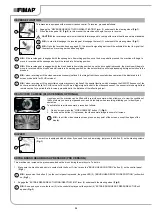
To perform a scrubbing program without drying , proceed as follows:
1. Make all the checks listed in “
2. Sit on the driver’s seat.
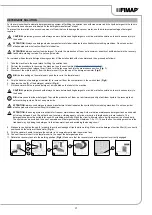
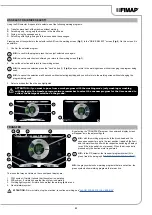
3. Move the main switch (1) to position "I" and turn the key a quarter turn clockwise (
Fig.1
).
4. Lower the brush head body and press the “BRUSH HEAD CONTROL” button (2) on the control panel (
Fig.2
).
N.B.:
as soon as the button (2) on the control panel is pressed, the green LED (3) (“BRUSH HEAD BODY WORK POSITION”) will switch
on (
Fig.2
).
5. Press the drive pedal (4) to begin moving the machine (
Fig. 3
).
N.B.:
Once the drive pedal has been pressed, the brush head body will begin to descend into its working position.
N.B.:
the gearmotor will only begin functioning, and the solenoid valve will only begin dispensing detergent solution, when the brush head
body is in its working position.
2
2
3
1
1
3
4
SCRUBBING WITH DRYING
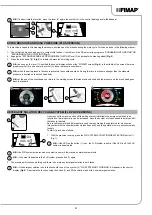
To perform a scrubbing and drying program, proceed as follows:
1. Make all the checks listed in “
2. Sit on the driver’s seat.
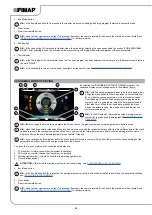
3. Move the main switch (1) to position "I" and turn the key a quarter turn clockwise (
Fig.1
).
4. Lower the brush head body and press the “BRUSH HEAD CONTROL” button (2) on the control panel (
Fig.2
).
N.B.:
as soon as the button (2) on the control panel is pressed, the green LED (3) (“BRUSH HEAD BODY WORK POSITION”) will switch
on (
Fig.2
).
5. Lower the squeegee body and press the “SQUEEGEE CONTROL” button (4) on the control panel (
Fig.2
).
N.B.:
as soon as the button (4) on the control panel is pressed, the green LED (5) (“SQUEEGEE BODY WORK POSITION”) will switch on
(
Fig.2
).
6. Press the drive pedal (6) to begin moving the machine (
Fig.3
).
N.B.:
Once the drive pedal has been pressed, the brush head body will begin to descend into its working position.
N.B.:
the gearmotor will only begin functioning, and the solenoid valve will only begin dispensing detergent solution, when the brush head
body is in its working position.
2
4
2
5
3
1
1
3
6
DRYING
To perform a drying only program, proceed as follows:
1. Make all the checks listed in “
2. Sit on the driver’s seat.
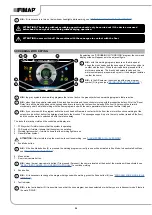
3. Move the main switch (1) to position "I" and turn the key a quarter turn clockwise (
Fig.1
).
4. Lower the squeegee body and press the “SQUEEGEE CONTROL” button (2) on the control panel (
Fig.2
).
N.B.:
as soon as the button (2) on the control panel is pressed, the green LED (3) (“SQUEEGEE BODY WORK POSITION”) will switch on
(Fig.2).
21


