CAUTION:
the following operations must be carried out by qualified personnel. An incorrect connection of the connector may cause
problems with machine functioning.
N.B.:
Carefully read the use and maintenance instructions of the battery charger that is used for charging, this document is delivered
along with the machine.
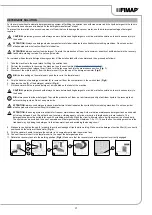
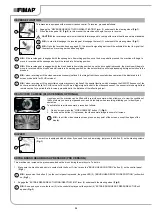
• Rotate the recovery tank until the pin in the gas spring (2) is resting on the solution tank (
Fig.3
).
• Remove the cap (3) from the battery charger socket (
Fig. 5
).
CAUTION:
before connecting the batteries to the battery charger, make sure it is suitable for the batteries used.
WARNING:
Before inserting the battery charger power cable into the socket, verify that there is no condensate or other forms of liquids.
N.B.:
The charger power cable is delivered inside the bag containing this instruction booklet.
• Plug the battery charger cable into the mains socket.
• Connect the battery charger's power cable to the socket on the battery charger itself.
CAUTION:
keep the recovery tank open for the duration of the battery recharging cycle to allow gas fumes to escape.
• When the recharge cycle is complete, disconnect the battery charger cable from the mains.
• Disconnect the battery charger's power cable from the socket on the battery charger itself.
• Reposition the cap (3) into the socket of the battery charger (
Fig.5
).
• Rotate the recovery tank into the working position (
Fig.4
). Make sure that the recovery tank retainer system is correctly engaged.
5
3
FILLING THE SOLUTION TANK
Before filling the solution tank, carry out the following steps:
1.
Take the machine to the usual place for filling the solution tank.
2. Perform the procedure for securing the machine ( see the section titled “
3.
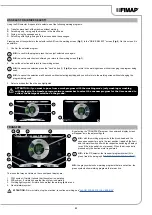
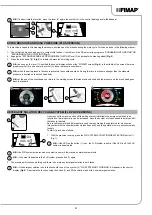
Move to the front of the machine and check that the water system filter cap (1) is tightened otherwise tighten it (
Fig.1
).
The solution tank can be filled with water in two different ways:
•
Removing the cap/measuring device (2) and filling the solution tank by means of a rubber hose or a bucket (
Fig. 2
).
•
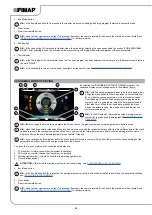
Using the filler hose (3) (
Fig.3
), which supports the water hose on its own. In this case, be sure to remove the cap/measuring device (2) in
order to allow the air to vent properly.
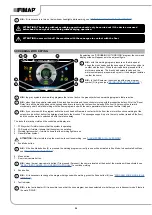
4. Fill with clean water, at a temperature no higher than 50°C (122°F) and no lower than 10°C (50°F). The amount inside the tank can be seen
by means of the level tube (4) (
Fig.4
) on the left-hand side of the machine.
2
4
3
1
1
4
3
2
16


