


CLEANING THE BRUSH HEAD BRUSHES (DUAL-BRUSH VERSION)
Careful cleaning of the brush guarantees better cleaning of the floor as well as a longer brush head gearmotor lifespan. To clean the brush,
proceed as follows:
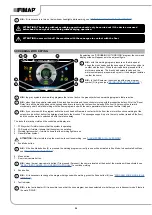
1.
Move to the left side of the machine and remove the left splash guard (1), first remember to completely unscrew the knobs (2) present on
the brush head body (
Fig.1
).
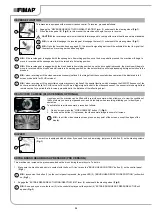
2. Press the brush locking pin (3) (
Fig.2
).
3. Keeping the pin (3) pressed, turn the brush clockwise until it is locked (
Fig.3
).
4. Turn until the button is pushed towards the outside of the coupling spring and is locked into place.
5. Clean the brush under a stream of running water to remove any impurities from its bristles. Check the wear status of the bristles and replace
the brushes if they are excessively consumed (the bristles' protrusion must not be less than 10 mm; this distance is indicated on the brush
by the yellow band). Read the paragraph “
ASSEMBLING THE BRUSH HEAD BRUSH (DUAL-BRUSH VERSION)
brushes.
6. After checking to make sure that the brush is clean, reassemble it and move on to the one on the right hand side.
N.B.:
you are advised to invert the right and left-hand brushes every day.
N.B.:
The image in
Fig.3
indicates the direction of rotation for uncoupling the left brush; the right brush must be turned in the opposite
direction.
ATTENTION:
If the brushes are not new however, and have deformed bristles, it is better to reassemble them in the same position (the
right-hand one on the right, and the left-hand one on the left), to prevent the different inclination of the bristles producing an overload on
the brush motor as well as excessive vibrations.
3
2
1
2
1
3
CLEANING THE RECOVERY TANK FILTERS
In order to clean the filters present inside the recovery tank, do the following:
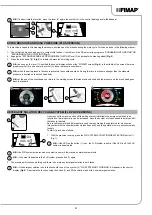
1. Stand at the back of the machine.
2. Remove the recovery tank cover (1) (
Fig.1
).
3.
Remove the float protection (2) by rotating it in the direction indicated by the arrow, and clean it under running water (
Fig.2
).
N.B.:
Use a spatula or brush to eliminate any dirt that is particularly difficult to remove.
4.
Having firstly removed the fastening clamp (4), remove the suction motor filter (3) from the support and clean it under running water (
Fig.3
).
N.B.:
Use a spatula or brush to eliminate any dirt that is particularly difficult to remove.
5.
Remove the dirty water basket/filter (5) from the support (
Fig.4
).
6.
Remove the basket cover (6) from the basket/filter (5) (
Fig.5
).
7.
Clean the basket/filter (5) and the basket cover (6) under a jet of water.
N.B.:
Use a spatula or brush to eliminate any dirt that is particularly difficult to remove.
8. When all the components that have just been washed are dry, carry out the operations just described in reverse to insert them into the
machine.
3
4
5
4
2
2
1
1
3
5
5
6
CLEANING THE RECYCLE FILTER (FLR VERSIONS)
Proceed as follows to empty the recovery tank:
1. Stand at the back of the machine.
2. Remove the recovery tank cover (1) (
Fig.1
).
3.
Remove the float protection (2) by turning it in the direction indicated by the arrow (
Fig.2
).
4.
Having firstly removed the fastening clamp (4), remove the suction motor filter (3) from the support (
Fig.3
)
5.
Remove the sediment filter (5) from the support and clean it under running water (
Fig. 4
).
N.B.:
Use a spatula or brush to eliminate any dirt that is particularly difficult to remove.
40


