REVERSE FUNCTION
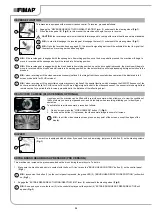
This machine is equipped with electronic traction control. To reverse, proceed as follows:
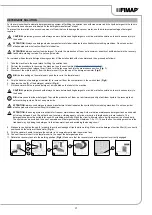
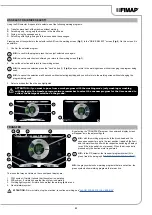
1. Engage the “REVERSE GEAR ACTIVATION/DEACTIVATION” lever (1) underneath the steering wheel (
Fig.1
).
2. Press the drive pedal (2) (
Fig.2
); in this manner the machine will begin to move in reverse.
CAUTION:
the reverse speed is lower than the forward speed to comply with current health and safety standards.
N.B.:
In order to disengage the reverse gear, disengage the lever (1) underneath the steering wheel (
Fig.1
).
N.B.:
Once the lever has been engaged (1), the acoustic signalling device will be activated in order to signal that
the machine's reverse gear has been engaged.
N.B.:
If the reverse gear is engaged with the squeegee in its working position, once the drive pedal is pressed, the machine will begin to
move in reverse and the squeegee body will be raised into its resting position.
N.B.:
If the reverse gear is engaged with the brush head in its working position, once the drive pedal is pressed, the machine will begin to
move in reverse and the brush head will remain in its working position, but the solenoid valve will stop dispensing detergent solution to the
brushes.
N.B.:
when reversing with the video camera accessory (optional), the image from the connected video camera will be displayed in full
screen mode (valid for PLUS versions).
N.B.:
when reversing with the anticollision system accessory (optional), the special function which manages the ON/OFF frequency of the
buzzer is activated (valid for PLUS versions). Every 50ms a trigger signal is sent to the ultrasound sensor, the sensor returns a signal that
remains active for a period that is inversely proportional to the distance of the reflecting object.
2
1
1
2
REAR VIDEO CAMERA (PLUS VERSION, OPTIONAL)
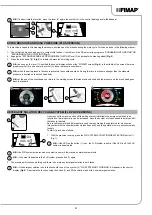
Upon request, the machine can be fitted with a rear video camera, which allows you to view the condition of
the floor where you have just passed over, and it also helps when reversing, allowing you to identify any
obstacles.
To activate the rear video camera, proceed as follows:
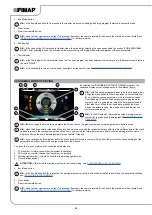
1. On any screen, press the “VIDEO CAMERA” button (1) (
Fig.1
).
2. As soon as the button (1) is pressed, the video camera image is shown full screen.
N.B.:
to exit the video camera screen, press on any point of the screen, except the edges of the
display.
DRIVE
0000.00
100%
1
1
BUZZER
The machine is equipped with a buzzer. if you need to sound a warning, just press the button (1) on the steering column
(
Fig.1
).
1
1
EXTRA BRUSH HEAD BRUSH PRESSURE (PRO VERSION)
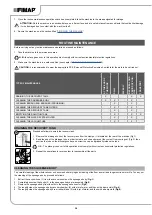
This machine can increase the pressure exerted on the brush during the work cycle. To do this:
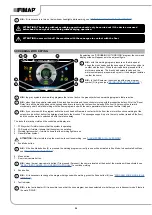
1.
Make sure the brush head body is in contact with the floor. If it isn't, press the "BRUSH HEAD CONTROL" button (1) on the control panel
(
Fig.1
).
N.B.:
as soon as the button (1) on the control panel is pressed, the green LED (2) (“BRUSH HEAD BODY WORK POSITION”) will switch
on (
Fig.1
).
2. Engage the “EXTRA-PRESSURE ACTIVATION/DEACTIVATION” lever (3) underneath the steering wheel (
Fig.2
).
N.B.:
As soon as you move the lever (3) in the control display panel the symbol (4) “EXTRA BRUSH HEAD PRESSURE ACTIVE will
appear (
Fig.3
).
30


