background image

5. Design and function 

© Festo Didactic GmbH & Co. KG • 544305


67


The controller unit can be set up flexibly through the use of several plug-in modules. 
 
The Robotino

®


PC 104 processor, compatible with MOPSlcdVE, 300 MHz, and Linux operating 
system with real-time kernel, SDRAM 128 MB 

 controller unit consists of 3 components: 


Compact flash card with C++ API for controlling Robotino


Wireless LAN access point 

®


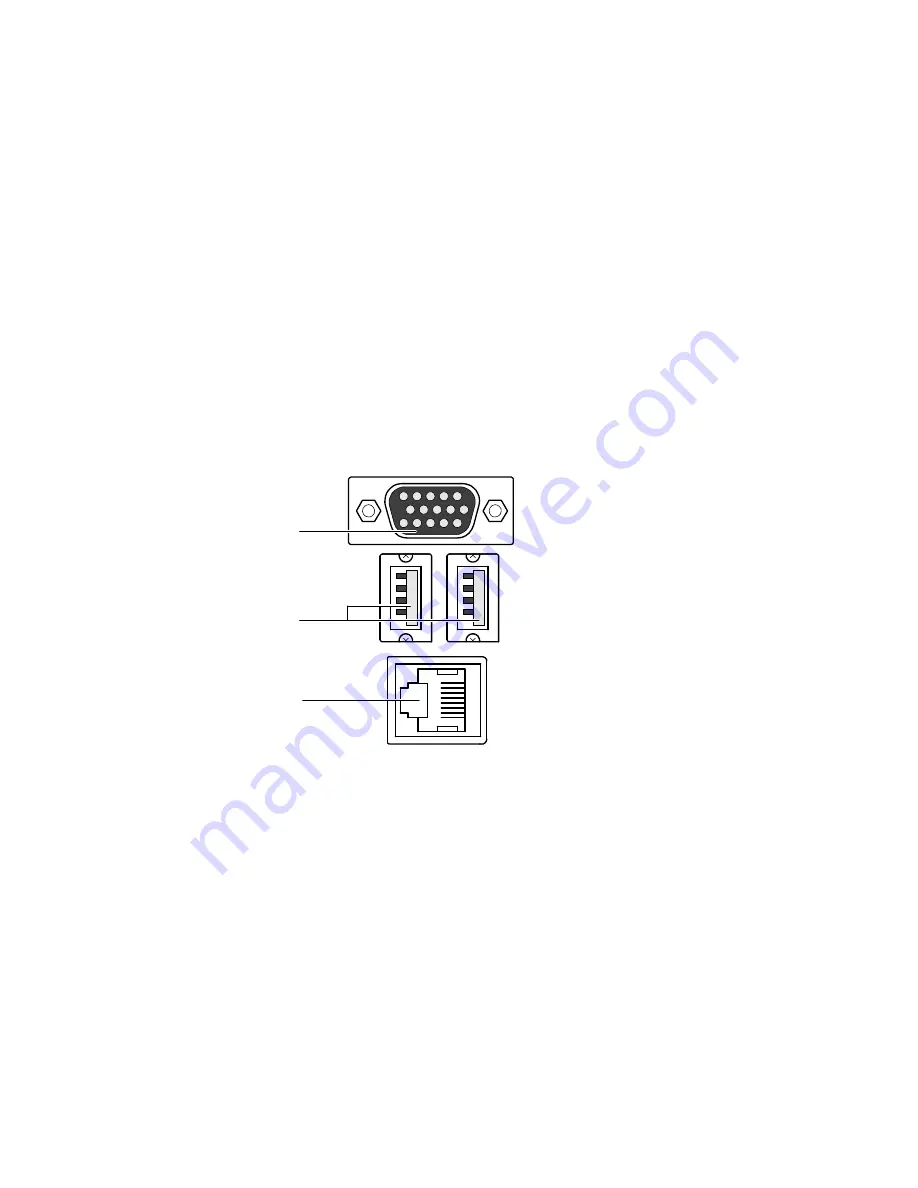
The controller unit is equipped with the following interfaces:  
Ethernet, 2 ea. USB and VGA. These are used to connect a keyboard, a mouse and a 
monitor screen. The operating system and the C++ library can thus be accessed 
without a PC, if a WLAN connection is not possible or not desired. The Ethernet 
connection cannot be used with the basic version. 
 

1

3


VGA socket connector (1)  

USB ports 1 and 2 (2) 


Ethernet interface (3) 


The I/O circuit board establishes communication between the controller unit and the 
sensors, the drive units and the I/O interface included with Robotino

®


Each of the motors in the individual drive units are controlled by a PID controller. 
Each motor can be controlled individually. 
 
Signals from the step encoder, all permanently installed sensors and all sensors and 
actuators which are connected to the I/O interface are forwarded to the controller 
unit or the additional actuators. 


5.5 
The controller unit 

5.6 
I/O circuit board module 

Содержание Robotino

Страница 1: ...544305 DE EN Robotino Handbuch Robotino Manual mit CD ROM CD ROM included ...

Страница 2: ...ng und Mitteilung seines Inhalts verboten soweit nicht ausdrücklich gestattet Zuwiderhandlungen verpflichten zu Schadenersatz Alle Rechte vorbehalten insbesondere das Recht Patent Gebrauchsmuster oder Geschmacksmusteranmeldungen durchzuführen The copying distribution and utilisation of this document as well as the communication of its contents to others without express authorisation is prohibited ...

Страница 3: ...oren ______________________________________________________20 5 9 Folientastatur und Display________________________________________24 5 10 Wireless LAN Accesspoint ________________________________________ 25 5 11 Compact Flash Karte_____________________________________________ 25 5 12 E A Schnittstelle________________________________________________26 6 Inbetriebnahme ____________________________...

Страница 4: ...68 5 8 Sensors _______________________________________________________68 5 9 Membrane keypad and display ____________________________________ 72 5 10 Wireless LAN access point ________________________________________ 73 5 11 The compact flash card___________________________________________ 73 5 12 The I O interface________________________________________________74 6 Commissioning__________________...

Страница 5: ...en folgenden Bereichen können bearbeitet werden Mechanik Mechanischer Aufbau eines mobile Robotersystems Elektrotechnik Motoransteuerung Messen und Auswerten verschiedener elektrischer Größen Sensorik Sensorgeführte Bahnsteuerung Kollisionsfreie Bahnsteuerung mittels Abstandssensoren Bahnsteuerung mittels Bildverarbeitung von Kamerabildern Regelungstechnik Antrieb omnidirektionaler Antriebe Einsat...

Страница 6: ...kterkennung und einfachem Explorationsverhalten entwickeln Zudem können folgende weiterführende Lernziele erreicht werden Die Auszubildenden können die Integration von zusätzlichen Sensoren vornehmen können von zusätzliche mechanische Vorrichtungen zum Beispiel Handhabungseinrichtungen oder eine Schussvorrichtung in das System integrieren sind fähig die Programmierung C von eigenen Navigations und...

Страница 7: ...Warnhinweise in diesem Handbuch zu lesen beauftragt sind verpflichten sich vor Arbeitsbeginn die grundlegenden Vorschriften über Arbeitssicherheit und Unfallverhütung zu beachten Das mobile Robotersystem Robotino ist nach dem Stand der Technik und den anerkannten sicherheitstechnischen Regeln gebaut Dennoch können bei ihrer Verwendung Gefahren für Leib und Leben des Benutzers oder Dritter bzw Beei...

Страница 8: ...len Robotersystem Robotino Mangelhafte Überwachung von Roboterteilen die einem Verschleiß unterliegen Unsachgemäß durchgeführte Reparaturen Katastrophenfälle durch Fremdkörpereinwirkung und höhere Gewalt Festo Didactic schließt hiermit jegliche Haftung für Schäden des Auszubildenden des Ausbildungsunternehmens und oder sonstiger Dritter aus die bei Gebrauch Einsatz des mobilen Robotersystems Robot...

Страница 9: ... Garantie Verwenden Sie ausschließlich original Ersatzteile Vor dem Wechsel der Speicherkarte CF Card Robotino ausschalten Akkus immer in Reihe laden 12V 12V nach dem Laden Ladegerät von Robotino trennen Sollte das Ladegerät von Netz getrennt werden jedoch mit Robotino verbunden bleiben können die Akkus über das Ladegerät entladen zerstört werden Mechanik Transportieren Sie den Robotino Montieren ...

Страница 10: ...10 Festo Didactic GmbH Co KG 544305 Parameter Wert Spannungsversorgung 24 VDC Digitale Eingänge 8 Digitale Ausgänge 8 Analoge Eingänge 8 0 10 VDC Relais Ausgänge 2 3 Technische Daten ...

Страница 11: ...no darauf dass keine Teile beschädigt werden Fassen Sie den Robotino immer an den beiden Haltegriffen um eine Beschädigung der Kommandobrücke der Elektronik und des Kollisionsschutzsensors zu vermeiden 1 2x Haltegriffe 1 Nach dem Auspacken muss der Robotino auf mögliche Beschädigungen überprüft werden Beschädigungen sind unverzüglich dem Spediteur und Festo Didactic zu melden Lieferumfang Prüfen S...

Страница 12: ...erung des Robotino kann über die Software Robotino View von einem PC über ein Wireless LAN direkt vorgenommen werden Mit Robotino View können Signale an die Motorsteuerung gesendet werden Sensorwerte angezeigt verändert oder ausgewertet werden Mit Robotino View kann der Robotino direkt sogar im laufenden Betrieb programmiert werden Zusätzlich steht eine Linux und eine C API zur Verfügung um eine P...

Страница 13: ...5 Aufbau und Funktion Festo Didactic GmbH Co KG 544305 13 Das Chassis besteht aus einer lasergeschweißten Edelstahlplattform 1 2x Haltegriffe 1 5 2 Chassis und Kommandobrücke ...

Страница 14: ...d die Akkus die Antriebseinheiten und die Kamera montiert Dort befinden sich auch die Abstandssensoren und der Kollisionsschutzsensor Das Chassis bietet zusätzlich Raum und Befestigungsmöglichkeiten für weitere Aufbauten Sensoren oder Aktoren 3 2x 2 3x Antriebseinheit 2 Batterie 3 ...

Страница 15: ...4305 15 Die hochempfindlichen Elemente des Systems wie Steuerung E A Modul oder die Schnittstellen befinden sich in der Kommandobrücke Die Kommandobrücke wird durch eine Steckverbindung mit den anderen Einheiten verbunden 4 5 Kommandobrücke 4 Kamera 5 ...

Страница 16: ...omponenten Gleichstrommotor Getriebe mit einer Übersetzung von 16 1 Allseitenrolle Zahnriemen Inkrementalgeber 1 2 3 4 5 Motor 1 Inkrementalgeber 2 Allseitenrolle 3 Getriebe 4 Zahnriemen 5 Alle Einzelkomponenten sind auf dem hinteren Befestigungsflansch montiert Zusammen mit dem vorderen Flansch wird die Antriebseinheit durch Schrauben am Chassis befestigt So wird die korrekte Lage der Antriebsein...

Страница 17: ...drehzahl rpm 3600 Nenndrehmoment Ncm 3 8 Nennstrom A 0 9 Anlaufmoment Ncm 20 Anlaufstrom A 4 Leerlaufdrehzahl rpm 4200 Leerlaufstrom A 0 17 Entmagnetisierstrom A 6 5 Trägheitsmoment gcm2 71 Motorgewicht g 390 Planetengetriebe PLG 42 S 1 stufig Nm 3 5 1 stufig i 4 1 8 1 2 stufig Nm 6 2 stufig i 16 1 64 1 3 stufig Nm 14 3 stufig i 100 1 512 1 Allseitenrolle angetrieben ARG 80 Durchmesser Ø 80 mm Max...

Страница 18: ...en gleicher Farbe in einem Bild und kann die Position und Größe eines Segmentes ermitteln Linien im Videobild können erkannt werden Die Ergebnisse können zur Lokalisierung von Objekten und zur Bahn und Objektverfolgung eingesetzt werden Technische Daten Bildsensor CMOS Farbsensor mit VGA Auflösung Farbtiefe 24 Bit True Colour Schnittstelle USB 1 1 Auflösungen Video 160 x 120 30 Bilder Sek SQCGA 17...

Страница 19: ...ssystem und die C Bibliothek zugegriffen werden wenn keine WLAN Verbindung möglich oder gewünscht ist Der Ethernet Anschluss kann in der Basisversion nicht genutzt werden 1 2 3 VGA Adapter 1 USB Port 1 und 2 2 Ethernet Schnittstelle 3 Die E A Platine realisiert die Kommunikation der Steuerungseinheit mit den Sensoren des Robotino den Antriebseinheiten und der E A Schnittstelle Die Ansteuerung der ...

Страница 20: ...eines Objekts zwischen 4 und 30 cm Seine Besonderheit ist sein einfache Anschluss der nur aus Stromversorgung und einem analogen Ausgangssignal besteht Seine Auswertelektronik misst die Entfernung und gibt sie über ein Analogsignal aus Mit dem Inkrementalgeber wirt die tatsächliche Drehzahl jedes einzelnen Motors gemessen Über eine PID Regelung deren Parameter in der Software Robotino View eingest...

Страница 21: ... kann eine Bahnverfolgung differenziert geregelt werden Der induktive Näherungsschalter muss auf der vorgesehenen Befestigungsmöglichkeit montiert werden und an die E A Schnittstelle angeschlossen werden Technische Daten Betriebsspannung 15 30 V DC Ausgangsspannung 0 10 V Typ SIEA M12B UI S Teilenummer 538292 Durchmesser M12 Erfassungsbereich 0 6 mm Einbauart Quasi bünding Schaltfrequenz 1000 Hz U...

Страница 22: ...eitet mit sichtbarem Rotlicht Das reflektierte Licht wird nachgewiesen Unterschiedliche Oberflächen und Farben ändern den Reflexionsgrad Ein gradueller Unterschied im reflektierten Licht kann jedoch nicht nachgewiesen werden Die Sensoren müssen auf den vorgesehenen Befestigungsmöglichkeiten montiert werden und an die E A Schnittstelle angeschlossen werden Inkrementalgeber 1 Stoßleiste Kollisionssc...

Страница 23: ... identifizierbar sein Aus der nachfolgenden Zeichnung kann diese Zuordnung entnommen werden IR1 wird in der Software als Sensor Abstand 1 angesprochen Analog sind die weiteren Abstand 2 Abstand 9 benannt Die Inkrementalgeber sind den jeweiligen Antriebsmodulen zugeordnet IR6 IR5 M2 IR4 IR3 M1 IR9 IR1 IR2 IR3 M3 IR8 SL IR7 Zuordnung der Sensoren IR1 IR9 Abstandssensoren 1 9 M1 M3 Motoren 1 3 SL Sto...

Страница 24: ...nen eingestellt Informationen abgerufen oder mitgelieferte Programme aufgerufen werden können Anzeigentext Beschreibung Robotino 172 26 1 1 Robotino V2 0 IP Adresse Software Version Enter 1 2 3 6 7 5 4 Display 1 LED 2 Ein Aus 3 Menüebene nach oben 4 Auswahl nach unten 5 Auswahl übernehmen 6 Auswahl nach oben 7 5 9 Folientastatur und Display Beispiel Startanzeige ...

Страница 25: ...werksicherheit durch WEP Verschlüsselung und WPA PSK Funktion Er ist schnell und einfach über die Web Management Utility zu konfigurieren Die Steuerungseinheit ist mit einem PC Card Steckplatz ausgerüstet in die eine PC Card eingesteckt ist Auf dieser PC Card befinden sich das Betriebssystem die Funktionsbibliotheken und die mitgelieferten Programme Updates können problemlos durchgeführt werden in...

Страница 26: ...ale Eingänge DI0 DI7 8 digitale Ausgänge DO0 DO7 2 Relais für zusätzliche Aktoren REL0 und REL1 Die Relais können als Öffner NC oder Schließer NO an den gemeinsamen Kontakt CO angeschlossen werden DO2 24V 24V DI0 DI2 GND DI1 DI3 DO0 DO1 24V AIN5 AIN7 AIN4 AIN6 REL0_NC REL0_CO REL0_NO DO3 GND DO6 24V 24V DI4 DI6 GND DI5 DI7 DO4 DO5 24V AIN1 AIN3 AIN0 AIN2 REL1_NC REL1_CO REL1_NO DO7 GND Kontaktbele...

Страница 27: ...ie Befestigungsmöglichkeit für den induktiven Sensor befindet Hindernisse müssen bis auf den Untergrund reichen da sonst der Kollisionsschutzsensor nicht anspricht Das gleiche gilt für die Abstandssensoren Dies ist wichtig da sonst eine Beschädigung des Robotino entstehen kann Schließen Sie als nächstes das Ladegerät an das entsprechende Kabel der Batterien an Das Kabel befindet hinter der Antrieb...

Страница 28: ...altknopf bis die LED erlischt Anschließend müssen Sie die Taste loslassen Der Robotino ist erst abgeschaltet wenn die Taste losgelassen wird Hauptmenü Durch Drücken der Enter Taste gelangen Sie in das Hauptmenü Die Anzeige ist in ihrem Ursprungszustand in englischer Sprache Das Hauptmenu enthält die folgenden Menüpunkte Sprachen Ladezustand DEMOs Netzwerk Mit den Tasten Pfeil nach oben oder Pfeil ...

Страница 29: ...em Menü wird die aktuelle IP Adresse angezeigt und kann geändert werden Mit der Enter Taste wird der Cursor Pfeilspitze nach rechts und mit der Pfeil nach links Taste nach links bewegt Mit den Pfeil nach oben unten Tasten kann der Wert der einzelnen Zahlen vergrößert oder verkleinert werden Um das Menü wieder zu verlassen fahren Sie mit der Pfeil nach links Taste zur ersten Ziffer Durch ein weiter...

Страница 30: ...m Zeitliche Begrenzung 10 s Programm beenden Siehe oben Vorwärts Der Robotino fährt geradeaus vorwärts Benötigter Platz Eine gerade Strecke von 1 m Zeitliche Begrenzung 10 s Programm beenden Siehe oben Viereck Der Robotino fährt ein Rechteck und dreht sich um die eigene Achse 1 m x 1m Zeitliche Begrenzung Keine Programm beenden Siehe oben Erkunden Der Robotino fährt geradeaus und weicht vorhandene...

Страница 31: ...n Beispiel Programme zu nutzen Zu jedem Funktionsbaustein finden Sie in der Kontext Hilfe von RobotinoView weitere Informationen und Beispiele Ab Version 2 0 können Sie RobotinoView Programme Dateiendung rvw2 per Mausklick auf Robotino übertragen und ausführen Robotino wird somit zum autonomen Roboter Bitte achten Sie darauf stets die aktuelle Version von RobotinoView auf Ihrem PC und Robotino Spe...

Страница 32: ...beaufforderung Sie befindet sich im Startmenü unter Programme Zubehör Klicken Sie auf Eingabeaufforderung Alternativ können Sie im Startmenü unter Ausführen den Befehl cmd eingeben Geben Sie nun an der Eingabeaufforderung den Befehl ping mit der IP Adresse die Sie vom Robotino Display abgelesen haben ein Zum Beispiel ping 172 26 1 1 Besteht eine WLAN Verbindung erhalten Sie folgende Meldungen C pi...

Страница 33: ... Eingabeaufforderung den Befehl ipconfig all ein und drücken Sie die Eingabetaste Ist eine Verbindung zum Robotino hergestellt erhalten Sie folgende Informationen Je nach Typ Ihres WLAN Netzwerks sind hier jedoch Unterschiede möglich Suchen Sie unter den verschiedenen Netzwerkeinstellungen die Einstellungen für Wireless Network Connection Die angezeigten Informationen können beispielsweise folgend...

Страница 34: ...üfung der WLAN Verbindung mit Robotino Starten Sie die Software Robotino View View Geben Sie in der Zeile 2 die IP Adresse des Robotino ein Klicken Sie auf das Antennensymbol 1 rechts neben der Eingabezeile für die IP Adresse WLAN Verbinden 1 IP Adressleiste 2 ...

Страница 35: ...tte auf die Webcam des Robotino zu Schließen Sie dazu die Webcam über die rechte der beiden USB Schnittstellen an der Kommandobrücke an Öffnen Sie eine neue Arbeitsfläche indem Sie auf das Symbol 1 hierfür in der Werkzeugleiste klicken Öffnen Sie nun den Ordner Robotino Ziehen Sie dann das Kamerasymbol 3b mit gedrückter Maustaste auf die Arbeitsfläche Hardware 4 indem Sie ihn anklicken Klicken Sie...

Страница 36: ...6 Inbetriebnahme 36 Festo Didactic GmbH Co KG 544305 Neues Arbeitsblatt 1 Programmstart 2 Webcam 3a und 3b Robotino Hardware 4 Kamerafenster 5 ...

Страница 37: ...in Vorteil ist hierbei dass alle Robotinos die gleiche IP Adresse haben können weil jeder sein eigenes Netzwerk bildet So kann von Jedem PC auf unterschiedliche Robotinos zugegriffen werden ohne die IP Adresse ändern oder ermitteln zu müssen Der Nachteil dieser Betriebsart ist dass verschiedene WLAN Netzwerke Kollisionen verursachen können wenn ihre Übertragungskanäle zu dicht beieinander liegen F...

Страница 38: ... folgende Sie den Hinweisen auf dem Display Der Wechsel dauert bis zu 60 Sekunden In diesem Fall wird ein zentraler WLAN Accesspoint benötigt der an ein lokales Ethernet Netzwerk angeschlossen wird Vorteil Es könne beliebig viele Robotinos Nachteil Jeder Robotino in einem Netzwerk arbeiten benötigt eine eigene IP Adresse diese muss über die Folientastatur des Robotino eingegeben werden kann Auch d...

Страница 39: ...ccesspoint von außen erreichbar Mit dem Robotino werden 2 zusätzliche Batterien geliefert Die während des Betriebs verbrauchten Batterien können ausgetauscht und die leeren Batterien können wieder aufgeladen werden So kann der Robotino weiter in Betrieb bleiben Zum Laden stellen Sie bitte beide Batterien so nebeneinander dass ein rot markierter Pluspol neben einem schwarzen Minuspol zu liegen komm...

Страница 40: ...rung Sind die Akkus vollständig leer müssen diese wieder geladen werden um eine einwandfreie Funktion des Robotino zu gewährleisten Sind die Akkus nicht ausreichend geladen funktionieren beispielsweise die Antriebseinheiten eventuell ungleichmäßig 4 1 3 2 Plusklemme rot 1 blaues Verbindungskabel 2 Minusklemme schwarz 3 Rastklemme 4 Zum Lösen der Kabelverbindung müssen Sie die Rastklemme des Stecke...

Страница 41: ...ter der Kommandobrücke um ihre Befestigung am Chassis zu lösen Ziehen Sie die Kommandobrücke nach oben ab und legen Sie sie vorsichtig beiseite Lösen Sie die Kabelschuhe von den Laschen des Minus und des Pluspols Öffnen Sie die Batteriebefestigung Drücken Sie hierzu die beiden Enden der Spange 1 an der Oberseite der Befestigungsvorrichtung nach unten und biegen Sie die beiden Befestigungsbügel 2 n...

Страница 42: ...ndes Achten Sie darauf dass keine Kabel durch die Batterie eingeklemmt werden Beide Pole der Batterien müssen zum Zentrum des Robotino Die Kabel müssen folgendermaßen an die Pole der Batterie angeschlossen werden zeigen Das Kabel mit dem schwarzen Kabelschuh muss an den Minuspol schwarz links angeschlossen werden Das Kabel mit dem roten Kabelschuh muss an den Pluspol rot rechts angeschlossen werde...

Страница 43: ...ommandobrücke 1 von hinten an die Befestigungsbleche 3a und 3b des Chassis heran Drücken Sie die Kommandobrücke dann mit sanftem Druck nach unten um sie auf dem Verbindungsstecker einzustecken Schrauben Sie die Kommandobrücke unbedingt wieder fest 1 2a 2b 3a 3b Kommandobrücke 1 Zentrierblech 2a und 2b Befestigungsblech 3a und 3b ...

Страница 44: ...andfreie Funktion zu gewährleisten Schrauben Sie den Lichtleiterkopf in die Halterung ein bis er auf der gegenüberliegenden Seite ca 2 mm übersteht Fixieren Sie ihn mit der mitgelieferten Mutter Achten Sie darauf dass sich beide Sensoren später auf der Seite der Schlitze befinden die sich gegenüberliegen Nur so können Sie den Abstand der Sensoren zueinander verändern Stecken Sie nun die freien End...

Страница 45: ...kopf im zugehörigen Schlitz befindet Montieren Sie nun das Lichtleitergerät 4 am Montageblech des Robotino Schrauben Sie es mit den mitgelieferten Schrauben 5 an den beiden dafür vorgesehenen Gewindebohrungen fest Induktiver Analogsensor Der analoge induktive Sensor wird in der fest eingebauten Befestigungsvorrichtung lediglich eingespannt Lösen Sie hierzu die Rändelschraube an der Befestigungsvor...

Страница 46: ...ogramme in einer Linux Version Sie können mit dem Linux eigenen Editor bearbeitet werden Grundsätzlich bestehen zwei Möglichkeiten auf die Funktionen Bibliotheken und Beispielprogramme auf dem PC 104 zuzugreifen Die eine Möglichkeit besteht darin mit einem Terminalprogramm über eine WLAN Verbindung auf die Linux Umgebung des PC 104 zuzugreifen Die zweite Möglichkeit besteht darin Tastatur und Bild...

Страница 47: ... beiden Fällen befinden Sie sich dann im home Verzeichnis des Benutzers robotino der Linux Umgebung des PC 104 Von hier aus können Sie auf alle Programme Quellcodes und Bibliotheken zugreifen Im Verzeichnis examples die Beispielprogramme des Robotino mit ihrem Quelldaten und einer kompilierten Version Das Programm Kreis Circle Wechseln Sie in das Verzeichnis robotino examples circle und führen Sie...

Страница 48: ...pdf Lichtleitersensor 165327_Lichtleitergeraet_SOEG_L pdf 165358_Lichtleiter_Reflex_SOEZ_RT pdf 369669_Lichtleitergeraet pdf 369682_Lichtleiter_RT pdf Kollisionsschutzsensor Kollisionsschutz pdf WLAN Access Point WAP 0004 Manual pdf WAP 0004 DataSheet pdf Sicherungen Sicherungen_Robotino Webcam Windows Hilfedatei _Datenblatt pdf Webcam Live Handbuch Deutsch chm Steuereinheit D_MOPSlcdSE_SE_w_STPC_...

Страница 49: ...itor direkt an Robotino anschließen Auf Fehlermeldung prüfen Kunstoffabdeckung vorsichtig öffnen Sichtpürfung der Kabel Robotino ausschalten Speicherkarte komplett in Robotino einschieben Speicherkarte von anderem Robotino testen Daten der Speicherkarte neu beschreiben Fehlermeldung dem Support mitteilen Support kontaktieren 3 Die Verbindung zu Robotino bricht sehr oft zusammen Laptop WLAN Karte v...

Страница 50: ...geben worden Ihr Laptop hat die IP nicht automatisch bezogen eine falsche feste IP eingestellt Robotino verwendet eine IP außerhalb des korrekten IP Bereiches erhält keine IP vom DHCP Menü Netzwerk DHCP Verbinden Sie sich zu einem bekannten Netzwerk anderen Robotino Stellen Sie sicher dass Ihr PC oder ein anderer Robotino nicht die identische IP verwendet Starten Sie unter DOS den Befehl ipconfig ...

Страница 51: ...oint im Robotino befindet sich im CL Mode und hat sich noch nicht mit einem externen AccessPoint verbunden Das Display ist noch nicht aktualisiert Öffnen Sie die Konfigurationsseite des externen AccessPoint z B http 172 26 101 2 und überprüfen Sie die SSID des externen AccessPoint und die verbundenen Teilnehmer die MAC Adresse steht auf dem AccessPoint PC104 von Robotino Um Rechenleistung zu spare...

Страница 52: ...hbewegungen auszuführen dies ist besonders bei größeren Stecken enorm wichtig Netzwerkkarten Option network switch für Ein Ausgangskarte EA09 Direkte Erreichbarkeit von IO Platine PC104 AccessPoint und Laptop u a zum hochfrequenten Analyse der PID Controller Hardware in the Loop direkte Programmierung des Microporzessors Externer AccessPoint Durch die Verwendung eines externen AccessPoints können ...

Страница 53: ...ts covering the following subjects can be taught Mechanics Mechanical construction of a mobile robot system Electrical Control of drive units Correct wiring of electrical components Sensors Sensor guided path control Collision free path control with distance sensors Path control by image processing of webcam pictures Feedback control systems Control of omnidirectional drives Use of communication i...

Страница 54: ...he following additional training aims can be achieved using object recognition for example by colour mounting and integration of additional sensors into the mobile robot system Robotino can mount and integrate handling devices into the system are able to program their own navigation and control algorithms using a C library create a autonomous navigation of the Robotino The basic requirement for sa...

Страница 55: ...ino read the chapter on safety and the cautionary notes in this manual and have a duty to observe the basic regulations regarding operational safety and the prevention of accidents The Robotino is designed according to state of the art technology and in compliance with recognised safety regulations However when using the system there is nevertheless a risk of physical or fatal injury to the user o...

Страница 56: ...tructional modifications on the Robotino Inadequate monitoring of components subject to wear Incorrectly carried out repairs Catastrophies as a result of foreign bodies and vis major Festo Didactic herewith rules out any liability for damage or injury to trainees the training company and or other third parties which may occur during the use operation of the system other than purely in a training s...

Страница 57: ...on safety under the supervision of an instructor Electrics Electrical connections are to be wired up or disconnected only when power is disconnected Use only low voltages of up to 24 V DC Mechanics Move the Robotino Securely mount all components on the chassis only by carefully seizing it by its handles No manual intervention unless the Robotino is at rest 2 Notes on safety ...

Страница 58: ...58 Festo Didactic GmbH Co KG 544305 Parameter Value Voltage supply 24 V DC 4 5 A Digital inputs 8 Digital outputs 8 Analogue inputs 8 0 10 V Relais outputs 2 3 Technical data ...

Страница 59: ... When unpacking the Robotino make sure that none of the Robotino assemblies have been damaged Always seize the Robotino by the two handles to avoid any damage to the command bridge electronics and collision protection sensor 1 2x Handle 1 Check the Robotino for any possible damaged once unpacked The carrier and Festo Didactic are to be notified immediately of any damage Scope of delivery Check the...

Страница 60: ...applications can be started directly at the Robotino control panel Robotino can be programmed with Robotino View software at a PC via wireless LAN Robotino View is capable of transmitting signals to the motor controller as well as displaying changing and evaluating sensor values Robotino can even be programmed during actual operation with Robotino View Linux and C APIs are also available for progr...

Страница 61: ...5 Design and function Festo Didactic GmbH Co KG 544305 61 The chassis consists of a laser welded stainless steel platform 1 2x Handle 1 5 2 Chassis and command bridge ...

Страница 62: ...ies the drive units and the camera are mounted to the chassis where the distance measuring sensors and the anti collision sensor are also located The chassis offers additional space and mounting options for other attachments sensors and or actuators 3 2x 2 3x Drive unit 2 Battery 3 ...

Страница 63: ...305 63 Highly sensitive system components such as the controller the I O module and the interfaces are situated on the command bridge The command bridge is connected to the other system modules by means of a plug connector 4 5 Command bridge 4 Camera 5 ...

Страница 64: ...ar unit with a gear ratio of 16 1 All way roller Toothed belt Incremental encoder 1 2 3 4 5 Motor 1 incremental encoder 2 all way roller 3 gear unit 4 toothed belt 5 All of the individual components are attached to the mounting flange at the rear Together with the flange at the front the drive unit is secured to the chassis with screws Correct positioning of the drive units in relationship to each...

Страница 65: ...d RPM 3600 Nominal torque Ncm 3 8 Nominal current A 0 9 Starting torque Ncm 20 Starting current A 4 No load speed RPM 4200 No load current A 0 17 Demagnetisation current A 6 5 Mass moment of inertia gcm2 71 Motor weight gr 390 Planetary gear unit PLG 42 S Single stage Nm 3 5 Single stage i 4 1 8 1 2 stage Nm 6 2 stage i 16 1 64 1 3 stage Nm 14 3 stage i 100 1 512 1 All way roller driven ARG 80 Dia...

Страница 66: ...no controller A segmenter locates surfaces of like colour within a given image and can determine the position and size of any segment Lines in video images can be detected Results can be utilised for pinpointing objects as well as for path and object tracking Technical Specifications Image Sensor Colour VGA CMOS Colour Depth 24 Bit True Colour PC connection USB 1 1 Video resolutions 160 x 120 30fp...

Страница 67: ... and the C library can thus be accessed without a PC if a WLAN connection is not possible or not desired The Ethernet connection cannot be used with the basic version 1 2 3 VGA socket connector 1 USB ports 1 and 2 2 Ethernet interface 3 The I O circuit board establishes communication between the controller unit and the sensors the drive units and the I O interface included with Robotino Each of th...

Страница 68: ...ts to objects at distances of 4 to 30 cm Sensor connection is especially simple including just one analogue output signal and supply power The sensors evaluation electronics determine distance and read it out as an analogue signal The actual speed of each individual motor is measured in RPM by the incremental encoder If actual motor speed deviates from the setpoint it can be adjusted to match the ...

Страница 69: ...acking can thus be controlled in a differentiated fashion The inductive proximity sensor must be attached to the mounting furnished for this purpose and must be connected to the I O interface Technical data Operating voltage 15 30 V DC Output voltage 0 10 V Type SIEA M12B UI S Part no 538292 Diameter M12 Sensing range 0 to 6 mm Mounting Quasi embeddable Switching frequency 1000 Hz Ambient temperat...

Страница 70: ...ks with visible red light Reflected light is detected Different surfaces and colours produce different degrees of reflection However gradual differences in reflected light cannot be detected The sensors must be attached to the mountings furnished for this purpose and must be connected to the I O interface Incremental encoder 1 Impact strip anti collision sensor 2 Distance measuring sensors 3 Diffu...

Страница 71: ...n a targeted fashion The respective designations are included in the figure below IR1 is addressed as Distance 1 in the software In a like fashion the other infrared sensors are designated Distance 2 through Distance 9 The incremental encoders are assigned to their respective drive units IR6 IR5 M2 IR4 IR3 M1 IR9 IR1 IR2 IR3 M3 IR8 SL IR7 Sensor assignments IR1 to IR9 distance measuring sensors 1 ...

Страница 72: ...ected information can be queried and included programs can be started Display text Description Robotino 172 26 1 1 Robotino V2 0 IP address Software version Enter 1 2 3 6 7 5 4 Display 1 LED 2 on off 3 shift up one menu level 4 scroll down one selection 5 acknowledge selection 6 scroll up one selection 7 5 9 Membrane keypad and display Example of an initial display ...

Страница 73: ...smission range up to 100 m inside of buildings It assures reliable network security with WEP encryption and WPA PSK function It s fast and simple to configure via the web management utility The controller unit is equipped with a slot into which a PC card has already been inserted This PC card contains the operating system the functions libraries and the included programs Updates can be easily inst...

Страница 74: ... DI0 to DI7 8 digital outputs DO0 to DO7 2 relays for additional actuators REL0 and REL1 The relays can be connected to the common contact CO as Normally Closed NC or normally open NO to the contacts DO2 24V 24V DI0 DI2 GND DI1 DI3 DO0 DO1 24V AIN5 AIN7 AIN4 AIN6 REL0_NC REL0_CO REL0_NO DO3 GND DO6 24V 24V DI4 DI6 GND DI5 DI7 DO4 DO5 24V AIN1 AIN3 AIN0 AIN2 REL1_NC REL1_CO REL1_NO DO7 GND I O inte...

Страница 75: ...he distance sensor 1 and the mounting facility for the inductive sensor are located Any obstacles must extend as far as the ground since otherwise the collision protection sensor will not respond The same applies in the case of the distance sensors This is particularly important since otherwise damage may be caused to the Robotino Next connect the battery charger to the appropriate cable of the ba...

Страница 76: ...d an unwanted start of for example a demo program Switching off Press the On Off button until the LED is extinguished and then release the button The Robotino is not switched off until the button is released Main menu Press the Enter key to access the main menu In its original status the display is in English It contains the following menu items Languages State of charge DEMOs Network Using the Up...

Страница 77: ...the main menu again press the Left arrow key Press the Enter key again at the last digit of the IP address to access the next display the subnet mask Proceed as in the case of the IP address When you are on the last digit of the subnet mask your changes to the IP address and subnet mask will be copied by pressing the Enter key again First check the functioning of the demo programs in the jacked up...

Страница 78: ... on the position of the obstacles the Robotino changes its direction of travel in different ways Required space Any Time limit None End program See above Distance sensors 1 2 and 9 are used to detect obstacles This is why the program cannot be stopped via the bumper within the coverage range of these sensors as the Robotino takes evasive action Follow line The camera of the Robotino must be connec...

Страница 79: ... card A WLAN connection must be established to enable you to control the Robotino with Robotino View Since different WLAN hardware and software is available it is not possible to describe the correct set up and preparation of your WLANs in detail Activate your WLAN Your WLAN setting must permit the assignment of an IP address to the WLAN Only then can the access point in the Robotino establish a c...

Страница 80: ...ing 172 26 1 1 Ping is executed for 172 26 1 1 with 32 bytes of data Response from 172 26 1 1 Bytes 32 time 4ms TTL 64 Response from 172 26 1 1 Bytes 32 time 2ms TTL 64 Response from 172 26 1 1 Bytes 32 time 3ms TTL 64 Response from 172 26 1 1 Bytes 32 time 6ms TTL 64 Ping statistics for 172 26 1 1 Packages Sent 4 received 4 lost 0 0 loss Approx time specifications in milliseconds Minimum 2ms maxi...

Страница 81: ...ction to the Robotino is established you will receive the following information However different options are possible here depending on the type of your WLAN adapter Find the setting for wireless network connection under the various network settings Ethernet adapter wireless network connection Connection specific DNS Suffix Description Dell Wireless 1470 Dual Band WLAN Mini PCI card Physical addr...

Страница 82: ...H Co KG 544305 Checking the WLAN connection with Robotino Start the Robotino View View software Enter the IP address of the Robotino in line 2 Click onto the aerial symbol 1 to the right of the input line Connecting WLAN 1 IP Address bar 2 ...

Страница 83: ...d all Robotino units directly By way of a simple example now access the webcam of the Robotino To do so connect the webcam to the command bridge via the USB interface Open a new worksheet by clicking onto the symbol 1 in the toolbar Now open the Robotino Drag the camera symbol 3a onto the desktop by holding down the mouse button hardware folder 2 by clicking it Click onto the green arrow in the to...

Страница 84: ...6 Commissioning 84 Festo Didactic GmbH Co KG 544305 New worksheet 1 Program start 2 Webcam 3 Robotino hardware 4 Camera window 5 ...

Страница 85: ... of the Robotino can be operated in the AP mode described above One advantage of this is that all Robotinos can share the same IP address since each one forms its own network It is therefore possible to access different Robotinos from each PC without the need to change or establish the IP address The disadvantage of this mode of operation is that different WLAN networks can cause collisions if the...

Страница 86: ...e in the Network WLAN menu follow the instructions on the display It can take up to 60 seconds to change mode In this case a central WLAN access point is required which is connected to a local Ethernet network Advantage Any number of Robotinos Disadvantage Each Robotino can operate in one network requires its own IP address which must be entered via the touch sensitive keyboard of the Robotino Als...

Страница 87: ...ries which have been depleted during use can be replaced and recharged while the second set is being used Robotino can thus be operated without interruption In order to charge the batteries set them next to each other such that the positive terminal of one battery identified in red and the negative terminal of the other battery identified in black are directly next to each other Connect these two ...

Страница 88: ...If the rechargeable batteries are completely empty these must be recharged again to ensure the correct functioning of the Robotino If the batteries are not sufficiently charged the functioning of the drive units may be erratic 4 1 3 2 Positive terminal red 1 Blue connector cable 2 Negative terminal black 3 latch 4 The latch in the plug on the end of the battery charging cable must be pressed while...

Страница 89: ...two hexagon socket head screws from the centring plates underneath the command bridge in order to dismantle it from the chassis Pull the command bridge up and out and set it carefully aside Disconnect the cable lugs from the negative and positive battery terminals Open the battery holder Press down both ends of the clasp 1 on the top of the battery holder to this end and bend out the two retaining...

Страница 90: ...ry cables are trapped underneath the batteries or between the batteries and the battery holders Both of the battery terminals must point towards the centre of the Robotino The cables must be connected to the battery terminals as follows The black cable must be connected to the negative terminal on the left black The red cable which is secured to the clasp with the locking device must be connected ...

Страница 91: ... plates 2 on the command bridge up to the mounting brackets 3 on the chassis Gently press the command bridge down in order to insert it into the connector plug Mount the command bridge securely with the previously removed screws 1 2a 2b 3a 3b Command bridge 1 Centring plates 2a and 2b Mounting brackets 3a and 3b ...

Страница 92: ...es are no destroyed and to ensure error free functioning Screw the fibre optic head into the mounting bracket until it protrudes from the other side by approximately 2 mm Secure it with the included nut When the mounting brackets are attached to the chassis during a later assembly step it must be assured that the sensors are located at the inside ends of the slots Otherwise the distance between th...

Страница 93: ...crews Secure both mounting brackets Make sure that the fibre optic head is in the correct slot Now mount the fibre optic unit 4 to the mounting plate in the Robotino Secure it to the threaded holes provided to this end with the included screws 5 Inductive analogue sensor The inductive analogue sensor is simply clamped into the permanently installed retainer Loosen the knurled screw on the retainer...

Страница 94: ...d source data for the Robotino sample programs in a Linux version These can be edited with the Linux editor Basically two options are available for accessing the functions libraries and sample programs on the PC 104 One option is to access the Linux environment of the PC 104 using a terminal program via a WLAN connection The other option is to connect the keyboard and screen directly to the PC 104...

Страница 95: ... be in the home directory of the user robotino of the Linux environment of the PC 104 From here you can access all programs source codes and libraries The directory examples contains the sample programs of the Robotino with their source data and a compiled version The program Circle Change into the directory robotino examples circle and execute the program by entering circle at the prompt The comm...

Страница 96: ... sensor 369669_Fibre_optic_device pdf 369682_Fibre_optic_cable_diffuse pdf 165327_Fibre_Optic_Device_SOEG_L pdf 165358_Fibre_Optic_Cable_Diffuse_SOEZ_RT pdf Collision sensor SafetyEdges pdf WLAN Access Point WAP 0004 Manual pdf WAP 0004 DataSheet pdf Webcam Windows Help File Webcam Live Users Guide English chm Fuses Fuses_Robotino Control unit _Datasheet pdf Kontron_M_MOPSlcdSE_MOPSSE_PSTEM111 pdf...

Страница 97: ...heck the fit of the memory card Connect the VGA monitor directly to Robotino Check for error messages Carefully open the plastic cover and visually inspect the cables Switch off Robotino insert memory card fully into Robotino Test memory card from another Robotino overwrite data on memory card inform Support of error message Contact Support 3 Connection with Robotino frequently drops Laptop WLAN c...

Страница 98: ... the laptop is switched off IP was assigned twice Your laptop did not obtain the IP automatically has the wrong fixed IP configured Robotino is using an IP outside the correct IP range did not obtain an IP from the DHCP Network DHCP menu Connect to a known network another Robotino Make sure that your PC or another Robotino is not using the same IP Start the command ipconfig all under DOS Robotino ...

Страница 99: ...isplay after the WLAN CH channel e g CH6 Access point in Robotino is in CL mode and still has not connected to an external access point The display is not yet updated Open the configuration page of the external access point e g http 172 26 101 2 and check the SSID of the external access point and the connected nodes the MAC address is set to the access point PC104 of Robotino To save processing po...

Страница 100: ...tary movements this is extremely important when dealing with long distances in particular Network card option network switch for input output card EA09 Direct accessibility of I O board PC104 access point and laptop among other things for high frequency analysis of the PID controllers hardware in the loop direct programming of the microprocessor External access point Many WLAN interruption problem...

Отзывы: