background image

c. Lens set-up and feeling

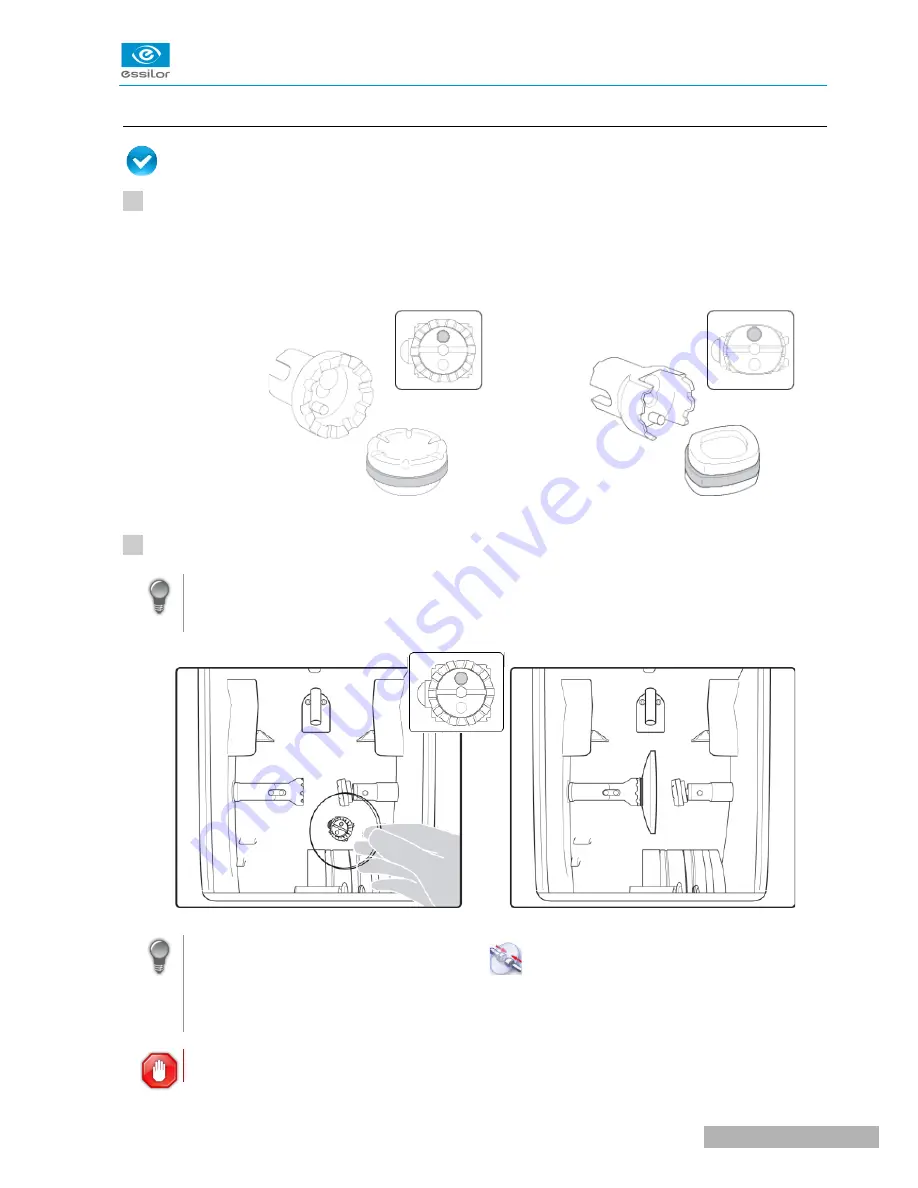
 Prerequisite: the lens must be centered and blocked before placing it in the edger.

Check that the posiblock holder and the stop correspond to the posiblock used. Otherwise, you will need 

to remove them form the lens clamp shafts and replace them with the tools matching the diameter of the  

posiblock.

For a 22 mm posiblock

For an 18×14 mm posiblock

Place the lens in the posiblock holder.

Place the metal peg of the posiblock upwards and the positioner downwards: a magnet is used to 

hold the lens in position on the axis.

You can clamp the lens manually by pressing 

: Manual lens clamping is particularly suited to 

hydrophobic lenses, thick lenses and high-camber lenses, as it ensures that the lens won't come 

off the pad before clamping.

Make sure you move your hand well away before you start the edging cycle.

U

SER

 M

ANUAL

> II. E

DGING


A


LENS

19

Neksia > v1.0 - 02.14

1

2

Содержание Neksia

Страница 1: ...User Manual...

Страница 2: ......

Страница 3: ...e 27 3 Grooving 27 a Automatic grooving 28 b Customized groove menu screen 29 c Customized grooving 31 d Modifying the groove curve 32 e Modifying a point in the groove curve 33 f Displacement of the...

Страница 4: ...58 4 Changing or cleaning the edger tools 60 a Changing or cleaning the drill bit 60 b Changing the grooving or chamfering wheel 62 5 Maintaining and cleaning the edger 64 a Precautions required 64 b...

Страница 5: ...to the documentation in the Introduction Guide provided on installation the user manual on the CD ROM The screens and features vary according to the edger used Neksia Classic Neksia Neksia drill This...

Страница 6: ......

Страница 7: ...I FIRST STEPS...

Страница 8: ...er Description of the edger F p 8 Using the device F p 10 1 DESCRIPTIVE DIAGRAMS This section consists of the list and descriptions of accessories for the edger 1 Trough 2 Main switch 3 Connectors 4 S...

Страница 9: ...22 mm stop 18x14 mm stop Unblocking clamp 1 0 mm drill bit mounted on the module option 0 8 mm drill bit option 25 mm grooving wheel mounted on the module Chamfering wheel mounted on the module Servic...

Страница 10: ...12 a Turning on the edger To switch on the edger press the main switch located on the top of the machine The edger will initialise On the edger screen press the icon to complete the initialization ph...

Страница 11: ...d calibrate Calibrate the touch screen F p 59 Never press hard on the screen as this could break it Never press on the screen with sharp objects such as pens scissors clamps etc Screen breakage is not...

Страница 12: ...en Main menus of the edging screen 1 Work screen indicator 2 Tool wear indicators 3 Settings 4 Devices connected 5 Active eye and information on the shape 6 Size increase reduction 7 Work area 8 Machi...

Страница 13: ...ble for the current screen 11 Start the edging cycle Detailed functions For more information consult the section Edging a lens Work environment of the edger Captioned screen F p 16 USER MANUAL I FIRST...

Страница 14: ...Neksia v1 0 02 14 14 USER MANUAL I FIRST STEPS...

Страница 15: ...II EDGING A LENS...

Страница 16: ...etouching F p 42 1 EDGER WORKING ENVIRONMENT This section describes The edger work screen F p 16 Shape call up procedure F p 18 Putting the lens in place F p 19 a Menu screen 1 Size reduction increase...

Страница 17: ...o the information acquired when tracing the frame and feeling the lens Customized mode The finish settings can be fully customized 7 Type of cycle Standard cycle For all types of materials 2 star cycl...

Страница 18: ...shape saved on the tracer Press for a few seconds on to open the numeric keypad You can then call a shape via the ID allocated to it Job call via a barcode Scan the barcode using the barcode reader op...

Страница 19: ...ock For an 18 14 mm posiblock Place the lens in the posiblock holder Place the metal peg of the posiblock upwards and the positioner downwards a magnet is used to hold the lens in position on the axis...

Страница 20: ...rameters can be fully customized For further information refer to the section concerning your type of finish 2 BEVELING This section describes the procedures for creation of a bevel In automatic mode...

Страница 21: ...on Edging a lens Polishing F p 39 and Edging a lens Chamfering F p 40 Press The door closes the lens is clamped then the feeling operation starts The edging cycle starts When the edging cycle is finis...

Страница 22: ...surface Frame rim tracking the bevel tracks the groove precisely according to the data obtained on frame tracing 3 Lens thickness Maximum lens thickness represented by the white square along the shape...

Страница 23: ...use of the customized bevel depends on 2 parameters the frame and the lens Before starting your job identify the major constraint BEVEL FRAME LENS ADVANTAGES Classic Lens for which the front surface b...

Страница 24: ...ns Chamfering F p 40 Press The door closes the lens is clamped and then felt The customized bevel finish screen is displayed Select the type of customized bevel you want to do To avoid reproducing def...

Страница 25: ...ress to select the general modification of the bevel curve Use the buttons and to move the bevel curve Press to move the curve towards the front surface of the lens Press to move the curve towards the...

Страница 26: ...rsor select the point on the curve that you want to move or click directly on the position of the shape you want to modify Use the buttons and to move the point on the selected curve Press to move it...

Страница 27: ...e lens are displayed in the zoom window at the position of the cursor Press The edging cycle starts When the edging cycle is finished the retouch screen is displayed Press to release the lens If neces...

Страница 28: ...matic grooving Call the desired shape located on the tracer The shape is displayed on the edger work screen After tracing a pattern demo lens or recut lens without any drilling settings the groove fin...

Страница 29: ...tant distance from the front surface Rear surface tracking the middle of the groove is positioned at a constant distance from the rear surface Distributed groove the middle of the groove is positioned...

Страница 30: ...groove selected Groove depth in mm Groove width in mm 7 Modify the selected setting 8 Groove trajectory Flat representation of the lens making it possible to measure the distances between the groove a...

Страница 31: ...out the groove when thin lenses are used Flat base High base Thin lens for which the base is approximately equal to the frame base In the event of pattern tracing base 0 makes it possible to retrieve...

Страница 32: ...the work area The edging screen for the second lens is displayed All finishes chosen and the modifications made are kept d Modifying the groove curve Once you have configured the desired type of custo...

Страница 33: ...ght of the work area The edging screen for the second lens is displayed All finishes chosen and the modifications made are kept e Modifying a point in the groove curve Once you have configured the des...

Страница 34: ...the groove curve The displacement of the groove curve enables you to move the groove without modifying its curve or perimeter Press from the customized groove finish screen You will access the trajec...

Страница 35: ...ed shape located on the tracer The shape is displayed on the edger work screen Select lens material Press to select the flat edge finish Choose the type of cycle Choose whether or not to polish and or...

Страница 36: ...illing at right angles with the front or rear surface you can modify the diameter but not the drilling angle which is automatically calculated by the edger based on the lens curve Customized drilling...

Страница 37: ...Press to release the lens If necessary retouch the lens Otherwise start edging the second lens Select the lens directly on screen on the left or right of the work area The edging screen for the secon...

Страница 38: ...e angle of the drill bit at the selected drilling point 7 Reminder of size reduction increase applied to lens diameter 8 Navigation Stop the cycle Return to the main edging screen without saving your...

Страница 39: ...eter and or angle of the selected drilling point The difference between the initial value and the modified one is displayed in the delta column Press The edging cycle starts When the edging cycle is f...

Страница 40: ...is type without water Otherwise the polishing wheel could suffer irreversible damage The polishing option is pre selected The polishing option is not available for high base jobs However the high base...

Страница 41: ...rther information contact your technical department Thickness at the edge of the lens LENS THICKNESS AVAILABLE OPTIONS 1 2 mm between 1 and 1 2 mm 1 mm Distance between the edge of the groove and the...

Страница 42: ...8 RETOUCHING 1 Diameter modification 2 Manual lens clamping 3 Start the retouch Neksia v1 0 02 14 42 USER MANUAL II EDGING A LENS...

Страница 43: ...djustment do a retouch on the edged lens to obtain optimal results Indicate the size reduction to be applied to the lens you want to retouch The chosen finish and the modifications made during the edg...

Страница 44: ...All finishes chosen and the modifications made are kept The retouch done on the first lens is automatically saved for the edging of the second lens Neksia v1 0 02 14 44 USER MANUAL II EDGING A LENS...

Страница 45: ...USER MANUAL II EDGING A LENS 45 Neksia v1 0 02 14...

Страница 46: ......

Страница 47: ...III CONFIGURING THE EDGER...

Страница 48: ...dures to set the time date and language F p 48 access the connections and the network F p 49 configure a screensaver and the brightness of the screen F p 49 a Time date and language To access this men...

Страница 49: ...nnections Connections are configured from the tracer see the instructions for use of the tracer The screen which you access from the edger is only available for consultation purposes c Screensaver and...

Страница 50: ...to adjust the precision of the edger You can adjust the diameter of the finished lenses F p 50 the position of the bevel and groove F p 51 the diameter of drill holes F p 52 the chamfer F p 53 the dep...

Страница 51: ...been made press to return to the work screen b Adjusting the position of the bevel and groove After edging a lens if the position of the bevel or groove always seems too close to the front or rear sur...

Страница 52: ...f the diameter of the holes always seems too small or too big you can adjust it according to the diameter of the drill bit used and the lens material To access that menu from your edger work screen se...

Страница 53: ...The following screen is displayed 1 Chamfer Small front surface Large front surface Small rear surface Large rear surface 2 Lens materials Plastic Polycarbonate MHI TrivexTM TribridTM Glass 3 Increasi...

Страница 54: ...educe the width of the groove Press to increase the width of the groove 2 Adjusting the default groove depth Press to reduce the depth of the groove Press to increase the depth of the groove Once the...

Страница 55: ...IV MAINTENANCE SERVICING...

Страница 56: ...vicing and cleaning the digital system F p 66 1 CARRYING OUT THE AUTOTESTS This menu is used to carry out a self diagnosis of the functions of the edger To test correct operation of the edger select f...

Страница 57: ...can check the calibration on the position of the feelers in the trough F p 57 calibrate the touch screen F p 59 If the edger detects a variation an adjustment is carried out during the cycle Have the...

Страница 58: ...le Check that the feelers are correctly aligned Press if the feelers are correctly aligned Press to loosen the clamps and remove the plastic pattern then to return to the work screen The calibration c...

Страница 59: ...to the menu Point precisely on each cross as they are displayed holding the stylus perpendicular to the screen so as not to alter the calibration The settings menu is displayed automatically once the...

Страница 60: ...Grooves Drill holes slots Notches Polishing Chamfers 4 Drilling Number of drilling operations performed for each lens material according to the drill bit used 5 Touch screen calibrations 6 Dressing c...

Страница 61: ...s generated by the machine by frequency of appearance To sort the total counters press press again to define the sort direction ascending descending 3 Sorting Button used to define the direction of so...

Страница 62: ...you cannot replace it All tools used on the module must be clean and dry to prevent water from seeping into the mechanisms The use of broken tools may cause lens breakage or errors with respect to le...

Страница 63: ...or clean the bit in place the wear statistics will not be reset Press The GMD module moves to facilitate the operation Position the drill bit changing tool in the notch of the chuck Position the open...

Страница 64: ...g wheel Wheel shaft 1 Grooving wheel The boss is turned towards the right 2 Chamfering wheel It is equipped with a positioner to prevent incorrect insertion Trimaterial chamfering wheel option May be...

Страница 65: ...without touching the wheel shaft Replacing the grooving or chamfering wheel Press the button corresponding with the wheel to be replaced Grooving wheel Chamfering wheel The GMD module moves to facilit...

Страница 66: ...rew back in and then tighten as much as possible If you took the drill bit out of the chuck put it back Remove the keys and press The module goes back into its initial position The wear statistics for...

Страница 67: ...nts module etc with a wet rag No additive should be added to the water in the edger tank Do not add pyridine b Cleaning the window and GCD module From the work screen of the edger select to access the...

Страница 68: ...rew using the Phillips screwdriver whilst holding the window in place Slide the window then pull it towards you to remove it The window is disassembled Neksia v1 0 02 14 68 USER MANUAL IV MAINTENANCE...

Страница 69: ...ow with water but do not rub To reassemble the window reverse the procedure Precautions Ensure that you correctly position the window in the door runners USER MANUAL IV MAINTENANCE SERVICING 69 Neksia...

Страница 70: ...led on the lens clamp shafts Select the appropriate dressing cycle Glass roughing wheel Finishing wheel Polishing wheel Never dress the polishing wheel twice in a row to avoid possible damage For each...

Страница 71: ...lder Press to close the clamps Press to start the dressing cycle Once the cycle is finished press to open the clamps and remove the dressing stone If the dressing stone shows a residual ring remove it...

Страница 72: ...Neksia v1 0 02 14 72 USER MANUAL IV MAINTENANCE SERVICING...

Страница 73: ...TECHNICAL DATA...

Страница 74: ...0 40 mm Drilling automatic adjustment of drilling angle according to lens curve up to 15 modification step 0 5 hole diameter 0 8 to 3 mm modification step 0 05 mm types of drilling through hole non th...

Страница 75: ...ied with the edger Longer cables are also available on an optional basis The temperature and humidity of the room where you use your machine must be within the following ranges Operation temperature b...

Страница 76: ...Neksia v1 0 02 14 76 USER MANUAL TECHNICAL DATA...

Страница 77: ...GENERAL INFORMATION...

Страница 78: ...indicates a word defined in the glossary See also indicates the page number to consult for further information 2 MODIFICATIONS The information contained in this document is non contractual and provide...

Страница 79: ...content of this document whether in part or as a whole for the purpose of its publication or dissemination by any means and in any format whatsoever even free of charge is strictly prohibited without...

Страница 80: ...ere there is a risk of explosion Do not use this system in the presence of liquids or flammable gases Make sure that the equipment is connected to a mains supply which complies with standard NFC 15 10...

Страница 81: ...GLOSSARY...

Страница 82: ...actions to be carried out on the tracer centerer blocker and edger in order to produce a pair of glasses It is possible to memorize it in the shape management screen under an identifier ID LENTICULAR...

Страница 83: ......

Страница 84: ...Essilor Instruments USA 8600 W Catalpa Avenue Suite 703 Chicago IL 60656 Phone 855 393 4647 Email info essilorinstrumentsusa com www essilorinstrumentsusa com...

Отзывы:

Похожие инструкции для Neksia