background image

16

Kongsberg XE

The 

RotaCut Knife Tool

 is a special tool for cutting light materials, as thin fabric.

Maximum 

Cutting Depth

 is 2 mm / 0.07 inch.  

Note: Due to the characteristics of this knife tool, some restrictions apply to the use of it:
• It is not suitable for curves with small diameter.
• It is not suitable for designs containing short lines in combination with sharp angles.

The 

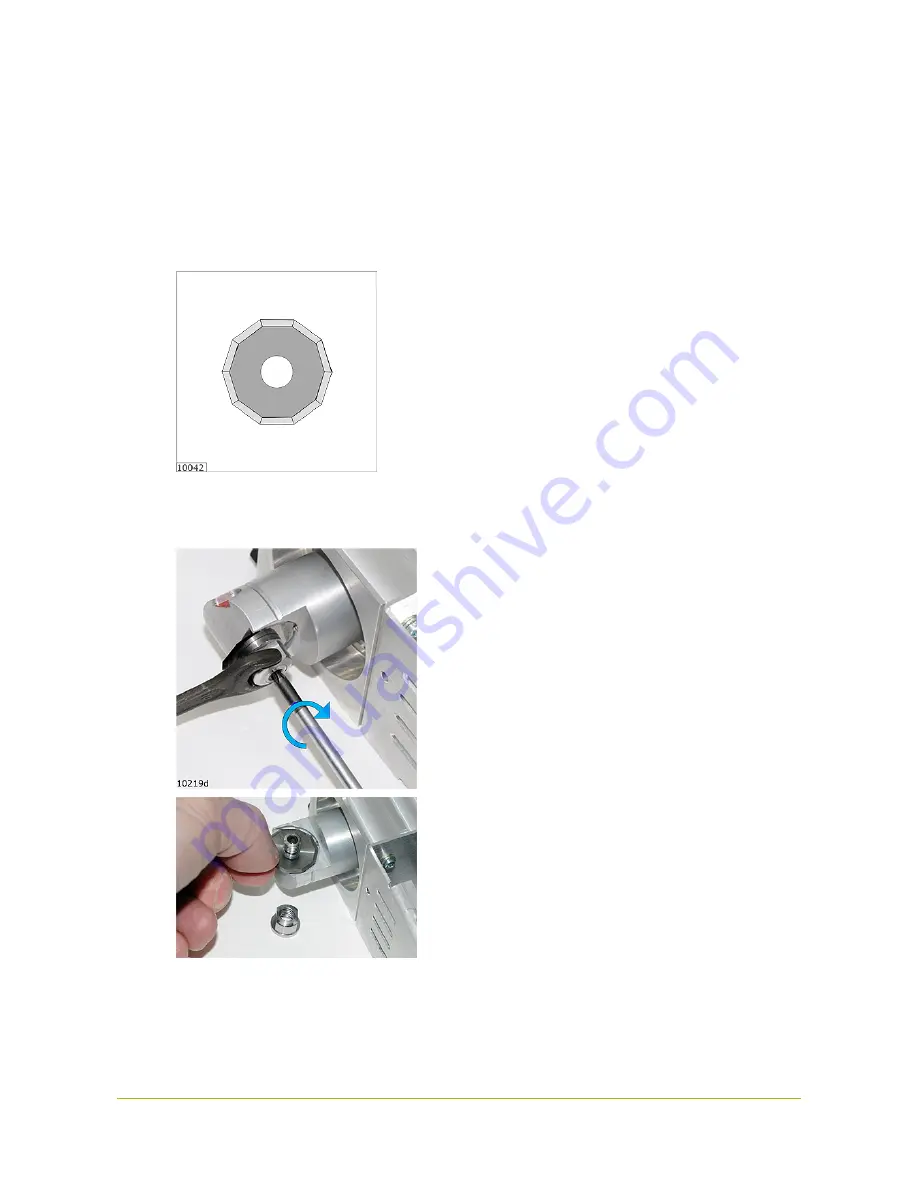
RotaCut Knife Tool

 is prepared for

Decagonal Knife Blades

, ø25 mm / 1 inch.

How to replace the Knife Blade

1

Use the spanner and the hexagonal screw

driver to remove the 

Knife Blade

 fixing nut.

2

Carefully remove the old 

Knife Blade

 and

insert the new one.  
Ensure the 

Knife Blade

 is properly seated.

Mount the nut and fix it properly.

115

Содержание Kongsberg XE10

Страница 1: ...Kongsberg XE User Manual 09 2017 Kongsberg XE ...

Страница 2: ...be met by Operators 14 5 4 Definition of Use 14 5 5 Danger Zones 14 5 5 1 Danger Zones 14 5 5 2 Moving Parts Laser Radiation and High Voltage 15 5 5 3 Loose Clothing 15 5 5 4 Noise Level 16 5 6 Warning Sign Explanation 16 5 7 Safety devices 17 5 7 1 Overview 17 5 7 2 Main Power Switch 18 5 7 3 Emergency Stop Button 18 5 7 4 Warning Lamp on top of Y Carriage 19 5 7 5 DynaGuard Safety System 19 5 8 P...

Страница 3: ...c Operations 42 8 1 Introduction 42 8 2 Power On Sequence 42 8 3 Reset Safety System 43 8 4 Power Off Sequence 43 8 5 Continue after Safety Break 44 9 Prepare for a Job 45 9 1 Introduction 45 9 2 Job Setup 45 9 3 Board Setup 46 9 4 Open an input file 46 9 5 Flute Grain Direction 47 9 6 Vacuum Section Selection 47 9 7 Speed Setting 47 9 8 Job Execution 48 9 9 Corrugated production 48 9 10 Folded Cart...

Страница 4: ...imization 66 11 19 Vacuum Setup 67 11 19 1 Vacuum Section Configuration 67 11 20 Park Position 67 11 21 Display Color 68 11 22 Board Size 68 11 23 Change Flute grain direction 69 11 24 Transformations 69 11 25 Step and Repeat 71 11 26 Counter setup dialog 73 12 Reference Points and Coordinate System 75 13 Job Setup 78 13 1 Introduction 78 13 2 Select Job Setup files 78 13 3 Create and edit Job Setup...

Страница 5: ...Knife Tool 100 16 6 Static Knife Tool 103 16 7 VibraCut Knife Tool 104 16 8 VariCut Knife Tool 107 16 9 Hi Force Knife Tool 111 16 10 Psaligraphy Knife 113 16 11 RotaCut Knife Tool 114 16 12 Multi Function Unit 118 16 13 Ballpoint Pen Ink Tool 118 16 14 Measuring Foot 120 16 15 Laser Pointer 121 16 16 i cut camera 121 17 Maintenance 122 17 1 Daily maintenance 122 17 2 Weekly maintenance 122 17 3 M...

Страница 6: ...Kongsberg XE 20 4 i cut 133 vi ...

Страница 7: ...sko Graphics Kongsberg AS shall not be liable for any direct indirect consequential or incidental damages arising out of the use or inability to use the system or the information contained herein The information contained herein is subject to change without notice Revisions may be issued from time to time to advise of such changes and or additions No part of this system may be reproduced stored in...

Страница 8: ...ge Record Date dd mm yy By Description 09 02 2014 jhbe First edition of this document 12 01 2017 JHBE Updated version of this document 13 06 2017 jhbe Psaligraphy Knife tool added 05 09 2017 jhbe PressCut chapter updated 8 ...

Страница 9: ...i XE This manual will provide a complete and detailed description of all XE i XE functions It is aimed for operators of Kongsberg Cutting Tables and people preparing files for such equipment Note Some of the functions and equipments described in this manual are optional 9 ...

Страница 10: ...hine Prepare for a Job A typical workflow is described with detailed information about each step How to Procedures Advanced Optional functions for the advanced user Multi Pass Creasing how to Jobs including Reverse Score how to Work with different Reference Point Settings how to Forced Tool Height Measurement how to System Setup Settings specifying the general behaviour of the system Tool Configurati...

Страница 11: ...is the dialog that appears when you click the Right mouse button Start button The italic style indicates this is a button on the Operator panel OK The bold style indicates this is a button or function in the GUI Maintenance Link to topic Options System Option Menu selection From the Options menu select System Option 4 3 Pictures and Illustrations Orientation Pictures and illustrations related to t...

Страница 12: ...ge of local languages Screen pictures and illustrations remains in English language 4 5 About Xx Guide dialogs To exit from any Xx Guide dialog use the control buttons available Using the cross in upper right corner is not recommended and the consequence is un predictable 12 ...

Страница 13: ... The Manufacturer The Manufacturer is responsible for delivering the system according to Safety Regulation standards 5 2 2 The Customer The Customer is responsible for Ensuring that the system is used for it s Intended Use only Allowing that only authorized and trained personnel operate the system Preventive maintenance as described in the Maintenance chapter That the Local Regulations regarding i...

Страница 14: ...ic Operations Prepare for a Job How to Procedures Advanced Any other use is considered non intended use Examples of non intended use Operation by operators not meeting the requirements as described above Unauthorized modifications bridging safety devices removing covers etc Utilizing accessories other than those specified by Esko Non intended use may cause Health hazards and injuries Damage to the s...

Страница 15: ...is considered to be a Danger Zone The Danger Zone is identified by the means of a yellow black floor marking 5 5 2 Moving Parts Laser Radiation and High Voltage 5 5 3 Loose Clothing While working with this machine do not Use ties Use loose necklaces 15 ...

Страница 16: ...its Hand Squeeze Potential areas with a risk of being squeezed are marked with the Hand Squeeze sign These areas are Between X axis end stopper and traverse wagon Do not Touch Potential areas with a risk of being squeezed are marked with the Do Not Touch sign These areas are Between Y carriage and rack Between the table top and the moving traverse Underneath the tool head Hearing Protection The He...

Страница 17: ...ts are marked with the Moving Parts sign These areas are Both traverse ends Y carriage Tool head s The Main Power Unit MPU contains Mains Voltage and may be opened by Authorized Personnel only The MPU is marked with the High Voltage warning sign Laser Radiation The tool head is equipped with a class II Laser Pointer Avoid laser light into your eyes 5 7 Safety devices 5 7 1 Overview 17 ...

Страница 18: ...mp 4 Photo cell supervision Dynaguard 5 Traverse Stop Switches Dynaguard 5 7 2 Main Power Switch The Main Power Switch turns power to the table on off 5 7 3 Emergency Stop Button Switch positions OUT Emergency Stop is switched OFF IN Emergency Stop is switched ON Servo Power to the machine is switched off 18 ...

Страница 19: ...is activated Reset Safety System to continue operation 5 7 5 DynaGuard Safety System The DynaGuard Safety System consists of two light beams in front of the traverse and one behind In addition there is a stop mechanism mounted on each end of the traverse Machine movement will stop and Servo Power will be switched off if One of the light beams are broken The stop mechanism is activated for instance ...

Страница 20: ... Eye protection should be used by any personnel working with milling Always use Hearing Protection when working with the machine for a longer period of time The acoustic noise level will vary with the type of operation and tooling but a typical average level is 78 5 83 5 dBA and a maximum level of 98 5 dBA 5 9 Procedures in case of Malfunctions Trouble shooting and repair shall be executed by Auth...

Страница 21: ...ath the traverse while the machine is working Y carriage 2 The top of the Y carriage is un protected in all four directions Actions Do not bend down over the table or traverse while the machine is working Inside cable chain 3 There is a risk for squeezing between the cable chain and the table base frame Actions Stay out of this area while the machine is working 21 ...

Страница 22: ...5 Kongsberg XE Traverse Beam 4 The DynaGuard Safety System photo cell beam c will stop the movement when hit Actions Stay out of this area while the machine is working 22 ...

Страница 23: ...ming conventions Machine 1 Cutting Table 5 Air Pressure Regulator 2 Traverse 6 Emergency Stop button 3 Y carriage 7 Operator Panel 4 Tools 8 Main Power on off switch 5 Main Power Unit MPU 9 Traverse Safety Stop switches DynaGuard Axes X X axis Z Z axis Y Y axis 23 ...

Страница 24: ...Power Switch Switch positions O the Main Power to the machine is switched OFF I the Main Power to the machine is switched ON 6 4 Operators Panel Power On Mains Power on off indication Servo Power On Servo Power on off control Start Press this button to Start Operation 24 ...

Страница 25: ...automatically selected at Power on The system remains in the Table Zero Mode until Table Zero movement is completed Jog buttons Press the Jog buttons to move the tool head in the desired direction The system must be in Pause mode i e the Pause button must be lit for these buttons to be operative Note It is possible to configure the jog direction see Option System setup Incremental Jog Press this bu...

Страница 26: ...rized Air system General The High Pressure Air System supplies the valves and tooling with compressed air The compressed air input is connected to a combined Pressure Regulator Valve Water Trap Wall Outlet Wall Outlet A Air Tube R Pressure Regulator Valve P Pressure Gauge W Water Trap T Air Tube to Tools and Valves For details regarding air supply requirements see Site Preparation Manual Air Press...

Страница 27: ...ble After installation of XE Guide the following application programs are available XE Guide Control program for the Cutting Table SysLoad Program for download of updates to CU modules HWT800 Hardware test program see separate HWT800 User Manual 27 ...

Страница 28: ...Graphical User Interface The XN Graphical User Interface GUI contains these main elements 1 Main Menu 5 Preview 2 Main Toolbar 6 Job View Toolbar 3 File View Toolbar 7 Job View 4 File View 8 ARS Toolbar 9 Status Bar 7 2 The Main Menu 28 ...

Страница 29: ...ctual flute grain direction to the system Transformation Specify scale and rotation Step and Repeat Specify multiple copies of current job Counter setup Parameter setting for crease using a matrix For folding carton only System Option Enter the System Option dialog Table Options Enter the Table setup dialog Registration setup Configure the ARS system Layout Toggle Layout Mode Toggles between single ...

Страница 30: ...of the Main Toolbar contains the following general functions Selects application from the drop down list View the Message Display Enter Tool Configuration Set Single Design operation Set Multi Design operation Work with 123Box Enter the Help system The right part contains the following functions 30 ...

Страница 31: ...inds current job T Estimated total job time R Estimated remaining job time Main Toolbar configuration From View Toolbars you can configure the Main Toolbar to show left right none of the Main toolbar 7 4 File View A total of 5 columns can be displayed in the File View 31 ...

Страница 32: ...eview window When a file is opened that is selected as a job the design will be displayed in Job View Customize File View The Customize File View dialog is available from Main Menu View Customize File View File View Pop up menu Use the Customize File View dialog to define the kind of data which you want displayed in the columns in File View Customize the 4 columns by selecting the appropriate field i...

Страница 33: ...ile mode Note You can view finished jobs by selecting View View Finished Jobs selecting View Finished Jobs from the pop up menu in the File View Auto Open function Pressing this button activates the Auto Open function The file at the top of the File View list will automatically be opened as a new job when the current job is finished Press the button a second time to disable the Auto Open function Not...

Страница 34: ... the Job View window Designs placed in Job View can be manipulated according to the selected layout mode Various display options are available from the Job View toolbar The File Information Bar on top of Job View display some parameters regarding the last Input File opened 34 ...

Страница 35: ... screen Enters zoom mode The cursor changes to a magnifying glass Select area to be zoomed View design only View design and selected board size View design selected board size and the table size Enters the Job Setup dialog Enter ARS registration setup dialog Work with ARS enabled Enter ARS registration setup dialog No ARS functions are enabled 35 ...

Страница 36: ...ob Setup file from the drop down list Select Board Size from the drop down list Enter the Step and Repeat setup dialog Number of copies for the Step and Repeat function Enter the Matrix function Matrix function is for Folded Carton application only Button face when the Matrix function is enabled Vacuum section selection Indicates that all designs are inside the Working area Indicates that one ore m...

Страница 37: ...a file in File view will display the job in the Preview window 7 9 Status bar The status bar at the bottom of the GUI shows brief descriptions of various functions in the GUI The status bar can be toggled on and off from Main Menu View Status bar 37 ...

Страница 38: ...play 7 11 Message Display The Message display is available from the Main Toolbar button The Message display offers additional information when troubleshooting the system Normally you will get all the necessary information from the pop up Critical Warning Display For additional information please examine the Message display Pop up on warnings Check this box if you want warnings to be automatically d...

Страница 39: ...e amount of messages Show The type of information displayed in the Message display can be configured to 1 Critical messages only 2 Critical and important messages 3 All messages 7 12 Position Display Main Menu View Position display Ctrl D Use the set of radio buttons to select one of the available displays Program reference Displays table coordinates relative to program reference point Table refere...

Страница 40: ...easured thickness of material on the table Encoder count X and Y Shows encoder input as read for X1 X2 and Y encoders Encoder count Z and Tool Rotation Shows encoder input as read for Z and Tool rotation encoders 7 13 Accelerator Keys Key Function Ctrl B Board Size setup Ctrl D Position Display Ctrl F Toggle Flute Direction Ctrl J Edit Job Setup Ctrl O Open Input File Ctrl P Set ball point pen pre...

Страница 41: ... Function Ctrl S Step And Repeat setup Ctrl T Tool Configuration F1 Help in active window Ctrl Alt D Memory dump Ctrl Alt L Servo Log Ctrl Alt O System Setup Ctrl E Display axis force Ctrl Alt K Keyboard command entry 41 ...

Страница 42: ... the following assumptions The User Interface is up and running The actual Tools are properly mounted and adjusted 8 2 Power On Sequence Follow these steps to power up the system and get ready to work 1 Front End PC Switch on the PC and the monitor 2 Table Power Switch the table on using the Main Power Switch Note After power off wait minimum 5 sec before the system is switched on again 3 Xx Guide ...

Страница 43: ...ce Point 7 The table is now ready for operation 8 3 Reset Safety System Press Pause to Reset Safety System 8 4 Power Off Sequence Follow these steps to power down the system 1 Servo Power Press the Servo On pushbutton to switch Servo Off 2 Table Power Turn Table Power off using the Main Power Switch Note After power off wait minimum 5 sec before the system is switched on again 3 Front End PC To switch...

Страница 44: ...ing Lamp starts flashing To continue operation proceed as follows 1 Ensure the table is free from obstructions and ready for operation 2 Reset the Safety System by pressing the Pause pushbutton 3 The Warning Lamp on top of the Y carriage should be on without flashing Observe that Servo Power is switched on 4 Press Start to continue 44 ...

Страница 45: ...nnel come close to the table The Starting Point in this procedure is Xx Guide and table are up and running Properly adjusted tools are mounted Use this chapter as a check list when changing from one job to another 9 2 Job Setup Job Setup is a table that links Logical tool numbers P numbers in the Input File to physical tools on the machine and describes their behavior 87 The Job Setup information ...

Страница 46: ...hen Auto Open is enabled and activated the files will be opened automatically 204 The Input File formats available are File extension Description acm Kongsberg acm format This is the default input format for Kongsberg XN Described in the Technical Reference manual for XN plt HPGL Described in the Technical Reference manual for XN dxf DXF See Appendix about DXF input tuning 214 ard ArtiosCAD See App...

Страница 47: ...st possible material hold down 9 7 Speed Setting Specify if this is a High Accuracy or High Speed job The machine speed during execution will have important impact on the final result For some combinations of tools and materials you can run with full speed for other combinations the speed and or the acceleration has to be reduced For this purpose the following alternatives are available Select betw...

Страница 48: ...lling ensure the vacuum cleaner container is prepared Empty the container regularly 4 Press Vacuum On to start the vacuum pump 5 Press Start to execute the job 9 9 Corrugated production Corrugated Production without Registration Marks is straight forward following the procedure described in the Prepare for a Job chapter Recommended tooling is described in Esko Tooling Guide 48 ...

Страница 49: ...the material thickness Fine tuning depths slightly up or down may be necessary to optimize crease quality for each material Samplemaking Procedure Select Folding Carton application Ensure that the surface of the table is free from obstructions Ensure that the Job Setup information is correct for the material From File View select the Input Program file for matrix preparation Click on the matrix ico...

Страница 50: ...or cutting the sample Position the sheet to be cut on top of the matrix Press Start to execute the job If more than one sample is to be produced repeat the procedure using the same matrix Matrix function and ArtiosCAD ArtiosCAD has functions to automate the process see Service Guide for ArtiosCAD Kongsberg integration available on the Xx Guide CD 9 11 Make a Pen Plot Pen Plot without Registration ...

Страница 51: ...s available by modifications of the actual Job Setup This function requires that the table is equipped with Left and Right rulers Proceed as follows 1 Open the Job Setup file for editing 2 Identify line for reverse score or add a line for this function 3 Open the More dialog for this line enable Reverse Score 4 When executing the job with this Job Setup selected the Reverse Score function will be ca...

Страница 52: ... this can be solved by using two different job setup files You have a job where you want to run P1 with a crease tool and P2 with a knife tool Due to other required tool combinations it is not possible to have those two tools mounted at the same time Run P1 using the first job setup file This job setup file specifies running P1 with the crease tool and ignore data for P2 Insert the crease tool in the to...

Страница 53: ... table Material Sheet of material with pre punched holes that fit the Positioning pins on the Register bar Positioning pins Use these pins to fix the sheet of material in a correct position on the table When the sheet is fixed and vacuum is switched on you must remove the pins Cutting underlay Cutting underlay Area not available for tools This area is outside the working area of the machine Work Flow...

Страница 54: ...ence point setting When working with register bar select one of the available Reference points Option Table options and set a reference point in a fixed position relative to one of the Positioning pins R in the illustration This position should be used as origin during geometry design and CAM file generation When preparing the job in the CAD system use the same Reference point as origin 54 ...

Страница 55: ...10 Kongsberg XE This work flow ensures exact positioning of the geometry relative to the Positioning pins 55 ...

Страница 56: ...ensure proper settings One time adjustments completed at the factory To be repeated if necessary 1 Adjust X1 to X2 Angle 2 Register Table Size 3 Set Ruler Position 4 Set Main Reference Point 5 Map Table Top Surface 6 Vacuum Setup Adjustments to customize the table 1 Set Reference Point 2 Set Table Speed 3 Set Table Acceleration 4 Jog Settings 5 Set Table Top Reference 7 Board Size 56 ...

Страница 57: ...11 3 Table Acceleration Options System Option Speed Setup Acceleration Use this setting to reduce the overall acceleration on the machine 11 4 Table Speed Select between High Quality Normal or High Speed mode Options System Option System In Job Setup reduce the speed for the actual line 57 ...

Страница 58: ... Jog Speed edit box Incremental Jog Step Size Options System Option Speed Setup Incr Jog The size of the Incremental Jog movements can be customized Enter the wanted value in the short Jog Increment edit box Enter the wanted value in the long Jog Increment edit box Jog Directions Options System Option Speed Setup Jog Panel Direction Specify jog direction for the Manual Jog joystick on the Operator...

Страница 59: ...les The Set Reference point wizard is an aid for adding or changing the table reference points Procedure Press the Set Reference Points button to set up any fixed reference points Follow the instructions given by the wizard and define the number of fixed references you want As many as 10 points can be defined Click the OK button i cut Main reference Press this button to establish the correct Main refe...

Страница 60: ...t the procedure for the right ruler 11 9 Set Table Top Reference Main Menu Options Table Option Set Table Top Reference Use this function to complete a Tool Height Reference calibration The Tool Height is measured in current position and the reference to the table top surface is updated The Table Top Reference function should be carried out After mechanical adjustments of traverse or tool head Whe...

Страница 61: ...tion away from the table surface 2 Execute the Map Table Top function 3 Follow the instructions given by the wizard 11 11 Register Table Size Main Menu Options Table Option Register Table Size This wizard moves the Tool Head from edge to edge of the Cutting Table in order to measure the table size This registration is normally done just once Procedure 1 Execute the Register Table Size function 2 F...

Страница 62: ... the Vacuum push button on the Operator Panel has been operated once Vacuum control modes Two control modes are available selectable from the dialog Disable I Cut controlled function to select Xx vacuum control Enable I Cut controlled function to select i cut vacuum control XE vacuum on off control Two modes of vacuum control is available Manual the Manual control function is enabled Vacuum on off i...

Страница 63: ...ontrol dialog shown above i cut vacuum control Pressing the Vacuum on pushbutton will start the vacuum pump Pressing the button a second time will stop the pump Note When running i cut the i cut vacuum control should be enabled Using two vacuum pumps If your machine is equipped with two vacuum pumps option a pump enable disable setting is available Enable 2 vacuum pumps Select if pump 1 or pump 2 ...

Страница 64: ...Units Options System Option System Display units Select unit to be used for the GUI 11 16 Language Options System Option System Language Select language for the GUI 11 17 Input File Options System Option System Input File format 64 ...

Страница 65: ... setting For ACM and HPGL use the setup dialog to specify the programming increment for the input file For DXF CFF2 DDES ARD see ArtiosCAD User manual for more information Enable CAD X CAD X enabled allows for the following input formats in addition to the formats mentioned above DXF CF2 DDES ARD If none of these formats are used leave the function disabled Origin in lower left corner Causes the en...

Страница 66: ...uce the movement with tool up to a minimum making the execution on the table as fast as possible Note i cut and ArtiosCAD users should leave this function OFF Check for critical geometry Optimizes cut directions for reduced paper tear hazards Note i cut and ArtiosCAD users should leave this function OFF Remove double cuts This function will remove any double cuts Used together with the Job Layout ...

Страница 67: ...remains un changed The setup should correspond to the actual hardware The selected setup will determine which vacuum section configuration that will be available in the user interface 11 20 Park Position Options System Option System Park Position The following functions are available Park position from file The park position is specified in the CAD system and transferred to XL via the input file Go to...

Страница 68: ...g the job 11 21 Display Color Options System Option System Display Colors This dialog defines what colors to be used for each line in Job Setup when a job is displayed in Job View Colors are changed by clicking on any of the combo boxes and selecting the wanted color Additional lines can be added at the bottom of the list 11 22 Board Size Main Menu Options Board Size setup Job View Toolbar Board Si...

Страница 69: ...n to save the new values Select the right board size from the Job View Board Size drop down list This will ensure a correct size of the displayed board in Job View 11 23 Change Flute grain direction Flute grain direction is altered from Main Menu Options Toggle Flute Direction Job View Toolbar Toggle Flute Direction Pop up dialog in Job View Ctrl F Correct setting of flute grain direction is import...

Страница 70: ...e Unfortunately the picture in Job view does not show the design with differential scaling only common scaling But the result on the table is according to the input Rotation Enter a rotation degree value in the edit box to rotate the design See table below for simple rotation angle calculation Use the Up down arrows to step the rotation in steps of 90 degrees Example A value of 90 will rotate the d...

Страница 71: ...0 179 25 32 1 119 4 0 229 25 1 432 5 32 0 224 13 16 1 164 5 0 286 26 1 489 3 16 0 269 27 32 1 208 6 0 344 27 1 547 7 32 0 313 7 8 1 253 7 0 401 28 1 604 1 4 0 358 29 32 1 298 8 0 458 29 1 661 9 32 0 403 15 16 1 343 9 0 516 30 1 718 5 16 0 448 31 32 1 387 10 0 573 31 1 776 11 32 0 492 1 1 432 11 0 630 32 1 833 3 8 0 537 1 1 8 1 611 12 0 688 33 1 890 13 32 0 582 1 1 4 1 790 13 0 745 34 1 947 7 16 0 ...

Страница 72: ... the number of copies in the Number of Copies edit box The number of copies will be distributed on the specified board with Y axis priority that is one Y column of jobs will be filled up before a new one is established XxY enabled You specify the number of copies in the X and Y edit boxes The total number of copies will be X x Y The job will be distributed in X columns and Y rows regardless the size...

Страница 73: ... The thickness of the matrix and the material will be measured The cutting depth is set to the half of the measured value If the matrix thickness in this manner becomes less than the minimum value specified the value specified will be used The minimum value should be within 0 1 8 mm 0 004 0 3 Counter thickness fixed value The specified value is used as the matrix thickness The fixed value should be wit...

Страница 74: ...11 Kongsberg XE The Counter function is enabled 74 ...

Страница 75: ...int From the Select Reference point drop down list select Panel Ref Point Position the Laser pointer at the desired reference point Press Init The Main Reference point position The fixed reference point number 1 is defined as the Main Reference point The other fixed reference points 2 10 are all specified relative to the Main reference point Thus moving the Main reference point will move these referen...

Страница 76: ... set in a specific position on the table using i cut reference point setting wizard 79 After i cut reference point setting do not modify the position of the Main Reference point If you need a reference point in another position on the table use one of the other reference points available 2 10 Rulers and reference points The ruler system ensures an easy and correct positioning of the material on the...

Страница 77: ...e Reference Point will automatically be moved to an identical distance from the right ruler as it is defined from the left ruler The lower right ruler is normally used for reverse score operations At the same time the direction of the X axis is reversed 77 ...

Страница 78: ...00 as the first line in the Job Setup file Typically the Job Setup is different for the different materials used Therefore it is recommended to have one Job Setup file for each material type used 13 2 Select Job Setup files Select a Job Setup file from the drop down list in Job View Invoke the Job Setup dialogue and select a Job Setup file from the drop down list in the dialogue 13 3 Create and edit Job S...

Страница 79: ... mm inch or percentage Speed unit Specify if the speed unit is mm min ips or percentage Line Logical tools can be numbered from 1 to 99 A maximum of 30 logical tools are available The color defined for each logical tool is displayed in Job View as shown The color for each logical tool number is specified in Options System Option Tool Select the tool to be used for this line from the drop down list D...

Страница 80: ...n the Speed unit setting This value affects tool down movements only X Y acceleration The acceleration can be reduced to a percentage of the maximum acceleration This value affects tool down movements only Z axis Speed The speed can be reduced to an absolute value or to a percentage of maximum speed depending upon the Speed unit setting RPM Specify RPM for the Milling tool Laser pointer Ignore This ...

Страница 81: ...cles when cutting with knife The value will be different for different materials Complete this wizard to obtain a proper adjustment of the Circle lag parameter Select between two different circle sizes R 15 and R 40 mm Note We recommend that the Circle lag value is set to 0 before the first figure is executed 13 5 Extended For each line in Job Setup an Extended Setup is available This button face indic...

Страница 82: ... text to be displayed is entered into the User defined text field Note Enable Sequencing if Stop before use is used in combination with Multi pass Knife lift angle If the change in direction is above this value in degrees the tool is lifted If the knife tool has a lag the knife lift angle is 14 degrees Perf pattern Specify a perforating pattern in the two edit boxes The first specifies a tool up lengt...

Страница 83: ...eways forces onto the cutting knife This is achieved by splitting circles into straight line segments and turn the cut direction for each segment Thus the knife is lowered into the material where there is no cut before Reciprocating knife with motor off To run the Reciprocating knife with motor switched off enable the function Run reciprocating knife lines with reciprocation off Disable material thic...

Страница 84: ...13 Kongsberg XE Extra lift of tool Add extra lift height to tools when moved in up position Useful for warped boards or uneven surfaces 84 ...

Страница 85: ...ect Multi Design layout mode When a design is opened from File view the first design will be located relative to the reference point as in single design layout The following designs will be placed according to the settings of the Job Layout Snap function If a design is opened using drag and drop it can dropped anywhere inside Job View The bar on top of Job View is showing the name of the selected d...

Страница 86: ... All designs are deleted selecting the menu item Delete All Rotate selected designs Selected designs can be rotated with the functions Rotate 90 Rotate 180 or Rotate Positioning selected designs with the mouse Selected designs can be positioned by holding the left mouse button down on a selected element and move the mouse They can be dropped anywhere or snapped to existing designs depending upon t...

Страница 87: ...itioned closer than the snap distance Gap between designs This parameter defines the distance between designs after a snap function is completed Nudge Fine positioning with the arrow keys on the keyboard Nudge step Defines the step the design is moved with when pressing an arrow key Super nudge step Defines the step the design is moved with when pressing an arrow key together with the Shift key 87 ...

Страница 88: ...knife HF VibraCut knife Crease tool VariCut Pen tool RotaCut Meas foot PressCut Yes Yes Yes Yes Static knife Yes Yes Yes Yes Yes Yes Yes Yes Yes Yes HiForce knife Yes Yes Yes Yes VibraCut knife Yes Yes Yes Yes HF VibraCut knife Yes Yes Yes Yes Crease tool Yes Yes Yes Yes Yes Yes Yes Yes Yes Yes VariCut Yes Yes Yes Yes Pen tool Yes Yes Yes Yes Yes Yes Yes Yes RotaCut Yes Yes Yes Yes Meas foot Yes Y...

Страница 89: ...tool Current tool configuration is displayed under Identified tools When a new tool is inserted it will be identified to the system automatically By default the system creates a username from the tool type and its serial number E g a knife with serial number 3020 will be named Knife 20 Use the Usernames edit boxes beneath each drop down box to give each tool a nickname you want to associate the tool ...

Страница 90: ...ls need to be adjusted in the position they will be used Before any adjustment complete a Table Top Reference function Options System Option Table Setup Table Top Reference Main Menu Machine Table Top Reference Machine Panel Toolbar Table Top Reference 15 4 Lag Settings for Rotating Tools 1 In the Configure Tool dialog select the tool to be adjusted 2 Press the Adjust Active Tool button to enter th...

Страница 91: ...ck of the knife blade Enter the value as measured or as found using the Lag test see below Width knife bottom width Enter the measured knife bottom width Lag Test Run this wizard to obtain correct Knife Lag value Follow the instructions in the dialog Add the measured value to the displayed value 91 ...

Страница 92: ...ght use the Tool Height Calibration dialog 1 Select the Tool to be adjusted 2 Press the Adjust Active Tool button to enter the wizard selection dialog 3 Select Tool Height Calibration 4 Follow the instructions given by the wizard step by step 5 Repeat the procedure for all tools Typical use of this function is to add depth in order to ensure proper through cut in difficult materials 15 6 Rotation Ad...

Страница 93: ...activated 7 Press Tool Override Down and Jog approximate 10 cm to make a test cut 8 Press Tool Override Down once more to lift the Tool again 9 Press Tool Override Down once more to lower the Tool again 10 Note how the knife enters into the material 11 Press Tool Override Down once more to lift the Tool again 12 If knife enters exact into the cut the angle is correct select Finish to exit 13 If se...

Страница 94: ...ve Tool to enter the Wizard Selection Dialog 4 Select Manual Adjustment of Center Offset and Angle 5 Enter value for the Center Offset and select Activate 6 Note that the Tool will move as the new value is activated 7 Press Tool Override Down and Jog approximate 10 cm to make a test cut 8 Press Tool Override Down once more to lift the Tool 9 Press the Jog button for the return direction shortly just...

Страница 95: ...ustment dialog 3 Key in or use the up down arrows to specify the wanted offset 4 Press Activate to enter the value 5 Test the new settings Note All tools should by default be close to correct angle when the adjustment value is 0 The Manual adjustment of function is useful if you want to test a tool for correct behavior before program execution 15 9 Tool Offset The Laser Pointer is the reference 1 Pl...

Страница 96: ...ol List The Tool List contains Tools that you can select for the available Tool Positions Ignore Automatic Tool Identification Ignore Automatic Tool Identification may be used when the Automatic Tool Detection fails and manual tool selection is necessary If Ignore Automatic Tool Identification is checked Tool Setup remains unchanged after Table Zero Position sequence Identify Tools function Delete To...

Страница 97: ...mW 16 1 Introduction Knife Blades are extremely sharp Take care when handling Knife Tools Laser Radiation Do not stare into beam The tool head is equipped with a class II laser pointer Emitted laser power 1 mW In this chapter all tools are explored General description How to operate How to adjust 16 2 Tool Handling and Care All Tools are precision instruments and should be treated as such to ensur...

Страница 98: ...heir stations should be kept clean with a soft brush 16 3 How to Replace a Tool When mounting a tool onto the P1 or P2 Tool Positions ensure that the guide pins and the electrical connector fits those on the bracket Use an Allen Key 6 mm to fix the tool Ensure both screws are properly fixed 16 4 Two or more tools of the same type Each tool is identified to the system by Tool Type In addition it is pos...

Страница 99: ...lly as the tool is mounted onto the machine How to define individual Tool Numbers Inside each Tool there is a Tool Board By means of dip switches you can specify 4 unique Tool Numbers The different Tool Numbers are defined as follows Tool Number Tool Board switch setting Tool 1 1 2 off Tool 2 1 on 2 off Tool 3 1 off 2 on Tool 4 1 2 on Note There are some restrictions see Technical Manual for more inform...

Страница 100: ...ustable from Selected Job Edit Layer dialog For applications where a more accurate depth control is required a simple foot solution is available The tool is prepared for a wide range of Knife Blades Replace Knife Blade This figure shows how the Knife Blade is fixed inside the PressCut Knife Tool The friction between the Alignment Pin A and the Knife Blade keeps the Knife Blade in place 100 ...

Страница 101: ...s tool Lag Setting Nominal value is 0 Tool Rotation Adjust tool angle tangential to moving direction It can be difficult to see when cutting in vinyl if the knife angle is correct positioned We recommend using a sheet of folded carton when executing this wizard Center Offset Adjust Tool sideways until centered Tool Offset Adjust offset relative to Laser Pointer For more information about how to run the...

Страница 102: ...d Dependent Tool Pressure The Speed Dependent Tool Pressure function adds pressure to the Knife Blade depending upon the speed of the machine The function can be illustrated as follows The upper curve illustrates the speed of the machine when executing a line Curve A illustrates the Knife Pressure if the Speed Dependent Pressure is set to 0 the pressure is constant from start to stop TheKnife Pres...

Страница 103: ...he adjustable screw S Procedure 1 Press clamp C as indicated to lock the Knife Shaft 2 Turn the screw S to adjust the Cutting Depth When seen from the Knife Blade side a clockwise adjustment will increase the Cutting Depth 16 6 Static Knife Tool The Static Knife tool is a general purpose knife tool for cutting Corrugated and folded carton Varnish blankets 103 ...

Страница 104: ... Height Correct tool height relative to table top Lag Setting Nominal value is 0 Tool Rotation Adjust Tool Angle tangential to Moving Direction Center Offset Adjust Tool sideways until centered Tool Offset Adjust offset relative to Laser Pointer For more information about how to run the Adjustment Wizards see the Tool Configuration chapter 16 7 VibraCut Knife Tool The VibraCut Knife Tool is available ...

Страница 105: ...ol Running with 12000 RPM and amplitude 0 6 mm 0 024 inches this tool is recommended for more demanding Corrugated Materials Note Hearing Protection is recommended when working with this tool Common to both models To reduce material tear a foot is available The same set of Knife Adapters can be used Replace Knife Blade Pull straight out to remove the Knife Foot 105 ...

Страница 106: ...eft Tool Adjustment For this tool complete the following adjustments Adjustment Description Tool Height Measured automatically possible to add an Offset Value Lag Setting The Knife Lag depends upon the Blade Adapter Nominal value is 0 3 mm Tool Rotation Adjust Tool Angle tangential to Moving Direction Center Offset Adjust Tool sideways until centered Tool Offset Adjust offset relative to Laser Pointer...

Страница 107: ...p of the material The cutting depth depends upon how far out from the foot the knife extends The cutting depth is configurable from the XE Guide Job setup dialog Note As the depth is specified as the distance the knife sticks out from the foot level it is recommended to run with job setup depth specified in mm inch Replace knife Turn to loosen the locking ring Pull off the foot 107 ...

Страница 108: ...t Adjust Tool sideways until centered Tool Offset Adjust offset relative to Laser Pointer These adjustments are carried out with the foot mounted Tool Height Correct tool height relative to table top The VariCut knife tool should be adjusted to a level where the foot is lifted 1 2 mm 0 04 0 08 inches by the material The procedure is as follows 1 Using the wizard adjust the height until the foot is t...

Страница 109: ...djustments are properly completed From the Tool Configuration dialog select the tool to be adjusted Select Tool height adjustment This dialog appears In this dialog the upper part Height settings is used for the Tool height adjustment as described above The zero reference for the cutting depth is adjusted in the section Align knife tip with foot Visually inspect the knife tip and adjust the Align k...

Страница 110: ...edure until the knife cut is exactly through the carton without cutting into the paper beneath 6 Now the VariCut cutting depth is properly adjusted Adjust foot pressure The downwards foot pressure has to be adjusted depending upon the actual material The pressure F is adjusted with the knob A The illustration shows how to adjust to obtain a Low or High pressure If you are cutting in a hard materia...

Страница 111: ... As the name indicates this tool is prepared for a higher tool pressure compared to the Static Knife Tool The tool is prepared for a wide range of Knife Blades To reduce material tear and also to keep the material down as the Knife Blade is pulled out a Knife Foot is available Replace Knife Blade Pull straight out to remove the Knife Foot 111 ...

Страница 112: ...justment For this tool complete the following adjustments Adjustment Description Tool Height Measured automatically possible to add an Offset Value Lag Setting The Knife Lag depends upon the Blade Adapter Nominal value is 0 3 mm Tool Rotation Adjust Tool Angle tangential to Moving Direction Center Offset Adjust Tool sideways until centered Tool Offset Adjust offset relative to Laser Pointer For more i...

Страница 113: ...e the Knife Adapter just pull it out from the holder 16 10 Psaligraphy Knife Note In XE Guide this tool is treated as a Hi Force Knife Tool Psaligraphy Knife is a tool for cutting of fine details in paper and folding carton 113 ...

Страница 114: ...escription Lag Setting The Knife Lag depends upon the Blade Adapter Nominal value is 0 3 mm Tool Height Measured automatically possible to add an Offset Value Tool Rotation Adjust Tool Angle tangential to Moving Direction Center Offset Adjust Tool sideways until centered Tool Offset Adjust offset relative to Laser Pointer For more information about how to run the Adjustment Wizards see the Tool Configu...

Страница 115: ... for curves with small diameter It is not suitable for designs containing short lines in combination with sharp angles The RotaCut Knife Tool is prepared for Decagonal Knife Blades ø25 mm 1 inch How to replace the Knife Blade 1 Use the spanner and the hexagonal screw driver to remove the Knife Blade fixing nut 2 Carefully remove the old Knife Blade and insert the new one Ensure the Knife Blade is p...

Страница 116: ... Be careful not to hit the sharp Knife Blade 4 Verify by hand that the foot movement is smooth Tool Adjustment The RotaCut Knife Tool is adjusted in the same way as the other C tools regarding rotation angle and offset Tool Height is manually adjusted Tool Height Tool Height for RotaCut is manually adjusted using the tool height adjustment wizard available from the Tool configuration dialog Follow t...

Страница 117: ... cutting underlay M material D X Y moving direction Tool Setup for RotaCut Knife Tool Correct setting of Lag and Width values are shown Lag 3 5 mm 0 14 inch Width 7 0 mm 0 28 inch Note After modifying these values the input file has to be re opened Use the Lag and Width parameters to achieve proper corner cutting 117 ...

Страница 118: ...i Function Unit 1 Tool Height Measuring tool 2 Ballpoint Pen Ink Tool 3 Laser spot 16 13 Ballpoint Pen Ink Tool The The Ballpoint Pen Tool is available for pen drawing Tool pressure is adjustable by a knob on top of the tool 118 ...

Страница 119: ...en replaced insert the pen tool into the pen holder and turn the bracket counter clockwise to engage the pen tool again Pen tool From left Pen tool Ballpoint pen insert Locking knob with pressure adjustment screw Lumocolor Ink Tool From left Sealing to be used when the tool is out of use Lumocolor pen tool Lumocolor sleeve Lumocolor pen insert Locking knob 119 ...

Страница 120: ...l height relative to table top The Pen tool should be adjusted to a level where the pen is lifted 1 2 mm 0 04 0 08 inches by the material Center Offset Adjust tool sideways until centered Tool Offset Adjust offset relative to laser pointer For more information about how to run the Adjustment Wizards see the Tool Configuration chapter 16 14 Measuring Foot The Measuring foot Measuring Foot 1 has 3 funct...

Страница 121: ...and job execution to indicate current position on the table The Laser Pointer is lit as long as it indicates the correct current position If there is no manual operation of the table the Laser Pointer will be switched off after a 30 sec time out Pressing any button on the Operators Panel will switch the Laser Pointer on again 16 16 i cut camera Two adjustments are available A adjust the aperture F ...

Страница 122: ...ld be thoroughly cleaned and oiled very lightly The automatic draining action of the air pressure reduction valve should be controlled Switch off the air compressor and allow the air pressure to fall Switch on the air compressor and check that any water in the glass bowl of the pressure reduction valve drains out automatically during the first few seconds of operation Remove and clean the bowl if th...

Страница 123: ... procedure Switch Power Off using the Main Power Switch Remove the Main Power plug from the wall socket 18 1 MPU MPU Location Note MPU location is model dependent All fuses are located on the rear side of the Main Power Unit MPU MPU 2007 fuses MPU 32569006 Fuse Location 123 ...

Страница 124: ... 32 mm T 5A 250V 1 1 4 x 1 4 in 6 3 x 32 mm Servo power fuse F3 T 15A 250V 1 1 4 x 1 4 in 6 3 x 32 mm T 15A 250V 1 1 4 x 1 4 in 6 3 x 32 mm 24V fuse F4 T 4A 250V 1 1 4 x 1 4 in 6 3 x 32 mm T 4A 250V 1 1 4 x 1 4 in 6 3 x 32 mm Procedure 1 Remove base cover in front of MPU 2 Pull out the MPU cabinet to access the rear side 3 Remove one fuse and check with ohm meter If blown replace with a new identi...

Страница 125: ...ion Procedure 1 Remove X1 cover 2 Remove fuse Fx1 check with ohm meter If blown replace with a new identical fuse 3 Replace X1 cover 4 Insert main power cable into the wall socket and turn main power ON Fuse Details T 8A 250V 1 1 4 x 1 4 in 6 3 x 32 mm 125 ...

Страница 126: ...cedure 1 Remove X2 cover 2 Remove fuse Fx2 check with ohm meter If blown replace with a new identical fuse 3 Replace X2 cover 4 Insert main power cable into the wall socket and turn main power ON Fuse Details T 8A 250V 1 1 4 x 1 4 in 6 3 x 32 mm 18 4 Y Z fuse 126 ...

Страница 127: ...z check with ohm meter If blown replace with a new identical fuse 3 Replace Y cover 4 Insert main power cable into the wall socket and turn main power ON Fuse Details Fy T 8A 250V 1 1 4 x 1 4 in 6 3 x 32 mm Fz T 2A 250V 1 1 4 x 1 4 in 6 3 x 32 mm 18 5 Tool Rotation Reciprocating knife Tool up_down 127 ...

Страница 128: ...er If blown replace with a new identical fuse 4 Insert main power cable into the wall socket and turn main power ON 5 For information about fuse sizes see table below Fuse Details Tool head Function Fuse Fuse size Fuse type Crease tool Tool rotation Fhr 2 T 2A 125V NANO 42441618 Crease tool Tool u d Fu d 0 5 T 0 5A 125V NANO 42441600 Hi force knife tool Tool rotation Fhr 2 T 2A 125V NANO 42441618 ...

Страница 129: ...125V NANO 42441618 RotaCut Knife RPM Fu d 2 T 2A 125V NANO 42441618 Static knife tool Tool rotation Fhr 2 T 2A 125V NANO 42441618 Static knife tool Tool u d Fu d 0 5 T 0 5A 125V NANO 42441600 VariCut knife tool Tool rotation Fhr 2 T 2A 125V NANO 42441618 VariCut knife tool Knife depth Fu d 0 5 T 0 5A 125V NANO 42441600 VibraCut knife tool Tool rotation Fhr 2 T 2A 125V NANO 42441618 VibraCut knife ...

Страница 130: ...19 Kongsberg XE 19 Install software For information about software installation see the Installation Manual for the actual machine Available on the Documentation DVD 130 ...

Страница 131: ...nsmitters pointing correctly to their receiver Check if the red light is shining on the receiver If necessary adjust by bending the transmitter receiver holder During start up X1 X2 Y servo error This is probably caused by a defect in an amplifier board Please contact Esko for technical support During start up X1 X2 Y fuse error Check the fuse of the motor If problem persists it is likely to be the...

Страница 132: ... big green cable still well connected Check all connections of the milling spindle at tool head inside cover X1 and at the inverter Check serial connection between inverter and PC connection OK COM port changed lately If problem still persists contact Esko 2 or 3 tools are working at the same time Check your compressed air make sure you have 7 bar Check compressed air connection at the head Is it ...

Страница 133: ...rsion Check the serial connection between PC and MCU Check the connection at the emergency button 20 4 i cut Outside table limit Check your starting point If you are using a random starting point X make sure the design fits the table When working with regmarks make sure you reset placement offset before starting a new job 133 ...

Отзывы: