❏
Image Format
: Select the save format from the list.
You can make detailed settings for each save format except BITMAP and PNG. After selecting the save
format, select
Options
from the list.
❏
File Name
: Check the save file name displayed.
You can change settings for file name by selecting
Settings
from the list.
❏
Folder
: Select the save folder for the scanned image from the list.
You can select other folder or create a new folder by selecting
Select
from the list.
6.
Click
Scan
.
Note:
❏
You can also start scanning by pressing
x
button on the scanner.
❏
To scan originals that are likely to jam, for example thin paper, enable
Slow
on the control panel to slow down the
scanning speed.
Press the
d
button, and then select
Scanner Settings
>
Slow
.
The scanned image is saved to the folder you specified.
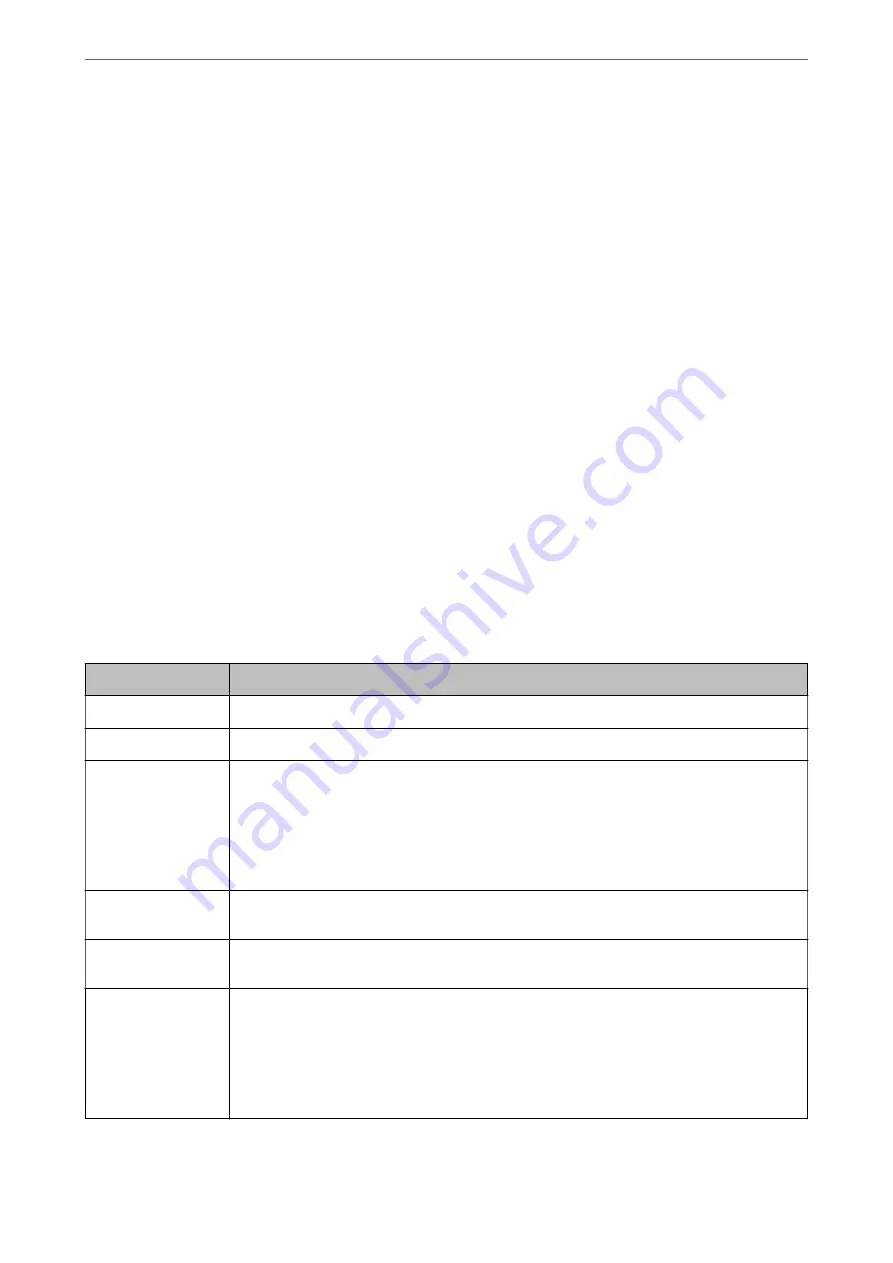
Required Settings for Special Originals in Epson Scan 2 Window
You need to set certain items on the
Main Settings
tab in Epson Scan 2 window when scanning special originals.
When you are using Document Capture Pro, you can open the window by pressing the
Detailed Settings
button
on the
Scan Settings
screen.
Type of Original
Required Settings
Envelopes
Select
Off
in
Detect Double Feed
.
Plastic cards
Select
Plastic Card
on the
Document Size
list, or select
Off
in
Detect Double Feed
.
Carrier Sheet
❏
If you select
Auto Detect
from the
Document Size
list, paper skew in the original is
automatically corrected even if you select
Off
in
Correct Document Skew
.
❏
If you select a other size than
Auto Detect
from the
Document Size
list, you can only use
Contents Skew
when using
Correct Document Skew
.
Paper Skew
is not applied when this is selected. When you select
Paper and Contents Skew
,
only contents skew is corrected.
Large size originals
If the size of the original you want to scan is not on the
Document Size
list, select
Customize
to
open the
Document Size Settings
window. Next, create the size manually on the window.
Long paper
If the size is not listed on the
Document Size
list, select
Auto Detect (Long Paper)
or select
Customize
to create a custom document size.
Laminated cards
To scan transparent areas around the edges, select
Customize
on the
Document Size
list to open
the
Document Size Settings
window. Next, select
Scan laminated card
in the window.
Note:
The appropriate effect may not be achieved depending on the original. If transparent areas
around the edges are not scanned, select
Customize
from the
Document Size
list, and then
create the size manually.
>
>
112
Содержание DS-730
Страница 10: ...Important Instructions Safety Instructions 11 Restrictions on Copying 12 ...
Страница 27: ...Specifications of Originals and Placing Originals Specifications of Originals 28 Placing Originals 33 ...
Страница 78: ...3 Click Edit Preparing to Scan over a Network Setting a Shared Network Folder Creating the Shared Folder 78 ...
Страница 91: ...Basic Scanning Scanning Using the Scanner s Control Panel 92 Scanning from a Computer 96 ...
Страница 255: ...Standards and Approvals Standards and Approvals for European Models 256 Standards and Approvals for U S Models 256 ...
Страница 257: ...Where to Get Help Technical Support Web Site 258 Contacting Epson Support 258 ...


