


Hardware Preparation and Installation
ATCA-8310 Installation and Use (6806800M72D
)
52
2.5.2
Removing the Blade
This section describes how to remove the blade from an AdvancedTCA system.
Removal Procedure
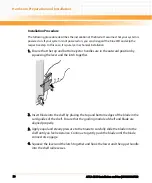
The following procedure describes how to remove the blade from a system. It assumes that the
system is powered on. If the system is not powered on, you can disregard the blue LED and skip
the respective step. In that case, it is purely a mechanical procedure.
1. Unlatch the lower handle by squeezing the lever and the latch together and turning
the handle outward just enough to unlatch the handle from the face plate. Do not
rotate the handle fully outward.
The blue LED blinks indicating that the blade power-down process is ongoing.
2. Wait until the blue LED is illuminated permanently, then unlatch the upper handle
and rotate both handles fully outward.
Damage of Circuits
Electrostatic discharge and incorrect blade installation and removal can damage circuits or
shorten their life.
Before touching the blade or electronic components, make sure that you are working in an
ESD-safe environment.
Blade Malfunctioning
Incorrect blade installation and removal can result in blade malfunctioning.
When plugging the blade in or removing it, do not press on the face plate but use the
handles.
If the LED continues to blink, a possible reason may be that the upper layer software
rejected the blade extraction request.
Содержание ATCA-8310
Страница 12: ...ATCA 8310 Installation and Use 6806800M72D Contents 12 Contents Contents ...
Страница 26: ...ATCA 8310 Installation and Use 6806800M72D 26 List of Figures ...
Страница 34: ...ATCA 8310 Installation and Use 6806800M72D About this Manual 34 About this Manual ...
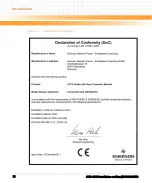
Страница 38: ...Introduction ATCA 8310 Installation and Use 6806800M72D 38 Figure 1 1 Declaration of Conformity ...
Страница 54: ...Hardware Preparation and Installation ATCA 8310 Installation and Use 6806800M72D 54 ...
Страница 70: ...Controls Indicators and Connectors ATCA 8310 Installation and Use 6806800M72D 70 ...
Страница 146: ...BIOS ATCA 8310 Installation and Use 6806800M72D 146 5 3 3 2 3 SATA Configuration Figure 5 32 SATA Configuration ...
Страница 162: ...BIOS ATCA 8310 Installation and Use 6806800M72D 162 ...
Страница 200: ...U Boot ATCA 8310 Installation and Use 6806800M72D 200 ...
Страница 244: ...Intelligent Peripheral Management Controller ATCA 8310 Installation and Use 6806800M72D 244 ...
Страница 438: ...CPLD and FPGA ATCA 8310 Installation and Use 6806800M72D 438 ...
Страница 442: ...Replacing the Battery ATCA 8310 Installation and Use 6806800M72D 442 ...
Страница 444: ...Related Documentation ATCA 8310 Installation and Use 6806800M72D 444 ...
Страница 454: ...ATCA 8310 Installation and Use 6806800M72D Sicherheitshinweise 454 ...
Страница 456: ...Index ATCA 8310 Installation and Use 6806800M72D 456 ...
Страница 457: ...Index ATCA 8310 Installation and Use 6806800M72D 457 ...
Страница 458: ...Index ATCA 8310 Installation and Use 6806800M72D 458 ...
Страница 459: ......


