Processor
127
NOTICE:
Socket pins are delicate. To avoid damage, ensure that the processor is
aligned properly with the socket, and do not use excessive force when you install
the processor. Be careful not to touch or bend the pins on the system board.
2
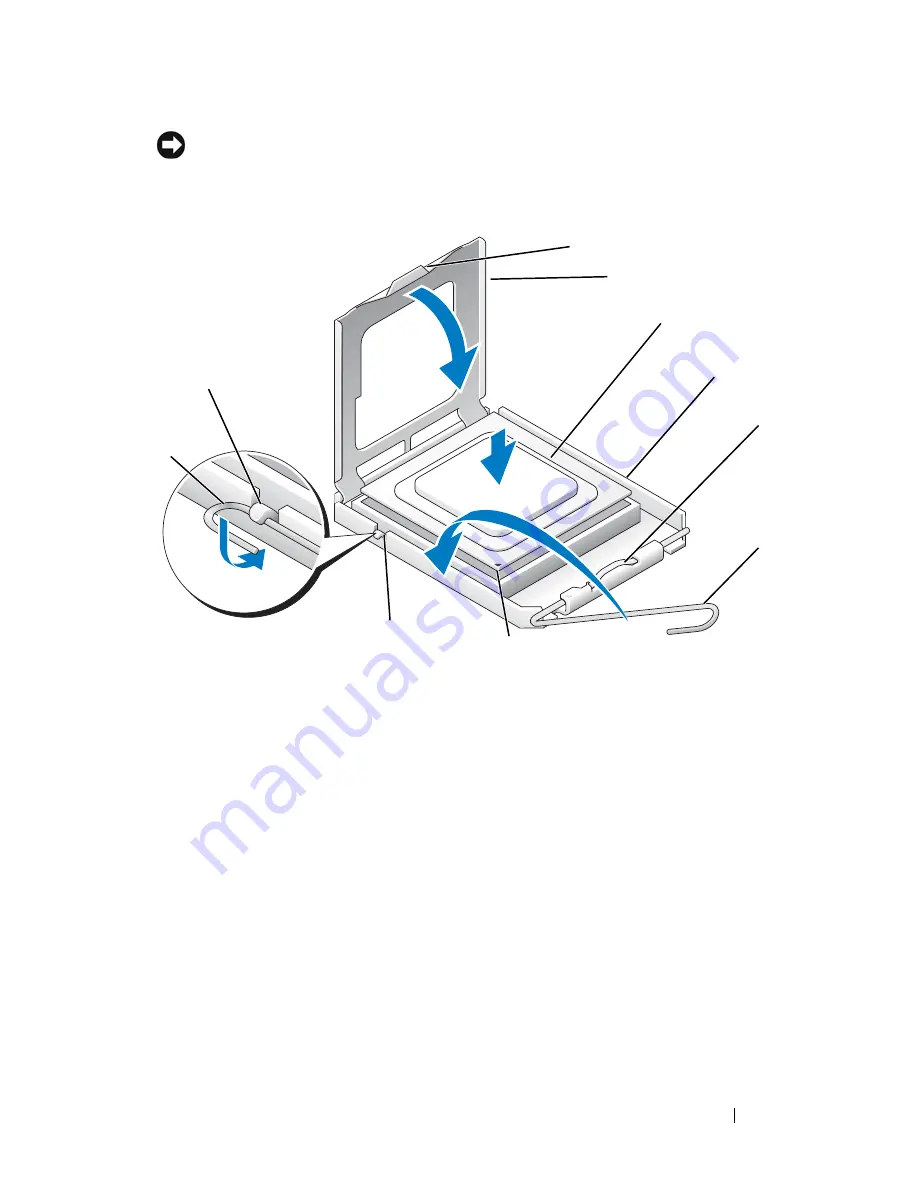
Pivot the release lever fully and ensure that the processor cover remains
raised.
3
Orient the two alignment notches on the processor with the two alignment
notches on the socket.
4
Align the pin-1 corners of the processor and socket, and set the processor
lightly in the socket, ensuring that the processor is positioned correctly.
1
tab
2
processor cover
3
processor
4
processor socket
5
retention latch
6
release lever
7
processor pin-1 indicator
8
alignment notch
9
retention hook
10
alignment notch
1
3
4
6
8
7
10
2
5
9
Содержание Vostro 220 - Vostro 220 Slim Desktop Computer
Страница 42: ...42 Working on Your Computer Vostro 220 2 4 3 13 16 18 5 14 17 19 21 22 1 23 20 15 8 9 11 10 12 6 7 24 25 ...
Страница 50: ...50 Computer Cover ...
Страница 52: ...52 Bezel 1 clips 4 2 bezel 1 2 ...
Страница 54: ...54 Bezel ...
Страница 64: ...64 PCI and PCI Express Cards ...
Страница 87: ...Drives 87 Vostro 220s 1 3 5 inch bay break away metal plate 1 ...
Страница 88: ...88 Drives ...
Страница 94: ...94 Fan Vostro 420 1 chassis fan 2 system board power connector 3 screws 4 2 1 3 ...
Страница 95: ...Fan 95 Vostro 220 1 chassis fan 2 system board power connector 3 screws 4 2 1 3 ...
Страница 96: ...96 Fan Vostro 220s 1 system board power connector 2 chassis fan 3 screw 1 2 3 ...
Страница 98: ...98 Fan ...
Страница 111: ...Power Supply 111 Vostro 220 ...
Страница 116: ...116 Power Supply ...
Страница 124: ...124 System Board ...
Страница 138: ...138 Contacting Dell ...


