
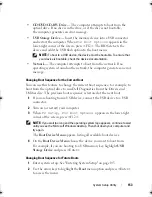


Flashing the BIOS
159
32
Flashing the BIOS
The BIOS may require flashing when an update is available or when replacing
the system board. To flash the BIOS:
1
Turn on the computer.
2
Go to
support.dell.com/support/downloads
.
3
Locate the BIOS update file for your computer:
NOTE:
The Service Tag for your computer is located on a label at the back of
your computer.
If you have your computer’s Service Tag:
a
Click
Enter a Tag
.
b
Enter your computer’s Service Tag in the
Enter a service tag:
field,
click
Go
, and proceed to step 4.
If you do not have your computer’s Service Tag:
a
Click
Select Model.
b
Select the type of product in the
Select Your Product Family
list.
c
Select the product brand in the
Select Your Product Line
list.
d
Select the product model number in the
Select Your Product Model
list.
NOTE:
If you have selected a different model and want to start over again,
click Start Over on the top right of the menu.
e
Click
Confirm
.
4
A list of results appears on the screen. Click
BIOS
.
5
Click
Download Now
to download the latest BIOS file.
The
File Download
window appears.
6
Click
Save
to save the file on your desktop. The file downloads to your
desktop.
7
Click
Close
if the
Download Complete
window appears.
The file icon appears on your desktop and is titled the same as the
downloaded BIOS update file.
book.book Page 159 Wednesday, May 16, 2012 2:37 PM
Содержание Alienware Aurora R4
Страница 16: ...16 Before you Begin ...
Страница 24: ...24 Technical Overview ...
Страница 26: ...26 Left Side Panel 1 release panel 2 security cable slot 3 security cable slot latch 4 left side panel 1 2 3 4 ...
Страница 28: ...28 Left Side Panel ...
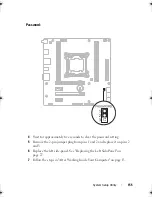
Страница 31: ...Hard Drive s 31 2 Follow the steps in After Working Inside Your Computer on page 15 ...
Страница 32: ...32 Hard Drive s ...
Страница 36: ...36 Hard Drive Fan Assembly ...
Страница 39: ...Optical Drive s 39 2 Follow the steps in After Working Inside Your Computer on page 15 ...
Страница 40: ...40 Optical Drive s ...
Страница 56: ...56 PCI Fan Assembly ...
Страница 62: ...62 Graphics Card ...
Страница 69: ...Memory Fan 69 2 Follow the steps in After Working Inside Your Computer on page 15 ...
Страница 70: ...70 Memory Fan ...
Страница 74: ...74 Processor Liquid Cooling Assembly ...
Страница 81: ...Processor 81 ...
Страница 82: ...82 Processor ...
Страница 88: ...88 Power Supply ...
Страница 92: ...92 Coin Cell Battery ...
Страница 98: ...98 System Board Assembly ...
Страница 102: ...102 Master I O Board ...
Страница 106: ...106 Top Lighting Board ...
Страница 108: ...108 Right Side Top Panel 2 Remove the screw that secures the right side top panel ...
Страница 112: ...112 Right Side Top Panel ...
Страница 116: ...116 Right Side Middle Panel ...
Страница 120: ...120 Right Lighting Board ...
Страница 122: ...122 Right Side Bottom Panel 2 Slide and remove the right side bottom panel from the chassis 1 screws 2 1 ...
Страница 135: ...Back Bezel 135 1 screws 2 2 back bezel 3 tabs 1 2 3 ...
Страница 140: ...140 WiFi Bluetooth Assembly ...
Страница 144: ...144 Top I O Panel ...
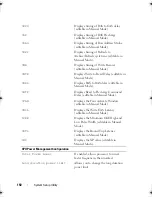
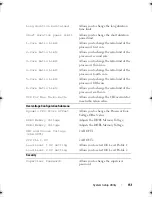
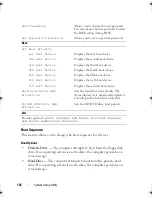
Страница 158: ...158 System Setup Utility ...
Страница 160: ...160 Flashing the BIOS 8 Double click the file icon on the desktop and follow the instructions on the screen ...
Страница 162: ...162 Specifications ...