


System Setup Utility
151
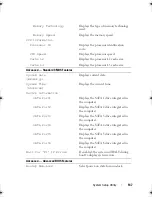
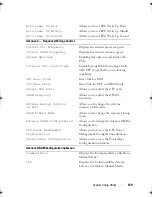
Long duration maintained
Allows you to change the long duration
time limit.
Short duration power limit
Allows you to change the short duration
power limit.
1-Core Ratio Limit
Allows you to change the ratio limit of the
processor’s first core.
2-Core Ratio Limit
Allows you to change the ratio limit of the
processor’s second core.
3-Core Ratio Limit
Allows you to change the ratio limit of the
processor’s third core.
4-Core Ratio Limit
Allows you to change the ratio limit of the
processor’s fourth core.
5-Core Ratio Limit
Allows you to change the ratio limit of the
processor’s fifth core.
6-Core Ratio Limit
Allows you to change the ratio limit of the
processor’s sixth core.
VID for Max Turbo Ratio
Allows you to change the VID override for
max turbo ration value.
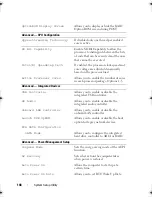
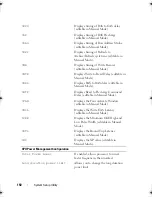
Overvoltage Configuration Submenu
Dynamic CPU VCore Offset
Allows you to change the Processor Core
Voltage Offset value.
DDR3 Memory Voltage
Adjusts the DDR3 Memory Voltage.
DDR3 Memory Voltage
Adjusts the DDR3 Memory Voltage.
DMI and Uncore Voltage
(2AH OUT1)
2AH OUT1.
CPU PLL 1.8V
2AH OUT2.
Load Level 1 OC Setting
Allows you to select OC Level Profile 1
Load Level 2 OC Setting
Allows you to select OC Level Profile 2
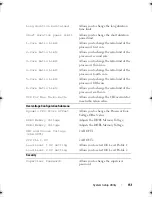
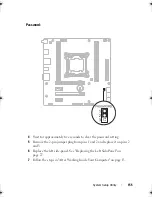
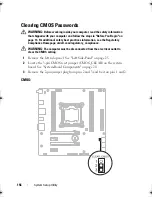
Security
Supervisor Password:
Allows you to change the supervisor
password.
book.book Page 151 Wednesday, May 16, 2012 2:37 PM
Содержание Alienware Aurora R4
Страница 16: ...16 Before you Begin ...
Страница 24: ...24 Technical Overview ...
Страница 26: ...26 Left Side Panel 1 release panel 2 security cable slot 3 security cable slot latch 4 left side panel 1 2 3 4 ...
Страница 28: ...28 Left Side Panel ...
Страница 31: ...Hard Drive s 31 2 Follow the steps in After Working Inside Your Computer on page 15 ...
Страница 32: ...32 Hard Drive s ...
Страница 36: ...36 Hard Drive Fan Assembly ...
Страница 39: ...Optical Drive s 39 2 Follow the steps in After Working Inside Your Computer on page 15 ...
Страница 40: ...40 Optical Drive s ...
Страница 56: ...56 PCI Fan Assembly ...
Страница 62: ...62 Graphics Card ...
Страница 69: ...Memory Fan 69 2 Follow the steps in After Working Inside Your Computer on page 15 ...
Страница 70: ...70 Memory Fan ...
Страница 74: ...74 Processor Liquid Cooling Assembly ...
Страница 81: ...Processor 81 ...
Страница 82: ...82 Processor ...
Страница 88: ...88 Power Supply ...
Страница 92: ...92 Coin Cell Battery ...
Страница 98: ...98 System Board Assembly ...
Страница 102: ...102 Master I O Board ...
Страница 106: ...106 Top Lighting Board ...
Страница 108: ...108 Right Side Top Panel 2 Remove the screw that secures the right side top panel ...
Страница 112: ...112 Right Side Top Panel ...
Страница 116: ...116 Right Side Middle Panel ...
Страница 120: ...120 Right Lighting Board ...
Страница 122: ...122 Right Side Bottom Panel 2 Slide and remove the right side bottom panel from the chassis 1 screws 2 1 ...
Страница 135: ...Back Bezel 135 1 screws 2 2 back bezel 3 tabs 1 2 3 ...
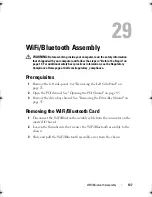
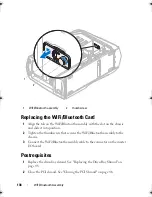
Страница 140: ...140 WiFi Bluetooth Assembly ...
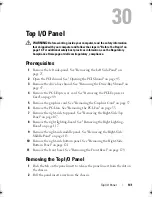
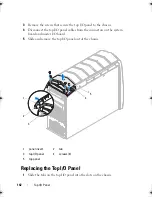
Страница 144: ...144 Top I O Panel ...
Страница 158: ...158 System Setup Utility ...
Страница 160: ...160 Flashing the BIOS 8 Double click the file icon on the desktop and follow the instructions on the screen ...
Страница 162: ...162 Specifications ...