


Before you Begin
13
3
Before You Begin
Turn Off Your Computer and Connected Devices
CAUTION:
To avoid losing data, save and close all open files and exit all open
programs before you turn off your computer.
1
Save and close all open files and exit all open programs.
2
Click
Start
and click
Shut Down
.
Microsoft Windows shuts down and then the computer turns off.
NOTE:
If you are using a different operating system, see the documentation of
your operating system for shut-down instructions.
3
Disconnect your computer and all attached devices from their electrical
outlets.
4
Disconnect all telephone cables, network cables, and attached devices
from your computer.
5
Press and hold the power button, while the computer is unplugged, to
ground the system board.
Safety Instructions
Use the following safety guidelines to protect your computer from potential
damage and ensure your personal safety.
WARNING:
Before working inside your computer, read the safety information
that shipped with your computer. For additional safety best practices information,
see the Regulatory Compliance Homepage at dell.com/regulatory_compliance.
CAUTION:
To avoid damaging the computer, ensure that the work surface is flat
and clean.
CAUTION:
To avoid damaging the components and cards, handle them by their
edges and avoid touching pins and contacts.
WARNING:
Disconnect all power sources before opening the computer cover or
panels. After you finish working inside the computer, replace all covers, panels,
and screws before connecting to the power source.
book.book Page 13 Wednesday, May 16, 2012 2:37 PM
Содержание Alienware Aurora R4
Страница 16: ...16 Before you Begin ...
Страница 24: ...24 Technical Overview ...
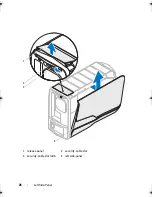
Страница 26: ...26 Left Side Panel 1 release panel 2 security cable slot 3 security cable slot latch 4 left side panel 1 2 3 4 ...
Страница 28: ...28 Left Side Panel ...
Страница 31: ...Hard Drive s 31 2 Follow the steps in After Working Inside Your Computer on page 15 ...
Страница 32: ...32 Hard Drive s ...
Страница 36: ...36 Hard Drive Fan Assembly ...
Страница 39: ...Optical Drive s 39 2 Follow the steps in After Working Inside Your Computer on page 15 ...
Страница 40: ...40 Optical Drive s ...
Страница 56: ...56 PCI Fan Assembly ...
Страница 62: ...62 Graphics Card ...
Страница 69: ...Memory Fan 69 2 Follow the steps in After Working Inside Your Computer on page 15 ...
Страница 70: ...70 Memory Fan ...
Страница 74: ...74 Processor Liquid Cooling Assembly ...
Страница 81: ...Processor 81 ...
Страница 82: ...82 Processor ...
Страница 88: ...88 Power Supply ...
Страница 92: ...92 Coin Cell Battery ...
Страница 98: ...98 System Board Assembly ...
Страница 102: ...102 Master I O Board ...
Страница 106: ...106 Top Lighting Board ...
Страница 108: ...108 Right Side Top Panel 2 Remove the screw that secures the right side top panel ...
Страница 112: ...112 Right Side Top Panel ...
Страница 116: ...116 Right Side Middle Panel ...
Страница 120: ...120 Right Lighting Board ...
Страница 122: ...122 Right Side Bottom Panel 2 Slide and remove the right side bottom panel from the chassis 1 screws 2 1 ...
Страница 135: ...Back Bezel 135 1 screws 2 2 back bezel 3 tabs 1 2 3 ...
Страница 140: ...140 WiFi Bluetooth Assembly ...
Страница 144: ...144 Top I O Panel ...
Страница 158: ...158 System Setup Utility ...
Страница 160: ...160 Flashing the BIOS 8 Double click the file icon on the desktop and follow the instructions on the screen ...
Страница 162: ...162 Specifications ...