148
System Setup Utility
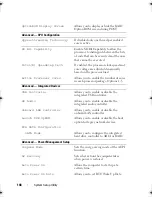
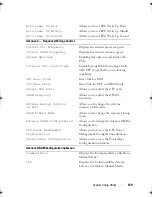
OptionROM Display Screen
Allows you to display or hide the RAID
Option ROM screen during POST.
Advanced — CPU Configuration
Hyper-threading Technology
If disabled only one thread per enabled
core is active.
XD Bit Capability
Enable XD Bit Capability to allow the
processor to distinguish between the bits
of code that can be executed and the ones
that cannot be executed.
Intel(R) Speedstep tech
If enabled, the processor clock speed and
core voltage are adjusted dynamically
based on the processor load.
Active Processor Cores
Allows you to enable the number of cores
in each processor package. Options 1-5.
Advanced — Integrated Devices
USB Controller
Allows you to enable or disable the
integrated USB controller.
HD Audio
Allows you to enable or disable the
integrated audio controller.
Onboard LAN Controller
Allows you to enable or disable the
onboard LAN controller.
Launch PXE OpROM
Allows you to enable or disable the boot
option for legacy network devices.
PCH SATA Configuration
SATA Mode
Allows you to configure the integrated
hard drive controller to AHCI or RAID.
Advanced — Power Management Setup
Suspend Mode
Sets the energy-saving mode of the ACPI
function.
AC Recovery
Sets what action the computer takes
when power is restored.
Auto Power On
Allows the computer to start up at a
certain time.
Auto Power On Date
Allows you to set RTC Wake Up Date.
book.book Page 148 Wednesday, May 16, 2012 2:37 PM
Содержание Alienware Aurora R4
Страница 16: ...16 Before you Begin ...
Страница 24: ...24 Technical Overview ...
Страница 26: ...26 Left Side Panel 1 release panel 2 security cable slot 3 security cable slot latch 4 left side panel 1 2 3 4 ...
Страница 28: ...28 Left Side Panel ...
Страница 31: ...Hard Drive s 31 2 Follow the steps in After Working Inside Your Computer on page 15 ...
Страница 32: ...32 Hard Drive s ...
Страница 36: ...36 Hard Drive Fan Assembly ...
Страница 39: ...Optical Drive s 39 2 Follow the steps in After Working Inside Your Computer on page 15 ...
Страница 40: ...40 Optical Drive s ...
Страница 56: ...56 PCI Fan Assembly ...
Страница 62: ...62 Graphics Card ...
Страница 69: ...Memory Fan 69 2 Follow the steps in After Working Inside Your Computer on page 15 ...
Страница 70: ...70 Memory Fan ...
Страница 74: ...74 Processor Liquid Cooling Assembly ...
Страница 81: ...Processor 81 ...
Страница 82: ...82 Processor ...
Страница 88: ...88 Power Supply ...
Страница 92: ...92 Coin Cell Battery ...
Страница 98: ...98 System Board Assembly ...
Страница 102: ...102 Master I O Board ...
Страница 106: ...106 Top Lighting Board ...
Страница 108: ...108 Right Side Top Panel 2 Remove the screw that secures the right side top panel ...
Страница 112: ...112 Right Side Top Panel ...
Страница 116: ...116 Right Side Middle Panel ...
Страница 120: ...120 Right Lighting Board ...
Страница 122: ...122 Right Side Bottom Panel 2 Slide and remove the right side bottom panel from the chassis 1 screws 2 1 ...
Страница 135: ...Back Bezel 135 1 screws 2 2 back bezel 3 tabs 1 2 3 ...
Страница 140: ...140 WiFi Bluetooth Assembly ...
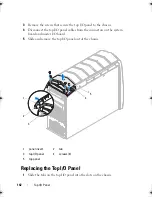
Страница 144: ...144 Top I O Panel ...
Страница 158: ...158 System Setup Utility ...
Страница 160: ...160 Flashing the BIOS 8 Double click the file icon on the desktop and follow the instructions on the screen ...
Страница 162: ...162 Specifications ...

