background image

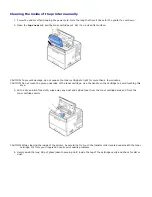
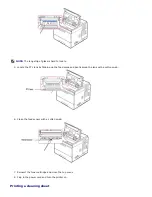
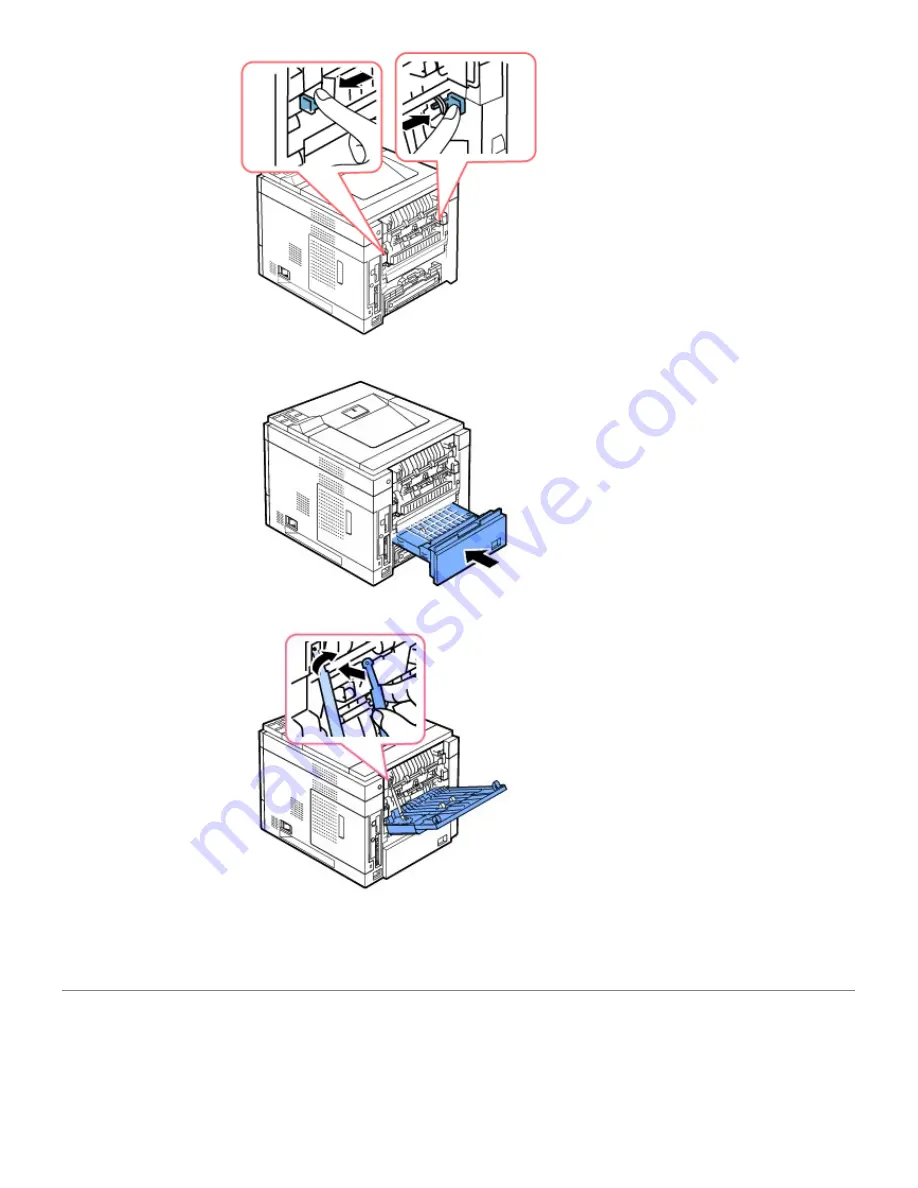
10.  Insert the 

duplex unit

 into the slot. 

11.  Put the 

rear door

 back on and insert the 

rear door

 strap to the printer.

12.  Close the 

rear door

.

13.  Reconnect the power cord and printer cable, and turn the printer on.

Replacement parts

From time to time, you need to replace the rollers and fuser unit to maintain top performance and to avoid print quality

and paper feed problems resulting from worn parts.

Содержание 5330dn - Workgroup Laser Printer B/W

Страница 1: ... used in this text Dell the DELL logo and Dell Toner Management System are trademarks of Dell Inc Microsoft Windows Windows Vista Windows Server 2008 Windows 7 and Windows Server 2008 R2 are either trademarks or registered trademarks of Microsoft Corporation Macintosh MacOS EtherTalk and TrueType are trademarks of Apple Inc registered in the U S and other countries Linux is a trademark or register...

Страница 2: ... The printer requires at least two people to lift it safely Leave enough room to open the printer tray covers doors and additional options It is also important to allow enough space around the printer for proper ventilation Provide the proper environment A firm level surface Away from the direct airflow of air conditioners heaters or ventilators Away from sunlight extreme humidity or high fluctuat...

Страница 3: ...ll Toner Management System Firmware Update Utility and HTML User s Guide c Owner s manual may not be supplied depending on model and country NOTE The power cord must be plugged into a grounded power socket 3 Save the carton and packing material in case the printer needs to be re packed 4 Remove the packing tape from the front back and sides of the printer About Your Printer These are the main comp...

Страница 4: ...se feeder paper width guides 4 control panel 12 multi purpose feeder extension 5 control board cover 13 multi purpose feeder 6 optional tray 2 500 sheet paper feeder 14 Output Expander 7 optional tray 3 500 sheet paper feeder 15 High Capacity Feeder 8 optional tray 4 500 sheet paper feeder Rear View ...

Страница 5: ...1 rear door 5 parallel port 2 duplex unit 6 USB port 3 power receptacle 7 power switch 4 network port Operator Panel Button Functions ...

Страница 6: ...ay Scroll increasing or decreasing values Confirms screen selection Goes back to the upper menu level Enter Menu mode and scroll through the available menus Stops an operation at any time Internal Fonts The Dell 5330dn Mono Laser Printer supports PCL and PS fonts ...

Страница 7: ...ct 4 PCL Font list pages print out Printing the PS Font list 1 Press Menu 2 Press Scroll to to highlight Reports and press Select 3 Press Scroll to to highlight PS Font list and press Select 4 PCL Font list pages print out NOTE Optional Fonts Add additional PCL fonts Barcodes PCL Logos by installing the optional USB font card or harddisk Please contact your local Dell sales team in your region for...

Страница 8: ...e Be careful not to cut the tape If this happens you cannot use the toner cartridge NOTE See the help pictures on the cartridge wrapping paper 3 Remove the flexible plastic holder from the toner cartridge 4 Thoroughly shake the cartridge 5 or 6 times to distribute the toner evenly inside the cartridge Thoroughly roll the cartridge to assure maximum copies per cartridge Save the box and the plastic...

Страница 9: ...ponding grooves within the printer guide the cartridge into the correct position until it locks firmly into place NOTE Do not use excessive force when inserting the cartridge into the printer Ensure cartridge is placed correctly according to the tabs and grooves before applying any pressure 7 Close the top cover Ensure cover is securely closed ...

Страница 10: ...standard Optional 500 Sheet Tray and HCF Setting Paper Size for DOS printing or Paper Tab for PC printing CAUTION Do not use glued paepr or pad note It could cause damage to the printer To load a stack of A4 or Letter sized paper 1 Pull open tray 1 and remove from the printer 2 Squeeze the paper width guide and slide it to the desired paper size marked at the bottom of the tray 3 Squeeze the paper...

Страница 11: ...the top side If you experience problems with the paper feed turn the paper around NOTE You need to adjust the paper guides when loading paper of a different size Refer to Setting the Paper Type and For standard Optional 500 Sheet Tray and HCF Setting Paper Size for DOS printing or Paper Tab for PC printing 6 Ensure that the tray is not overfilled and that all four corners of the paper are flat in ...

Страница 12: ...ing Paper Size Changing the size of the paper in the paper tray The tray is preset to Letter or A4 size depending on country specifications To change the size you need to adjust the Paper guides 1 Push the back plate of the tray outwards completely so that the length of the tray can be extended 2 Squeeze the paper length guide and slide it to the required paper size you are loading which is marked...

Страница 13: ...er Cable Connecting the Printer Locally A local printer is a printer connected to your computer using USB or Parallel IEEE1284 compatible cable If your printer is attached to a network instead of your computer skip the following steps and go to Connecting the Printer to the Network USB and Parallel cables are sold separately Contact Dell to purchase printer cable Using a USB cable NOTE Connecting ...

Страница 14: ...a certified Parallel cable You will need to buy a IEEE1284 compliant cable which is about 10 feet 3 meters in length 1 Ensure the printer computer and any other attached devices are powered off and unplugged 2 Connect a Parallel cable to the Parallel port on your printer Push the metal clips down fit inside the notches on the cable plug 3 Connect the other end of the cable to the parallel interfac...

Страница 15: ...ter CAUTION The fusing area inside your printer becomes hot once the printer is powered on To avoid injuries or burns access this area only when the system is powered off and has cooled down CAUTION Do not disassemble the printer when it is powered on If you do it may give you an electric shock To turn on the printer 1 Plug one end of the power cord into the power connector at the back of the prin...

Страница 16: ...iagram below shows the menus and items available in each menu NOTE Some menus may not appear in the display depending on options or models If so it is not applicable to your machine Dell 5330dn Mono Laser Printer Menu Function 1 Paper Setup Paper Size Type NOTE Only installed paper sources are displayed This menu selection is used to set the size and type of media loaded into an input tray ...

Страница 17: ... linked source Tray x Type Select the paper type currently loaded in the tray Plain Paper Thick Thin Colored Printed Recycled Bond Letter Head Use this menu item to Optimize print quality for the specified paper Select paper sources through your software application by selecting type and size Automatically link paper sources Any sources containing the same type and size of paper are automatically ...

Страница 18: ...een millimeters and inches INCH Millimeters INCH displays paper width and length in inches Millimeters displays paper width and length in millimeters Tray x Width Set the paper width of custom media 148 216 mm Set the custom width from 148 to 216 mm Tray x Length Set the paper length of custom media 210 355 mm Set the custom length from 210 to 355 mm MPF Width Set the paper width of custom media 7...

Страница 19: ...trays On Off If this menu item is set to Off the printer doesn t work until you insert paper into the specified tray Substitute Size Substitutes the specified paper size if the requested size is not loaded Nearest Size Off Substitute size set to Off means no substitution is allowed for the requested paper size See Substitute Size Configure MPF Determines when the printer selects paper loaded in th...

Страница 20: ... layout and current settings of the control panel menu items Configuration Shows the printer s current configuration Demo page Allows you to check if your printer properly performs printing Network Settings Prints information relating to network settings and verifies the network connection Also provides information to configure printer for network printing Job History Shows the list of completed p...

Страница 21: ... printer may not support the entire range of values The factory default Power Save setting depends on your printer model Print the menu settings page to determine the current Power Save setting When the printer is in Power Save mode it is still ready to receive print jobs Select a high value if your printer is in constant use Under most circumstances this keeps the printer ready to print with mini...

Страница 22: ...l display The printer goes offline for 30 seconds then automatically clears the message and continues printing Off If a paper mismatch occurs an error message remains on the display and the printer remains off line until you insert the correct paper Jam Recovery On Off Specifies whether the printer reprints jammed pages On Printer reprints jammed pages Off Printer does not reprint jammed pages Aut...

Страница 23: ...ormal Light Dark Lighten or darken the print on the page by changing the toner density setting The Normal setting usually produces the best result Use the Light toner density setting to save toner Finishing Use this menu selection to define how the printer delivers the printed output Menu selection Purpose Values Copies Set the default number of copies by selecting any number from 1 to 999 1 999 O...

Страница 24: ...margin from 0 0 to 9 9 mm Short Binding Set the bottom margin of the back of the page for short binding from 0 to 22 mm Long Binding Set the right margin of the back of the page for long binding from 0 to 22 mm Collation Keeps the pages of a print job stacked in sequence when printing multiple copies of the job On Off On Prints entire job according to the number of times specified by the Copies me...

Страница 25: ...ot print application generated blank pages as part of your job Form Menu Only if HDD is installed Menu selection Purpose Values Form Menu See Printing using the form files Off Single Form Double Form Off Prints in normal mode Single Form Prints all pages using the first form Double Form Prints the front page using the first form and the back page using the second form Select Form Only if HDD is in...

Страница 26: ...twork Menu and USB Menu Resource residing in flash memory or on the hard disk NOTE All downloaded resources fonts macros and symbols sets in printer memory RAM are deleted 4 Job Management Stored jobs Menu selection Purpose Values Stored jobs Print jobs currently stored in the hard disk User ID1 User ID2 Job Expiaration Menu selection Purpose Values Job Expiration Limits the amount of time a confi...

Страница 27: ...lues Clear Stored Job Delete jobs currently stored in the hard disk and RAM disk Secure Job Stored Print ALL ALL All Secure Jobs and Stored Prints are deleted 5 Network I O Ports This menu lets you configure the network interface installed in your printer You can reset the network interface and print a configuration page Ethernet Speed Menu selection Purpose Values Ethernet Speed Allows selection ...

Страница 28: ...ask and Gateway manually DHCP The DHCP server allots the IP address to you automatically BOOTP The BOOTP server allots the IP address to you automatically Show IP Address Displays the assigned IP Address View only TCP IP IPv6 Menu selection Purpose Values IPv6 Activate Activates or deactivates the IPv6 On Off On Activates the IPv6 Off Deactivates the IPv6 DHCPv6 Config This item lets you select th...

Страница 29: ...pe 802 3 Select this value to use the IEEE 802 3 frame type Ethernet II Select this value to use the Ethernet 2 frame type SNAP Select this value to use the SNAP frame type AppleTalk Menu selection Purpose Values Activate Activates or deactivates the Netware feature On Off On Activates the AppleTalk feature Off Deactivates the AppleTalk feature View Name Displays the assigned AppleTalk name View o...

Страница 30: ...r searches for wireless networks in the area and shows the results Custom You can configure the wireless settings according to your needs WLAN Default Performs a simple reset and restores the factory default settings for the wireless network configuration On Off WLAN Signal Displays the signal sensitivity of wireless View only You can see any one of the following Excellent Very Good Good Low Very ...

Страница 31: ... Toner Low Alert When the toner cartridge is almost empty the printer displays a shortage of the toner message On Off Firmware Version Displays the current firmware version of the printer View only 7 Emulation Menu selection Purpose Values Emulation Type The printer language defines how the computer communicates with the printer Auto PCL PostScript HEXDUMP Auto Select to have printer can change th...

Страница 32: ...arks and special signs used when printing letters Available symbol sets vary depending on the Typeface setting Point Size 4 00 999 75 0 25 unit By selecting between PCL8 and PCL45 from the Typeface menu you can determine the font size by setting the height of the characters in the font Courier Regular Dark Select the version of Courier font to use Pitch 0 44 99 99 0 01 unit By selecting between PC...

Страница 33: ...g Operator Panel Menus 1 Press Menu 2 Press Scroll to to highlight the desired setting and press Select 3 If the setting item has sub menus repeat step 2 4 Press Scroll to to access the required value 5 Press Select to save the selection 6 If you want to move to the upper level menus press Select 7 Press Cancel to return to Standby mode Printing a Demo Page After setting up your printer print a de...

Страница 34: ...s automatically lowered To set how long the printer waits before going to power save 1 Press Menu 2 Press Scroll to to highlight Settings and press Select 3 Press Scroll to to highlight Setup and press Select 4 Press Scroll to to highlight Power Save and press Select 5 Press Scroll to to display the time settings you want The available options are 5 10 15 30 60 and 120 minutes 6 Press Select to sa...

Страница 35: ...7 Press Cancel to return to Standby mode ...

Страница 36: ...ties CD to provide last minute updates about technical changes to your printer or advanced technical reference material for experienced users or technicians How to use my printer Owner s manual CAUTION Read and follow all safety instructions in your Owner s Manual prior to setting up and operating your printer How to set up my printer Setup diagram Safety Information Warranty Information Product I...

Страница 37: ... printer Dell Support Website The Dell Support Website provides several online tools including Solutions Troubleshooting hints and tips articles from technicians and online courses Upgrades Upgrade information for components such as memory Customer Care Contact information order status warranty and repair information Downloads Drivers Reference Printer documentation and product specifications You ...

Страница 38: ...etwork interface card DIMM and hard disk are sensitive to static electricity Before installing or removing internal accessories discharge static electricity from your body by touching something metal such as the metal back plate on any device plugged into a grounded power source If you walk around before finishing installation discharge any static electricity once again Installing Printer Memory A...

Страница 39: ...lot holding the DIMM by its edges 5 Push the DIMM into the printer until it snaps into place Ensure that the latches fit over the notches located on either side of the DIMM 6 Close the control board cover by aligning the groove on it with the notch on the printer and sliding it 7 Reconnect the power cord and printer cable and turn the printer on ...

Страница 40: ... PS 1 Ensure the PostScript printer driver is installed on your computer For details about installing the PS printer driver see Installing Software in Windows 2 Click the Windows Start menu 3 For Windows 2000 select Settings and then Printers For Windows XP Server 2003 select Printers and Faxes For Windows Vista Server 2008 select Control Panel Hardware and Sound Printers For Windows 7 select Cont...

Страница 41: ...d unplug all cables from the printer 3 Grasp the control board cover and remove it 4 Insert a USB Font Card into the outer USB slot on the contol board CAUTION Do not insert a USB Font Card into the inner USB memory slot You could damage the control board of the printer 5 Close the control board cover by aligning the groove on it with the notch on the printer and sliding it ...

Страница 42: ...paper handling capacity of your printer by installing optional trays Each tray holds 500 sheets of paper 1 Power the printer off and unplug all cables from the printer 2 Remove the packing tape and the packing material inside the optional tray 3 Find the location of the paper option tray connector and alignment pins ...

Страница 43: ...onfigure the properties of the printer driver To access the properties of the printer driver 1 Click the Windows Start button 2 For Windows 2000 select Settings and then Printers For Windows XP Server 2003 select Printers and Faxes For Windows Vista Server 2008 select Control Panel Hardware and Sound Printers For Windows 7 select Control Panel Hardware and Sound Devices and Printers For Windows Se...

Страница 44: ...rinters For Windows XP Server 2003 select Printers and Faxes For Windows Vista Server 2008 select Control Panel Hardware and Sound Printers For Windows 7 select Control Panel Hardware and Sound Devices and Printers For Windows Server 2008 R2 select Control Panel Hardware Devices and Printers 3 Select Dell 5330dn Mono Laser Printer PS 4 Right click the printer icon and select Properties 5 Click the...

Страница 45: ...er the High Capacity Feeder aligning the feet on the printer with the alignment pins in the High Capacity Feeder 4 Load paper in the High Capacity Feeder For information about loading paper in this tray see Loading Print Media 5 Reconnect the power cord and cables then power on the printer When you print a document on paper loaded in the High Capacity Feeder you must configure the properties of th...

Страница 46: ...n list 6 Click OK and print the document To set the tray in the printer properties of the PostScript printer driver 1 Click the Widows Start button 2 For Windows 2000 select Settings and then Printers For Windows XP Server 2003 select Printers and Faxes For Windows Vista Server 2008 select Control Panel Hardware and Sound Printers For Windows 7 select Control Panel Hardware and Sound Devices and P...

Страница 47: ...mputer s workload You can also use various print features such as storing a job in the hard disk proofing a job and printing private documents Installing the Hard Disk 1 Turn the printer power off and unplug the power cord and printer cable from the printer 2 Grasp the control board cover and remove it 3 If electric lines are drooped push them inside the printer ...

Страница 48: ...sh the hard disk in until it is locked into place 5 Fasten the three screws supplied with your new hard disk 6 Close the control board cover by aligning the groove on it with the notch on the printer and sliding it 7 Reconnect the power cord and printer cable and turn the printer on ...

Страница 49: ...er HDD 6 Click OK Dell 5330dn Mono Laser Printer PS 1 Click the Widows Start button 2 For Windows 2000 select Settings and then Printers For Windows XP Server 2003 select Printers and Faxes For Windows Vista Server 2008 select Control Panel Hardware and Sound Printers For Windows 7 select Control Panel Hardware and Sound Devices and Printers For Windows Server 2008 R2 select Control Panel Hardware...

Страница 50: ...ach year use this procedure to automatically switch to Daylight Savings Time and to Standard time 1 Press Menu 2 Press Scroll to to highlight Settings and press Select 3 Press Scroll to to highlight Setup and press Select 4 Press Scroll to to highlight Day Light Saving and press Select 5 Press Scroll to to highlight Manual and press Select 6 Enter the correct Start date using Scroll to or Scroll t...

Страница 51: ...you want and press Select 4 If you select Confidential or Store in Job type when you storing a job enter the password and press Select 5 Press Scroll to to highlight the Print 1 Copy or Print Copies and press Select Deleting a stored job You can delete jobs currently stored in the hard disk 1 Press Menu 2 Press Scroll to to highlight Job Management and press Select 3 Press Scroll to to highlight C...

Страница 52: ...ighlight 2nd Form and press Select 9 Press Scroll to to select the form file you want to use and press Select Installing an Output Expander To increase the paper output capacity of your printer install an Output Expander An Output Expander holds 600 sheets of plain paper 1 Power off the printer off and unplug all cables from the printer 2 Face the back of the printer as shown grasp the dummy cover...

Страница 53: ...5 Grasp the Output Expander stacker as shown 6 Locate the slots on the Output Expander where the stacker will be inserted 7 Align the stacker as shown ...

Страница 54: ...tput Expander For easy insertion ensure there is contact between the rib on the stacker and the top edge of the Output Expander 9 Flip the Output Expander stacker down 10 Reconnect the power cord and cables to the printer and power on the printer ...

Страница 55: ... Settings and then Printers For Windows XP Server 2003 select Printers and Faxes For Windows Vista Server 2008 select Control Panel Hardware and Sound Printers For Windows 7 select Control Panel Hardware and Sound Devices and Printers For Windows Server 2008 R2 select Control Panel Hardware Devices and Printers 3 Select the Dell 5330dn Mono Laser Printer 4 Right click the printer icon and select P...

Страница 56: ...Windows Vista Server 2008 select Control Panel Hardware and Sound Printers For Windows 7 select Control Panel Hardware and Sound Devices and Printers For Windows Server 2008 R2 select Control Panel Hardware Devices and Printers 3 Select Dell 5330dn Mono Laser Printer PS 4 Right click the printer icon and select Properties 5 Click the Device Settings tab and select Bin 1 from the Output Bin drop do...

Страница 57: ...driver package allows you to monitor a number of printer devices via a USB port The printer driver package is supplied with a smart and flexible installation program You do not need to search for additional components necessary for the printer software all required packages will be carried onto your system and installed automatically This is possible on a wide set of the most popular Linux clones ...

Страница 58: ...super user root If you are not a super user ask your system administrator 1 Insert the Drivers and Utilities CD The Drivers and Utilities CD will run automatically If the Drivers and Utilities CD does not run automatically click the icon at the bottom of the desktop When the Terminal screen appears type in root localhost root cd mnt cdrom Linux root localhost root install sh If you still failed to...

Страница 59: ...d printer wizard appears automatically Click Next 5 If you connect your printer using the USB cable the following window appears Select your printer from the drop down list and click Next OR If you connect your printer using the network cable the following window appears ...

Страница 60: ...p down list Click Next 6 If you connect your printer using the USB cable choose a port you will use with your printer After choosing the port click Next OR If you connect your printer using the network cable skip to the next step 7 Select the driver and click Next ...

Страница 61: ...8 Enter your printer s name location and description Click Next 9 To complete installation click Finish 10 When the following window appears click Finish ...

Страница 62: ...em password NOTE To install the printer software you must log in as a super user root If you are not a super user ask your system administrator 2 Insert the Drivers and Utilities CD The Drivers and Utilities CD will run automatically If the Drivers and Utilities CD does not automatically run click the icon at the bottom of the desktop When the Terminal screen appears type in root localhost root cd...

Страница 63: ...n your desktop Opening the Configurator 1 Double click Configurator on the desktop You can also click the Startup Menu icon select Dell printer and then Configurator 2 Press each button on the Modules pane to switch to the corresponding configuration window You can use the on screen help by clicking Help 3 After changing the configurations click Exit to close the Configurator Printers Configuratio...

Страница 64: ...ted printer Set as Default sets the current printer as a default printer Stop Start stops starts the printer Test allows you to print a test page to check if the machine is working properly Properties allows you to view and change the printer properties For details see Configuring Printer Properties Classes Tab The Classes tab shows a list of available printer classes ...

Страница 65: ...class Ports Configuration In this window you can view the list of available MFP ports check the status of each port and release a port that is stalled in a busy state after its owner has terminated for any reason Refresh renews the available ports list Release port releases the selected port Sharing Ports Between Printers ...

Страница 66: ...Printers configuration you can change the various printer properties for your machine 1 Open the Configurator If necessary switch to Printers configuration 2 Select your printer on the available printers list and click Properties 3 The Printer Properties window opens The following five tabs display at the top of the window General allows you to change the printer location and name The name entered...

Страница 67: ...irectly using lpr 3 In the Dell LPR window select the model name of your machine from the Printer list and click Properties 4 Change the printer and print job properties The following four tabs display at the top of the window General allows you to change the paper size paper type and orientation of the documents enables the duplex feature adds start and end banners and changes the number of pages...

Страница 68: ... with a much more user friendly Dell LPR program To print any document file 1 Type lpr file_name from the Linux shell command line and press Enter The Dell LPR window appears When you type only lpr and press Enter the Select file s to print window appears first Select the files you want to print and click Open 2 In the Dell LPR window select your printer from the list and change the printer and pr...

Страница 69: ...Mac OS X 10 4 or lower Power PC G4 G5 Intel processors 128 MB for a Power PC based MAC 512 MB 512 MB for an Intel based Mac 1 GB 1 GB Mac OS X 10 5 867MHz or faster Power PC G4 G5 Intel processors 512 MB 1 GB 1 GB Mac OS X 10 6 Intel processors 1 GB 2 GB 1 GB Install the printer driver 1 Ensure that you connect your printer to the computer Turn on your computer and printer 2 Insert the printer s D...

Страница 70: ...ished click Quit Setting Up the Printer Set up for your printer will be different depending on which cable you use to connect the printer to your computer the network cable or the USB cable For a Network connected Macintosh Mac OS 8 6 9 2 1 From the Apple menu select Chooser 2 Click LaserWriter 8 the PostScript driver provided with your Macintosh The name of your printer appears in the list 3 Sele...

Страница 71: ...ot work properly select Select a driver to use and your printer name in Print Using For MAC OS 10 6 if Auto Select does not work properly select Select Printer Software and your printer name in Print Using 8 Click Add 9 Your printer s IP address appears on the Printer List and is set as the default printer For a USB connected Macintosh Mac OS 8 6 9 2 1 Open the Macintosh HD and double click Applic...

Страница 72: ...ct Select a driver to use and your printer name in Print Using For MAC OS 10 6 if Auto Select does not work properly select Select Printer Software and your printer name in Print Using 6 Click Add Your printer appears on the Printer List and is set as the default printer Printing Printing a Document When you print with a Macintosh you need to check the printer software setting in each application ...

Страница 73: ...an print multiple pages on one sheet of paper Select Layout from the Presets drop down list to access the following features For details see Printing Multiple Pages on One Sheet of the Paper and Duplex Printing Printing Multiple Pages on One Sheet of Paper You can print more than one page on a single sheet of paper This feature provides a cost effective way to print draft pages 1 From your Macinto...

Страница 74: ...ventional layout used in book binding Short Edge Binding this is the type often used with calendars CAUTION If you need multiple copies of a document and you want those copies on both sides of the paper you must print them one at a time as separate print jobs Regarding Collated copy if your document has odd pages the last page of the first copy and the first page of the next copy will be printed o...

Страница 75: ...type and adjusting print quality Select Printer Features from the Presets drop down list to access the following features Reverse Duplex Printing Allows you to select general print order compared to duplex print order Fit to Page Allows you to scale your print job to any selected paper size regardless of the digital document size This can be useful when you want to check fine details on a small do...

Страница 76: ...Paper Type is set to Printer Default If you load a different type of print material select the corresponding paper type Resolution You can select the printing resolution The higher the setting the sharper the clarity of the printed characters and graphics The higher setting may also increase the time it takes to print a document ...

Страница 77: ...ticles accumulate inside the printer This buildup causes print quality problems such as toner specks or smearing Your printer has a cleaning mode that corrects and prevents these types of problems CAUTION Cleaning solvents containing alcohol or other strong substances may discolor or crack the printer cabinet Cleaning the Exterior Clean the printer cabinet with a soft damp lint free cloth Do not l...

Страница 78: ...touch the green underside of the toner cartridge Use the handle on the cartridge to avoid touching this area 3 With a dry and lint free cloth wipe away any dust and spilled toner from the toner cartridge area and from the toner cartridge cavity CAUTION While cleaning the inside of the printer be careful not to touch the transfer roller located underneath the toner cartridge Oil from your fingers c...

Страница 79: ...he PTL lens by flipping up the feed guide and gently swab the lens with a cotton swab 6 Clean the feed sensor with a cotton swab 7 Reinsert the toner cartridge and close the top cover 8 Plug in the power cord and turn the printer on Printing a cleaning sheet ...

Страница 80: ...nce and press Select 4 Press Scroll to to highlight Clean Drum or Clean Fuser and press Select Your printer automatically picks up a sheet of paper from the tray and prints out a cleaning sheet with dust or toner particles on it Maintaining the Toner Cartridge Storing the Toner Cartridge Store the toner cartridge in the original packaging until you are ready to install it Do not store the toner ca...

Страница 81: ...rtridge is near the end of its life white streaks or light print occurs The LCD displays the warning message Toner Low Thoroughly shake the toner cartridge from side to side to distribute the toner evenly and temporarily improve print quality This is not intended to be a long term method of correction but only to assist your printing needs until you obtain a new cartridge assembly CAUTION Do not t...

Страница 82: ... inserting the cartridge into the printer Ensure cartridge is placed correctly according to the tabs and grooves before applying any pressure 6 Close the top cover Ensure that the cover is surely closed Replacing the Toner Cartridge At this stage the toner cartridge needs to be replaced Order an extra toner cartridge to have on hand when the current cartridge no longer prints satisfactorily See Or...

Страница 83: ...c holder out of the toner cartridge 4 Thoroughly shake the cartridge 5 or 6 times to distribute the toner evenly inside the cartridge Thoroughly roll the cartridge to assure maximum copies per cartridge Save the box and the plastic bag for shipping NOTE If toner comes into contact with your clothing wipe the toner off with a dry cloth and wash your clothing in cold water Hot water sets toner into ...

Страница 84: ...ing any pressure 9 Close the top cover Ensure that the cover is securely closed NOTE When a new cartridge is in its first use wait about 15 seconds before the first comes printed paper out Replacing the Fuser unit At this stage the toner cartridge needs to be replaced See Ordering Supplies to order toner cartridges CAUTION To avoid burns do not replace the fuser immediately after printing as the f...

Страница 85: ...5 Pull the duplex unit out of the printer 6 Push both the levers of the fuser and downward both levers of the fuser 7 Pull the Fuser unit straight out ...

Страница 86: ...rom its bag and then remove the tape 9 Insert Fuser unit completely into the printer If Fuser unit is not completely inserted the printer will not operate Make sure that both levers of the fuser are securely latched onto the printer ...

Страница 87: ...ap to the printer 12 Close the rear door 13 Reconnect the power cord and printer cable and turn the printer on Replacement parts From time to time you need to replace the rollers and fuser unit to maintain top performance and to avoid print quality and paper feed problems resulting from worn parts ...

Страница 88: ...these items be installed by a trained service professional Ordering Supplies You can order supplies using the Dell Toner Management System or the Dell Printer Configuration Web Tool If your printer is connected to a network type your printer s IP address in your Web browser to launch the Dell Printer Configuration Web Tool and click the toner supplies link 1 Double click the Dell Toner Reorder Pro...

Страница 89: ...printer s IP address in your Web browser to launch the Dell Printer Configuration Web Tool and click the supplies link NOTE Refer to the following table to order toner cartridges Toner cartridge Part number Dell Standard Capacity Toner Cartridge 10 000 pages a NY312 Dell High Capacity Toner Cartridge 20 000 pages a NY313 a Page coverage in accordance with ISO IEC 19752 testing methodology ...

Страница 90: ...o Configure the network parameters necessary for the printer to connect to various network environments NOTE For details on how to access the Embedded Web Service please refer to the chapter Dell Printer Configuration Web tool SetIP Address A utility program allowing you to select a network interface card and manually configure the addresses for use with the TCP IP protocol See Set IP Address Util...

Страница 91: ...rk Information Page The Network Information page shows how the network interface card on your printer is configured The default settings are suitable for most applications To print a network information page 1 Press Menu 2 Press Scroll to to highlight Reports and press Select 3 Press Scroll to to highlight Network Settings and press Select Setting Network Protocols When you first install the print...

Страница 92: ...steps 1 Press Menu 2 Press Scroll to to highlight Network I O Ports and press Select 3 Press Scroll to to select the network protocol you want to use and press Select If you selected TCP IP IPv4 a Press Scroll to to highlight IPv4 Activate and press Select b Press Scroll to to change the setting to On enable or Off disable If you selected TCP IP IPv6 a Press Scroll to to highlight IPv6 Activate an...

Страница 93: ...ress and press Select 5 Press Scroll to to highlight DHCP and press Select To assign the address from the BOOTP server press Select when BOOTP displays Restoring the Network Configuration You can return the network configuration to its default settings 1 Press Menu 2 Press Scroll to to highlight Network I O Ports and press Select 3 Press Scroll to to highlight Clear Settings and press Select 4 Pre...

Страница 94: ...Server 2008 default Start menu a Click Start Control Panel b Click Hardware and Sound c Click Printers For Windows 7 select Control Panel and Hardware and Sound and Devices and Printers For Windows Server 2008 R2 select Control Panel and Hardware and Devices and Printers 2 Right click on your printer icon 3 Click Sharing 4 If you are using Windows Vista Server 2008 you may be prompted to change th...

Страница 95: ...job to the printer 1 On the Windows desktop of the client computer double click My Network Places or Network Neighborhood 2 Double click the host name of the print server computer 3 Right click the shared printer name and click Install or Connect Wait for the driver information to copy from the print server computer to the client computer and for a new printer object to be added to the Printers fo...

Страница 96: ...are and Sound c Click Printers For Windows 7 select Control Panel and Hardware and Sound and Devices and Printers For Windows Server 2008 R2 select Control Panel and Hardware and Devices and Printers 2 Click Add Printer to launch the Add Printer wizard 3 Click Network Print Server 4 Select the network printer from the Shared printers list If the printer is not listed type the path of the printer i...

Страница 97: ...tioning features or use of this software must display the following acknowledgment This product includes software developed by the OpenSSL Project for use in the OpenSSL Toolkit http www openssl org 4 The names OpenSSL Toolkit and OpenSSL Project must not be used to endorse or promote products derived from this software without 5 prior written permission For written permission please contact opens...

Страница 98: ...ributions in binary form must reproduce the above copyright notice this list of conditions and the following disclaimer in the documentation and or other materials provided with the distribution 3 All advertising materials mentioning features or use of this software must display the following acknowledgement This product includes cryptographic software written by Eric Young eay cryptsoft com The w...

Страница 99: ...Multi purpose Feeder for detailed loading instructions Paper Characteristics The following paper characteristics affect print quality and reliability We recommend that you follow these guidelines when evaluating new paper stock Weight The printer can automatically feed paper weights from 60 to 120 g m2 16 to 32 lb bond long grain in the paper tray Paper lighter than 60 g m2 16 lb may not be substa...

Страница 100: ...per Business papers designed for general business use may also provide acceptable print quality Always print several samples before buying large quantities of any type of print media When choosing any print media consider the weight fiber content and color Use only paper able to withstand these temperatures without discoloring bleeding or releasing hazardous emissions Check with the paper manufact...

Страница 101: ... Straighten the edges on a level surface Selecting Preprinted Forms and Letterhead Use the following guidelines when selecting preprinted forms and letterhead paper for the printer Use long grain paper for best results Use only forms and letterhead printed using an offset lithographic or engraved printing process Choose papers that absorb ink but do not bleed Avoid papers with rough or heavily tex...

Страница 102: ...cturer and not drilled into paper already packaged in a ream Drilled paper can cause jams when multiple sheets feed through the printer Prepunched paper could include more paper dust than standard paper Your printer may require more frequent cleaning and feed reliability may not be as good as that of standard paper Transparencies Try samples of any transparencies you are considering using with the...

Страница 103: ...o 90 g m2 24 lb bond weight for the Multi purpose Feeder with cotton content 25 percent or less Use only new undamaged envelopes For best performance and to minimize jams do not use envelopes that Have excessive curl or twist Are stuck together or damaged in any way Contain windows holes perforations cutouts or embossing Have metal clasps string ties or metal folding bars Have an interlocking desi...

Страница 104: ...eading and driver edge and replaced with a non oozing adhesive Remove a 0 125 in 3 mm strip from the leading edge to prevent labels from peeling inside the printer Portrait orientation is preferred especially when printing bar codes Do not use labels that have exposed adhesive Card Stock Card stock is single ply and has a large array of properties such as moisture content thickness and texture tha...

Страница 105: ...s and Support NOTE Paper Tray includes Standard Tray 500 sheet Optional Tray and High Capacity Feeder High Capacity Feeder supports only A4 Letter Legal and Folio Legend Y indicates Support Dimensions Paper Tray Multi purpose Feeder Duplex printing Capacity Print Media Size A4 8 27 x 11 69 in 210 x 297 mm Y Y Y 500 sheets of 75 g m2 20 lb paper for the tray 100 sheets of 75 g m2 20 lb paper for th...

Страница 106: ...ts of 75 g m2 20 lb paper for the multi purpose feeder Envelope 7 3 4 Monarch 3 88 x 7 5 in 98 4 x 190 5 mm Y 10 sheets of 75 g m2 20 lb in the multi purpose feeder Envelope COM 10 4 12 x 9 5 in 105 x 241 mm Y Envelope DL 4 33 x 8 66 in 110 x 220 mm Y Envelope C5 6 38 x 9 02 in 162 x 229 mm Y Envelope C6 4 49 x 6 38 in 114 x 162 mm Y Custom NOTE Paper Tray supports custom paper from A5 to Legal si...

Страница 107: ...Print Media Types and Weights Print Media Type Print Media Weight Tray 1 and Optional Trays Multi purpose Feeder Paper Xerographic or business paper 60 120 g m2 grain long 16 32 lb bond 60 216 g m2 grain long 16 to 58 5 lb bond Card stock maximum long grain a Index Bristol Up to 216 g m2 58 5 lb Tag Up to 216 g m2 58 5 lb Cover Up to 216 g m2 58 5 lb Card stock maximum grain short a Index Bristol ...

Страница 108: ...grated Forms Pressure sensitive area must enter the printer first 135 140 g m2 36 40 lb bond Paper base long grain 75 135 g m2 20 36 lb bond Envelopes 25 Cotton Content Maximum Weight 24 lb Sulfite wood free or up to 25 cotton bonds 60 105 g m2 16 28 lb a Short grain is preferred for papers over 135 g m2 Selecting an Output Location The printer has two output locations the output tray face down an...

Страница 109: ...ed on the Printer Rear output Tray 100 sheets of 75 g m2 paper Plain paper 60 216 g m2 Label Envelopes Cardstock Transparencies N A One is standard on the printer and located at the rear side Standard bin 250 sheets of 75 g m2 plain paper Plain paper up to 163 g m2 Envelopes Short edge Feed Only Labels N A One is standard on the printer and located on the top of the printer Output expander bin 1 6...

Страница 110: ... To use the rear door Open the rear door by pulling it down CAUTION The fuser area inside the rear door of your printer becomes very hot when in use Use caution when accessing this area Printing to the Optional Output Expander face down You can increase the paper output capacity of your printer by installing an Output Expander An Output Expander holds 600 sheets of plain paper See Installing an Ou...

Страница 111: ... load print media into tray 1 or optional trays both are loaded the same way follow these instructions 1 Pull open the paper tray and load paper with the print side face down Load letterhead paper with the design side face down The top edge of the sheet with the logo should be placed at the front side of the tray For details about loading paper in the paper tray see Loading Print Media NOTE If you...

Страница 112: ... using paper flex or fan the edge of the paper stack to separate the pages before loading For transparencies hold them by the edges and avoid touching the print side Oils from your fingers can cause print quality problems 3 Load the print material with the side to be printed on facing up Depending on the paper type being used adhere to the following loading method Envelopes load with the flap side...

Страница 113: ...cument click on Paper tab Source and MP Feeder This loading procedure is almost the same as the procedure for loading the Multi purpose Feeder 1 Load the paper with the side to be printed on facing up 2 Squeeze the multi purpose feeder width guides and adjust them to the width of the paper Do not use too much force the paper will buckle resulting in a paper jam or skew 3 To print a document set th...

Страница 114: ...aper jams when using print media 3 by 5 in 76 by 127 mm in the Multi purpose Feeder open the rear door for straight paper path Open rear door of printer when printing on transparencies If not they may tear when exiting the machine Using the High Capacity Feeder To increase the paper handling capacity of your printer install a High Capacity Feeder A High Capacity Feeder can hold up to 2100 sheets o...

Страница 115: ...to loosen them and fan them out Do not fold or crease the print media Align the edges on a level surface 4 Insert the paper stack into the High Capacity Feeder with the print side facing down 5 Close the High Capacity Feeder completely ...

Страница 116: ...ll to to highlight Paper Size Type and press Select 4 Press Scroll to to select the paper tray to be used and press Select 5 Press Scroll to to highlight Type and press Select 6 Press Scroll to to find the paper type to be used and press Select 7 Press Cancel to return to Standby mode Tray Behavior Tray Linking Tray linking enables the automatic linking feature for trays The print media in the mul...

Страница 117: ...aper if available When the substitute size is set to Off it means no substitution is allowed for the requested paper size Configure MPF Multi purpose Feeder can be configured to behave in Tray mode or in Bypass mode by setting the Configure MPF menu in the operator Panel Bypass Mode In this mode the printer pulls the paper from the Multi purpose Feeder first unless it is closed or empty The Multi ...

Страница 118: ...d Print Printing a Document Your printer prints documents using the Printer Control Language PCL or Postscript PS printer driver When you install the Dell software your printer automatically installs the PCL and PS printer drivers See Installing Dell Software for Local Printing The drivers provided with your printer allow a wide variety of options Use the chart below to determine which print drive...

Страница 119: ...re selected within the Print window These settings include the number of copies and print range 3 Select the printer driver you want to use from the Print window 4 To take advantage of the printer features provided by your printer click Preferences or Properties depending on the program or operating system in the above window and go to step 5 If you see Setup Printer or Options click that button i...

Страница 120: ... select Control Panel and Hardware and Devices and Printers 3 Double click the Dell 5330dn Mono Laser Printer icon For Windows 7 and Windows Server 2008 R2 right click your printer icon See what s printing 4 From the Document menu click Cancel Printer Settings You can use the printer properties window which allows you to access all of the printer options required to use your printer When the print...

Страница 121: ...Printers c Point to the Dell 5330dn Mono Laser Printer d Right click on the printer icon e Click Print Setup or Properties and point to Printing Preferences f Change the settings on each tab and click OK Layout Tab The Layout tab provides options for you to adjust how the document appears on the printed page The Layout Options section includes advanced printing options such as Multiple Pages per S...

Страница 122: ...o set the paper handling needs when accessing the printer properties use the following options Click the Paper tab to access the paper properties Property Description Copies Copies allows you to choose the number of copies to be printed up to 999 Size The Size option allows you to choose the size of paper loaded in the paper tray If the required size is not listed in the Size box click Custom When...

Страница 123: ...urce specifically for the first page For example load thick stock for the first page into the Multi purpose Feeder and plain paper into Tray n Then select Tray in the Source option and Multi purpose Feeder in the First page option Output bin Optional Output Bin 1 allows you to choose the output destination for the printed document But paper with a smaller size of width of 3 76 2mm and length of 5 ...

Страница 124: ...ownload as Bitmap setting is often useful when printing Adobe Download as Bitmap When this option is selected the driver downloads the font data as bitmap images Documents with complicated fonts such as Korean or Chinese print faster in this setting Print as Graphics When this option is selected the driver downloads any fonts as graphics When printing documents with high graphic content and relati...

Страница 125: ...ob name When several users send a print job to the printer this option allows you to easily find your documents in the output tray User Printer Fonts When Use Printer Fonts is checked the printer uses the fonts that are stored in its memory resident fonts to print your document rather than downloading the fonts used in your document Because downloading fonts takes time selecting this option can sp...

Страница 126: ...nting the document is cleared from the RAM Disk If you want to save the file in the hard disk after printing check Store to HDD check box Store Select this setting to save a document in the hard disk without printing When you print the saved document using the control panel you must enter a password Use this setting when you store a private or a confidential document Check Store to Public HDD to s...

Страница 127: ...lp screens give detailed information about the printer features provided by the printer driver You can also click from the upper right hand corner and then click on any setting Printing Multiple Pages on One Sheet of the Paper You can select the number of pages to print on a single sheet of paper You can print up to 16 pages on one sheet 1 To change the print settings from your software applicatio...

Страница 128: ...than one 5 Click the Paper tab and select the paper source size and type 6 Click OK and print the document Printing a Reduced or Enlarged Document You can scale your print job on a page 1 To change the print settings from your software application go to printer properties 2 From the Paper tab select Reduce Enlarge on the Output size drop down list 3 Enter the scaling rate in the Percentage input b...

Страница 129: ...original document size This can be useful when you want to check fine details on a small document 1 To change the print settings from your software application go to printer properties 2 From the Paper tab select Fit to Page on the Output size drop down list 3 Select the correct size from the Fit to Page drop down list 4 Select the paper source size and type 5 Click OK and print the document Print...

Страница 130: ...yout Type drop down list 3 Configure the poster option Select the page layout from Poster 2x2 Poster 3x3 Poster 4x4 or Custom If you select Poster 2x2 the output automatically stretches to cover 4 physical pages Specify an overlap in millimeters or inches to make it easier to reconstruct the resulting poster 4 Click the Paper tab and select the paper source size and type 5 Click OK and print the d...

Страница 131: ...selected in the Size option on the Paper tab 3 Click the Paper tab and select the paper source size and type 4 Click OK and print the document 5 After printing fold and staple the pages Printing on Both Sides of Paper You can print on both sides of a sheet of paper Before printing decide how you want your document oriented The options are Printer Setting this feature is determined by the setting y...

Страница 132: ...size and type 5 Click OK and print the document The printer prints on both sides of paper Using Watermarks The Watermark option allows you to print text over an existing document For example you may want to have large gray letters reading TOP SECRET DRAFT or CONFIDENTIAL printed diagonally across the first page or all pages of a document There are several predefined watermarks that come with your ...

Страница 133: ...displays in the preview image window The preview image is provided so that you can see how the watermark will appear on the printed page To print the watermark on the first page only ensure the First Page Only box is checked 4 Select the watermark options You can select the font name style and size and gray scale level from the Font Attributes section and set the angle of the watermark from the Me...

Страница 134: ...pecial file format that can be printed on any document Overlays are often used to take the place of preprinted forms and letterhead paper Rather than using preprinted letterhead you can create an overlay containing the exact same information that is currently on your letterhead To print a letter with your company s letterhead you do not need to load preprinted letterhead paper in the printer You n...

Страница 135: ...e of up to eight characters in the File name box Select the destination path if necessary The default is C FormOver 6 Click Save You can see the name in the Overlay List 7 Click OK or Yes until you complete creating The file is not printed out it is stored in your computer Using a Page Overlay ...

Страница 136: ...loppy disk you can also load the file when you access this Load Overlay window After you select the file click Open The file is now shown in the Overlay List box and is available for printing Select the overlay from the Overlay List box 6 If necessary click Confirm Page Overlay When Printing When this box is checked a message window appears each time you submit a document for printing asking you t...

Страница 137: ...rint job NOTE Only Confidential and Proof printing are available with the base memory for all other stored jobs options you need to install the hard disk Please refer to the section Using Hard disk for details NOTE The confidential Jobs held in the memory RAM of the printer are deleted when the printer is turned off The confidential Jobs held in Hard Disk are deleted only after they are printed or...

Страница 138: ...r panel and do not require a PIN number Proof Print If you send a Proof Print job the printer prints one copy and holds the remaining copies you requested in printer memory Use Proof Print to examine the first copy to ensure it is satisfactory before printing the remaining copies Once all copies are printed the Proof Print job is automatically deleted from printer memory Print Schedule If you send...

Страница 139: ... when you send a job to print The Dell Toner Management System window also displays the level of toner remaining and allows you to order replacement toner cartridges User s Guide HTML documentation provides detailed information about using the printer Firmware Update Utility updates your printer s firmware Set IP Address Utility sets your printer s TCP IP addresses PS driver Postscript Printer Des...

Страница 140: ...or Local Printing A local printer is a printer attached to your computer using a USB or Parallel cable If your printer is attached to a network instead of your computer skip the following steps and go on to Installing Dell Software for Network Printing Printer driver is the software that lets your computer communicate with your printer The procedure to install drivers depends on the operating syst...

Страница 141: ...P Address Before using the printer on the network you must set an IP address subnet mask and gateway for the printer If you want DHCP or BOOTP to automatically set the IP address a DHCP or BOOTP server must exist on the network If the network is using DHCP BOOTP an IP address is automatically assigned after connecting the network cable to the printer In case there is no DHCP or BOOTP the printer w...

Страница 142: ...gning and verifying the TCP IP settings install the Dell software on each network computer You can install the Dell software on the network computers locally or remotely NOTE You need administrative access to install printer drivers on the network computers 1 Ensure that the printer is connected to your network and powered on All applications should be closed on your computer before beginning inst...

Страница 143: ...ld be one of the following operating system Windows 2000 Windows XP Windows Server 2003 Windows Vista Windows Server 2008 Windows 7 Windows Server 2008 R2 NOTE The server computer should be able to resolve the client computer name into an IP address 6 The list of printers available on the network appears Select the printer you want to install and then click Next If you do not see your printer in t...

Страница 144: ...you may print a test page Click Finish to complete the installation and close the wizard You are now ready to print Uninstalling Software You should remove the printer drivers if you are upgrading the software or if your driver installation fails Remove the software using the Drivers and Utilities CD or the Windows uninstall option NOTE Close all programs before uninstalling software Restart your ...

Страница 145: ...0dn Mono Laser Printer Printer Status Monitor Printing Status The Printer Status Monitor displays the current status of the printer Toner Level View the level of toner remaining in the toner cartridge Order Supplies Click to order replacement toner cartridges online See Ordering Supplies User s Guide Allows you to view the DELL 5330dn Mono Laser Printer User s Guide Printer Settings Utility When y...

Страница 146: ...Exit button at the bottom of the window Firmware Update Utility To print firmware update using Firmware Update Utility 1 Click Start Programs DELL DELL Printers DELL 5330dn Mono Laser Printer Firmware Update Utility The Firmware Update Utility window opens Follow the on screen instructions to complete the firmware update Dell Toner Re order application To order replacement toner cartridges or supp...

Страница 147: ...er of the network printer card or interface This program is especially for the network administrator to set several network IPs at the same time NOTE You can only use Set IP Address Utility when your printer is connected to a network 1 Connect the network cable to your machine 2 Print the Configuration page of the printer to see the current network configuration and MAC address 3 Click Start Progr...

Страница 148: ...he TCP IP configuration window 5 Enter the network card s MAC address IP address subnet mask default gateway and then click Apply NOTE when you enter the MAC address enter it without colon 6 Click OK 7 Click Exit to close the SetIP Address program ...

Страница 149: ...per output capacity Output tray 250 sheets face down Rear door 100 sheets face up Output Expander 600 sheets face down Paper type Paper tray Plain paper 75 90 g m2 20 24 lb Multi purpose Feeder Plain paper Transparencies Labels Card stock 105 216 g m2 28 56 lb Envelopes 60 105 g m2 16 28 lb Duplex printing Plain paper 60 120 g m2 16 32 lb Consumables 1 piece toner cartridge system Power requiremen...

Страница 150: ...umables accessories and package Package weight Paper 2 94 Kg Plastic 1 13 Kg a Sound Pressure Level ISO 7779 b Toner yield in accordance with ISO IEC 19752 testing methodology Yields vary with usage and environmental conditions Printer Specifications Item Description Printing method Laser Beam Printing Printing speed Simplex a Letter 50 ppm pages per minute A4 48 ppm Printing speed Duplex Letter 3...

Страница 151: ...1i IBM AIX 5 2 5 3 First printing time Ready Mode less then 8 5 seconds a This printing speed is when you use the tray 1 Printer speed from trays Paper size Tray 1 Tray 2 4 High Capacity Feeder Multi purpose Feeder A4 48 ppm 45 ppm 33 ppm Letter 50 ppm 47 ppm 35 ppm Paper Specifications Overview Your printer accepts a variety of print materials such as cut sheet paper including up to 100 percent r...

Страница 152: ...6 32 lb for the paper tray 60 216 g m2 bond 16 58 5 lb for the multi purpose feeder 60 120 g m2 bond 16 32 lb for the duplex printing 500 sheets of 75 g m2 bond 20 lb paper for the paper tray 100 sheet of 75 g m2 bond 20 lb paper for the multi purpose feeder A4 8 27 X 11 69 in 210 X 297 mm Executive 7 25 X 10 5 in 184 X 267 mm Legal 8 5 X 14 in 215 9 X 355 6 mm Oficio 8 5 X 13 5 in 215 9 X 342 9 m...

Страница 153: ... The following problems may cause print quality deviations jamming or even damage to the printer Symptom Problem with paper Solution Poor print quality or toner adhesion problems with feeding Too moist too rough too smooth or embossed faulty paper lot Try another kind of paper between 100 400 Sheffield 4 5 moisture content Dropout jamming curl Stored improperly Store paper flat in its moisture pro...

Страница 154: ...ns when heated up to 180 C 356 F for 0 1 second Grain Long Grain Moisture Content 4 6 by weight Smoothness 100 400 Sheffield Paper Output Capacity Output Location Capacity Output tray Face Down 250 sheets of 75 g m2 bond 20 lb paper Rear door Face Up 100 sheets of 75 g m2 bond 20 lb paper Printer and Paper Storage Environment Paper storage environmental conditions directly affect the feed operatio...

Страница 155: ...e damage Planning is important to prevent damage to large supplies of paper Unopened paper in sealed reams can remain stable for several months before use Opened packages of paper have more potential for environment damage especially if they are not wrapped with a moisture proof barrier The paper storage environment should be properly maintained to ensure optimum performance The required condition...

Страница 156: ...der Multi purpose feeder Jam Tray x Paper Jam 0 Paper Feed Jam tray 1 or optional trays Paper Feed Jam tray 1 or Paper Feed Jam optional trays Paper Jam 1 Open Close Door In the paper exit area or around the toner cartridge area In the paper exit area or Around the toner cartridge Paper Jam 2 Check Inside Paper Exit Jam In the paper exit area Duplex Jam 0 Check Inside In the duplex unit Duplex jam...

Страница 157: ...en pulled check the fuser area For more information see Around the toner cartridge 3 Insert paper tray 1 into the printer until it snaps into place Printing automatically resumes Paper Feed Jam optional trays 1 Pull optional tray open 2 Remove the jammed paper from the printer If you cannot see the paper in this area or the paper does not move when pulled go to the next step ...

Страница 158: ...mes Multi purpose Feeder Jam 1 If the paper is not feeding properly pull the paper out of the printer 2 Open and close the top cover to resume printing Around the Toner Cartridge NOTES The fuser area is hot Take care when removing paper from the printer 1 Open the top cover and pull the toner cartridge out Set it on a clean flat surface ...

Страница 159: ...ner cartridge Use the handle on the cartridge to avoid touching this area 2 Carefully lift up the feed guide 3 Remove the jammed paper by gently pulling it straight out If you cannot see the paper in this area or if there is any resistance removing the paper stop pulling and go to the paper exit area For more information see In the paper exit area ...

Страница 160: ... guide has been flipped back down into position In the Paper Exit Area 1 Open and close the top cover The paper is automatically ejected from the printer 2 Gently pull the paper out of the output tray 3 If you cannot see the paper in this area or if there is any resistance removing the paper stop pulling and go to the next step 4 Open the rear door 5 Then gently pull the paper straight out ...

Страница 161: ...If you still do not see the paper go to the next step 6 Pull the rear door strap 7 While pushing the fuser lever to the right open the fuser door 8 Pull the jammed paper out ...

Страница 162: ...ginal position and close the rear door Printing automatically resumes In the Duplex Unit Area If the the duplex unit is not inserted correctly paper jam may occur Ensure that the duplex unit is inserted correctly Duplex jam 0 1 Pull the duplex unit out of the printer 2 Locate the paper and remove it 3 Insert the duplex unit into the slot ...

Страница 163: ...electing the correct paper types most paper jams can be avoided When a paper jam occurs follow the steps outlined in Clearing Jams in the Paper Tray Follow the procedures in Loading Print Media in the Paper Tray Ensure that the adjustable guides are correctly positioned Do not overload the paper tray Ensure that the paper is below the paper capacity mark on the inside wall of the paper tray Do not...

Страница 164: ... job close the rear door to continue job See graphical error message displayed with text error message Replace Toner Scenarios Printer detects toner cartridge replace errors Paper Jam 0 Paper has jammed in the feeding area of the paper tray or multi purpose feeder Paper Jam 1 Paper has jammed around the toner cartridge area Paper Jam 2 Paper has jammed in the paper exit area Duplex Jam 0 Paper has...

Страница 165: ...oad Size Type There is no paper in the HCF Load paper in the HCF See Using the High Capacity Feeder MPF Empty Load Size Type Press Select There is no paper in the multi purpose feeder Load paper in the multi purpose feeder See Using the Multi purpose Feeder Paper Mismatch Tray x MPF Load Size Type Continue Cancel The paper size specified in the printer properties does not match the paper being loa...

Страница 166: ...lem in the fuser unit Unplug the power cord and plug it back in If the problem persists please call for service Over Heat Overheat Error Power Cycle There is a problem in the fuser unit Unplug the power cord and plug it back in If the problem persists please call for service LSU Motor Error LSU Motor Error Power Cycle A problem has occurred in the LSU Laser Scanning Unit Unplug the power cord and ...

Страница 167: ...s Temperature The engine in your printer is checking some problems detected Please wait a few minutes Self Diagnostics LSU The LSU Laser Scanning Unit in your printer is checking some problems detected Please wait a few minutes Install Toner A toner cartridge is not installed Install a toner cartridge Invalid Toner Toner is not valid for this machine The toner cartridge you have installed is not f...

Страница 168: ...d into the printer Remove any obstructions from inside the printer See Cleaning the Interior Paper has not been loaded correctly Remove paper from the tray and reload it correctly There is too much paper in the paper tray Remove excess paper from the tray The paper is too thick Use only paper that meets the specifications required by the printer See Paper Specifications The paper keeps jamming Ens...

Страница 169: ... that is working properly and print a job You can also try using a different printer cable The printer may be configured incorrectly Check the printer properties to ensure that all of the print settings are correct The printer driver may be incorrectly installed Remove the printer driver and then reinstall it See Uninstalling Software and Installing Software in Windows respectively The printer is ...

Страница 170: ...our printer is selected The software application is malfunctioning Try printing a job from another application The operating system is malfunctioning Exit Windows and reboot the computer Power the printer off and then back on again Pages print but are blank The toner cartridge is defective or out of toner Thoroughly shake the toner See Redistributing Toner If necessary replace the toner cartridge ...

Страница 171: ... roller may be dirty Clean the inside of your printer See Cleaning the Interior The paper path may need cleaning See Cleaning the Interior Dropouts If faded areas generally rounded occur randomly on the page A single sheet of paper may be defective Try reprinting the job The moisture content of the paper is uneven or the paper has moist spots on its surface Try a different brand of paper See Paper...

Страница 172: ...em If the defects occur on the back of the page the problem will likely correct itself after a few more pages The fusing assembly may be damaged Contact a service representative Background scatter Background scatter results from bits of toner distributed on the printed page The paper may be too damp Try printing with a different batch of paper Do not open packages of paper until necessary so that ...

Страница 173: ...r Specifications Turn over the stack of paper in the paper tray Also try rotating the paper 180 in the paper tray Try printing to the rear door Back of printouts are dirty Check for leaks in the toner Clean the inside of the printer See Cleaning the Interior Black pages The toner cartridge may not be installed properly Remove the cartridge and reinsert The toner cartridge may be defective and need...

Страница 174: ...ng the Toner Cartridge If the problem persists the printer may require repair Contact a service representative Curl If the printed paper is curled or the paper does not feed into the printer Turn over the stack of paper in the paper tray Also try rotating the paper 180 in the paper tray Try printing to the rear door Common Windows Problems Condition Suggested solutions File in Use message appears ...

Страница 175: ...not be printed The PostScript option may not be installed Print a configuration page and verify that the PS version is available for printing Limit Check Error The print job may be too complex Reduce the complexity of the page or try adjusting the print quality settings Or expand the memory capacity A PS error page prints Print job may not be PS Ensure that the print job is a PS job Check to see w...

Страница 176: ...he print job whenever print options are changed and then try to restart the job from the beginning Since Unified Linux Driver locks the mfp port while printing the abrupt termination of the driver keeps the port locked and therefore unavailable for subsequent print jobs If this situation occurres please try to release the mfp port Common Macintosh Problems Condition Suggested solutions The printer...

Страница 177: ... Printer Configuration Web Tool type your network printer s IP address in your Web browser If you do not know the IP address of your printer print the network information page which lists the IP address 1 Press Menu 2 Press Scroll to to highlight Reports and press Select 3 Press Scroll to to highlight Network Settings and press Select to print a network information page If an IP address has not be...

Страница 178: ...thentication is selected Setup Email Server Primary SMTP Gateway Sets the primary SMTP gateway SMTP Port Number Specifies the SMTP port number This must be 25 or between 5000 and 65535 Enable Primary SMTP Auth Specifies the authentication method for outgoing e mail Primary SMTP Account Name Specifies the SMTP login user Up to 63 alphanumeric characters periods hyphens under bars and symbols can be...

Страница 179: ...les Paper Handling Alerts Select the check box to receive an E Mail Alert for paper handling Select Alerts for List 2 Supplies Alerts Select the check box to receive an E Mail Alert for consumables Paper Handling Alerts Select the check box to receive an E Mail Alert for paper handling a Available when POP before SMTP for E Mail Send Authentication is selected Copy Printer Settings Quickly clone c...

Страница 180: ...Wireless Setup Wireless can be setup using the Dell Web configuration tool Click on the Wireless link to change the settings For details of Wireless setup please refer to Quick Install Guide for the wireless network interface card Online Help Click Help to visit the Dell website for printer troubleshooting ...

Отзывы: