________________________________________________________
__
Page - 26
Setup and Self Test
Ribbon Loading Instructions
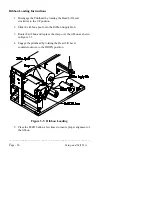
1. Disengage the Printhead by rotating the Head Lift Lever
clockwise to the UP position.
2. Slide the ribbon spool onto the Ribbon Supply Hub.
3. Route the ribbon and replace the clasp over the ribbon as shown
in Figure 3.5.
4. Engage the printhead by rotating the Head Lift Lever
counterclockwise to the DOWN position.
Figure 3-5 Ribbon Loading
5. Press the FEED button a few times to insure proper alignment of
the ribbon.
Содержание Prodigy
Страница 1: ...Prodigy Operator s Manual ...
Страница 3: ......
Страница 4: ......
Страница 8: ......
Страница 54: ...________________________________________________________ __ Page 46 Using the Printer ...
Страница 84: ...________________________________________________________ __ Page 76 Using the Printer ...
Страница 108: ...________________________________________________________ __ Page 100 Using the Printer s Internal Labeling Software ...
Страница 125: ...Appendix D Page D 9 6 Continued 152 DPI Printer ...
Страница 140: ......
Страница 142: ...Page E 2 Appendix E ...
Страница 146: ...4 Warranty Information ...


