60
Installing the Status Monitor
5.
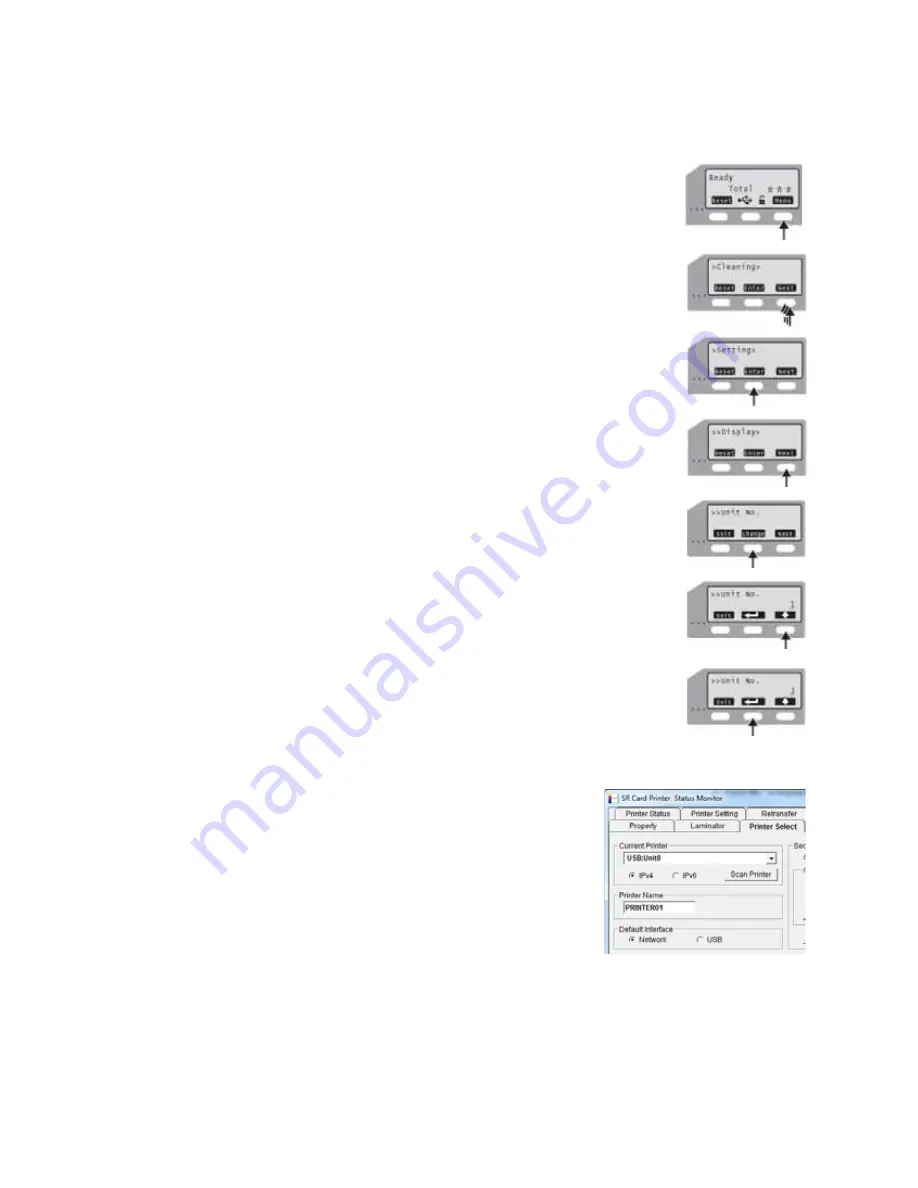
Change
the
unit
number
at
the
printer
LCD
panel.
a.
Press
Menu
to
enter
the
menus.
b.
Press
Next
several
times
until
Setting
is
displayed.
c.
Press
Enter
to
open
the
Setting
menu.
d.
The
first
submenu
is
Display.
Press
Next
twice.
e.
Unit
No.
is
displayed.
Press
Change
.
f.
Press
the
down
arrow
key
to
scroll
to
the
desired
unit
number.
To
select
a
lower
number,
scroll
to
10
and
then
press
the
down
arrow
key
again.
The
number
rolls
over
to
1.
g.
Press
the
Return
key
to
assign
the
number.
h.
Press
Exit
twice
to
leave
the
menus.
i.
Power
off
the
printer.
Wait
30
seconds
or
more.
Power
on
the
printer.
6.
Open
the
Status
Monitor
as
an
administrator
‐
level
user.
Refer
to
the
“Using
the
Status
Monitor”
section
of
the
User’s
Guide
.
Click
the
Printer
Select
tab.
7.
Make
sure
that
the
identifier
from
step 4
is
selected
in
the
Current
Printer
field.
Click
Refresh
to
get
the
new
unit
number
from
the
printer.
8.
Change
the
Printer
Name
field
to
correspond
with
the
unit
number.
For
example,
if
you
set
the
unit
number
to
8,
change
the
printer
name
to
PRINTER08.
9.
Change
the
Default
Interface
value
and
network
settings,
and
change
if
needed.
If
the
printer
is
set
to
USB
and
you
plan
to
install
the
printer
with
a
network
connection,
change
the
value
to
Network
.
Содержание LM200
Страница 24: ...16 Installing the Hardware Components ...
Страница 34: ...26 Installing the Smart Card Driver ...
Страница 62: ...54 Installing the USB Printer Driver ...
Страница 70: ...62 Installing the Status Monitor ...
Страница 94: ...86 Removing Printer Driver and Status Monitor ...


