background image


Printer Operation 

Introduction 

Thank you for purchasing a Dascom DP-550 Series Mobile Thermal Printer.  The DP-550 Series offers a 
variety of configurations to suit any printing environment. 
All models support paper and labels up to 3.12 inches wide and include “black mark” sensing capabilities on the 
printed side.  The DP-550LP also supports rear black mark sensing and label gap sensing.  All models are 
equipped with a serial port which may be used for either RS-232C or USB communications with an optional 
cable.  The printer may also be equipped with an optional IrDA

®

, Bluetooth

®

, or Wi-Fi

®

 interface, or a Magnetic 

Card Reader for reading credit cards, drivers licenses, etc.   
DP-550si and DP-550LPsi models are also available for permanently mounted industrial installations.  These 
models include a ball-type mounting attachment and replace the battery with a Serial Data/Power connector.  
This power connector accepts an 8-32 VDC input making it ideal for automotive and industrial equipment 
installations.  If your printer is an “si” model, you may ignore all references to batteries and battery charging. 
Each printer is shipped with Quick Setup Instructions and one roll of receipt paper.  Non “si” models also 
include a battery and a belt loop system.  “si” models include an unterminated data/power cable. 
The remainder of this chapter focuses on preparing the printer for initial use and tasks that will be encountered 
during everyday use.  The following chapter, “

Maintenance and Troubleshooting

”, describes how to 

maintain the printer for optimal performance and has information on how to diagnose any problems that may 
occur. 
For systems integrators and administrators, appendices contain detailed instructions on how to configure 
printing characteristics and communications with host systems. 
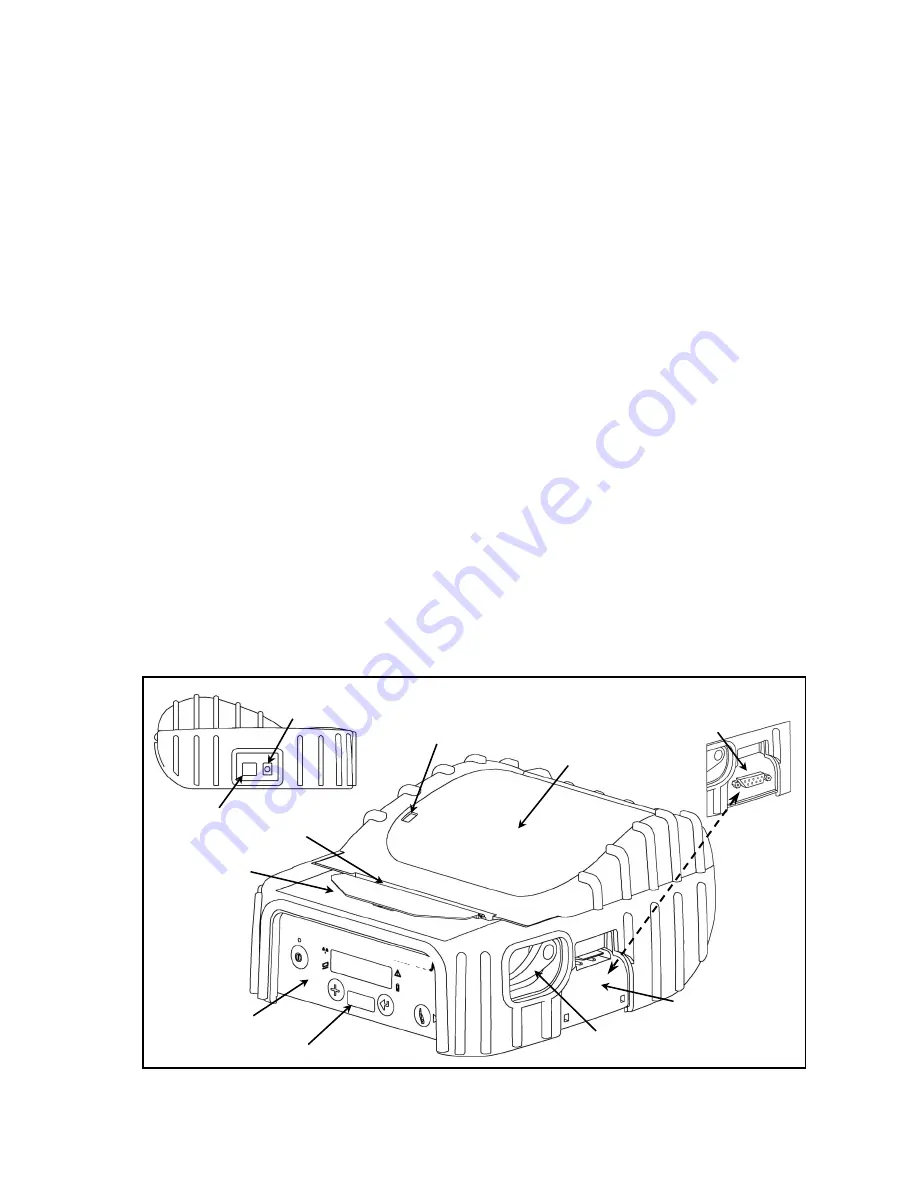
To begin, please refer to Figure 1 to familiarize yourself with the locations of the various features of the printer. 


Magnetic 

Card Reader

Power Connector For Non “si” Models

Serial Data 

Connector 

Tear Bar 

Paper Door Release 

Control Panel 

Battery 

Paper Door

Serial Data/Power 

Connector Replaces 

Battery on “si” Models 

Paper Gauge

IrDA Window 


Содержание Tally DP-550

Страница 1: ...USER GUIDE DP 550 Mobile Label Printer...

Страница 2: ......

Страница 3: ...unction with any other antenna or transmitter Part 15 21 Caution Changes or modifications not expressly approved by Dascom Inc could void the user s authority to operate the equipment Bluetooth Equipp...

Страница 4: ...removing any covers or performing any required cleaning or maintenance Connecting this printer to an ungrounded receptacle can result in electrical shock Never place the printer near inflammable or ex...

Страница 5: ...sting the Power Adapter and Battery 15 Troubleshooting 16 Error Messages 16 Other Problems 17 Obtaining Service 18 Appendix A Printer Configuration 19 Setup Menu Descriptions 19 Image Management 20 De...

Страница 6: ...s 50 Exiting Setup 50 Control Panel Setup Examples 51 Example Changing Print Contrast and the Default Font 51 Example Changing the Serial Interface Baud Rate 52 Appendix J Power Considerations 53 Stan...

Страница 7: ...e and industrial equipment installations If your printer is an si model you may ignore all references to batteries and battery charging Each printer is shipped with Quick Setup Instructions and one ro...

Страница 8: ...propriate input source and then connect the output of the power adapter to the printer s Power Connector The Battery Indicator will turn on and remain on until the battery is fully charged This may ta...

Страница 9: ...ore information regarding battery charging battery life and battery disposal refer to Battery Care on page 14 Installing Paper Each printer is supplied with a roll of receipt paper For your convenienc...

Страница 10: ...te Make sure the roll spins freely on the paper supports Movable Support Fixed Support Figure 4 Paper Support Refer to Figure 5 and unroll enough paper to allow it to lay through the print head as sho...

Страница 11: ...item May also be used to access a stored command file see the DP 5XX Programmer s Manual for more information Enter Button Used in printer configuration menus to advance to the next setup item May als...

Страница 12: ...mation It is also possible that a false paper error may be detected when using black mark sensing on preprinted forms This condition should not occur unless the size of the black mark on the form is l...

Страница 13: ...Paper Feed button A sample self test printout is shown below Firmware Revision Release Date Printer Serial Number Bluetooth Interface Installed and Selected Serial Interface Installed Not Selected Sel...

Страница 14: ...wn in Figure 7 Figure 7 Tearing Off Printed Output Using the Magnetic Card Reader The optional Magnetic Card Reader MCR is used by some applications to read information from credit cards drivers licen...

Страница 15: ...elt loop system slide your belt through the strap of the belt loop and then insert the knob located on the bottom of the printer into the slot of the belt loop connector Pull down on the printer until...

Страница 16: ...d output To set the emulation chosen please refer to the appendix that applies to the printer interface that you will be using in your application Printer Replaced Type of Application Suggested Emulat...

Страница 17: ...rint job Using the automatic header feature can allow the printer to print a logo at the beginning of each print job without requiring changes to application programs Promos print at the end of each p...

Страница 18: ......

Страница 19: ...clean the Print Element Area on the Print Head Caution Do not use sharp objects to clean the print head This may damage the printer and require service Such damage is not covered under warranty Clean...

Страница 20: ...lly charged and will not cause damage to the printer or battery The printer s battery status is displayed in the lower right corner of the front panel LCD Display The status is displayed as a battery...

Страница 21: ...the Paper Feed Button and turn the printer on using the Power Button until Printing Current Menu Values is displayed If the printer successfully prints the Self Test the battery is functional If the S...

Страница 22: ...ithout loss of data These are typically caused by interface configuration errors such as serial handshaking or baud rate and will require that the printer be turned off to clear the error Message Poss...

Страница 23: ...arge battery Print head dirty Clean print head Refer to page 13 Poor print quality Poor quality or old paper Verify paper from approved source Try new roll of paper Obstruction in paper path or paper...

Страница 24: ...are unable to assist you contact Dascom Customer Service at 877 434 1377 to obtain the name of the nearest Dascom Authorized Service Center If you wish to return your printer to Dascom for service pl...

Страница 25: ...used Setup Menu Descriptions Interface Contains communication parameters and the printer language emulation Menu items vary depending upon the interface s installed and currently selected as the activ...

Страница 26: ...f present 16 9 Courier 9 9 Scalable Font Set Default Scalable or Downloaded font sets if available Default Scalable 9 9 Resident Font Set Default Resident or Downloaded font sets if available Default...

Страница 27: ...r to the DP 5XX Programmer s Manual Resident Font Set Possible Values Default Resident Downloaded Font Sets This item selects the font set to be used in conjunction with the particular printer control...

Страница 28: ...This item specifies what is to be done with data that will not fit within the printable area The printable area is defined as the printable line length of the print head approximately 2 84 inches min...

Страница 29: ...printed to the right of the margin will either be wrapped around and printed on the next line or will be discarded based on the setting for Truncate Lines in the Image Management menu Graphic data tha...

Страница 30: ...e This item is not available when Form Feed Control is set to Distance This item allows the Black Mark Paper sensor to be adjusted to allow for variations in paper materials and Black Mark printing me...

Страница 31: ...a previously stored graphic image with an ID value of to be printed at the beginning of each print job Please refer to the DP 5XX Programmer s Manual for more information on storing graphics and logo...

Страница 32: ...t system sends a request to the DP 550 to enable the Magnetic Card Reader Swipe Card Now will be displayed and the MCR Indicator will flash to indicate that the card may now be passed through the MCR...

Страница 33: ...Common 6 RTS Request To Send From Host Figure 11 Serial Interface RJ Connector In addition to the connector described above DP 550si printers have a DB9F Serial Data Power connector located on the rig...

Страница 34: ...ud rate data bits parity stop bit s and handshaking method XON XOFF ETX ACK RTS CTS must match the settings on the host computer If these settings do not match errors and or lost data may occur When u...

Страница 35: ...e printer will only respond to commands valid for the currently selected emulation For more information please refer to the DP 5XX Programmer s Manual Baud Rate Possible Values 9600 19200 38400 57600...

Страница 36: ...an ETX character has been received and processed out of the input buffer ETX characters used for handshaking cannot be part of an escape sequence RTS CTS Possible Values Off On This item enables or di...

Страница 37: ...as established a connection with the printer the Wireless Indicator will illuminate Note The printer s IrDA implementation makes use of IrCOMM rather than IrLPT As a result some host systems will requ...

Страница 38: ...g note and then refer to Appendix H Note In order to use the Mobile Setup Utility communications must first be established between the host device running the utility and the printer This may require...

Страница 39: ...as established a connection to the printer the Wireless Indicator will be lit When the host closes the connection the indicator will turn off To conserve battery power application programs should disc...

Страница 40: ...een the host device running the utility and the printer This may require that you first use the Control Panel Setup to establish communications and then use the Mobile Setup Utility for final configur...

Страница 41: ...ter at the current position press the Increment Button The characters that may be selected are 0123456789 and SPACE Setting a character to SPACE will terminate the value being set Security Possible Va...

Страница 42: ...Twelve digit hexadecimal string This item displays the unique hardware value associated with the particular Bluetooth interface installed in the printer This value is set by the hardware manufacturer...

Страница 43: ...ode when not communicating However according to the IEEE 802 11b standard the printer must be granted permission from the network s Access Point before operating in the low power mode Since different...

Страница 44: ...Setup feature as described in Appendix I Which setup method may be used is indicated in the table below Before using the Mobile Setup Utility please read the following note and then refer to Appendix...

Страница 45: ...r Server Port 8023 9 9 Advanced Features Contact Dascom Technical Support 9 Emulation Possible Values Printek O Neil ZPL II Mt3 CPCL may be used by a host application program to control the various ca...

Страница 46: ......

Страница 47: ...ew the operator can review the settings but cannot edit or change the values When set to Initialize the printer will reset all values in that menu to the factory default values and security will be re...

Страница 48: ......

Страница 49: ...Selected Setup Method Menu Item Values Default Value Control Panel Setup Utility Emulation Printek Oneil ZPL II Mt3 CPCL MPL IPL ESim HexDump CPCL 9 9 INTERFACE MENU Bluetooth Selected Setup Method M...

Страница 50: ...Server Port 8023 9 9 Advanced Features Contact Dascom Technical Support 9 IMAGE MANAGEMENT Setup Method Menu Item Values Default Value Control Panel Setup Utility Print Contrast 75 to 125 0 9 9 Defau...

Страница 51: ...Feed Distance 0 0394 to 2 5216 1 2608 9 9 Top of Form Adjust 0 2955 to 0 2955 0 0000 9 9 Tear Adjust 0 2955 to 0 3152 0 0000 9 9 Mark Sensitivity 10 to 10 0 9 9 ADVANCED Setup Method Menu Item Values...

Страница 52: ......

Страница 53: ...e typing hit the Enter key again You can return to the main menu by pressing the Escape keyboard key NOTE If Dascom printer driver is used for TCP IP printing it may block access to the TCP socket Ple...

Страница 54: ......

Страница 55: ...A 20 Device Settings Appendix A 22 Advanced Appendix A 24 Control Panel Setup Basics Power Indicator LCD Display Power Button Figure 14 DP 550 Control Panel When in Setup the top line of the LCD Displ...

Страница 56: ...Button until the desired menu is displayed With a few exceptions which are described where appropriate pressing the Advance Button will always advance you to the next menu Exiting Setup Setup may be e...

Страница 57: ...etup Menus and will then proceed to Interface and will display the currently active interface on the bottom line Entering Setup Menus INTERFACE Current I O 4 Press the Advance Button to proceed to the...

Страница 58: ...layed please refer to Appendix B Using the Serial USB Interface for instructions on how to make Serial the currently selected interface Entering Setup Menus INTERFACE Serial 4 Press the Enter Button t...

Страница 59: ...ins fully capable of receiving data or responding to a control panel button The printer will automatically wake up when it begins to receive data from a host system or when any front panel Button is p...

Страница 60: ......

Страница 61: ...Appendix K Print Font Samples Print Samples 55...

Страница 62: ...Appendix K Print Font Samples Courier Font With International Extended Character Set Courier Font PC Line Drawing Extended Character Set 56...

Страница 63: ...Appendix K Print Font Samples Sans Serif Font 57...

Страница 64: ......

Страница 65: ...os and additional bar codes Connectivity Serial RS 232C USB Standard Optional Cable Required Wireless Options IrDA Bluetooth Complete Bluetooth 2 0 Stack Including Protocols L2CAP RFCOMM SDP Profiles...

Страница 66: ...P 550si models Weight DP 550 1 75 lbs 0 79 kg including battery DP 550si 1 75 lbs 0 79 kg Environmental Specifications Operating Temp 4 to 122 F 20 to 50 C 40 to 185 F 40 to 85 C on DP 550si models St...

Страница 67: ...Outside Diameter Black Mark Sensing On Back Side and Gap Sensing On DP 550LP Models Approved Vendors Kansaki P300 P310 P350 P354 P390 P530UV TO281CA OP200 TO381N F180 F380 F550 Jujo TF 50KS E2C Honsh...

Страница 68: ...ob and will require little if any reverse paper motion The Black Mark must be printed on the front side of the paper for the DP 550 It may optionally be printed on the back side of the paper for use w...

Страница 69: ...es 100 240VAC 50 60Hz Wall Adapter Available for North America South Africa India Korea Continental Europe United Kingdom Ireland Australia New Zealand 12 24VDC Vehicle Adapter Battery Charger Four Ba...

Страница 70: ......

Страница 71: ...rinter character pitch The horizontal spacing of characters Measured in cpi cpi Characters per inch current line The line upon which the next character will be printed current print position The colum...

Страница 72: ...ng parameters of the printer to the value or state assumed when the printer is powered on RS 232C An EIA standard for serial data transmission server Any node on a network that provides services to an...

Страница 73: ......

Отзывы: