


User's Manual
111
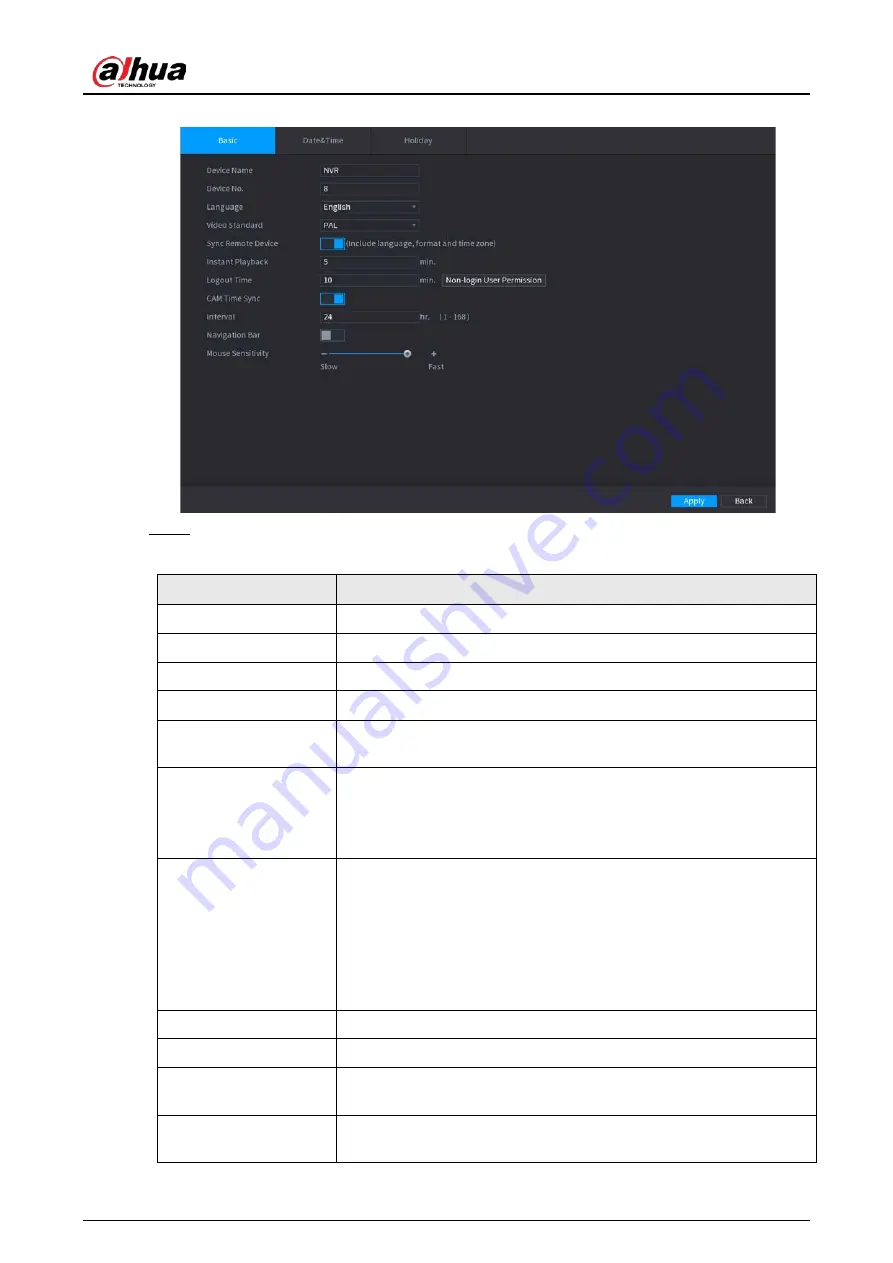
Figure 4-14 Basic settings
Step 2
Set parameters. See Table 4-3.
Table 4-3 Basic parameters
Parameter
Description
Device Name
Enter the Device name.
Device No.
Enter a number for the Device.
Language
Select a language for the Device system.
Video Standard
Select
PAL
or
NTSC
as needed.
Sync Remote Device
Enable this function; the NVR can synchronize information with the
remote device such as Language, video standard and time zone.
Instant Playback
In the
Instant Play
box, enter the time length for playing back the
recorded video. The value ranges from 5 to 60.
On the live view control bar, click the instant playback button to play
back the recorded video within the configured time.
Logout Time
Enter the standby time for the Device. The Device automatically logs
out when it is not working in the configured period. You need to login
the Device again.
The value ranges from 0 to 60. 0 indicates there is not standby time for
the Device.
Click
Monitor Channel(s) when logout
. You can select the channels
that you want to continue monitoring when you logged out.
CAM Time Sync
Syncs the Device time with IP camera.
Interval
Enter the interval for time sync.
Logout Time
You can set auto logout interval once login user remains inactive for a
specified time. Value ranges from 0 to 60 minutes.
Navigation Bar
Enable the navigation bar. When you click on the live view screen, the
navigation bar is displayed.
Содержание NVR41-4KS2 Series
Страница 1: ...Dahua Network Video Recorder User s Manual ZHEJIANG DAHUA VISION TECHNOLOGY CO LTD V1 1 0 ...
Страница 74: ...User s Manual 58 Figure 2 79 Alarm input port Figure 2 80 Alarm input port ...
Страница 101: ...User s Manual 85 Figure 3 41 Step 9 Secure the HDD bracket and put the top cover back ...
Страница 114: ...User s Manual 98 3 6 15 NVR616 4KS2 Series The following figure is for reference only Figure 3 58 ...
Страница 132: ...User s Manual 116 Figure 4 19 Modify IP Step 3 Set parameters See Table 4 5 ...
Страница 147: ...User s Manual 131 Figure 4 29 Period Step 3 Set record type See Figure 4 30 ...
Страница 319: ...User s Manual 303 The Exception interface is displayed See Figure 4 190 Figure 4 190 Figure 4 191 Figure 4 192 ...
Страница 420: ...User s Manual 404 Figure 4 290 File management Step 2 Click Add The Add interface is displayed See Figure 4 291 ...
Страница 452: ...User s Manual ...


