background image

DGS-3048 Gigabit Ethernet Switch Manual 

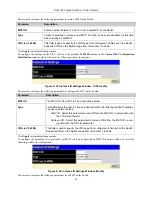
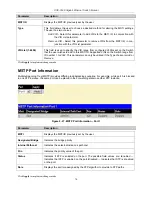
Parameter 

Description 

Allowed to go port

Allows the selection of the port number on which the MAC address entered above 
resides. 

Click 

Apply

 to implement the changes made. To delete an entry in the Static Unicast Forwarding Table, click the 

corresponding 

 under the Delete


heading.  

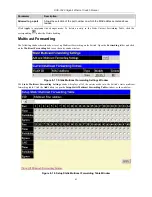
Multicast Forwarding 

The following window describes how to set up Multicast Forwarding on the Switch. Open the 

Forwarding

 folder and click 

on the 

Multicast Forwarding

 link to see the entry window below: 


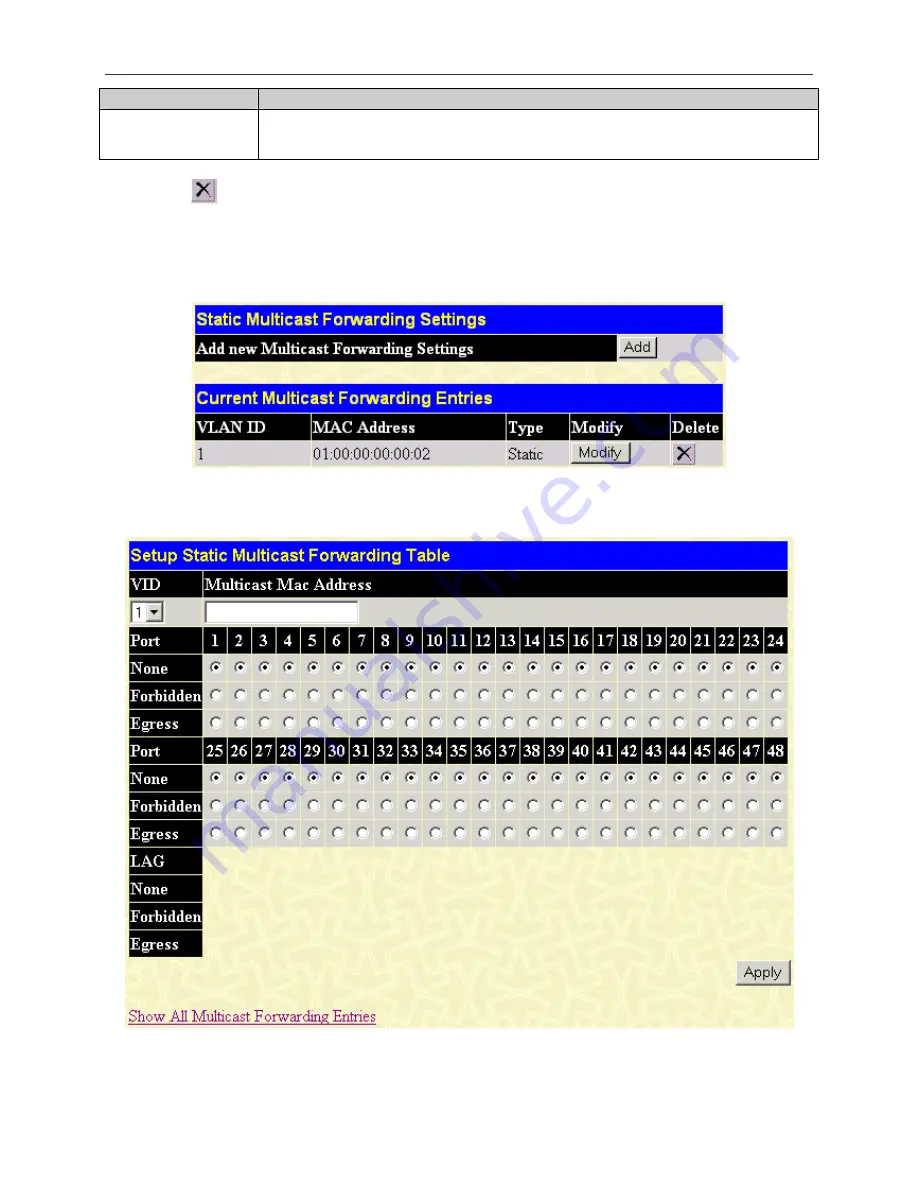
Figure 8- 17. Static Multicast Forwarding Settings Window 

The 

Static Multicast Forwarding Settings

 window displays all of the entries made into the Switch's static multicast 

forwarding table. Click the 

Add

 button to open the 

Setup Static Multicast Forwarding Table 

window, as shown below: 


Figure 8- 18. Setup Static Multicast Forwarding Table Window 

61 

Содержание D DGS-3048 DGS-3048

Страница 1: ...D Link DGS 3048 Managed 48 Port Gigabit Ethernet Switch Manual ...

Страница 2: ......

Страница 3: ...ot installed and used in accordance with this user s guide may cause harmful interference to radio communications Operation of this equipment in a residential area is likely to cause harmful interference in which case the user will be required to correct the interference at his own expense CE Mark Warning This is a Class A product In a domestic environment this product may cause radio interference...

Страница 4: ...dentifying External Components 6 Front Panel 6 Rear Panel 6 Side Panels 6 LED Indicators 7 Connecting the Switch 8 Switch to End Node 8 Switch to Hub or Switch 8 Switch to Core Router Switch 9 Introduction to Switch Management 10 Management Options 10 Web based Management Interface 10 SNMP Based Management 10 Command Line Console Interface Through the Serial Port 10 Connecting the Console Port RS ...

Страница 5: ...es 34 Download Firmware 35 SNMP Manager 36 SNMP View Table 36 SNMP Group Table 37 SNMP User Table 38 SNMP Community Table 40 SNMP Host Table 41 SNMP Engine ID 42 SNMP Trap Configuration 42 L2 Features 44 VLANs 44 Understanding IEEE 802 1p Priority 44 VLAN Description 44 Notes About VLANs on the DGS 3048 44 IEEE 802 1Q VLANs 45 802 1Q VLAN Tags 46 Port VLAN ID 48 Tagging and Untagging 48 Ingress Fi...

Страница 6: ...Control 74 802 1p Default Priority 74 802 1p User Priority 75 QoS Scheduling Mechanism 76 QoS Output Scheduling 77 Security 78 802 1x 78 Port Access Entity 78 802 1x Port Based Access Control 78 Authentication Server 79 Authenticator 79 Client 80 Authentication Process 80 Port Based Network Access Control 81 802 1x Authenticator Parameter 81 RADIUS Server 85 Trusted Host 86 Access Authentication C...

Страница 7: ... Switch History Log 108 Reset 109 Reboot System 109 Save Changes 109 Logout 110 Technical Specifications 111 Cable Lengths 113 Glossary 114 Warranty and Registration Information 117 All countries and regions excluding USA 117 Wichtige Sicherheitshinweise 117 Product Registration 122 D Link Europe Limited Product Warranty 123 D Link Europe Limited Produktgarantie 125 D Link Europe a limité la garan...

Страница 8: ...guring the Spanning Tree Section 8 Security Provides a description of the security features of the Switch including Trusted Host Secure Socket Layer SSL Secure Shell SSH and Access Authentication Control Section 9 Management A discussion of the management features of the Switch including User Accounts and SNMP Section 10 Monitoring Features graphs and windows used in monitoring features and packet...

Страница 9: ...onents Operate the product only from the type of external power source indicated on the electrical ratings label If you are not sure of the type of power source required consult your service provider or local power company To help avoid damaging your system be sure the voltage selection Switch if provided on the power supply is set to match the power available at your location 115 volts V 60 hertz...

Страница 10: ...bserve the following precautions for rack stability and safety Also refer to the rack installation documentation accompanying the system and the rack for specific caution statements and procedures Systems are considered to be components in a rack Thus component refers to any system as well as to various peripherals or supporting hardware CAUTION Installing systems in a rack without the front and s...

Страница 11: ...flow is provided to components in the rack Do not step on or stand on any component when servicing other components in a rack NOTE A qualified electrician must perform all connections to DC power and to safety grounds All electrical wiring must comply with applicable local or national codes and practices CAUTION Never defeat the ground conductor or operate the equipment in the absence of a suitabl...

Страница 12: ...g carton do not remove the component from the antistatic packing material until you are ready to install the component in your system Just before unwrapping the antistatic packaging be sure to discharge static electricity from your body 2 When transporting a sensitive component first place it in an antistatic container or packaging 3 Handle all sensitive components in a static safe area If possibl...

Страница 13: ...6Gbps Max Forwarding Rate 35 7 million packets per second High speed data forwarding rate of 1 488 095 pps per port at 100 of wire speed for 1000 Mbps speed Supports 8K MAC address Supports four priority queues per port Supports 512Kbytes buffer memory per Switch 802 1D Spanning Tree support Can be disabled on the entire Switch or on a per port basis 802 1Q Tagged VLAN support including GVRP GARP ...

Страница 14: ...ctions only However the DGS 3048 provides counters for both receive and transmit functions Supports Web based management TFTP Client support DHCP Client support Password enabled Telnet remote control console Broadcast storm control Multicast storm control Command Line Interface support Syslog support SNTP support SNMP Trap on MAC Notification support Jumbo frame support SSH support SSL support TAC...

Страница 15: ...k reseller for replacement Installation Use the following guidelines when choosing a place to install the Switch The surface must support at least 4 kg The power outlet should be within 1 82 meters 6 feet of the device Visually inspect the power cord and see that it is secured to the AC power connector Make sure that there is proper heat dissipation from and adequate ventilation around the Switch ...

Страница 16: ...AC 50 60 Hz The Switch s power supply will adjust to the local power source automatically and may be powered on without having any or all LAN segment cables connected After the Switch is plugged in the LED indicators should respond as follows All LED indicators except console will momentarily blink This blinking of the LEDs indicates a reset of the system The console LED indicator will blink while...

Страница 17: ... the Switch back in External Redundant Power System The Switch supports an external redundant power system Figure 2 3 DPS 500 in DPS 900 Case with DGS 3048 Figure 2 4 DPS 500 in DPS 800 Case with DGS 3048 NOTE See the DPS 500 documentation for more information CAUTION Do not use the Switch with any redundant power system other than the DPS 500 5 ...

Страница 18: ...orts to connect fiber optic media to another Switch server core router Switch or network backbone Rear Panel The rear panel of the Switch contains an external Redundant Power Supply connector and an AC power connector Figure 3 2 Rear Panel View The external Redundant Power Supply connector is used to connect the DGS 3048 to a DPS 500 An auto Switch circuit automatically switches to an external RPS...

Страница 19: ... indicators of the Switch include Power Console RPS Speed and Link Activity The following shows the LED indicators for the Switch along with an explanation of each indicator Figure 3 4 LED Indicators Power This indicator on the front panel lights solid green when the system is powered up and remains dark when the system is not powered on RPS This indicator is lit solid amber when the external Redu...

Страница 20: ...h Figure 4 1 Switch Connected to an End Node The Link Act LEDs light green when the link is valid A blinking green LED indicates packet activity on that port The Speed LEDs indicate port speed and will light solid green for 1000 Mbps connections They will remain off for 10 or 100 Mbps connections Switch to Hub or Switch These connections can be accomplished in a number of ways using a normal cable...

Страница 21: ... optic media SFP Transceiver for 1000BASE LX Single mode fiber module 10km SFP Transceiver for 1000BASE SX Multi mode fiber module 550m SFP Transceiver for 1000BASE LHX Single mode fiber module 40km SFP Transceiver for 1000BASE ZX Single mode fiber module 80km Figure 4 3 Switch Connected by an Optical Fiber Cable to a Core Router Switch with a Server Connected by Crossover Cable and a PC Connected...

Страница 22: ...driven interface provides complete access to all Switch management features Connecting the Console Port RS 232 DCE The Switch provides an RS 232 serial port that enables a connection to a computer or terminal for monitoring and configuring the Switch This port is a female DB 9 connector implemented as a data terminal equipment DTE connection To use the console port you need the following equipment...

Страница 23: ...are using to make this connection is configured to match these settings If you are having problems making this connection on a PC make sure the emulation is set to VT 100 You will be able to set the emulation by clicking on the File menu in you HyperTerminal window clicking on Properties in the drop down menu and then clicking the Settings tab This is where you will find the Emulation options If y...

Страница 24: ...nd press the Enter key 2 You will be asked to provide a password Type the password used for the administrator account being created and press the Enter key 3 You will be prompted to enter the same password again to verify it Type the same password and press the Enter key Successful creation of the new administrator account will be verified by a Success message NOTE Passwords are case sensitive Use...

Страница 25: ...gured with a shared set of privileges The SNMP version may also be set for a listed group of SNMP managers Thus you may create a group of SNMP managers that are allowed to view read only information or receive traps using SNMP v 1 while assigning a higher level of security to another group granting read write privileges using SNMP v 3 Using SNMP v 3 individual users or groups of SNMP managers can ...

Страница 26: ... Starting at the command line prompt enter the commands config ipif System ipaddress xxx xxx xxx xxx yyy yyy yyy yyy where the x s represent the IP address to be assigned to the IP interface named System and they represent the corresponding subnet mask Alternatively you can enter config ipif System ipaddress xxx xxx xxx xxx z Where the x s represent the IP address to be assigned to the IP interfac...

Страница 27: ...n SFP transceiver port Use your cabling requirements to select an appropriate SFP transceiver type Insert the SFP transceiver sold separately into the SFP transceiver slot Use the appropriate network cabling to connect a device to the connectors on the SFP transceiver CAUTION When the SFP transceiver acquires a link the associated integrated 10 100 1000BASE T port is disabled 15 ...

Страница 28: ...us all settings encountered in Web based management are the same as those found in the console program NOTE This Web based Management module does not accept Chinese language input or other languages requiring 2 bytes per character NOTE The Web browser needs to be upgraded to the latest Java version JavaTM Plug in version 1 5 0 or later Login to Web Manager To begin managing your Switch simply run ...

Страница 29: ...DGS 3048 Gigabit Ethernet Switch Manual Figure 6 1 Enter Network Password Dialog Box 17 ...

Страница 30: ... Select the folder or window to be displayed The folder icons can be opened to display the hyperlinked menu buttons and subfolders contained within them Area 2 Presents a graphical near real time image of the front panel of the Switch This area displays the Switch s ports and expansion modules showing port activity duplex mode or flow control depending on the specified mode Various areas of the gr...

Страница 31: ... learned MAC Address is allowed to remain idle To change this type in a different value representing the MAC address age out time in seconds The MAC Address Aging Time can be set to any value between 1 and 10 The default setting is 5 IGMP Snooping This indicates if Internet Group Management Protocol IGMP Snooping is enabled on the Switch When enabled this feature instructs the Switch to read IGMP ...

Страница 32: ... 802 1x More information regarding 802 1x its functions and implementation can be found later in this section under the Security 802 1x folder Port Based 802 1x specifies that ports configured for 802 1x are initialized based on the port number only and are subject to any authorization parameters configured Syslog State This allows you to enable or disable the System Log State The default is enabl...

Страница 33: ...ly to activate the new settings The information is described as follows Parameter Description Device Type A description of the Switch type MAC Address The Ethernet address for the device Also known as the physical address Boot PROM Version Version number for the firmware chip This information is needed for new runtime software downloads Firmware Version Version number of the firmware installed on ...

Страница 34: ...Protocol request will be sent when the Switch is powered up Once you have selected a setting under Get IP From click Apply to activate the new settings The information is described as follows Parameter Description Get IP From There are two choices for how the Switch receives its IP Address settings Manual and DHCP IP Address The host address for the device on the TCP IP network Subnet Mask The add...

Страница 35: ...the Port Configuration Window click on the Port Configuration folder and choose the Port Settings link Figure 7 3 Port Configuration Window To configure Switch ports 1 Choose the port or sequential range of ports using the From and To pull down menus 2 Use the remaining pull down menus to configure the parameters described below 23 ...

Страница 36: ...ons 1000M Full and take on certain characteristics that are different from the other choices listed The 1000M Full parameters refer to connections running a 1000BASE T cable for connection between the Switch port and other device capable of a gigabit connection Flow Control Displays the flow control scheme used for the various port configurations Ports configured for full duplex use 802 3x flow co...

Страница 37: ...folder and choose the Port Description link Figure 7 4 Port Description Window The following parameters can be set Parameter Description From To These two fields allow you to specify the range of ports included in the description Description Text description of the port User Accounts The Switch allows you to set up and manage user accounts by using the following windows 25 ...

Страница 38: ...in the appropriate information in the Username New Password and Confirm New Password fields Then select the desired access Admin or User in the Access Right drop down menu and click Apply The information on the window is described as follows Parameter Description User Name Enter a user name in this field New Password Enter the desired new password in this field Confirm New Password Enter the new p...

Страница 39: ...er the new password a second time Access Right Displays the current access level assigned to each corresponding user There are two access levels User and Admin Admin has full read write access while a User has read only access Admin and User Privileges There are two levels of user privileges Admin and User Some menu selections available to users with Admin privileges may not be available to those ...

Страница 40: ...ed source port Figure 7 8 Setup Port Mirroring Window To configure a mirror port 1 Select the Source Port from where you want to copy frames and the Target Port which receives the copies from the source port 2 Select Ingress Egress or None and change the Status drop down menu to Enabled 3 Click Apply to let the changes take effect NOTE You cannot mirror a fast port onto a slower port For example i...

Страница 41: ... below for a description of the parameters in the following window Figure 7 10 System Log Server Add Window The following parameters can be set Parameter Description Index Syslog server settings index Server IP The IP address of the Syslog server Severity This drop down menu allows you to select the level of messages that will be sent The options are Warning Informational and ALL Facility Some of ...

Страница 42: ... local3 20 local use 4 local4 21 local use 5 local5 22 local use 6 local6 23 local use 7 local7 UDP Port Enter the UDP port number used for sending Syslog messages The default is 514 To set the System Log Server configuration click Apply To delete an entry from the System Log Servers window click the corresponding under the Delete heading of the entry to delete To return to the System Log Servers ...

Страница 43: ...ays the time source for the system Current Time SNTP Settings SNTP State Use this pull down menu to Enabled or Disabled SNTP SNTP Primary Server This is the IP address of the primary server the SNTP information will be taken from SNTP Secondary Server This is the IP address of the secondary server the SNTP information will be taken from SNTP Poll Interval in Seconds This is the interval in seconds...

Страница 44: ...f you would like to update the system clock Time in HH MM SS Enter the current time in hours and minutes if you would like to update the system clock Click Apply to implement your changes Time Zone and DST The following are windows used to configure time zones and Daylight Savings time settings for SNTP Open the Administration folder then the SNTP Setting folder and click on the Time Zone and DST ...

Страница 45: ...ings Daylight Saving Time State Use this pull down menu to enable or disable the DST Settings Daylight Saving Time Offset in Minutes Use this pull down menu to specify the amount of time that will constitute your local DST offset 30 60 90 or 120 minutes Time Zone Offset from GMT in Use these pull down menus to specify your local time zone s offset from Greenwich 33 ...

Страница 46: ...g date be specified concisely For example specify to begin DST on April 3 and end DST on October 14 From What Month Enter the month DST will start on each year From What Date Enter the day of the week DST will start on each year From What Year Enter the year DST will start From What Time Enter the time of day DST will start on each year To What Month Enter the month DST will end on each year To Wh...

Страница 47: ...stration folder Figure 7 13 TFTP Services Window To download firmware configure the following fields and click Start Parameter Description Active Select the activity type Server IP Address Enter the IP address of the server from which you wish to download firmware File Name Specify the path and filename of the firmware on the Server 35 ...

Страница 48: ...blic Allows authorized management stations to retrieve MIB objects private Allows authorized management stations to retrieve and modify MIB objects SNMPv3 uses a more sophisticated authentication process that is separated into two parts The first part is to maintain a list of users and their attributes that are allowed to act as SNMP managers The second part describes what each user on that list c...

Страница 49: ...ts that an SNMP manager can access To implement your new settings click Apply To return to the SNMP View Table click the Show All SNMP View Table Entries link SNMP Group Table An SNMP Group created with this table maps SNMP users identified in the SNMP User Table to the views created in the previous menu To view the SNMP Group Table window open the SNMP Manager folder in the Administration folder ...

Страница 50: ...ements in the Structure of Management Information SMI and adds some security features SNMPv3 Specifies that the SNMP version 3 will be used SNMPv3 provides secure access to devices through a combination of authentication and encrypting packets over the network Security Level The Security Level settings only apply to SNMPv3 NoAuthNoPriv Specifies that there will be no authorization and no encryptio...

Страница 51: ...ges SNMP V3 Encryption Check to use encryption Auth Protocol You need to check encrypted in SNMP V3 Encryption in order to configure Auth Protocol MD5 Specifies that the HMAC MD5 96 authentication level will be used This field is only operable when the Encryption field has been checked This field will require the user to enter a password SHA Specifies that the HMAC SHA authentication protocol will...

Страница 52: ... subset of all MIB objects will be accessible to the SNMP community Read write or read only level permission for the MIB objects accessible to the SNMP community To configure SNMP Community entries open the SNMP Manager folder located in the Administration folder and click the SNMP Community Table link which will open the following window To create a new entry click the Add button a separate windo...

Страница 53: ...f up to 32 characters that is used to identify the group of MIB objects that a remote SNMP manager is allowed to access on the Switch The view name must exist in the SNMP View Table Access Right Read Only Specifies that SNMP community members using the community string created can only read the contents of the MIBs on the Switch Read Write Specifies that SNMP community members using the community ...

Страница 54: ... will be used with a Auth Priv security level Community String or SNMP V3 User Name Type in the community string or SNMP V3 user name as appropriate To implement your new settings click Apply To return to the SNMP Host Table click the Show All SNMP Host Table Entries link SNMP Engine ID The Engine ID is a unique identifier used for SNMP V3 implementations This is an alphanumeric string used to ide...

Страница 55: ...onfiguration window enables disables SNMP Trap generation It is possible to enable SNMP Trap during authentication Figure 7 25 SNMP Trap Configuration window To change the SNMP Trap Configuration select the desired options and click the Apply button 43 ...

Страница 56: ...ueue Queue 1 be reserved for data packets with a priority value of 7 Packets that have not been given any priority value are placed in Queue 0 and thus given the lowest priority for delivery A weighted round robin system is employed on the Switch to determine the rate at which the queues are emptied of packets The ratio used for clearing the queues is 4 1 This means that the highest priority queue...

Страница 57: ...ions over IEEE 802 1Q enabled Switches that are members of that VLAN and this includes broadcast multicast and unicast packets from unknown sources VLANs can also provide a level of security to your network IEEE 802 1Q VLANs will only deliver packets between stations that are members of the VLAN Any port can be configured as either tagging or untagging The untagging feature of IEEE 802 1Q VLANs al...

Страница 58: ... tag is contained in the following two octets and consists of 3 bits of user priority 1 bit of Canonical Format Identifier CFI used for encapsulating Token Ring packets so they can be carried across Ethernet backbones and 12 bits of VLAN ID VID The 3 bits of user priority are used by 802 1p The VID is the VLAN identifier and is used by the 802 1Q standard Because the VID is 12 bits long 4094 uniqu...

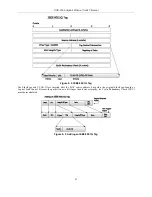
Страница 59: ...Type and VLAN ID are inserted after the MAC source address but before the original EtherType Length or Logical Link Control Because the packet is now a bit longer than it was originally the Cyclic Redundancy Check CRC must be recalculated Figure 8 3 Adding an IEEE 802 1Q Tag 47 ...

Страница 60: ...can have as many VIDs as the Switch has memory in its VLAN table to store them Because some devices on a network may be tag unaware a decision must be made at each port on a tag aware device before packets are transmitted should the packet to be transmitted have a tag or not If the transmitting port is connected to a tag unaware device the packet should be untagged If the transmitting port is conn...

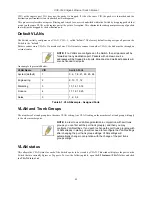
Страница 61: ...ll ports Broadcast and multicast packets will also be flooded to all ports An example is presented below VLAN Name VID Switch Ports System default 1 5 6 7 8 21 22 23 24 Engineering 2 9 10 11 12 Marketing 3 13 14 15 16 Finance 4 17 18 19 20 Sales 5 1 2 3 4 Table 8 1 VLAN Example Assigned Ports VLAN and Trunk Groups The members of a trunk group have the same VLAN setting Any VLAN setting on the memb...

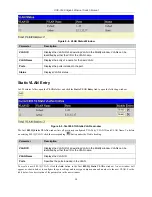
Страница 62: ... window The first 802 1Q Static VLANs window lists all previously configured VLANs by VLAN ID and VLAN Name To delete an existing 802 1Q VLAN click the corresponding button under the Delete heading Parameter Description VLAN ID Displays the VLAN ID of an existing VLAN in the Modify window VLANs can be identified by either the VID or the VLAN name VLAN Name Displays the VLAN ID Ports Specifies the ...

Страница 63: ...click the Show All Static VLAN Entries link To change an existing 802 1Q VLAN entry click the Modify button of the corresponding entry you wish to modify A new window will appear to configure the port settings and to assign a unique name and number to the new VLAN See the table below for a description of the parameters in the new window 51 ...

Страница 64: ...N name VLAN Name Allows the entry of a name for the new VLAN in the Add window or for editing the VLAN name in the Modify window Port Settings Allows an individual port to be specified as member of a VLAN Tag Specifies the port as either 802 1Q tagging or 802 1Q untagged Checking the box will designate the port as Tagged None Allows an individual port to be specified as a non VLAN member Egress Se...

Страница 65: ... In the L2 Futures menu open the VLANs folder and click GVRP Settings This GVRP Settings window shown below allows you to determine whether the Switch will share its VLAN configuration information with other GARP VLAN Registration Protocol GVRP enabled Switches In addition Ingress Checking can be used to limit traffic by filtering incoming packets whose PVID does not match the PVID of the port Res...

Страница 66: ... and Disabled Enabled enables the port to compare the VID tag of an incoming packet with the PVID number assigned to the port If the two are different the port filters drops the packet Disabled disables ingress filtering Ingress Checking is Enabled by default Acceptable Frame Type This field denotes the type of frame that will be accepted by the port The user may choose between Tagged Only which m...

Страница 67: ...e tag When the packet arrives at its destination the receiving device will use the PVID to make VLAN forwarding decisions If a packet is received by the port and Ingress filtering is Enabled the port will compare the VID of the incoming packet to its PVID If the two are unequal the port will drop the packet If the two are equal the port will receive the packet GVRP The Group VLAN Registration Prot...

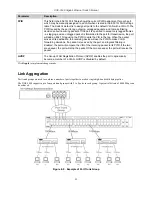
Страница 68: ... and 802 1p default priority configurations must be identical Port locking port mirroring and 802 1x must not be enabled on the trunk group Further the aggregated links must all be of the same speed and should be configured as full duplex Load balancing is automatically applied to the ports in the aggregated group and a link failure within the group causes the network traffic to be directed to the...

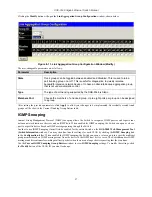
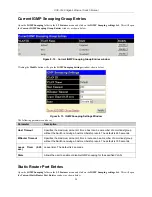
Страница 69: ...Trunking Group Entries table IGMP Snooping Internet Group Management Protocol IGMP snooping allows the Switch to recognize IGMP queries and reports sent between network stations or devices and an IGMP host When enabled for IGMP snooping the Switch can open or close a port to a specific device based on IGMP messages passing through the Switch In order to use IGMP Snooping it must first be enabled f...

Страница 70: ...st Timeout Specifies the maximum amount of time a host can be a member of a multicast group without the Switch receiving a host membership report The default is 260 seconds MRouter Timeout Specifies the maximum amount of time a route can be a member of a multicast group without the Switch receiving a host membership report The default is 300 seconds Leave Timer 0 25 sec Leave timer The default is ...

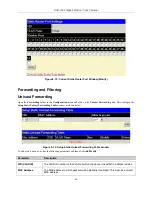
Страница 71: ...DGS 3048 Gigabit Ethernet Switch Manual Figure 8 14 Current Static Router Port Window Clicking the Modify button will open the Static Router Port Entries window shown below 59 ...

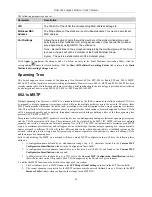
Страница 72: ... will open the Setup Static Unicast Forwarding Table window as shown below Figure 8 16 Setup Static Unicast Forwarding Table window To add or edit an entry define the following parameters and then click Add Modify Parameter Description VID VLAN ID The VLAN ID number of the VLAN on which the above Unicast MAC address resides MAC Address The MAC address to which packets will be statically forwarded ...

Страница 73: ...arding The following window describes how to set up Multicast Forwarding on the Switch Open the Forwarding folder and click on the Multicast Forwarding link to see the entry window below Figure 8 17 Static Multicast Forwarding Settings Window The Static Multicast Forwarding Settings window displays all of the entries made into the Switch s static multicast forwarding table Click the Add button to ...

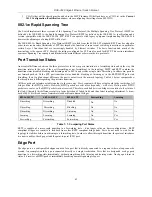
Страница 74: ...ll allow for faster convergences of new topologies for the failed instance Frames designated for these VLANs will be processed quickly and completely throughout interconnected bridges utilizing either of the three spanning tree protocols STP RSTP or MSTP This protocol will also tag BDPU packets so receiving devices can distinguish spanning tree instances spanning tree regions and the VLANs associa...

Страница 75: ...state discarding there is no functional difference the port is not active in the network topology Table 6 1 below compares how the three protocols differ regarding the port state transition All three protocols calculate a stable topology in the same way Every segment will have a single path to the root bridge All bridges listen for BPDU packets However BPDU packets are sent more frequently with ev...

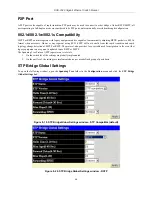
Страница 76: ...fit from the rapid transition and rapid topology change detection of MSTP or RSTP The protocol also provides for a variable used for migration in the event that legacy equipment on a segment is updated to use RSTP or MSTP The Spanning Tree Protocol STP operates on two levels 1 On the switch level the settings are globally implemented 2 On the port level the settings are implemented on a per user d...

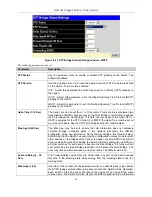
Страница 77: ...urther details Max Age 6 40 Sec The Max Age may be set to ensure that old information does not endlessly circulate through redundant paths in the network preventing the effective propagation of the new information Set by the Root Bridge this value will aid in determining that the Switch has spanning tree configuration values consistent with other devices on the bridged LAN If the value ages out an...

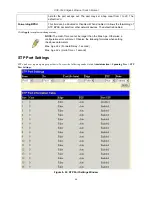
Страница 78: ...The default is Enabled Click Apply to implement changes made NOTE The Hello Time cannot be longer than the Max Age Otherwise a configuration error will occur Observe the following formulas when setting the above parameters Max Age 2 x Forward Delay 1 second Max Age 2 x Hello Time 1 second STP Port Settings STP can be set up on a port per port basis To view the following window click Administration...

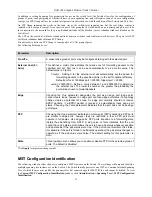
Страница 79: ...rmine the external cost The lower the number the greater the probability the port will be chosen to forward packets Edge Choosing the True parameter designates the port as an edge port Edge ports cannot create loops however an edge port can lose edge port status if a topology change creates a potential for a loop An edge port normally should not receive BPDU packets If a BPDU packet is received it...

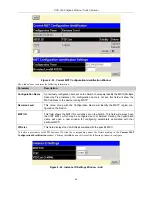
Страница 80: ... will identify the MSTP region con figured on the Switch MSTI ID This field shows the MSTI IDs currently set on the Switch This field will always have the CIST MSTI which may be configured but not deleted Clicking the hyperlinked name will open a new window for configuring parameters associated with that particular MSTI VID List This field displays the VLAN IDs associated with the specific MSTI To...

Страница 81: ...fy The user may configure the following parameters to configure the CIST on the Switch Parameter Description MSTI ID The MSTI ID of the CIST is 0 and cannot be altered Type This field allows the user to choose a desired method for altering the MSTI settings The user has two choices Add VID Select this parameter to add VIDs to the MSTI ID in conjunction with the VID List parameter Remove VID Select...

Страница 82: ...ized if the Type chosen is Add or Remove Click Apply to implement changes made MSTP Port Information Multiple Spanning Tree MSTP provides differing load balancing scenarios For example while port A is blocked in one STP instance the same port can be placed in the Forwarding state in another STP instance Figure 8 27 MSTP Port Information Port 1 Parameter Description MSTI Displays the MSTI ID previo...

Страница 83: ...r may forward these tagged packets to designated queues on the Switch where they will be emptied based on priority For example lets say a user wishes to have a video conference between two remotely set computers The administrator can add priority tags to the video packets being sent out utilizing the Access Profile commands Then on the receiving end the administrator instructs the Switch to examin...

Страница 84: ...f eight CoS queues A H with their respective weight value 8 1 the packets are sent in the following sequence A1 B1 C1 D1 E1 F1 G1 H1 A2 B2 C2 D2 E2 F2 G2 A3 B3 C3 D3 E3 F3 A4 B4 C4 D4 E4 A5 B5 C5 D5 A6 B6 C6 A7 B7 A8 A1 B1 C1 D1 E1 F1 G1 H1 For weighted round robin queuing if each CoS queue has the same weight value then each CoS queue has an equal opportunity to send packets just like round robin...

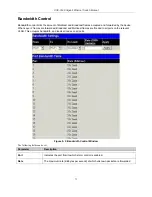
Страница 85: ... are forwarded Broadcast and Multicast frames are flooded to all ports on the relevant VLAN This occupies bandwidth and loads all nodes on all ports Figure 9 2 Bandwidth Control Window The following fields can be set Parameter Description Port Indicates the port from to which storm control is enabled Rate The maximum rate kilobytes per second at which unknown packets are forwarded 73 ...

Страница 86: ...old value is the upper threshold at which the specified traffic control is Switched on This is the number of Broadcast and Broadcast Multicast packets received by the Switch that will trigger the storm traffic control measures The Threshold value can be set from 3500 to 1000000 Kb per second The default setting is 3500 The settings of each port may be viewed in the Traffic Control Information Tabl...

Страница 87: ...lt Priority Assignment window This window allows you to assign a default 802 1p priority to any given port on the Switch The priority queues are numbered from 0 the lowest priority to 7 the highest priority Click Apply to implement your settings 802 1p User Priority The DGS 3048 allows the assignment of a user priority to each of the 802 1p priorities In the Configuration folder open the QoS folde...

Страница 88: ...m This window allows you to select between a RoundRobin and a Strict mechanism for emptying the priority classes In the Configuration menu open the QoS folder and click QoS Scheduling Mechanism to view the window shown below Figure 9 6 QoS Scheduling Mechanism Window The Scheduling Mechanism has the following parameters Parameter Description Strict The highest class of service is the first to proc...

Страница 89: ...result in unacceptable levels of packet loss or significant transmission delay If you choose to customize this setting it is important to monitor network performance especially during peak demand as bottlenecks can quickly develop if the QoS settings are not suitable In the Administration folder open the QoS folder and click QoS Output Scheduling to view the window shown below Note In order to con...

Страница 90: ...erver based access control model This is accomplished by using a RADIUS server to authenticate users trying to access a network by relaying Extensible Authentication Protocol over LAN EAPOL packets between the Client and the Server The following figure represents a basic EAPOL packet Figure 10 1 EAPOL Packet Utilizing this method unauthorized devices are restricted from connecting to a LAN through...

Страница 91: ...or Switch services Figure 10 3 Authentication Server Authenticator The Authenticator the Switch is an intermediary between the Authentication Server and the Client The Authenticator serves two purposes when utilizing 802 1x The first purpose is to request certification information from the Client through EAPOL packets which is the only information allowed to pass through the Authenticator before a...

Страница 92: ...uthentication Process Utilizing the three components stated above the 802 1x protocol provides a stable and secure way of authorizing and authenticating users attempting to access the network Only EAPOL traffic is allowed to pass through the specified port before a successful authentication is made This port is locked until the point when a Client with the correct username and password is granted ...

Страница 93: ...t 802 1X Client 802 1X Client 802 1X Client 802 1X Client 802 1X Client 802 1X Client Network access controlled port Network access uncontrolled port RADIUS Server Ethernet Switch Figure 10 6 Example of Typical Port Based Configuration Once the connected Client has successfully been authenticated the Port then becomes Authorized and all subsequent traffic on the Port is not subject to access contr...

Страница 94: ...DGS 3048 Gigabit Ethernet Switch Manual Figure 10 7 802 1x Authenticator Parameter Window To configure the parameters click the port number link 82 ...

Страница 95: ... sent and received through the port The authentication process begins when the link state of the port transitions from down to up or when an EAPOL start frame is received The Switch then requests the identity of the client and begins relaying authentication messages between the client and the authentication server The default setting is auto TxPeriod This sets the TxPeriod of time for the authenti...

Страница 96: ... retransmit an EAP Request to the client before it times out of the authentication sessions The default setting is 2 ReAuthPeriod A constant that defines a nonzero number of seconds between periodic reauthentication of the client The default setting is 3600 seconds ReAuth Determines whether regular reauthentication will take place on this port The default setting is Disabled ...

Страница 97: ...ADIUS Server Setting window This window displays the following information Parameter Description Succession First Choose the desired RADIUS server to configure First Second or Third RADIUS Server 0 0 0 0 Set the RADIUS server IP Authentic Port 1812 Set the RADIUS authentic server s UDP port The default port is 1812 Accounting Port The UDP port number for accounting requests The default is 1813 Key...

Страница 98: ...asswords for authentication the Switch contacts the TACACS RADIUS server to verify and the server will respond with one of three messages The server verifies the username and password and the user is granted normal user privileges on the Switch The server will not accept the username and password and the user is denied access to the Switch The server doesn t respond to the verification query At th...

Страница 99: ...ation Login Method List Using the pull down menu configure an application for normal login on the user level utilizing a previously configured method list The user may use the default Method List or other Method List configured by the user See the Login Method Lists window in this section for more information Enable Method List Using the pull down menu configure an application for normal login on ...

Страница 100: ...the server host utilizes the RADIUS protocol Port 1 65535 Enter a number between 1 and 65535 to define the virtual port number of the authentication protocol on a server host Timeout 1 30 Enter the time in seconds the Switch will wait for the server host to reply to an authentication request Retransmit 1 10 Enter the value in the retransmit field to change how many times the device will resend an ...

Страница 101: ...ed to authenticate the user When the local method is used the privilege level will be dependant on the local account privilege configured on the Switch Successful login using any of these techniques will give the user a User privilege only If the user wishes to upgrade his or her status to the administrator level the user must use a CLI command after which the user must enter a previously configur...

Страница 102: ...p to four of the following authentication methods to this method list tacacs Adding this parameter will require the user to be authenticated using the TACACS protocol from a remote TACACS server radius Adding this parameter will require the user to be authenticated using the RADIUS protocol from a remote RADIUS server local Adding this parameter will require the user to be authenticated using the ...

Страница 103: ...s found the Switch will send an authentication request to the second TACACS host in the server group and so on until the list is exhausted At that point the Switch will restart the same sequence with the following protocol listed RADIUS If no authentication takes place using the RADIUS list the Local Enable password set in the Switch is used to authenticate the user Successful authentication using...

Страница 104: ...e locally enabled password for the Enable Admin command When a user chooses the local_enable method to promote user level privileges to administrator privileges he or she will be prompted to enter the password configured here that is locally set on the Switch To view the following window click Security Access Authentication Control Configure Local Enable Password Figure 10 18 Configure Local Enabl...

Страница 105: ...e This Message Authentication Code will be encrypted with a sent message to provide integrity and prevent against replay attacks The Switch supports two hash algorithms MD5 Message Digest 5 and SHA Secure Hash Algorithm These three parameters are uniquely assembled in four choices on the Switch to create a three layered encryption code for secure communication between the server and the host The u...

Страница 106: ...ertain implementations concerning the function and configuration of SSL are not available on the web based management of this Switch and need to be configured using the command line interface For more information on SSL and its functions see the DGS 3048 Command Line Interface Reference Manual located on the documentation CD of this product NOTE Enabling the SSL command will disable the web based ...

Страница 107: ...SH server using the Encryption Algorithm window 4 Finally enable SSH on the Switch using the SSH Configuration window After completing the preceding steps a SSH Client on a remote PC can be configured to manage the Switch using a secure in band connection SSH Configuration The following window is used to configure and view settings for the SSH server and can be opened by clicking Security Secure S...

Страница 108: ...e default is Enabled AES128 CBC Advanced Encryption Standard AES128 encryption algorithm with Cipher Block Chaining AES192 CBC Advanced Encryption Standard AES192 encryption algorithm with Cipher Block Chaining AES256 CBC Advanced Encryption Standard AES 256 encryption algorithm with Cipher Block Chaining ARC4 Arcfour encryption algorithm with Cipher Block Chaining Cast128 CBC Cast128 encryption a...

Страница 109: ...igest encryption algorithm Public Key Algorithm HMAC RSA HMAC Hash for Message Authentication Code mechanism utilizing the RSA encryption algorithm HMAC DSA HMAC Hash for Message Authentication Code mechanism utilizing the Digital Signature Algorithm DSA encryption Authentication Algorithm Public Key This field may be enabled or disabled to choose if the administrator wishes to use a publickey con...

Страница 110: ...ows CPU Utilization The CPU Utilization window displays the percentage of the CPU utilization The utilization value can vary between 0 and 100 To view the CPU utilization open the Monitoring folder and then click the CPU Utilization link Figure 11 1 Utilization Window The following fields can be set Parameter Description Time Interval Select the desired setting between 1s and 60s where s stands fo...

Страница 111: ...th being used on the port To view the port utilization open the Monitoring folder and then click the Port Utilization link Figure 11 2 Utilization Window The following fields can be set Parameter Description Time Interval Select the desired setting between 1s and 60s where s stands for seconds The default value is one second Record Number Select the number of times the Switch will be polled betwee...

Страница 112: ...ars all statistics counters on this window Click Apply to implement your changes Packets The Web Manager allows various packet statistics to be viewed as either a line graph or a table Six windows are offered Received RX Click the Received RX link in the Packets folder of the Monitoring menu to view the following graph of packets received on the Switch Figure 11 3 Rx Packets Analysis window line g...

Страница 113: ...ets folder of the Monitoring menu to view the following graph of UMB cast packets received on the Switch Figure 11 4 Rx Packets Analysis Window line graph for Unicast Multicast and Broadcast Packets To view the UMB Cast Table click the View Table link which will show the following table 101 ...

Страница 114: ...nual Transmitted TX Click the Transmitted TX link in the Packets folder of the Monitoring menu to view the following graph of packets transmitted from the Switch Figure 11 5 Tx Packets Analysis Window line graph for Bytes and Packets 102 ...

Страница 115: ...Manual Size The Web Manager allows packets received by the Switch arranged in six groups and classed by size to be viewed as either a line graph or a table Two windows are offered Figure 11 6 Packet Size Analysis window line graph 103 ...

Страница 116: ...interfaces is displayed as a static router port designated by an S A router port that is dynamically configured by the Switch is designated by D To view the following window open the Monitoring folder and click the Browse Router Port link Figure 11 7 Browse Router Port Window Session Table Figure 11 8 Current Session Table Window This window displays a list of all the users that are currently logg...

Страница 117: ... the Switch s dynamic MAC address forwarding table to be viewed When the Switch learns an association between a MAC address and a port number it makes an entry into its forwarding table These entries are then used to forward packets through the Switch To view the MAC Address forwarding table from the Monitoring menu click the MAC Address link 105 ...

Страница 118: ...efined port VLAN or MAC address VID The VLAN ID of the VLAN the port is a member of MAC Address The MAC address entered into the address table Port The port that the MAC address above corresponds to Learned How the Switch discovered the MAC address The possible entries are Dynamic Self and Static Next Click this button to view the next page of the address table View All Entry Clicking this button ...

Страница 119: ...h The following field can be viewed Parameter Description VLAN ID The VLAN ID VID of the multicast group Multicast Group The IP address of the multicast group MAC Address The MAC address of the multicast group Queries Ports These are the ports where the IGMP packets were snooped are displayed NOTE To configure IGMP snooping for the DGS 3048 go to the Configuration folder and select IGMP Snooping C...

Страница 120: ...s where the IGMP packets were snooped are displayed Switch History Log The Web manager allows the Switch s history log as compiled by the Switch s management agent to be viewed To view the Switch history log open the Monitoring folder and click the Switch Log link Figure 11 13 Switch History Window The Switch can record event information in its own logs to designated SNMP trap receiving stations a...

Страница 121: ...g window is used to reset the Switch to the default settings Reboot System The following window is used to restart the Switch All of the configuration information entered from the last time Save Changes was executed will be lost Click the Reboot button to restart the Switch Figure 11 14 Restart System Window Save Changes The DGS 3048 has two levels of memory normal RAM and non volatile or NV RAM C...

Страница 122: ...Figure 11 15 Save Configuration Window Click the Save Configuration button to save the current Switch configuration in NV RAM The following dialog box will confirm that the configuration has been saved Figure 11 16 Save Configuration Confirmation Dialog box Click the OK button to continue Once the Switch configuration settings have been saved to NV RAM they become the default settings for the Swit...

Страница 123: ...0 Physical and Environmental AC Inputs 100 240 VAC 50 60 Hz internal universal power supply Power Consumption 45 watts maximum DC Fans 2 built in 40 x 40 x 10 mm fans Operating Temperature 0 to 40 degrees Celsius 32 to 104 degrees Fahrenheit Storage Temperature 40 to 70 degrees Celsius 40 to 158 degrees Fahrenheit Humidity Storage 5 to 95 non condensing Dimensions 441mm W x 309mm D x 44mm H 19 inc...

Страница 124: ... TX UTP Cat 5 100 meters max EIA TIA 568 150 ohm STP 100 meters max 1000BASE T UTP Cat 5e 100 meters max UTP Cat 5 100 meters max EIA TIA 568B 150 ohm STP 100 meters max 1000BASE LX Single mode fiber module 10km 1000BASE SX Multi mode fiber module 550m 1000BASE LHX Single mode fiber module 40km 1000BASE ZX Single mode fiber module 80km Mini GBIC SFP Transceiver for 1000BASE LX Single mode fiber mo...

Страница 125: ...BASE LX Single mode fiber module 10km DEM 311GT SFP Transceiver for 1000BASE SX Multi mode fiber module 550m DEM 314GT SFP Transceiver for 1000BASE LHX Single mode fiber module 40km DEM 315GT SFP Transceiver for 1000BASE ZX Single mode fiber module 80km 1000BASE T Category 5e UTP Cable Category 5 UTP Cable 1000 Mbps 100m 100BASE TX Category 5 UTP Cable 100 Mbps 100m 10BASE T Category 3 UTP Cable 1...

Страница 126: ... A device that interconnects local or remote networks no matter what higher level protocols are involved Bridges form a single logical network centralizing network administration broadcast A message sent to all destination devices on the network broadcast storm Multiple simultaneous broadcasts that typically absorb available network bandwidth and can cause network failure console port The port on ...

Страница 127: ...er data transmission should the other fail See also main port and standby port RJ 45 Standard 8 wire connectors for IEEE 802 3 10BASE T networks RMON Remote Monitoring Subset of SNMP MIB II that allows monitoring and management capabilities by addressing up to ten different groups of information RPS Redundant Power System A device that provides a backup source of power when connected to the Switch...

Страница 128: ...nd topology independent devices that communicate as if they are on a common physical LAN VLT Virtual LAN Trunk A Switch to Switch link which carries traffic for all the VLANs on each Switch VT100 A type of terminal that uses ASCII characters VT100 screens have a text based appearance ...

Страница 129: ...tz zu trennen und von einer qualifizierten Servicestelle zu überprüfen a Netzkabel oder Netzstecker sint beschädigt b Flüssigkeit ist in das Gerät eingedrungen c Das Gerät war Feuchtigkeit ausgesetzt d Wenn das Gerät nicht der Bedienungsanleitung ensprechend funktioniert oder Sie mit Hilfe dieser Anleitung keine Verbesserung erzielen e Das Gerät ist gefallen und oder das Gehäuse ist beschädigt f W...

Страница 130: ...e must be mailed or otherwise shipped to D Link with all costs of mailing shipping insurance prepaid D Link shall never be responsible for any software firmware information or memory data of Purchaser contained in stored on or integrated with any product returned to D Link pursuant to this warranty Any package returned to D Link without an RMA number will be rejected and shipped back to Purchaser ...

Страница 131: ...free of physical defects The customer s sole and exclusive remedy and the entire liability of D Link and its suppliers under this Limited Warranty will be at D Link s option to replace the non conforming Software or defective media with software that substantially conforms to D Link s functional specifications for the Software or to refund the portion of the actual purchase price paid that is attr...

Страница 132: ...RCHASER OF THE PRODUCT Limitation of Liability TO THE MAXIMUM EXTENT PERMITTED BY LAW D LINK IS NOT LIABLE UNDER ANY CONTRACT NEGLIGENCE STRICT LIABILITY OR OTHER LEGAL OR EQUITABLE THEORY FOR ANY LOSS OF USE OF THE PRODUCT INCONVENIENCE OR DAMAGES OF ANY CHARACTER WHETHER DIRECT SPECIAL INCIDENTAL OR CONSEQUENTIAL INCLUDING BUT NOT LIMITED TO DAMAGES FOR LOSS OF GOODWILL LOSS OF REVENUE OR PROFIT...

Страница 133: ...ase the separation between the equipment and receiver Connect the equipment into an outlet on a circuit different from that to which the receiver is connected Consult the dealer or an experienced radio TV technician for help For detailed warranty information applicable to products purchased outside the United States please contact the corresponding local D Link office ...

Страница 134: ...Registration Register your D Link product online at http support dlink com register Product registration is entirely voluntary and failure to complete or return this form will not diminish your warranty rights ...

Страница 135: ...he Limited Product Warranty This Limited Product Warranty is applicable in all European Countries as listed in the addendum European Countries for D LINK Limited Product Warranty The term European Countries in this D LINK Limited Product Warranty only include the countries as listed in this addendum The Limited Product Warranty will be honored in any country where D LINK or its authorized service ...

Страница 136: ...onsumer your statutory rights remain unaffected Performance of the Limited Product Warranty If a product defect occurs D LINK s sole obligation shall be to repair or replace any defective product free of charge to the original purchaser provided it is returned to an Authorized D LINK Service Center during the warranty period Such repair or replacement will be rendered by D LINK at an Authorized D ...

Страница 137: ...ienste gemäß den Bestimmungen dieser eingeschränkten Garantie erbringen Gleichwohl kann sich die Verfügbarkeit von Garantiediensten und die Bearbeitungszeit von Land zu Land unterscheiden und von Registrierungsanforderungen abhängig sein Einschränkung der Garantie D LINK gewährleistet dass die nachstehend aufgeführten Produkte bei gewöhnlicher Verwendung für die unten angegebene Laufzeit der einge...

Страница 138: ...auszutauschen Voraussetzung hierfür ist dass das Produkt während der Garantielaufzeit einem autorisierten D LINK Servicecenter übergeben wird Reparatur oder Austausch werden von D LINK durch ein autorisiertes D LINK Servicecenter durchgeführt Bauteile oder Hardware Produkte die gemäß dieser eingeschränkten Garantie entfernt werden gehen in das Eigentum von D LINK über Die verbliebene eingeschränkt...

Страница 139: ...antie et les temps de réponse varient d un pays à l autre et peuvent également être assujettis à un enregistrement Limitation de la Garantie Produit D LINK garantit que les produits décrits ci dessous dans le cadre d une utilisation normale sont dénués de défauts conséquents tant au niveau de leurs composants matériels que de leur fabrication et ce pendant toute la Période de Garantie Produit Limi...

Страница 140: ... erreur d un produit l unique obligation de D LINK se limite à la réparation ou au remplacement gratuit du produit défectueux au bénéfice de l acheteur initial sous réserve que le produit soit rapporté à un Centre de Service Agréé D LINK pendant la période de garantie D LINK assure la réparation ou le remplacement dans un Centre de Service Agréé D LINK Les composants pièces ou produits retirés dan...

Страница 141: ...embargo la disponibilidad del servicio de garantía así como el tiempo de respuesta pueden variar de un país a otro y pueden estar sujetos a requisitos de registro Limitación de la garantía del producto D LINK garantiza que los productos descritos más adelante están libres de defectos de fabricación y materiales en condiciones normales de uso a lo largo del período de la garantía limitada del produ...

Страница 142: ...ados Uso de la garantía limitada del producto Si un producto presenta algún defecto la obligación exclusiva de D LINK será reparar o reemplazar sin coste alguno para el comprador originario cualquier producto defectuoso siempre y cuando éste sea entregado en un centro autorizado de servicio D LINK durante el período de garantía D LINK realizará la reparación o sustitución para un centro autorizado...

Страница 143: ...i fabbricazione o vizi di materiale durante il Periodo di garanzia sotto specificato Periodo di garanzia a condizione che vengano utilizzati e sottoposti a manutenzione in conformità con il manuale d uso e con ogni altra documentazione fornita all acquirente all atto dell acquisto e relativi emendamenti D LINK non garantisce che il funzionamento del prodotto sarà ininterrotto o esente da errori né...

Страница 144: ...resso un Centro di Assistenza autorizzato D LINK Tutti i componenti o i prodotti hardware rimossi conformemente ai termini e alle condizioni della presente garanzia divengono di proprietà di D LINK Il pezzo o il prodotto in sostituzione beneficerà della garanzia per il tempo residuo della parte o del prodotto originale Il prodotto in sostituzione non deve necessariamente essere nuovo o di identica...

Страница 145: ...800 FAX 61 2 8899 1868 URL www dlink com au India D Link House Kurla Bandra Complex Road Off CST Road Santacruz East Mumbai 400098 India TEL 91 022 26526696 56902210 FAX 91 022 26528914 URL www dlink co in Middle East Dubai P O Box 500376 Office No 103 Building 3 Dubai Internet City Dubai United Arab Emirates TEL 971 4 3916480 FAX 971 4 3908881 URL www dlink me com Turkey Regus Offices Beybi Giz P...

Страница 146: ......

Страница 147: ......

Отзывы: