background image


39

Corinex 

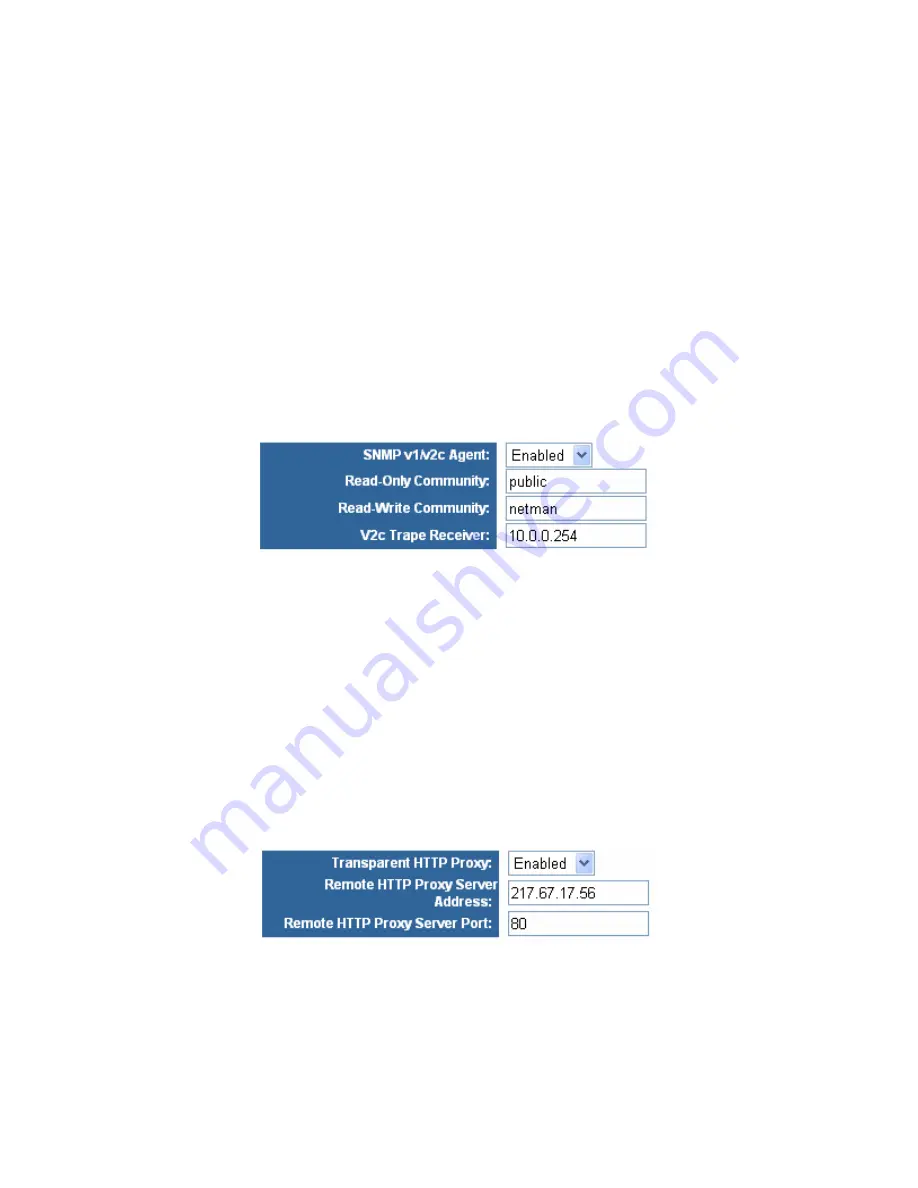
SNMP v1/v2c Agent

 allows a SNMP management software (like the Corinex 

Open Powerline Management or Corinex Open Management for Hotels software) to 
retrieve reports from the networked device. These reports are based upon the defined 
objects in the Management Information Base (MIB). The agent queries, reports, and sets 
MIB variables based upon directions from the NMS or upon pre-set alarm conditions. 
Corinex SNMP v1/v2c will work with the most popular NMS solutions such as HP 
OpenView and SunNet Manager. Because the Corinex SNMP v1/v2c Agent is bilingual, 
it can communicate with an NMS that is running either SNMP Version 1 or Version 2c. 
 
You can set the SNMP Agent for the SNMP management software to 

Enabled

 in the 

SNMP v1/v2c Agent

 drop down menu. Then you can also change the 

Read-Only 

Community 

and 

Read-Write Community 

strings in the corresponding fields. Default 

values are 

public 

and 

netman

, and we are recommending you to change them, as they 

are well known and enable others to configure your Router from other computers. 
You can also define the trap server IP address in the 

V2c Trape Receiver

 filed. 


HTTP Proxy settings 

Using a proxy server leads to reduced bandwidth usage and thus helps keeping the 
network-related costs lower. If you want to use Proxy server you must enter the required 
parameters in to the following fields.


Transparent HTTP Proxy

 - You can


Enable or Disable the HTTP Proxy by selecting 

from drop down menu. 
 

Remote HTTP Proxy Server Address

 - Enter the Remote HTTP Proxy Server IP 

address in this field. 
 

Remote HTTP Proxy Server Port

 – Enter the number of the HTTP proxy server port  


DDNS Settings 


The Router offers a Dynamic Domain Name System (DDNS) feature. DDNS lets you 
assign a fixed host and domain name to a dynamic Internet IP address. It is useful when 
you are hosting your own website, FTP server, or other server behind the Router. To 

Содержание Wireless to Powerline Router G

Страница 1: ......

Страница 2: ...2 ...

Страница 3: ...3 ...

Страница 4: ... Corinex office or the authorized reseller Published by Corinex Communications Corp World Trade Center 404 999 Canada Place Vancouver B C Canada V6C 3E2 Tel 1 604 692 0520 Fax 1 604 694 0061 Corinex is a registered trademark of Corinex Communications Corp Apple MAC OS X are either registered trademarks or trademarks of Apple Computer Inc in the U S A and or other countries Microsoft MS DOS MS Wind...

Страница 5: ...prietary notices labels or marks from the Software is strictly prohibited Furthermore you hereby agree not to create derivative works based on the Software You may permanently transfer all of your rights under this EULA provided you retain no copies you transfer all of the Software and the recipient agrees to the terms of this EULA If the Software is an upgrade any transfer must include all prior ...

Страница 6: ... the price paid for the Software if any In no event shall CORINEX or its suppliers be liable to you for any consequential special incidental or indirect damages of any kind arising out of the use or inability to use the software even if CORINEX or its supplier has been advised of the possibility of such damages or any claim by a third party 6 Applicable Laws This EULA will be governed by the laws ...

Страница 7: ...h the Ethernet Interface using Corinex Setup Tool 72 6 Setup of Router SNMP Powerline Agent on the OPM Management Station 78 7 Setup of Router SNMP Powerline Agent on the OMH Software 83 Appendix A Troubleshooting 86 Appendix B Wireless Security 93 Appendix C Glossary 101 Appendix D How to Ping your ISP s E mail and Web addresses 110 Appendix E Finding the MAC address and IP address for your Ether...

Страница 8: ... 802 11b g port The Router can act as the bridge between the access side of the network and its specific wire requirements and the distribution side of the network which uses the existing electrical wires to move the signals to every electrical outlet and makes those signals available to wired or portable devices or uses the wireless type of connection also The Corinex Wireless to Powerline Router...

Страница 9: ...t up and maintained All functions can be configured with the UI via web browsers Corinex Wireless to Powerline Router G uses 56 bit DES encryption with key management for secured powerline communications applications End user equipment which uses Corinex adapters to connect to the network can run on Windows 98 ME 2000 NT XP Linux and MAC operating systems and use the full range of the Router s net...

Страница 10: ...ver Client HTTP Server Basic Realm Support Transparent HTTP Proxy SNMP V1 V2c Agent Remote administration and remote upgrades available over the Internet Supports Universal Plug and Play UPnP Supports Traffic and Event Logging Support for NTP Network Time Protocol for Synchronizing with a Real Time Server 1 2 2 Hardware 802 3 10 100 Base T 802 11g Wireless LAN HomePlug 1 0 Powerline network 1 2 3 ...

Страница 11: ...itial configuration of the Router AC 220 110 V power outlet Broadband Connection DSL Cable or Internet device with 10 100 Ethernet connection Ethernet Powerline and or Wireless connection for each computer Windows 98 ME 2000 NT XP Mac OS X or Linux operating system for computers sharing the Internet connection Web browser supporting JavaScript for the Router management 2 Product Specification This...

Страница 12: ...Receive Sensitivity 802 11g 11Mbps 80 dBm 54Mbps 66 dBm Typical Environmental Parameters Operation Operating Temperature 0ºC to 40ºC 32ºF to 104ºF Operating Humidity 10 to 85 Non Condensing Storage Storage Temp 20ºC to 70ºC 4ºF to 158ºF Storage Humidity 5 to 90 Non Condensing EMI EMC FCC Part 15B UL CE EMI EMC Safety 2 2Physical Details Fig 2 1 Corinex Wireless to Powerline Router G ...

Страница 13: ... receiving transmitting data LAN LINK ACT Green On Link Blinking receiving transmitting data Powerline ACT Green Blinking receiving transmitting data Off No data transmitted to Powerline COL Green Blinking when collision is occurred on this port WLAN 11G ACT Green Steady on when link is ready Blinking receiving transmitting data through 802 11g WLAN interface Rear Panel Fig 2 3 Corinex Wireless to...

Страница 14: ...work connection and power supply 2 3Software Features 2 3 1 General Features of the Corinex Wireless to Powerline Router G Feature Additional Information Protocol Support TCP IP ICMP PPPoE PAP CHAP PPTP Microsoft PPTP Client Static Routing Protocol Dynamic Routing Protocol RIPv1 RIPv2 Wireless Distribution System WDS Broadcom AfterBurner 125Mbps High Speed Mode VPN tunnel passing support PPTP L2TP...

Страница 15: ... 0 Other Features DHCP Server Client Dynamic DNS client DNS Proxy Transparent HTTP Proxy NTP Network Time Protocol Syslog 2 4Safety Labels Content of the Label on the Bottom of the Corinex Wireless to Powerline Router G The label shows the voltage and current values for your Router It also shows both MAC Addresses WAN LAN and serial number SN as well as the network Password required for remote Pow...

Страница 16: ...ting the Router First you need to connect cables and connect the Router both to the power and to the Internet connection and optionally to your Ethernet connected computers Step 2 Connecting the Computers Then you will need to connect the computers to the Router in order to be able to configure the settings of the Router These steps differ between Ethernet Powerline and Wireless connection and als...

Страница 17: ...able to the Corinex Wireless to Powerline Router G and then plug the power cable into a power outlet Turn on the Internet connection cable or DSL modem Then turn on the computer you wish to use to configure the Corinex Wireless to Powerline Router G 3 2 Step 2 Configuring Computers The instructions in this chapter will help you to configure each of your computers to be able to communicate with the...

Страница 18: ...her across a network or the Internet Find out which operating system your computer is running such as Windows 95 98 Millennium 2000 XP Linux or Macintosh OS or other operating system Then follow the instructions for configuring the TCP IP networking in the following section Configuring Windows XP PCs 1 Click the Start button open the Control Panel From there click the Network Connections icon and ...

Страница 19: ...cal Area Connection Status 3 The Local Area Connection Status screen will appear Click the Properties button 4 Select Internet Protocol TCP IP and click the Properties button Fig 3 4 Local Area Connection Properties ...

Страница 20: ...e the computer configuration Fig 3 5 Internet Protocol TCP IP Properties 6 If you do not have DHCP server on the network or it is switched off then select Use the following IP address Set the IP address manually in the format 10 0 0 X and mask 255 255 255 0 of local TCP IP settings In the Default gateway box set the gateway address The default is 10 0 0 2 ...

Страница 21: ...he Network window Configuring Windows 2000 PCs 1 Go to the network screen by clicking the Start button Click Settings and then Control Panel From there double click the Network and Dial up Connections icon 2 Select the Network and Dial up Connections icon for the applicable Ethernet adapter usually it is the first Local Area Connection listed Do not choose a TCP IP entry which name mentions DUN PP...

Страница 22: ...ection Status 4 Select Internet Protocol TCP IP as shown in Figure 3 8 and click the Properties button Fig 3 8 Local Area Connection Properties 5 Obtain an IP address automatically as shown in Figure 3 9 then click the OK button ...

Страница 23: ...et the IP address manually in the format 10 0 0 X and mask 255 255 255 0 of local TCP IP settings In the Default gateway box set the gateway address The default is 10 0 0 2 Fig 3 10 Internet Protocol TCP IP Properties 7 Click OK button in the TCP IP Properties window to complete the PC configuration and click Close or the OK button to close the Network window ...

Страница 24: ...ocal Network Do not choose a TCP IP entry that mention DUN PPPoE VPN or AOL names If the word TCP IP appears by itself select this line If there is no TCP IP line listed refer to Appendix D Installing the TCP IP Protocol or your Ethernet Adapter s User Guide to install TCP IP now Click the Properties button 3 Click the IP Address tab and select Obtain an IP address automatically as shown in Figure...

Страница 25: ...If you do not have DHCP server on the network then select Use the following IP address Set the IP address manually in the format 10 0 0 X and mask 255 255 255 0 of local TCP IP settings and click the OK button Fig 3 13 Set the IP Address ...

Страница 26: ... Yes button If Windows does not ask you to restart restart your computer anyway Configuring Linux PCs To access the Internet via the Corinex Wireless to Powerline Router G it is only necessary to set the Corinex Wireless to Powerline Router G as the Gateway Setup differs between various Linux distributions we are giving the Mandrake as an example check your distribution how to change IP settings N...

Страница 27: ...CP IP Configuring Linux 2 Select Control Center Fig 3 15 If you are not logged as root the following screen will appear Enter your root password Fig 3 16 Entering root Password 3 The following screen Fig 3 17 will appear Select Network Internet ...

Страница 28: ...trol Center 4 In the following screen Fig 3 18 select DrakConnect for setting up network Internet connection Fig 3 18 Configuring Linux Control Center 5 Select the Interface entry for your Network card Normally this will be called eth0 ...

Страница 29: ...g Linux Control Center Selecting Network card 6 Click the Wizard button then on next dialogue Fig 3 20 click on the Next button Fig 3 20 Network Configuration Wizard 7 Select LAN connection Fig 3 21 and click on Next button ...

Страница 30: ...l screens until you click Finish Fig 3 22 Network Configuration Wizard Automatic IP selection Fixed IP Address By default most Linux installations use a fixed IP Address If you wish to continue using a fixed IP Address make the following changes to your configuration Set the IP address manually in the format 10 0 0 X and Netmask 255 255 255 0 ...

Страница 31: ...0 2 Ensure your DNS Name Server settings are correct Fig 3 23 Network Configuration Wizard Static IP address Configuring Macintosh clients With Macintosh computers the procedure is as follows 1 Open the Network Control Panel in System Preferences Fig 3 24 System Preferences 2 Select Ethernet from the pop up menu ...

Страница 32: ...32 Fig 3 25 Network 3 Select Using DHCP from the TCP IP tab field Configure The DHCP Client ID field can be left blank Fig 3 26 Network TCP IP Using DHCP 4 Close the Network panel saving your settings ...

Страница 33: ...line Router G IP address The default is 10 0 0 2 Ensure your DNS settings are correct Fig 3 27 TCP IP settings Manually Configuring other clients For fixed IP Addresses Ensure the Gateway field for your network port is set to the IP address of the Corinex Wireless to Powerline Router G Ensure your DNS Name Server settings are correct For DHCP Ensure the TCP IP address settings of your Network port...

Страница 34: ... of the TCP IP level for each platform are similar to the procedure as described in the previous section Using the Ethernet Connection 4 Corinex Wireless to Powerline Router G Configuration 4 1 Overview For your convenience use the Corinex Wireless to Powerline Router G web based utility to configure it This chapter will explain all of the functions of this utility The utility can be accessed via ...

Страница 35: ...ord from its default The Basic LAN WAN Status Filters Routing Wireless Powerline Security and Firmware tabs are available for setup of the Corinex Wireless to Powerline Router G Each of these tabs groups have several similar settings of which you can choose to access display screens The display screen consists of one or more entry fields containing current values of the settings By changing these ...

Страница 36: ...er admin in the User Name field and enter admin in the Password field Then click the OK button Fig 4 3 Login window 4 3 Basic Tabs The first screen that appears displays the Basic tab This allows you to change the Corinex Wireless to Powerline Router G general settings Change these settings as described here and click the Apply button to apply your changes or Cancel to cancel your changes The Rest...

Страница 37: ...37 Fig 4 4 Basic settings window In the Router Username field you can change the management access password to the Router For that you will need to enter both the current password in the Router ...

Страница 38: ...enable the Firewall feature by selecting from drop down menu You prevent your network from being pinged or detected by other Internet users The Firewall feature also reinforces your network security by hiding your network ports You can turn the firewall function off if it is interfering with an application s function Turning off the firewall protection will not leave your network completely vulner...

Страница 39: ...trings in the corresponding fields Default values are public and netman and we are recommending you to change them as they are well known and enable others to configure your Router from other computers You can also define the trap server IP address in the V2c Trape Receiver filed HTTP Proxy settings Using a proxy server leads to reduced bandwidth usage and thus helps keeping the network related co...

Страница 40: ...ecords These can be used for pointing incoming mail to your domains such as john com to the proper mail server Note The DESTINATION ADDRESS of an MX record MUST be a domain name and NOT simply an IP address You can also Backup MX service by selecting true for backup or false for no backup option from the drop down menu DDNS Sub system You can choose a subsystem name from dyndns statdns or custom D...

Страница 41: ...es such as port forwarding mapping of the router Note If you use applications such as multi player gaming peer to peer connections real time communications such as instant messaging or remote assistance a feature in Windows XP you should enable UPnP In the Connection Logging field you can select appropriate setting from the drop down menu The four options are offered Disabled Denied Accepted or Bo...

Страница 42: ...creen you can change the settings of your local area network Router IP MAC Address shows the MAC Address of the LAN interface In the IP Address and Subnet Mask fields you can change the IP address of the LAN interface of your Router The default value is 10 0 0 2 mask 255 255 255 0 You see also the MAC Address of the LAN interface ...

Страница 43: ...DHCP leases with each computer s name IP address Hardware address and when its lease expires Spanning Tree Corinex Wireless to Powerline Router G supports 802 1d Spanning Tree Protocol to prevent network loops Select Enable to enable the Spanning Tree Daemon or Disable to disable the Spanning Tree Daemon from drop down menu Static Routing Static Routes provide additional routing information to you...

Страница 44: ...a setting of 2 or 3 works but if this is a direct connection set it to 1 After you have entered the values in this screen you can set them up by clicking on the Apply button After you press the Apply button the notification screen will appear This screen notifies you of any errors that were detected while changing the router s settings If all values were inserted correctly and you do not see any e...

Страница 45: ...45 4 5 WAN Tabs Select the WAN settings from the main tabs The following screen will appear Fig 4 6 WAN settings window ...

Страница 46: ...u want to use for WAN connection The Corinex Wireless to Powerline Router G supports four WAN connection types DHCP Obtain IP address dynamically Static PPPoE and PPTP The setup will differ according to the type of your Internet connection You can select a Protocol type from the drop down menu from DHCP Static PPPoE PPTP and Disabled You can also select the Primary connection type Follow the instr...

Страница 47: ...ough your ISP Set the name of the PPPoE Service Name and PPPoE Access Concentrator if required by your ISP Determine whether the PPPoE link should be automatically disconnected if no traffic has been observed for the period specified by PPPoE Max Idle Time or not Set the number of seconds to wait before disconnecting the PPPoE link if PPPoE Connect on Demand is Enabled Set whether the PPPoE link s...

Страница 48: ...n the PPTP link if PPTP Connect on Demand is Enabled In the PPTP Keep Alive drop down menu you can set whether the PPTP link should be automatically restored if it is lost This setting has no effect if PPTP Connect on Demand is Enabled If the PPTP Connect on Demand is Enabled you can set the number of seconds to wait before disconnecting the PPTP link in the PPTP Redial Period input field In the P...

Страница 49: ...re static routes only for unusual cases such as when having multiple routers or using multiple IP subnets located in your network To add or edit Static Routes 1 Type the Destination IP Address of the final destination 2 Type the IP Subnet Mask for this destination If the destination is a single host type 255 255 255 255 3 Type the Gateway IP Address which must be a router on the same LAN segment a...

Страница 50: ...not see any errors message Validating values done and also Committing values done your configuration has been updated Reboot the system to enable the new configuration or continue without restarting the device by pressing the Continue button 4 6 Status Tabs Select the Status settings from the main tabs The following screen will appear Fig 4 7 Status window The System Up Time shows you the system u...

Страница 51: ...51 4 7 Filters Tabs Select the Filters settings from the main tabs The following screen will appear Fig 4 8 Filters settings window ...

Страница 52: ...ng the specified time You can set the range of IP address in the LAN IP Address Range field then select the type of protocol TCP or UDP in the Protocol field and set the Destination Port Range In the following fields set the time period for which you want to configure the filtering You can turn on the filtering by checking the Enabled check box After you have entered the values in this screen you ...

Страница 53: ...53 4 8 Routing Tabs Select the Routing settings from the main tabs The following screen will appear Fig 4 9 Routing settings window ...

Страница 54: ... probably adequate for most networks unless you have an unusual network setup RIP 2 carries more information RIP 2 uses subnet broadcasting Two RIP modes are offered in the RIP Mode field Router with RIP on WAN interface Gateway with RIP on both WAN LAN interfaces Port Forwarding Corinex Wireless to Powerline Router G creates a firewall between your internal network and the Internet A firewall kee...

Страница 55: ...ort Start End or To Port Start End fields The inbound port should be specified as one number from 0 to 65535 You can turn on the filtering by checking the Enabled check box DMZ A DMZ DeMilitarized Zone Host is a host without firewall protection It allows a computer to be exposed to unrestricted 2 way communication for Internet games video conferencing Internet telephony and other special applicati...

Страница 56: ...multiple kinds of servers from different computers on your LAN After you have entered the values in this screen you can set them up by clicking on the Apply button After you press the Apply button the notification screen will appear This screen notifies you of any errors that were detected while changing the router s settings If all values were inserted correctly and you do not see any error messa...

Страница 57: ...57 4 9 Wireless Tabs Select the Wireless settings from the main tabs The following screen will appear Fig 4 10 Wireless settings window ...

Страница 58: ...security breach in case your wireless communication is not encrypted If you don t want the access point to periodically broadcast its SSID to others please set this field to Closed Otherwise set it to Open AP Isolation An access point can have multiple associated wireless clients If you want to let the clients communicate with each other through the access point set this field to Off Otherwise set...

Страница 59: ...mited Rate Support can be used in case you experience any problems with connecting to the access point The last option is 802 11b Only which is used in situations where only 802 11b and no 802 11g devices are present 54g Protection The 802 11 standard provides a method to enable coexistence of 802 11g and 802 11b devices in the same network without interfering This means the devices supporting dif...

Страница 60: ...egotiation RTS CTS between the sending and the receiving stations about the transmission of the packet If the size of the packet is larger than this threshold the sending station sends a RTS Right to Send packet to the receiving station and after it receives the CTS frame Clear to Send it will send the packet This value is set to 2347 bytes by default DTIM Interval This setting indicates the inter...

Страница 61: ...rd If you turn On the AfterBurner Technology the Corinex Wireless to Powerline Router G provides up to 40 percent greater throughput than typical standard 802 11g without impacting the performance of neighboring wireless LANs When you enable the AfterBurner Technology it may happen that the following screen will appear Click on the OK button to continue WDS Operation Mode The wireless part of the ...

Страница 62: ...nt By selecting the option Allow only the specified clients can connect to your access point If you select the option Deny all clients other than the specified ones can connect You can disable this filtering by selecting the option Disabled MAC Addresses This feature allows or denies wireless access to clients with the specified MAC addresses The MAC address format is XX XX XX XX XX XX Authenticat...

Страница 63: ...passwords Note For Corinex Wireless to Powerline Router G the default Network Encryption Key is HomePlug The 56 bit DES encryption is always enabled for Powerline data security as default This part of the tab enables you to configure the Powerline settings You can Enable or Disable the Powerline interface in the HomePlug Enabled field In the Device ID field you can see the DEK Default Encryption K...

Страница 64: ...gs window into effect After you press the Apply button the notification screen will appear This screen notifies you of any errors that were detected while changing the router s settings If all values were inserted correctly and you do not see any error messages Validating values done and also Committing values done your configuration has been updated Reboot the system to enable the new configurati...

Страница 65: ...65 4 11 Security Tabs Select the Security settings from the main tabs The following screen will appear Fig 4 11 Security settings window ...

Страница 66: ...zation by an external RADIUS server RADIUS Server IP Address Here you can enter the IP address of the remote RADIUS server RADIUS Port Specifies the UDP port where the RADIUS server listens for client requests By default it is set to 1812 but depends on the actual server RADIUS Key Here you can enter the shared secret The shared secret is a key by which the server and the clients recognize each ot...

Страница 67: ...ded RADIUS Server Wireless Authentication In this section you can set the security settings for users connecting through the Wireless Interface You can set which RADIUS server to use network authentication method and enter passwords for authentication Wireless Interface Here you can select which wireless interface you want to manage By default the name of the interface is corinex followed by the M...

Страница 68: ... change the encryption keys Set the Network Key Rotation Interval in seconds Leave blank or set zero to disable the rotation WEP Encryption WEP is a basic encryption method not as secure as WPA To use WEP select a WEP key and a level of WEP encryption and either generate a WEP key through the Passphrase or enter the WEP key manually The WEP Encryption field enables or disables WEP data encryption ...

Страница 69: ...CII or 10 hexadecimal characters in length If you use 128 bit WEP encryption than each key must consist of exactly 13 ASCII or 26 hexadecimal characters in length Valid hexadecimal characters are 0 9 and A F In the Current Network Key field you can select which network key is used for encryption outbound data and or authenticating client After you have entered the values in this screen you can set...

Страница 70: ...o change upgrade the Firmware Router s internal software through by the file found on the Corinex Support Web page or sent to you by the Corinex Technical Support Click on the Choose button and select the firmware file in the following dialogue Note Be sure that you are entering the valid firmware file because with entering the wrong file you will most probably destroy the internal Router firmware...

Страница 71: ...selecting the firmware file click the Open button and then in the display screen Upgrade button Note After successful firmware upgrade we recommend you to reset the Corinex Wireless to Powerline Router G to factory default settings ...

Страница 72: ...port through the Ethernet Then by using the Corinex Setup Tool you can discover the Powerline port of the Router as it will appear in the first window of the Tool Make sure you are configuring the Powerline port of the Router not any other adapter that Corinex Setup Tool may find in the network 5 1 Installing the Setup Tool 1 Insert the installation CD The CD should automatically start the install...

Страница 73: ... additional documents included on the Installation CD 2 The following welcome screen will be displayed Click Next to continue Fig 5 3 Setup Tool 3 The next screen will ask where the Setup Tool should be installed Click Next to continue Fig 5 4 Select Destination Directory ...

Страница 74: ...gram s shortcuts Select the Start Menu Folder or simply click Next Fig 5 5 Select Start Menu Folder 5 The following screen will appear to inform you that Setup is ready to begin installing the Setup Tool on your computer Click Install Fig 5 6 Ready to Install ...

Страница 75: ...f this fails there is a problem with connections on the Powerline Try to check the connection to the AC outlet or use a different AC outlet If the setup does not work refer to the troubleshooting guide but first try unplugging the Powerline device and reboot the computer as this sometimes fixes the problem 5 3 Running the Setup Tool The setup so far allows transmission of data encrypted with a uni...

Страница 76: ...screen should be displayed This is the screen where your network password is selected Choose a password between 4 and 24 characters the password is case sensitive so remember exactly how it was typed as it will be needed for the next device being set up Type your password in the Network Encryption Key box and click Next If you don t want to use encryption uncheck the box Encrypt frames Fig 5 7 Cho...

Страница 77: ... private and secure network all HomePlug certified devices in the network must be set to the same network encryption key either to the default key HomePlug or your own selection Fig 5 7 Configured devices The adapter with the MAC address 00 50 C2 02 12 95 acts as local device in the network and identifies the devices shown under Device Address in the window as belonging to the network The function...

Страница 78: ...mePlug standard certified Powerline devices The Corinex Open Powerline Management software answers a wide ranging need of service providers when they expand their services based upon the new Powerline devices in the network Corinex Open Powerline Management offers easy to use and intuitive step by step navigation for an authorized user or network administrator and gives users easier implementation...

Страница 79: ... 6 2 Add Wizard Option Add Local Network After the Next button click choose a name for the Local Network text field Name for example floor1 as shown in Fig 6 3 than click the Finish button Fig 6 3 Adding a Local Network choosing a name for a Local Network After clicking on the Finish button a Local Network named floor 1 will be created and you will be asked if you want to add a Powerline network ...

Страница 80: ...twork text field Name for example powerline 1 as shown in Fig 6 5 The Local network list allows you to choose a Local Network necessary if there is more than one A Completing dialogue will be displayed by the Next button click Fig 6 5 Adding Powerline Network choosing a name for a Powerline Network After clicking on the Finish button in completing dialogue you will be able to add a Powerline devic...

Страница 81: ...ign device i e floor 1 and Powerline 1 as in Fig 6 6 Fig 6 6 Adding a Powerline Device By clicking on the Next button you will be asked to fill more information into the Add Powerline device window If you need to add a Powerline device that is not connected to the Powerline now you need to click on the Enter MAC address manually check box and fill MAC address field with valid MAC address e g 00 0B...

Страница 82: ...ming of the Powerline Agent s settings and after inserting these names and number settings you must click on the Finish button to continue Fig 6 8 Adding Powerline Device Powerline Agent settings If the Agent s settings are correct the Choose Powerline adapter dialog may appear if agent can access more than one powerline network If this happened choose the desired device from the accessible device...

Страница 83: ...rinex Open Management for Hotels is based on SNMP Simple Network Management Protocol a standard protocol for enhanced management and testing of communication devices The management is independent from any hardware configuration and as a no worry system designed for future network expansion with support for HomePlug standard certified Powerline devices The Corinex Open Management for Hotels softwar...

Страница 84: ...ure the SNMP Node Configuration of the SNMP Node Fig 7 1 Corinex Open Management for Hotels main window When the user wants to add the new SNMP node the Plug ins SNMP Node Add option must be selected from the Main menu The following window will appear as it is shown on Fig 7 2 Fig 7 2 Add SNMP Node Window ...

Страница 85: ...vice the name or IP address of this device must be written in to the text field Agent Address The default IP address of the Corinex Wireless to Powerline Router G is 10 0 0 2 The insertions for the fields Port Read and Write community must be in accordance with the naming of the Agent s settings In Connection section you need to specify the Timeout and the number of Retries for the SNMP communicat...

Страница 86: ...ing the installation and operation of the Corinex Wireless to Powerline Router G Read the description below to solve your problems If you can not find an answer here check the Corinex website at www corinex com Computer networking can sometimes be tricky when many components must work together to function properly for the ultimate network system The problems are usually easy to fix with the right ...

Страница 87: ...power socket Unplug all Corinex Powerline Adapters and plug them back in again one by one Run the Setup Tool again The devices may be programmed with different passwords Setup all devices with a new password as described in the previous chapter 4 Check that TCP IP detects the Corinex Wireless to Powerline Router G From the command prompt run ping and type the computer name or IP address of the com...

Страница 88: ...ess configuration of the Wireless adapter on your computer See Chapter Using the Wireless Connection I am getting interference between my other 2 4GHz wireless devices and my wireless network You can take several steps Change the channel of the other 2 4GHz Wireless devices or the Access Point so that they can use different channels Move wireless devices farther away from the Access Point space I ...

Страница 89: ...es from one node to another and AppleTalk a communications protocol used on Apple and Macintosh networks can be used for LAN to LAN connections but those protocols cannot connect from the Internet to a LAN Does the Internet connection of the Router support 100Mbps Ethernet The Router s current hardware design supports up to 100Mbps Ethernet on WAN port however the Internet connection speed will va...

Страница 90: ...ove the dial up settings on your browser Check with your browser documentation and make sure that your browser is set to connect directly and that any dial up is disabled For Internet Explorer click Tools Internet Options and then the Connection tab Make sure that Internet Explorer is set to Never dial a connection For Netscape Navigator click Edit Preferences Advanced and Proxy Make sure that Net...

Страница 91: ...that the receiver knows the parameters of the spread spectrum signal being broadcast If a receiver is not tuned to the right frequency a spread spectrum signal looks like background noise There are two main alternatives Direct Sequence Spread Spectrum DSSS and Frequency Hopping Spread Spectrum FHSS What is DSSS Direct Sequence Spread Spectrum DSSS generates a redundant bit pattern for each bit to ...

Страница 92: ...my network WEP is probably enabled on the Router but not on your wireless adapter or vice versa Verify that the same WEP keys and levels 64 or 128 are being used on all nodes of your wireless network How many channels frequencies are available with the Router There are fourteen available channels ranging from 1 to 14 For 802 11g we support 11 channels for North America 13 for Europe ETSI and 14 fo...

Страница 93: ... PC or access point can hear the signal because it is within that radius Just as with a cordless phone cellular phone or any kind of radio device anyone else within that radius who has their device set to the same channel or bandwidth can also receive those transmission Wireless networks are easy to find Hackers know that in order to join a wireless network your wireless PC will typically first li...

Страница 94: ...y be seen by someone outside of your network because it is often broadcast in clear text Simply put any information transmitted on a wireless network leaves both the network and individual users vulnerable to attack All a hacker needs is a packet sniffer software available on the Internet along with other freeware or shareware hacking utilities available on the Internet to acquire your WEP keys an...

Страница 95: ... rig an access point with your network s settings and send out a stronger signal that your access point In this way some of your network s PCs may associate with this rogue access point not knowing the difference and may begin sending data through it and to this hacker The trade off for the convenience and flexibility wireless networking provides is the possibility of being hacked into through one...

Страница 96: ...tion To perform this type of attack the hacker has to be physically close to your network So monitoring both your network and your property is important Furthermore if you are suspicious of unauthorized network traffic most wireless products come with a log function with which you can view activity on your network and verify if any unauthorized users have had access 3 Network Devices With every wi...

Страница 97: ...r has broken into your wireless network if it is connected to your wired network they ll have access to that too This means that the hacker has effectively used your wireless network as a backdoor through your firewall which you ve put in place to protect your network from just this kind of attack via the Internet You can use the same firewall technology to protect your wired network from hackers ...

Страница 98: ... So a higher level of security ensures that hackers will have a harder time breaking into your network Setting one static WEP key on your wireless network leaves your network open the threats even as you think it is protecting you While it is true that using a WEP key increases wireless security you can increase it further by using multiple WEP keys Keep in mind that WEP keys are stored in the fir...

Страница 99: ...cess WPA is the newest and best available standard in Wi Fi security Two modes are available Pre Shared Key and RADIUS Pre Shared Key gives you a choice of two encryption methods TKIP Temporal Key Integrity Protocol which utilizes a stronger encryption method and incorporates Message Integrity Code MIC to provide protection against hackers and AES Advanced Encryption System which utilizes a symmet...

Страница 100: ...ADIUS server This should only be used when a RADIUS server is connected to the Router First select the type of WPA algorithm TKIP or AES Enter the RADIUS server s IP Address and port number along with a key shared between the Router and the server Last enter a Group Key Renewal period which instructs the Router how often it should change the encryption keys Fig 9 2 WPA and Radius ...

Страница 101: ...e PC or server to connect to the intranet and or Internet Asymmetrical Digital Subscriber Line ASDL A new standard for transmitting at speeds up to 7 Mbps over a single copper pair Auto negotiate To automatically determine the correct settings The term is often used with communications and networking For example Ethernet 10 100 cards hubs and switches can determine the highest speed of the node th...

Страница 102: ... fundamental unit that a computer uses in its operation It is a group of adjacent binary digits usually 8 often used to represent a single character Cable Modem A device that connects a computer to the cable television network which in turn connects to the Internet Once connected cable modem users have a continuous connection to the Internet Cable modems feature asymmetric transfer rates around 36...

Страница 103: ...on within the local subnet Demodulation Opposite of modulation the process of retrieving data from a modulated carrier wave DHCP Dynamic Host Configuration Protocol A protocol that lets network administrators centrally manage and automate the assignment of Internet Protocol IP addresses in an organization s network Using the Internet s set of protocol TCP IP each machine that can connect to the In...

Страница 104: ...amic Routing The ability for a router to forward data via a different route based on the current conditions of the communications circuits For example it can adjust for overloaded traffic or failing lines and is much more flexible than static routing which uses a fixed forwarding path Encapsulation The wrapping of data in a particular protocol header For example Ethernet data is wrapped in a speci...

Страница 105: ...hat provides for querying defining and managing IP addresses within a network A commonly used utility under Windows NT and 2000 for configuring networks with static IP addresses IPSec Internet Protocol Security A VPN protocol used to implement secure exchange of packets at the IP layer IRQ Interrupt ReQuest hardware interrupt on a PC There are 16 IRQ lines used to signal the CPU that a peripheral ...

Страница 106: ...ween users Network Mask also known as the Subnet Mask NIC Network Interface Card A board installed in a computer system usually a PC to provide network communication capabilities to and from that computer system Also called an adapter Node A network junction or connection point typically a computer or work station Notebook PC A notebook computer is a battery powered personal computer generally sma...

Страница 107: ...ce that enables a printer to be located anywhere in the network RIP Routing Information Protocol A simple routing protocol that is part of the TCP IP protocol suite It determines a route based on the smallest hop count between source and destination RIP is a distance vector protocol that routinely broadcasts routing information to its neighboring routers and is known to waste bandwidth AppleTalk D...

Страница 108: ...outing through the Internet TCP IP Transmission Control Protocol Internet Protocol TCP IP is the basic communication language or protocol of the Internet It can also be used as a communications protocol in a private network either an intranet or an extranet When you are set up with direct access to the Internet your computer is provided with a copy of the TCP IP program just as every other compute...

Страница 109: ...tion between pairs of wires two insulated copper wires are twisted around each other Each signal on twisted pair requires both wires Since some telephone sets or desktop locations require multiple connections twisted pair is sometimes installed in two or more pairs all within a single cable VLAN Virtual LAN A logical association that allows users to communicate as if they were physically connected...

Страница 110: ... Internet addresses or IP addresses the Access Point may have problems by sending or receiving mail and by accessing the Internet The solution is to determine the true web addresses behind your ISPs code words You can determine the IP and web addresses of your ISP s servers by pinging them Important If you don t have your ISP s web and e mail IP addresses you must either get them from your ISP or ...

Страница 111: ...ver address it might not be permanent IP addresses change very much often Web addresses however usually don t This is the reason why you are likely to have fewer problems by configuring your system with web addresses rather than IP addresses Follow the instructions below to find the web address assigned to the IP address you just pinged 1 At the DOS command prompt type ping a 81 0 193 56 where 81 ...

Страница 112: ...em accessing the Internet through this Internet application Appendix E Finding the MAC address and IP address for your Ethernet Adapter This section describes how to find the MAC address of your Ethernet adapter of your computer to do either MAC Filtering or MAC Address Cloning for the Router and ISP You can also find the IP address of your computer s Wireless or Ethernet adapter The IP address is...

Страница 113: ...example shows the IP address of your Wireless adapter as 10 101 2 38 Your computer may show something different E 2 For Windows NT 2000 and XP The following steps show an alternative way of obtaining the MAC and IP address for your Wireless or Ethernet adapter 1 Click Start and Run In the Open field enter cmd Press Enter key or click the OK button Fig 11 2 Running ipconfig 2 In the command prompt ...

Страница 114: ...e 12 digit MAC address in this format XX XX XX XX XX XX without the hyphens for MAC Filtering When entering information for MAC Address Cloning type the 12 digit MAC address E 3 For Linux PC From the Start Button on Desktop bar choose Terminals Xterm or any other convenient terminal Fig 11 3 Starting Terminal Login as superuser by issuing su command then press Enter Provide the password and press ...

Страница 115: ...ng ifconfig Login as superuser by issuing su command and then press Enter Provide the password and press Enter again Enter iwconfig and then press Enter You can see the wireless port parameters Fig 11 5 Running iwconfig ...

Страница 116: ...116 E 4 For Macintosh OS X computer 1 In Applications open Utilities Fig 11 6 Applications 2 In Utilities select Network Utility ...

Страница 117: ...cted to the Corinex Wireless to Powerline Router G through the Ethernet or through the Wireless In this section you can see the wireless connection type Fig 11 8 Network Utility 4 The field Hardware Address contains the MAC Address of selected interface ...

Отзывы: